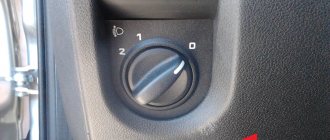
The Lada Granta is equipped with modern electrical equipment, which increases the comfort and safety of the car. Electrical wiring in the Lada Granta connects all electronic and electrical devices, as well as their control elements. It has 2 fuse blocks. One of them, containing 5 power fuses, is located in the engine compartment immediately behind the battery. The other mounting block is located on the lower left side of the instrument panel, to the right of the headlight control module. The interior block of the Lada Granta in the “norm” configuration contains 32 fuses (including 6 reserve ones) and 12 relays.
Granta's electrical circuit is quite complex, and it is very difficult to understand it on your own without special education. Since there is no such diagram in the instructions supplied with the car, we will describe it in parts.
Front and rear wiring diagram
The wiring diagram for the front of the Lada Granta is quite simple, the main thing is not to confuse it with the wiring of the ignition system.
The following devices are available here.
Car front wiring diagram
- Right block headlight.
- Room lighting bulb.
- Left block headlight.
- Electric washer motor.
- Accumulator battery.
- Mounting block with power fuses.
- DC generator.
- Klaxon.
- The plug connecting the front wiring harness to plug 1 of the instrument panel.
- Plug connecting the front harness and plug 2 of the instrument panel.
- Plug connecting the front harness to plug 2 of the instrument panel.
- Reverse indicator switch.
- Radiator fan.
When replacing wiring, pay attention to the color of the wires. You can connect wires of certain colors only to those contacts to which they are connected in the diagram. If connected incorrectly, the fuses will constantly melt.
The electrical circuit for the rear of the car is more complex, it has more elements and connects to 6 wire harnesses.
Wiring diagram of the rear part of Granta
- Socket to connector 3 of the tidy.
- Socket to connector 4 of the tidy.
- Right side turn signal.
- Left side turn signal.
- Handbrake position sensor.
- Rear window heating element.
- Interior lighting lamp.
- The switch is in the driver's seat belt.
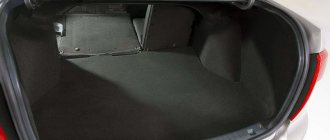
- Luggage compartment lighting.
- Fuel pump module.
- Right rear light.
- Trunk lock drive.
- Interior lighting switch.
- Stop signal.
- Left rear headlight.
- Clamp to the left rear door harness block.
- Clamp to the right rear door harness block.
- Clamp to the harness block of the right front door.
- Clamp to the left front door harness block.
- Airbag control unit.
- Clamp to the license plate light bulb harness block.
Return to contents
Repairing the trunk release button - using the example of a Chevrolet Cruze
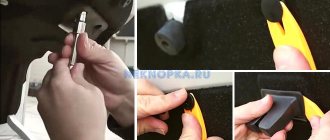
To determine the cause of the breakdown of the Chevrolet Cruze trunk release button, you need to remove it, inspect it and ring it.
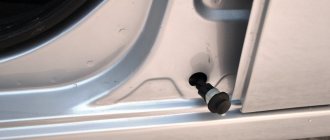
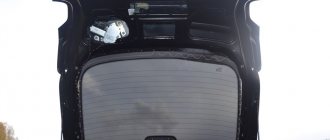
- To remove the panel (saber) with the button and license plate lights, you will have to remove the trim on the inside of the trunk lid.
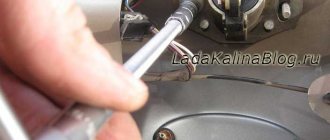
- Under it there will be 4 10mm nuts and 2 yellow plastic clips.
- The nuts are unscrewed, and the clips are carefully pressed inward and snapped off.
- After this, it is enough to disconnect the connector connecting the wires going to the button and the backlight to completely remove the saber.
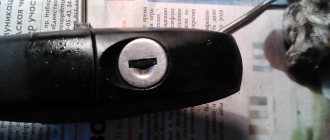
When visually inspecting the button from the inside, traces of moisture will usually be visible under the transparent silicone sealant filler.
It gets there during rain through small gaps between the button key and the body, or at the place where the wires are connected (there is also a small gap there). Trying to dry the button with a hairdryer without disassembling it will lead to nothing.
Dashboard wiring
The electrical circuit of the instrument panel is the most complex, since it contains 34 devices. But you can figure it out too. Here is a list of available devices.
The instrument panel is a complex device
- The plug to which plug 9 of the front wiring is connected.
- Plug for connecting plugs 10 and 11 of the front wiring.
- The connector to which socket 1 of the rear wiring is connected.
- Connector for connecting socket 2 of the rear wiring.
- Control unit for dimensions, low beam, emergency lights.
- Mechanical ignition switch.
- Route bookmaker mode switch.
- Wiper switch.
- Dashboard.
- Light switch.
- Switch for the electric trunk lock.
- Diagnostic block.
- The connector to which the air intake box harness plug is connected.
- Rear window defroster switch.
- Emergency light switch.
- Brake light switch.
- Connector for connecting audio system speakers.
- The connector to which the car radio is connected.
- Device on the steering wheel.
- Driver's airbag module.
- Absent.
- Fuse block.
- Power steering (ESR).
- Cigarette lighter socket.
- Climate control console illumination lamp.
- Tidy light bulb.
- The socket to which the ignition system wiring plug is connected.
- Control device.
- Clutch pedal position indicator switch (only on cars with a manual gearbox).
- E-gas.
- Climate control system resistor.
- Electric motor for interior heater.
- Interior heater switch.
- Door lock control module.
The wiring diagrams for the Lada Granta ignition system vary depending on the type of engine installed, so when replacing the engine, the wiring of this system must also be changed.
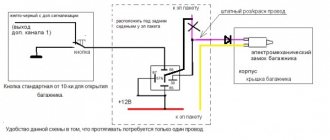
Many car enthusiasts who independently “pump” their cars are wondering: how to properly connect the electrics? This question arises in almost any installation. After all, simply screwing on the blocks, locks and strips is not difficult, but only properly connected electricians can make the system work. If we take into account one of the most pressing problems - the installation of remote control locks for the fifth door, then the correct wiring diagram for the electric trunk lock will help us here. You can find it either in the instructions that should be included with the device, or you can take it from a reliable source, but it is better to use proven options and ask friends and acquaintances what scheme they used.
How to install an electric lock in the trunk lid of a Lada Granta
Electric trunk lock - improving the operation of the Lada Granta
The middle of 2011 is very important in the history of the domestic automotive industry. It was this period that Russian car enthusiasts remembered for the release of a new product from the Volga Automobile Plant - the Lada Granta sedan.
This car successfully fulfilled its purpose, namely replacing the classics of the Samara family.
Created on the basis of the Lada Kalina, Granta today enjoys enormous success among buyers not only in Russia, but also far beyond the borders of our state.
1 What Lada Granta owners missed
Today the car is produced in 3 main trim levels: “standard”, “norm” and “luxury”.
If with the second and third options everything is more or less clear (as they say, we will do everything for your money), then owners of cars with the first configuration were missing such an important detail as the electric drive of the trunk lid and hood lock.
At first glance, it seems that such a trifle cannot significantly spoil the mood of the happy car owner. However, given the weather conditions in our country in winter, installing an electric lock for the hood or trunk lid on this car is literally asking for it.
Judge for yourself, because in 20-degree frosts, the problem of opening the trunk lid and hood becomes the main headache of the car owner: either the key cannot be inserted into the core of the lock, or it can only be pulled out with great effort. One way or another, a lock with an electric drive is needed, and it is very difficult to argue with this fact.
Despite the fact that on Lada Granta cars with the “standard” configuration there is no electric trunk and hood lock, the manufacturer still did not leave the buyer without the opportunity to equip the car with such an important part.
This is evidenced by the presence of wiring for the electric drive, as well as a special button on the key fob.
If you press and hold this button for two seconds, you can hear a click in the electrical package control unit.
As you can see, there is absolutely everything for installing a lock with an electric drive except the mechanism itself. The lock can be purchased at any car supply store for about 800 rubles.
2 Installing an electric lock on a Lada Granta
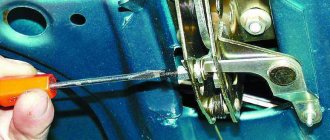
The entire process of installing an electric lock can be considered in the form of a simple algorithm. First, remove the inner trunk trim. To do this, disconnect the 7 pistons and 2 bolts holding the trunk closing handle.
Next we notice the lock mechanism. Insert the key into the lock and turn it in different directions. With this action it will be easier for us to understand the principle of operation of the lock in its various positions.
In the “closed” position, the pusher in the lock moves in vain, and in the “open” position, it presses on the rod, due to which the trunk or hood lids open.
After determining the principle of operation of the lid lock, it is easy to guess that if you connect the pusher to the activator, then the need to insert the key into the lock will disappear on its own.
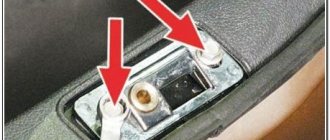
Remove the lock washer and pusher. Next, we need a metal plate from which we need to machine the part. We will need the latter in order to insert the pusher and rod from the activator into it. To do this, you need to make 2 holes in the part.
The size of the first should correspond to the size of the protrusion on the pusher. We will insert the activator rod into the second hole. The first hole in the part should be in the center, the second - in the lower left edge.
In addition to the part with the holes, we will need a thin washer that can be inserted into the hole in the center.
Then we assemble the entire mechanism: our part is put on the plastic pusher. We put a new washer on top. In order to fasten this structure, you can use a retaining ring. We attach the activator to its place provided by the Lada Granta manufacturing plant. Using special rods that were included with the activator, we connect the latter with the part we turned.
Next, we check the mechanism we received. If there is a need to adjust the open-close positions, then we do it.
https://tuningkod.ru
Source: https://legkoe-delo.ru/remont-avtomobilya/automobile/91101-kak-ustanovit-zamok-s-elektroprivodom-v-kryshke-bagazhnika-lada-granta
Preparation for installation
We purchase a lock kit. There are a lot of manufacturers of auto parts on the market now, but there are no special differences between the sets. It is important that the device has a warranty card and instructions for use and connection. Also in the box you will find:
Additionally, you need to stock up on a set of standard tools: pliers, screwdriver, screwdrivers, multimeter, drill with carbide drill bit. In addition to the standard accessories, immediately buy additional wires; it is quite possible that the length of those you find in the box will not be enough for you. Black heat-resistant insulating tape, corrugated tubes, and clips for fastening the trim will also be useful, since very often the trim of car elements is attached to disposable ones.
Important! Be sure to check that the warranty card for the purchased device is available and filled out correctly. Regardless of who performed the installation, you or the service, you have the right to free repairs within a year.
Self-installation
First of all, it is necessary to secure the electric drive to the trunk lid and provide it with a mechanical connection to the lock itself. To do this, you will have to make two cuts on the lock, and bend the resulting free “tongue”. Thus, we gained access directly to that part of the lock, by pulling which the trunk lid will open. Now we attach the long metal stick from the kit so that the lock can close when the system is operating. It is quite possible that you will have to cut off extra centimeters of this pin.
Now our device is installed properly and all that remains is to connect the electrics. To do this, we will use the diagram below.
Important! When working with electrical equipment, remove the battery!
In most cars, electrics operate on 12V positive voltage. However, if you doubt that everything is the same for you, it is better to check with the car dealer and not use this diagram for connection. It is very important to make the correct connection of the wires, since the proper operation of your car as a whole depends on it. At best, some options will simply not work correctly; at worst, a short circuit will occur. And it is not always possible to restore the electrics and electronics of the car after it. And this work will cost a lot of money. In addition to the above, lay wires where standard wiring is already laid. In difficult places, for example, when you have to pull the wire from the passenger compartment to the trunk, it is necessary to use protective corrugated tubes.
Stories from our readers
“Fucking basin. "
Hi all! My name is Mikhail, now I’ll tell you a story about how I managed to exchange my two-wheeler for a 2010 Camry. It all started with the fact that I began to be wildly irritated by the breakdowns of the two-wheeler, it seemed like nothing serious was broken, but damn it, there were so many little things that really started to irritate me. This is where the idea arose that it was time to change the car to a foreign car. The choice fell on the melting Camry of the tenth years.
Yes, I had matured morally, but financially I just couldn’t handle it. I’ll say right away that I am against loans and taking a car, especially not a new one, on credit is unreasonable. My salary is 24k a month, so collecting 600-700 thousand is almost impossible for me. I started looking for different ways to make money on the Internet. You can’t imagine how many scams there are, what I haven’t tried: sports betting, network marketing, and even the volcano casino, where I successfully lost about 10 thousand ((The only direction in which it seemed to me that I could make money was currency trading on the stock exchange, they call it Forex. But when I started delving into it, I realized that it was very difficult for me. I continued to dig further and came across binary options. The essence is the same as in Forex, but it’s much easier to understand. I started reading forums, studying trading strategies. I tried it on a demo account, then opened a real account. To be honest, I didn’t manage to start earning money right away, until I understood all the mechanics of options, I lost about 3,000 rubles, but as it turned out, it was a precious experience. Now I earn 5-7 thousand rubles a day. I managed to get the car buy after half a year, but in my opinion this is a good result, and it’s not about the car, my life has changed, I naturally quit my job, I have more free time for myself and my family. You’ll laugh, but I work directly on the phone)) If If you want to change your life like me, then here’s what I advise you to do right now: 1. Register on the site 2. Practice on a Demo account (it’s free). 3. As soon as you get something on the Demo account, top up your REAL ACCOUNT and go to REAL MONEY! I also advise you to download the application to your phone, it’s much more convenient to work from your phone. Download here.
Connection diagram:
This modification will require about 1000 rubles, but it’s worth it! Let us remind you that instead of the standard lock, the “tens” also install a trunk lock from the Lada Kalina, but such a modernization will require more effort and time. By the way, do you know how to implement automatic closing of the trunk lid?
Is it worth installing an electric lock from a Lada Granta on a VAZ?