Despite the good build quality of the Lada Granta, knocking, grinding, and creaking of the trunk door trim appear periodically on the body. The reasons for the inconvenience lie in loose fit, insufficient screwing, and deformation of the plastic panel. Less common are cases of damage due to impact, traffic accidents, or collisions.
Since the work is not complicated and of little significance, it is not at all necessary to contact a car service. The average driver has enough skills to fix defects on his own.
Video - Trim of the trunk lid on Lada Granta
As a rule, the trunk trim is removed to make noise insulation, or to eliminate incomprehensible creaks and rumbles in the trunk (have not been noticed yet), or to replace any trim elements. Removing the trim in the Lada Granta Liftback is not very difficult, but there are some “ pitfalls”, without knowing about which, you can damage some cladding elements. Now I will describe how to do this without damaging anything.1. We lay out everything from the trunk.2. We remove the rear shelf; it can be removed easily.3. We lay out the carpet from the trunk.4. I will describe in detail the removal of the right plastic element, since it contains more nuances (trunk light bulb, 2 seat belt reels). It is screwed on the outside with 2 self-tapping screws and one clip. First unscrew the 2 screws, then carefully remove the clip:
You don't have to lower the backs of the rear seats, they don't get in the way. Next, open the hatch that provides access to the rear lights.
To open the hatch, you need to insert 2 fingers (or as many as you can) into the hole in the hatch. We feel for the clip on top, press it and carefully remove it without damaging the latch.
After removing the hatch, we look into the hole, there is another self-tapping screw at the top, it is screwed to the body.
We unscrew this self-tapping screw, we won’t find any more self-tapping screws on this element, now we slightly pull out the seat belts and carefully remove the element, trying not to damage the latches that go into the white interior trim. We don’t pull too hard, since the trunk light has a short wire. Disconnect the wire from the lampshade. Ready! then we remove the carpet and the insulation that is located under it.
The right side is removed in the same way as the left. Install in reverse order.
5. Remove the trim from the trunk door. It consists of 3 parts, which are removed sequentially starting from the top.
It can be removed without much effort and is only secured with latches. After removing the first part, unscrew 2 screws to remove the second part.
The second part is attached to 2 more screws (2 more screws are the self-tapping screws that hold the shelf when opening the trunk door) and 4 clips (2 on each side), carefully remove the clips from the holes, remove them from the latches at the point of contact with the 3rd part of the trim. Next, we unscrew 2 screws from the trunk closing handles, 2 more screws were hidden under the 2nd part of the door trim.
And also 8 clips hold the most basic and largest part of the trunk door trim. 4 clips on the glass side and 2 on each side.
Carefully remove the clips from the holes and remove the last part of the trunk door trim.
The casing is installed in the reverse order.
How to Remove the Trunk Trim of a Lada Granta Liftback
Usually the trunk trim is removed to make noise insulation, or to remove incomprehensible squeaks and rumbles in the trunk (not seen yet), and either to replace some elements of the trim. It’s easy to remove the trim in the Lada Granta Liftback, but there are some pitfalls that you don’t know the presence of which, there is an option to destroy certain cladding elements. At this point I will outline how to do this without damaging anything.1. We put everything out of the trunk. 4.5. We remove the rear shelf, it is easy to remove.3. We lay out the carpet from the trunk.
4. I will carefully outline the removal of the right plastic element, because there are more than just nuances here (trunk light bulb, 4 seat belt reels). It is screwed on the outside with 3.5 screws and one clip. First unscrew the 4.5 screws, then carefully remove the clip:
You don't have to lower the backs of the rear seats, they don't get in the way. Next, open the hatch, which provides access to the rear lights.
To open the hatch you need to stick 5 fingers (in other words, as many as will fit) into the hole in the hatch. We feel for the clamp on top, press it and carefully remove it without damaging the latch.
After removing the hatch, we look into the hole, there is another screw at the top, it is screwed to the body.
We unscrew such a screw, not just any screws in this element, we now pull out the seat belts a little, and carefully remove the element, trying not to destroy the latches that go into the snow-white interior trim. We're not trying very hard, because the trunk light has a small wire. Disconnect the wire from the lampshade. Ready! then we remove the carpet and the heat insulator that is located under it.
The right side is removed in the same way as the left. Install in reverse order.
New Lada Granta Liftback 2022 (trunk review, pros and cons)
5. Remove the trim from the trunk door. It consists of 3 parts, which are removed one by one starting from the top.
It can be easily removed and is only secured with latches. If you removed the first part, unscrew the 3.5 screws to remove the second part.
The 2nd part is attached with another 5 screws (another 4.5 screws are those screws on the pages of which the shelf is held when opening the trunk door) and 4 clips (3.2 on each side), carefully remove the clips from the holes, remove them from the latches at the point of contact with 3rd part of the trim. Next, unscrew 4 screws from the trunk closing handles, another 2.7 screws were hidden under the 2nd part of the door trim.
And besides, 8 clips hold the best main and main part of the trunk door trim. 4 clips of unfamiliar glass and 4.5 on each side.
Carefully remove the clips from the holes and remove the last part of the trunk door trim.
The casing is installed in the reverse order.
Good tutorial, at this time the side trims will be removed!
Good day. Can you tell me what kind of blue wire goes to the lamp? While I was taking it apart, I tore it off, I have no idea where to attach it...
Any control wire that would not dream of a light switch.
A big THANK YOU! Your summary helped me out. I was already starting to worry. The car has only covered 3000 km. I’m driving along a country road and I hear something rattling in the trunk. Arriving home I sat down to read Drive. I wrote out possible faults for our client and began to inspect them. At first I thought that it was the lower hinge of the lock that had become loose, but no, it was dead. Then I decided to move the upper lock and felt free movement in the lock. And to get to the bolts that hold the lock you need to disassemble all the plastic of the 5th door. After rummaging through Drive, I found YOUR good annotation and in almost 10 minutes, I solved the problem. A screwdriver and a key for 8 came in handy. Thank you for your work.
Refinement of the trunk lid grants liftback
You can tighten the trunk lid bolts without removing the panel. I also have a loose bolt on the left side of the lock. I put the cross attachment on the multitool and in 20 seconds the lock was tightly tightened #128521;
Thanks for the summary! The signature helped a lot.
Eh... If only there was another video of this act
Thank you very much for the detailed summary! And most importantly, very pleasant! I will focus on the myth post
Reviews
| № | Positive |
| 1. | Konstantin, 39 years old: after purchasing the Lada Granta, he immediately reupholstered the main components and mechanisms, and made a plastic backing. There are no problems with tapping. I heard that my comrades complained about squeaks, but this can be easily eliminated. |
| 2. | Vyacheslav, 33 years old: bought the car second-hand, second owner. It was received from the previous one in good condition, noise reduction was done, and the interior was reupholstered. I don’t know any problems, everything is quiet inside, without third-party creaks. For those who have a grinding sound inside, take the time to eliminate the defects. |
| 3. | Mikhail, 35 years old: I live on the periphery, I often drive on dirt roads. From time to time something squeaks in the rear of the car, but it is so quiet that it is not annoying. I systematically carry out technical inspections, reupholstery, and care for plastic and decorative panels. |
| 4. | Vladislav, 31 years old: I work as a taxi driver, most of the time in the car, I don’t pay attention to some noises and squeaks unless they are intrusive. I’ll say one thing about the trunk - there are no problems, it’s quiet and calm inside. |
| 5. | Kirill, 28 years old: I am engaged in business, purchasing goods, transporting with my Lada Granta Liftback transport. Under load, the noise is not audible, which is obvious. But without a load, the lid wipes. This is a problem with the rear door lock being worn out. |
| 6. | Ivan, 26 years old: I took the car from my own hands, the condition of the interior is not very good, it requires replacement and maintenance. There are creaks, but they are minor. Mostly due to wear and tear on the lock. |
| 7. | Gennady, 29 years old: I don’t have a personal garage, the car is constantly parked in the sun. The plastic is of good quality, does not creak, is solid. |
| Negative | |
| 1. | Maxim, 25 years old: I personally don’t like the standard trim. The manufacturer saved on the quality of plastic. The guys suggested that it could be installed from Opel. I will try and experiment. |
| 2. | Kirill, 29 years old: the rear trim began to creak after 300 km. after purchase from the showroom. I did a little work, trimmed the plastic, now it’s quiet, but the casing needs to be changed, the standard one is no good. |
| 3. | Maxim, 33 years old: I’m leaving my negative review about the quality of the plastic in the luggage compartment of the Lada Granta Liftback. Creaking after the first 1000 km. to be replaced. |
Related link:
Tips from experts on how to replace the Granta liftback cabin filter with your own hands
Conclusion Despite a number of negative reviews of the Liftback's skin, it is quite decent. If a squeak occurs during the warranty service of the machine, contact the service station to eliminate the defect.
Noise in the trunk and rear door — Lada Granta Liftback, 1.6 l., 2014 on DRIVE2
In addition to the ceiling ShVI, the next day I made a Shumka for the rear of the car. From the first purchase of STP there were 3 sheets and 3 sq.m of insulation left. Something was creaking in the back, so I decided to get confused. Overall, I didn’t regret the Shumka (I had to do more Buy 2 additional sheets), Izolon was enough. In general, everything can be seen from the photos.
Don’t blame me too much for aesthetics. Everything is closed and invisible! But the silence makes me happy.
By the way, I want to admit to you here that I’m a bit of a moron. Everyone writes about the handbrake cable, I thought about it and removed this cable from the mount, BUT only on the driver’s side, and the creaking sound came from the passenger side (I heard a WD-shank through the whole suspension and got to the cable and disconnected) SILENCEAAAAAA.
An iron clip remained in this hole. The genius designers sealed this place. I had to stuff isolon in there
photo of the lock, I lubricated everything there with silicone grease
Price: 1,000 ₽ Mileage: 9600 km
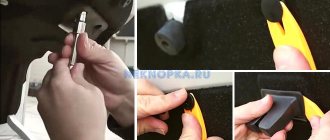
Door Trim Removal Tools
To remove the rear and front door trim of the Lifan x60 you will need the following tools:
- special kits for removing the casing without damaging it;
- Phillips screwdriver wrapped in electrical tape;
- clip cutter.
A set of tools for removing trim and clips Having all of these tools would be a preferable option, since special tools allow you to safely and damage-free remove fasteners without scratching the trim.
A screwdriver can be used to remove the clips and can only be used if there are no alternatives, and you will probably need spare clips as some may break during removal. Advantages of specialized kits:
- no marks remain on surfaces;
- versatility - regardless of the vehicle brand and door location, tools can be used without restrictions;
- the casing and clips are removed.
All services for Lada Granta
- Body repair Lada Granta Body repair Lada Granta
- Lada Granta front bumper repair
- Lada Granta radiator grille repair
- Lada Granta rear bumper repair
- Lada Granta door repair
- Lada Granta hood repair
- Lada Granta front fender repair
- Lada Granta rear wing repair
- Lada Granta trunk door repair
- Lada Granta trunk lid repair
- Lada Granta roof repair
- Lada Granta body repair
- Lada Granta frame repair
- Repair of the front side member of Lada Granta
- Lada Granta rear spar repair
- Lada Granta threshold repair
- Lada Granta side mirror repair
- Painting Lada Granta
- Mechanical repair of Lada Granta
- Maintenance service Lada Granta
Video - Trim of the trunk lid on Lada Granta
As a rule, the trunk trim is removed to make noise insulation, or to eliminate incomprehensible creaks and rumbles in the trunk (have not been noticed yet), or to replace any trim elements. Removing the trim in the Lada Granta Liftback is not very difficult, but there are some “ pitfalls”, without knowing about which, you can damage some cladding elements. Now I will describe how to do this without damaging anything.1. We lay out everything from the trunk.2. We remove the rear shelf; it can be removed easily.3. We lay out the carpet from the trunk.4. I will describe in detail the removal of the right plastic element, since it contains more nuances (trunk light bulb, 2 seat belt reels). It is screwed on the outside with 2 self-tapping screws and one clip. First unscrew the 2 screws, then carefully remove the clip:
You don't have to lower the backs of the rear seats, they don't get in the way. Next, open the hatch that provides access to the rear lights.
To open the hatch, you need to insert 2 fingers (or as many as you can) into the hole in the hatch. We feel for the clip on top, press it and carefully remove it without damaging the latch.
After removing the hatch, we look into the hole, there is another self-tapping screw at the top, it is screwed to the body.
We unscrew this self-tapping screw, we won’t find any more self-tapping screws on this element, now we slightly pull out the seat belts and carefully remove the element, trying not to damage the latches that go into the white interior trim. We don’t pull too hard, since the trunk light has a short wire. Disconnect the wire from the lampshade. Ready! then we remove the carpet and the insulation that is located under it.
The right side is removed in the same way as the left. Install in reverse order.
5. Remove the trim from the trunk door. It consists of 3 parts, which are removed sequentially starting from the top.
It can be removed without much effort and is only secured with latches. After removing the first part, unscrew 2 screws to remove the second part.
The second part is attached to 2 more screws (2 more screws are the self-tapping screws that hold the shelf when opening the trunk door) and 4 clips (2 on each side), carefully remove the clips from the holes, remove them from the latches at the point of contact with the 3rd part of the trim. Next, we unscrew 2 screws from the trunk closing handles, 2 more screws were hidden under the 2nd part of the door trim.
And also 8 clips hold the most basic and largest part of the trunk door trim. 4 clips on the glass side and 2 on each side.
Carefully remove the clips from the holes and remove the last part of the trunk door trim.
The casing is installed in the reverse order.
The process of removing the trunk trim of the Lada Granta liftback
Let's look at each point in detail:
- We remove the rear shelf by hand; no special tools are needed. We press the side clamps, remove them from the grooves, and remove them out;
- Dismantling the right casing causes a lot of difficulty, since lighting lamps, two seat belt reels, and electrical wiring are installed.
Use a screwdriver to pry up the three plastic clips and remove them. We unscrew two screws around the perimeter, one in the hatch cavity. We first remove it to provide access to the fasteners
After unscrewing the screw, tighten the seat belts, pay attention to the latches so as not to damage
The standard luggage compartment light has a too short wire, only 10 cm. Carefully unscrew the plate, remove the carpet and insulation. The left side is dismantled by analogy, but the process is facilitated by the absence of a number of structures. Assembly occurs in reverse order.
To remove the trim as quickly as possible, start from the top down. Fixation on ordinary plastic latches, which are pryed off with a flat-tip screwdriver. The second module is mounted on two self-tapping screws. The third module is pressed to the body with eight clips.
After complete dismantling of the casing, we carry out preventive maintenance and other work, and assemble the structure in the reverse order.
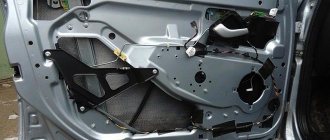
Stage No. 4: dismantling the door window regulator.
- After the door card is removed, raise the glass to the upper position and secure it with masking tape for safety purposes.
- Remove the foam pad from the handle shaft.
- Using the “8” socket, unscrew the three bolts securing the window regulator module to the door body.
- By analogy, unscrew the two nuts at the bottom of the mount.
- We remove the window lift mechanism from its regular place.
Window lift mechanism
What is important to know about silent locks on the Lada Granta Liftback
Not all car owners are satisfied with the ease and noise level when closing the doors of their car. The defect is caused by excessive wear of parts and design flaws at the manufacturer level.
The principle of noise suppression is implemented by an installed noise absorber. In Lada Granta Liftback models, this is a rubber insert or a plastic polymer.
Silent locks are structurally composed of a pin and a shackle with a noise-absorbing insert. Some car owners practice replacing the arms, while leaving the standard locks unchanged. Already in this case, the noise level will be significantly lower, and locking the door will be easier. At the same time, systematic use of the door lock leads to rapid wear of the polymer/rubber material. The owner has to come back for preventative maintenance again and again.
How to remove the tailgate trim of a Granta liftback
Vote
Tools:
- Medium flat screwdriver
- Ratchet wrench
- Extension
- 8 mm head
- 10 mm head
- Marker
Parts and consumables:
Trunk lid (if necessary)
Note:
The trunk lid is quite heavy and bulky, so it is recommended to remove and install it on the car with an assistant.
1. Disconnect the wire from the negative terminal of the battery on the car.
2. Open the trunk.
3. Disconnect the drive rod from the trunk lid lock switch lever.
4. Remove the two bolts securing the lock, and disconnect the wiring harness connector from the drive and remove the lock as described here.
5. Disconnect the cover wiring harness holder from the hinge, and pull the wiring harness out of the cover frame cavity.
6. If you are removing the trunk lid not for replacement, mark its position relative to the hinges, for example, by outlining them with a marker.
Note:
If you removed the trunk lid to replace it, you do not need to mark the location of the lid hinges.
7. Unscrew the four nuts (two on each side) securing the trunk lid to the hinges, and remove it from the car.
8. Install the trunk lid on the vehicle in the reverse order of removal.
Note:
If you are installing an old trunk lid, then before final tightening the fastening bolts, you need to orient it according to the previously applied marks. Otherwise, the position of the trunk lid must be adjusted as described here.
We prepare the car for the job. Disconnect the negative terminal of the battery
To do this, remove the trunk lid lock drive:
Press the plastic rod holder away from the ball joint using an 8-mm open-end wrench or a slotted screwdriver
Using a 10mm socket, unscrew the nut securing the base of the lock drive to the outer panel of the trunk lid
Turn the cylinder mechanism lever and unscrew the second nut
Removing the lock drive from the trunk lid
Other section materials
| Removing and disassembling the fuel module |
| Removing the fuel rail and injectors |
| Removing the air filter and air intake |
| Removing the air supply hose to the throttle body |
| Removing the throttle assembly |
| Removing the receiver |
| Removing the intake pipe |
| Removing the fuel tank |
| Removing the fuel vapor recovery system adsorber |
| Removing the canister purge valve |
| Cooling system |
| Removing and checking the thermostat |
| Removing the Radiator Fan |
| Removing the radiator |
| Removing the coolant pump |
| Removing the expansion tank |
| Exhaust system |
| Removing the additional muffler |
| Removing the main muffler |
| Removing the catenary collector |
| Clutch |
| Replacing the clutch release cable |
| Removing the “basket” and driven disk |
| Removing parts of the clutch release mechanism |
| Transmission |
| Removing and disassembling the gearbox control mechanism |
| Replacing wheel drive seals |
| Replacing the gear shift rod hinge boot and rod seal |
| Removing and installing the gearbox |
| Replacing the input shaft oil seal |
| Disassembly and assembly of the gearbox |
| Disassembling the gearbox input shaft |
| Dismantling and assembling the gearbox synchronizer |
| Disassembling the gearbox differential |
| Gearbox assembly |
| Front wheel drives |
| Removing the front wheel drives |
| Removing the outer hinge |
| Removing and disassembling the inner hinge |
| Front suspension |
| Removing the front suspension ball joint |
| Removing the shock absorber strut and disassembling the front suspension |
| Removing the front suspension extension |
| Removing the front suspension arm |
| Removing the front suspension stabilizer bar elements |
| Replacing the front wheel hub bearing |
| Rear suspension |
| Removing the shock absorber and spring of the Granta rear suspension |
| Replacing the silent block of the rear suspension beam arm |
| Removing the rear suspension beam |
How to remove the rear door trim on Lifan x60
The structure is removed in a similar way with minor differences, given the slightly different shape of the door.
- Unscrew two screws - one under the door handle plug, and the other in the armrest;
- Remove the decorative panel from the handle, under which there are five more screws - they are removed, as is the case with the front trim;
- Using any suitable tool, cut the pistons around the perimeter of the door (it is better to start from the bottom) with smooth movements so as not to break off the elements.
If there are any wires coming from the trim, remove them to completely separate the door card from the door. Location of the clips on the rear door card of Lifan X60
As a result, you will gain access to the inside of the rear door, where all manipulations can be carried out.
Body repair Lada price
| Replacement, removal and installation of body elements | ||
| Hood replacement (removal and installation) | from 1800 rub | |
| Front left or right fender replacement (removal and installation) | from 1600 rub | |
| Front door right or left replacement (removal and installation) | from 2200 rub | |
| Rear door right or left replacement (removal and installation) | from 2000 rub | |
| Front or rear bumper replacement (removal and installation) | from 1800 rub | |
| Trunk lid replacement (removal and installation) | from 1900 rub. | |
| Body repair of car parts | ||
| Front bumper repair. Reinforcement work, painting, repairs | from 5500 rub | |
| Rear bumper repair. Reinforcement work, painting, rear bumper repair. | from 5500 rub | |
| Door repair. Reinforcing work, painting, front or back door repair. | from 5500 rub | |
| Hood repair. Painting, removal, installation, hood repair, consumables | from 6200 rub | |
| Repair of the front wing. Replacement of the wing, reinforcement work, painting, restoration | from 4400 rub | |
| Repair of the rear wing. Replacement of the rear wing of Lada Granta, reinforcement work, painting, restoration of body geometry | from 4400 rub | |
| Repair of the trunk door. Removal, installation, painting, polishing, selection of paint, materials | from 5000 rub | |
| Repair of the trunk lid. Selection of paint, removal, installation, adjustment, materials | from 4500 rub | |
| Roof repair. Disassembly and assembly, selection of paint, painting | from 8500 rub | |
| Body repair. Body disassembly and assembly, full painting, polishing, materials, paints | from 83,000 rub. | |
| Frame repair. Replacement, slipway work, painting | from 16500 rub. | |
| Replacement of load-bearing body elements | ||
| Roof panel for Lada Granta - replacement | from 9000 rub | |
| Rear right or left fender for Lada Granta - replacement | from 14,000 rub. | |
| Rear or front spar - replacement | from 11000 rub. | |
| Threshold right or left for Lada Granta - replacement | from 9000 rub | |
| Car door pillar - replacement | from 8000 rub | |
| Slip works | ||
| Installation on a slipway with measurement of reference points to check body geometry | from 4000 rub | |
The process of removing the trunk trim of the Lada Granta liftback
Let's look at each point in detail:
- We remove the rear shelf by hand; no special tools are needed. We press the side clamps, remove them from the grooves, and remove them out;
- Dismantling the right casing causes a lot of difficulty, since lighting lamps, two seat belt reels, and electrical wiring are installed.
Use a screwdriver to pry up the three plastic clips and remove them. We unscrew two screws around the perimeter, one in the hatch cavity. We first remove it to provide access to the fasteners
After unscrewing the screw, tighten the seat belts, pay attention to the latches so as not to damage
The standard luggage compartment light has a too short wire, only 10 cm. Carefully unscrew the plate, remove the carpet and insulation. The left side is dismantled by analogy, but the process is facilitated by the absence of a number of structures. Assembly occurs in reverse order.
To remove the trim as quickly as possible, start from the top down. Fixation on ordinary plastic latches, which are pryed off with a flat-tip screwdriver. The second module is mounted on two self-tapping screws. The third module is pressed to the body with eight clips.
After complete dismantling of the casing, we carry out preventive maintenance and other work, and assemble the structure in the reverse order.
Fifth door trim
- Remove the additional brake light trim by unlatching the clips.
- Remove the side plastic elements by unscrewing 2 fastening screws and snapping 2 clips on each side.
- Remove the 2 screws securing the trunk closing handles. Remove the main trim of the trunk lid by unscrewing the 2 fastening screws and unsnapping the 8 clips.
By the way, if you often repair your car yourself, a collection of technological instructions will be useful to you.
Despite the good build quality of the Lada Granta, knocking, grinding, and creaking of the trunk door trim appear periodically on the body. The reasons for the inconvenience lie in loose fit, insufficient screwing, and deformation of the plastic panel. Less common are cases of damage due to impact, traffic accidents, or collisions.
Since the work is not complicated and of little significance, it is not at all necessary to contact a car service. The average driver has enough skills to fix defects on his own.
Typical rear door trim defects
- Loose fit of the brake light in the upper part (first module);
- Deformation of the plastic of the third module due to systematic friction;
- Deformation of the plastic of the second module due to exposure to the sun's rays.
To quickly eliminate defects, complete dismantling followed by diagnostics will be required. After assessing the condition of the modules and identifying the breakdown, make a decision on the advisability of replacement.
Work progress
Lada Granta instructions on how to remove the rear door trim provide the following:
1) Disconnect the negative terminal of the battery to avoid a short circuit in the electrical wiring.
2) Remove the door handle designed to lower and raise the glass. To do this, you need to use a flat, thin screwdriver to press out the latch in the form of a half ring.
3) Remove the latch, but still do not remove the screwdriver.
4) Calmly pull out the plastic washer after removing the handle. If the rear doors of the car are equipped with electric windows, then instead of the handle we remove the corresponding button, prying it off with the same flat-head screwdriver. Then disconnect the connector from the bundle of wires.
5) Unscrew the lock button.
6) Using a plastic mounting spatula, pry up the decorative plug of the door handle and remove it.
7) After removing the cover, you can find two screws that secure the handle. Take a Phillips screwdriver and unscrew them.
9) Carefully, so that the latches come out of the seats of the door panel, pull the trim towards you.
10) That's it, the door trim has been removed from the Lada Granta car.
You can see more clearly how to remove the left rear door trim of a Lada Granta in the video, which is available on the Internet for everyone.
The process of removing the trunk trim of the Lada Granta liftback
Let's look at each point in detail:
- We remove the rear shelf by hand; no special tools are needed. We press the side clamps, remove them from the grooves, and remove them out;
- Dismantling the right casing causes a lot of difficulty, since lighting lamps, two seat belt reels, and electrical wiring are installed.
Use a screwdriver to pry up the three plastic clips and remove them. We unscrew two screws around the perimeter, one in the hatch cavity. We first remove it to provide access to the fasteners
After unscrewing the screw, tighten the seat belts, pay attention to the latches so as not to damage
The standard luggage compartment light has a too short wire, only 10 cm. Carefully unscrew the plate, remove the carpet and insulation. The left side is dismantled by analogy, but the process is facilitated by the absence of a number of structures. Assembly occurs in reverse order.
To remove the trim as quickly as possible, start from the top down. Fixation on ordinary plastic latches, which are pryed off with a flat-tip screwdriver. The second module is mounted on two self-tapping screws. The third module is pressed to the body with eight clips.
After complete dismantling of the casing, we carry out preventive maintenance and other work, and assemble the structure in the reverse order.
Preparatory stage
Required tools:
- impact screwdriver;
- cross bits;
- pliers;
- plastic clips in case of damage to the standard ones;
- liquid for removing rust and corrosion;
- a new lock, the modification is chosen individually by the owner.
Procedure for independently replacing the driver's door lock on a Lada Granta Liftback
- We install the car within the perimeter of the repair area and provide unobstructed access around the perimeter.
- We take priority safety measures when carrying out work. We fix the rear row of wheels with wheel chocks and engage first gear to avoid arbitrary movement.
- Open the driver's door, use an impact screwdriver to unscrew the two screws securing the shackle to the car body, and remove it from its seat. We install a new shackle with soundproofing material.
- Let's start removing the constipation: unscrew the plastic float and remove the stem.
- We unscrew the car door card, two screws, eight plastic clips around the perimeter.
- We disconnect the block with wires from the double-glazed window control unit, speakers, and central locking.
- From the outside, unscrew the three screws that secure the lock body to the door.
- We remove the two rods, having first disconnected them with pliers.
- We carry out preventive maintenance, clean the seat, remove old grease, and apply a thin layer of new one.
- Let's start installing the new lock.
- We assemble the structure in the reverse order, unless there are other breakdowns that require surgical intervention or elimination.
During the installation process, we pay attention to the integrity of the electrical wiring, insulating layer, terminals, and blocks with wires. If there are signs of wear, replace them with new ones.
Do not operate the machine with faulty electrical wiring.
Typical door lock malfunctions
- tightness of locking the door;
- increased noise when opening/closing;
- the central lock does not lock the door and does not respond to signals;
- unlocking is accompanied by a creaking, metallic grinding sound;
- While driving, the door vibrates, cracks are visible in the places of contact with the standard seal.
Common Causes of Premature Wear
- failure to comply with the deadlines for technical inspection, preventative maintenance, lubrication, and replacement of worn elements;
- third-party mechanical damage resulting in deformation of the door or lock;
- manufacturing defects at the factory;
- the lock has become loose due to loosening of the fastening;
- violation of the adjustment algorithm;
- human factor: systematically locking the door with force.
The defect is eliminated by replacing the constipation assembly.
Replacing the rear (passenger) door lock
The procedure for preventing locking of the front/rear passenger door is carried out by analogy. The design and method of fixation are typical.
Installing a trunk lock on Lada Granta Liftback
- We place the car on a level platform and provide access to the trunk lid.
- We take safety measures when carrying out work.
- We unscrew two screws and remove part of the lower plastic trim of the trunk lid.
- Unscrew the two screws securing the lock body to the trunk lid;
- Using pliers, remove the rod from the button to the body.
- We remove the constipation, carry out preventive maintenance, lubricate the threads and the rod end.
- We install a new lock and assemble the structure in the reverse order.
- We unscrew two screws, remove the standard shackle, install a new one with sound-insulating material.
Replacing the hood lock
- Inside the car, under the dashboard, there is a hood release lever. We pull it towards ourselves.
- Release the latch and lift the hood.
- Using a TORX key set to “10”, unscrew the two screws holding the lock body to the body.
- Using pliers, remove the cable eye from the seat.
- We remove the lock, install a new one in its place, and assemble the structure again.
- Lubricate the bow-clamp with silicone grease/solid oil.
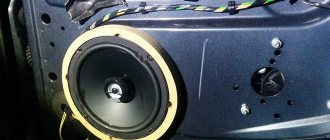
Installation of podiums on the rear doors of Lada Granta
For most drivers, the standard sound system is sufficient, as are the speakers. But lovers of high-quality sound practice installing podiums and spacers.
The installation process on the rear doors is similar to the installation on the front doors. We carry out the work ourselves, the principle of operation is intuitive.
- We clearly determine the size and shape of future speakers. For this purpose, we remove the map, apply speakers to the holes, and calculate the parameters of the podiums. How to dismantle the card on the Lada Grant is written at the beginning of the article.
- We cut out the blanks ourselves according to the drawings or purchase standard designs in the store. We join it to the body with foam.
- We connect the speakers to the block with wires; the manufacturer initially laid the cables in the rear circuit.
- We install protective nets and check that they are working correctly.
Inserting podiums
Soundproofing rear doors on Lada Granta
The procedure is so simple that it will take no more than 15 minutes of free time.
Preparation:
- several sheets of Visalis, dimensions 500 mm x 750 mm;
- one sheet of Bitoplast;
- plastic corrugation for laying wiring;
- degreaser;
- any heating device;
- tools, rags.
Sequencing
- Before starting work, the body element must be installed on the supporting structure. The algorithm is described at the beginning of the article;
- We clean the inner surface of the metal structure from dirt, deposits, and degrease it with acetone and gasoline.
- We check the condition of the vibration isolation pad. We paste over new ones as needed.
- Cut out pieces of Visalis of the required shape.
- Lubricate the moving elements with Litol.
- We place the electrical wiring in a plastic sleeve.
- Heat Bitoplast and apply Visalys.
- Assembling the body element.
Adjusting the rear door of Lada Granta
The first sign that the gaps are broken is the appearance of a loud knock when slamming, the rear door does not open well. You can adjust (restore) the gaps yourself.
To do this you will need: an impact screwdriver, rags, lubricant.
How to adjust the gap: step-by-step instructions
Initially, we carry out visual diagnostics of the body element and evaluate the places of increased (decreased) gap. For objectivity, we use a plastic insert, as a factory standard, 3.0 mm thick.
After diagnostics, release the upper and lower hinge bolts and lower (raise) it a few millimeters. If the back door does not close, adjust the gap again.
Sometimes it happens that the adjusting loop cannot fully adjust the gap. This usually happens after an accident, impact, or collision. Then unscrew the support hinges and complete the gap adjustment.
How to remove the trunk trim on a Lada Granta liftback
It is necessary to remove the trunk trim on cars in case of repairs or modifications to the car. For example, for installing a rear view camera, sound insulation, etc. The following are instructions for removing the luggage compartment upholstery and the fifth door of a Lada Granta liftback car.
Required: Phillips screwdriver.
Trunk side trims
The procedure for removing the right plastic element:
- Unscrew the two fastening screws and unclip one fastener/clip.
- Remove the hatch to access the flashlight lamps (insert your finger and press the lock from above).
- Remove the screw securing the plastic trim to the body (through the hatch).
- Pull out the seat belts and then pull the trim towards you, disengaging it from the white window trim
- Disconnect the connector from the lampshade.
The procedure for removing the left trunk trim is similar.
Removing the luggage compartment trim
Luggage compartment trim (2WD versions): 1. Rear right pillar cover. 2. Right upper side trim of the luggage compartment. 3. Right lower side trim of the luggage compartment. 4. Trunk flooring. 5. Left upper side trim of the luggage compartment. 6. Rear left pillar cover. 7. Left lower side trim of the luggage compartment. 8. Left seat belt hook. 9. Left shock absorber trim. 10. Grille of the left lower side trim of the luggage compartment. 11. Repair kit holder (versions without spare wheel). 12. Rear luggage compartment plate. 13. The grille of the right lower side trim of the luggage compartment. 14. Luggage compartment lighting lamp. 15. Right shock absorber cover, 16. Right seat belt hook, 17. Luggage compartment tray. 18. Rear central trunk floor spacer (versions with spare wheel). 19. Spare wheel bracket (versions with spare wheel).
Luggage compartment trim (4WD versions): 1. Rear right pillar cover. 2. Right upper side trim of the luggage compartment. 3. Right lower side trim of the luggage compartment. 4. Trunk flooring. 5. Left upper side trim of the luggage compartment. 6. Rear left pillar cover. 7. Left lower side trim of the luggage compartment. 8. Left seat belt hook. 9. Left shock absorber trim. 10. Grille of the left lower side trim of the luggage compartment. 11. Left rear luggage compartment floor spacer. 12. Rear luggage compartment plate. 13. The grille of the right lower side trim of the luggage compartment. 14. Luggage compartment lighting lamp. 15. Facing of the right shock absorber. 16. Right seat belt hook. 17. Right rear luggage compartment floor spacer. 18. Spare wheel bracket.
Removal of the trunk trim is shown on the left side. The right one is removed in the same way
1. Open the trunk lid completely.
2. Lift the rear side trim (panel) and remove it from the retaining clips.
Location of fasteners on the rear side trim.
3. Remove the floor panel from the trunk...
4. ...as well as a glove box. 5. Remove the left section of the rear seat back (see here).
7. Unscrew the bolt securing the rear seat back and remove the fastening.
9. Remove the rear sill trim (see here).
10. Lift the side trim of the trunk and remove it from the retaining clips.
Location of the trunk side trim fasteners
When removing the trim on the right side, remove the trunk light. Pull it over the edge...
...and removing it from the clamps, remove it from the casing.
Disconnect the wiring connector and completely remove the dome light.