Why is the rear brake mechanism acting up?
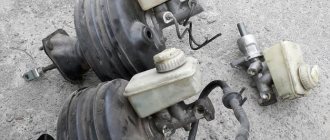
The hydraulic drive built into the VAZ-2110 combines in its internal design a booster and a dual-circuit pressure controller designed to control the rear brakes.
If the rear cylinder is not working correctly, problems can provoke and create an emergency situation at any time when the vehicle is moving along the roadway. To prevent this from happening, the part should be repaired in a timely manner. There is nothing surprising in replacing an old type of rear brake cylinder (RBC) with a new one; nothing lasts forever. Auto parts stores offer car enthusiasts the opportunity to purchase parts from the best manufacturers that will last a long time and guarantee safety on the road.
Installation
Installation of the new element is carried out in the reverse order. Before installation, you need to thoroughly clean the brake mechanism from dirt using sandpaper. Degrease the seat with white spirit.
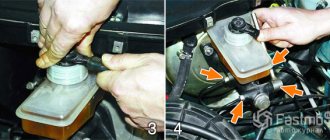
So, first you need to open the hood and add brake fluid to the maximum level. It is not recommended to mix different classes of products. Cars of the “tenth” family are filled with RosDot-4 class fluid. Please note that during pumping the level in the tank will drop. As soon as it drops 1.5 centimeters, you need to top it up again. Next we need an assistant. He will press the brake pedal at your command. So, unscrew the cap from the bleeder fitting and put the hose on it. We put its second end into a plastic bottle. We give the command to the assistant. He must press the pedal 5 times and at the last stage press it “to the floor”. At this time, you will observe how aired liquid flows out of the fitting.
Thanks Don't like it
Mikhail Alekseevich March 22, 2011
I also had this problem since the beginning of the frost, I topped it up 2 times. Spring has come and I decided to take a look and replace it if necessary. As a result, the gas pump leaked where the vacuum rod presses on the piston! I thought about getting confused with a set of belts, but I changed my mind because I hadn’t heard of them in the store, and I think the release springs in it have aged after all. In addition, I took the VUT repair kit and changed it and everything became normal. I made one mistake and decided to reduce the free play of the brake pedal and unscrewed the adjustment visible on the rod. After 4 km the car could barely move at 1, fortunately I got to work. A day later I returned home with the handbrake. Now I've done everything.
Repair kit for rear brake cylinder VAZ 2110
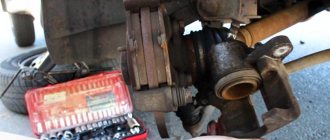
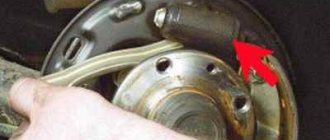
Usually, when the rear brake cylinder fails on VAZ 2110 vehicles, you can observe a decrease in the level of brake fluid in the reservoir. This occurs due to a violation of the tightness of the piston and its rubber. To fix this problem, you need to replace the cylinder with a new one. There is nothing complicated in this procedure, and to perform it you will need the following tools: A 10-point socket with a ratchet and a wrench A special wrench for unscrewing the brake pipes (the so-called split wrench) First, you need to remove the brake drum and rear pads, since access to the cylinder cannot be obtained otherwise. After this, using a split wrench, we unscrew the tube that fits the cylinder from the reverse side: To prevent brake fluid from leaking out, you can plug its end for a while. Then we take the head with a knob and unscrew the two fastening bolts, again from the rear side, as is more clearly demonstrated in the photo below: After which you can safely remove the rear brake cylinder of the VAZ 2110 from the outside, since it is not attached to anything else. The price of a new part produced by VIS is about 300 rubles per piece. If you change in pairs, then naturally you will have to pay about 600 rubles. Installation is carried out in reverse order. If, after installing everything new, the braking efficiency has decreased, and when you press the brake pedal, it sinks more than necessary, it is necessary to pump the fluid through the system. Leaking brake cylinders of the rear wheels of VAZ 2108, 2109, 21099 cars are a very common malfunction.
Required Tools
- 10 mm spanner
- 12 mm spanner
- 13 mm spanner
- a special wrench for unscrewing the brake pipe
Preparatory work
— place the car in the pit, the handbrake should be lowered, the wheels should be supported
— loosen the rear wheel bolts, jack it up and remove it
— weaken the tension of the parking brake cable (handbrake)
To facilitate this operation and improve access to the parking brake actuator adjusting nut, you can disconnect the connection between the muffler and the resonator. Using a 13 mm wrench, unscrew the nuts securing the clamp at their connection and disconnect it.
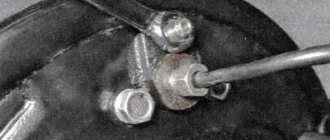
Using a 13 mm wrench, unscrew the lock nut on the handbrake rod with another 13 mm wrench while holding the adjusting nut. Using the same wrench, unscrew the adjusting nut while holding the handbrake rod with pliers.
- unscrew the guide pins of the brake drum and remove it
If the pins do not turn away, lightly tap them with a hammer. If the drum cannot be removed, we also tap it with a hammer on all sides through a wooden spacer. We clean its mounting hole from contamination and treat it with a high-pressure spray.
Reasons why the brakes might fail
Any problems during the braking process reduce its effectiveness, which can lead to dire consequences for everyone - the driver, passengers, and other road users.
Very often, problems arise simply because the driver uses low-quality brake fluid. If your car suddenly loses brakes, this may be due to several reasons, the main thing is not to blame the master cylinder for all the problems.
Below are the reasons why the brakes on a car fail:
- One of the main causes is usually a leaking slave cylinder. Gradually, slowly or quickly, all the contained liquid flows out of it.
- You should also check the level of brake fluid in the reservoir and the condition of the main brake.
- If traces of smudges are noticeable on the main brake, then this is the reason.
- Another possible cause of brake failure could be that the brake line is torn. For example, rubber brake hoses could fray, partially rot in some places, or get punctures.
- The working cylinders may have jammed;
If it is nevertheless noticed that the main brake cylinder is not working:
- it will show where traces of brake fluid leaks appeared;
- it will be impossible to press the brake pedal;
- on the contrary, the brake pedal can move on its own without the driver making any effort to do so.
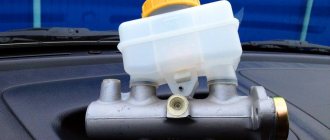
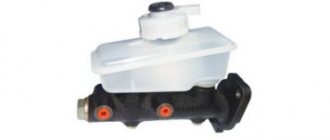
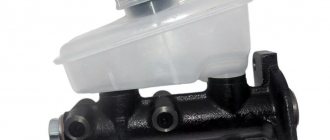
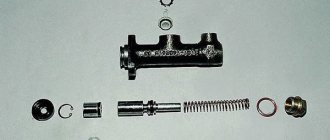
Master brake cylinder with reservoir: 1 — master cylinder body;
2 low pressure o-ring; 3 — drive piston of the “left front-right rear brake” circuit; 4 - spacer ring; 5 - high pressure sealing ring; 6 — pressure spring of the sealing ring; 7 — spring plate; 8 — piston return spring; 9 — washer; 10 — locking screw; 11 — drive piston of the “right front-left rear brake” circuit; 12 — connecting sleeve; 13 - tank; 14 - emergency brake fluid level sensor; A - gap.
Therefore, it is possible to repair the VAZ 2110 brake cylinder, but not always. Most often, if it leaks, a repair kit will help fix the problem and restore the cylinder’s functionality. If the internal mirror in the cylinder is damaged, then, unfortunately, nothing can be corrected, since grinding is prohibited. If everything is not so scary and repairs are possible, you can do it yourself, because the price of the repair kit is quite reasonable, and almost every motorist can afford it.
Determination of breakdowns of the GTZ VAZ-2110
You can determine the faulty part yourself; to do this, you just need to know what to look for:
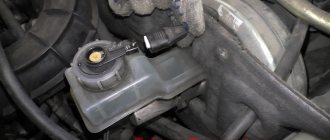
- Leaks in the brake fluid on the vacuum booster at the junction with the main brake cylinder indicate that the cuff in the cylinder is worn out.
Leaks on the vacuum booster indicate wear on the seal in the cylinder.
In any case, you need to determine for yourself whether it’s worth bothering with disassembling the GTZ and repairing it or immediately installing a new part.
Is it worth buying a repair kit and is it profitable?
Buying a repair kit can save the money spent several times, but it will increase the time costs.
Based on the cost of the GTZ at 1,000 rubles, you need to think carefully about whether it is worth disassembling the brake cylinder for such a sum. Repair kits can be incomplete or complete. In any case, you need to purchase a complete one, since no one will measure the forces on the return springs.
You can also repair the brake master cylinder yourself.
An attempt to save money will result in a long procedure of disassembling, washing and drying all parts. When washing, you need to make sure that no gasoline or oil gets on the rubber parts, as this can damage them.
Therefore, the use of a repair kit can only be justified in the following cases:
- The assembled part is not available for sale.
- Inability to allocate 1,000 rubles for a purchase.
- The desire to understand the brake system with your own hands from beginning to end.
In other cases, it is better to immediately install the assembled part.
Checking the metering brake valve
To check the master cylinder metering valves on vehicles not equipped with ABS, two pressure gauges must be used. These valves are used to limit the pressure in the rear brake circuit once the master cylinder has reached a predetermined pressure. (On vehicles equipped with ABS, the hydraulic pressure in the front and rear wheel cylinders or calipers is controlled by the hydraulic modulator/motor module.) When checking the metering valves, the pressure on the front and rear axles must be checked on diagonally opposite wheels at the same time. Use the following procedure to check pressure.
- Remove the bleeder fitting and connect the pressure gauge to one of the rear wheel cylinders.
- Install another fitting and a second pressure gauge on the front wheel cylinder on the other side of the car.
- Press the brake pedal firmly several times to build up pressure in the system. (The pressure indicated on the pressure gauge is not adjustable and is the actual hydraulic pressure in the brake system.)
- Apply pressure until the values shown in the table below are reached.
| MODEL | Reference factor for slope angle and valve response pressure | Front axle pressure gauge input pressure, kPa (psi) | Front axle pressure gauge output pressure, kPa (psi) |
| . | . | 500 (73) | 500 (73) |
| Sedan and hatchback | 0,3/30 | 4 500 (653) | 3 450 ± 200(500 ± 29) |
| . | . | 10 000 (1,450) | 5 100 ± 300(740 ± 44) |
| . | . | 500 (73) | 500 (73) |
| VAN | 0,3/40 | 5 500 (798) | 4 450 ± 200(645 ± 29) |
| . | . | 10 000 (1,450) | 5 800 ± 300(841 ± 44) |
Important: If pressure exceeds 10,000 kPa (1,450 psi), the rear axle pressure gauge may not be accurate.
- Disconnect the pressure gauges and repeat the test on the other circuit.
- Disconnect the pressure gauges and repeat the test on the other circuit.
How to check the condition of the VAZ-2110 air conditioning center
Before you begin replacing the brake cylinder located at the rear, you need to inspect the car and establish an accurate “diagnosis”, especially since no special equipment is required for this - just a set of basic knowledge and your desire to understand the breakdown of the VAZ-2110 brake system.
See if the car has malfunctions and problems that are direct symptoms that the rear brake cylinder cannot be restored:
- Poor brake performance. For example, when pressed, the pedal easily falls down, and checking the brake system and adjusting its individual mechanisms did not give a positive effect.
- Brake fluid is coming out of the cylinder and there are marks on the shield. Even disassembling the unit and replacing the cuffs will be unsuccessful; the part will have to be replaced.
What reasons will indicate a malfunction?
DmitryCorsten Blog Error codes for on-board computers of the Samara-2 family VAZ 2113, VAZ 2114, VAZ 2115
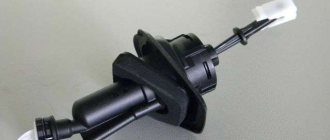
The following signs will help you understand that the clutch master cylinder is malfunctioning:
- a sharp decrease in the level of working fluid in the tank;
- traces of leaks in the area where the working and main cylinders are located;
- a kind of “failure” when pressing the clutch pedal;
- inability to fully press the clutch pedal.
Among the main types of malfunctions noted by experts, it is worth highlighting the following:
- malfunction of the cylinder itself;
- worn cuffs or piston;
- filling the system with low-quality brake fluid, which may contain both numerous dust particles and an excess of moisture.
To eliminate the causes of the malfunction of the main element, it is time to use two methods - replace the one that has become unusable with a new one or eliminate a minor breakdown by repairing it yourself. However, it is worth understanding that only rubber cuffs and the body can be repaired, and besides, repairing components will not always give the expected result. It should also be noted that as for the boot, it also needs to be inspected for the presence of large contaminations. According to experts, it is best to completely replace the cylinder, especially since its cost does not exceed 550 rubles.
Features of the brake system on the VAZ-2110
The brakes on the VAZ-2110 have diagonal separation of the contours.
The device of the brake system of the VAZ-2110.
This allows if one brake circuit fails, it can only be repaired. Often car owners have to change the brake cylinder on one of the rear wheels. The first problem that novice car enthusiasts face is finding the location of this very cylinder. To see it, just remove the brake drum.
Brake cylinder location.
It is the brake cylinder that pushes the pads, forcing them to press against the walls of the drum.
Signs of a broken brake cylinder
A faulty rear wheel cylinder can be detected as follows:
- The wheel stopped braking.
- The wheel is jammed or jammed.
- The brake cylinder is leaking.
If the first two points are quite obvious, and the cylinder malfunction can be determined visually, then in the third case everything is much more complicated.
Brake fluid leaks on the inside of the wheel.
A cylinder leak will sooner or later lead to it jamming, and if this happens on the road, then major troubles cannot be avoided. To detect a leak, you need to pay attention to indirect signs. If there are visible leaks of brake fluid on the wheel, and the fluid itself runs out very quickly, you need to urgently remove the rear wheel and drum.
Wheel leaks do not always mean a broken rear brake cylinder. Most often, this is a brake hose that has burst or frayed.
Tool preparation and removal
- brake fluid;
- keys “10”, “13” and “17”;
- equipment for unscrewing fittings;
- pliers;
- metal brush to remove oxidation of contacts;
- dry cloth;
- device for tensioning springs;
- new brake cylinder for VAZ 2114.
Before starting work, you need to prepare a place where you can easily lay out all the dismantled parts. Be sure to record their location in the vehicle system.
Where do we start repairing the master cylinder? We remove the negative terminal from the battery, then open the hood and remove the remaining brake fluid with a syringe. We unscrew the brake pipes with an open-end wrench (you need to be careful so as not to leak fluid onto other parts of the car).
Removing the main brake cylinder on a VAZ 2114
What to do when the thread is rooted and cannot be removed? Let's try to moisten the connection with brake fluid, and after a while, use a No. 10 wrench to remove the hoses. When all the steps taken do not allow you to unscrew the mechanism, you can use a special wrench with a cap slot and a clamping bolt. It should be secured to the nut, tightened with a bolt and rotate the desired part.
In order not to mix up the brake pipes during reinstallation, they must be signed with an identification corrector.
If all efforts are crowned with success, we proceed to unscrewing the master cylinder. Using a 18mm socket, remove the two main nuts of the mechanism that secure it to the amplifier.
Continuing the repair of the VAZ 2114 master brake cylinder, we install a new device with an updated fluid barrel. Next, we return all the parts back in the correct order. Do not fix the hoses too tightly, so as not to break the fastening threads. It is advisable to change the fluid in the system, because the mechanism will need to be pumped.
When installing a filled barrel, the help of another person is required, who will lightly press the brake pedal until liquid flows out of the front holes of the system. At this point, the two front tubes are installed.
If the vacuum booster does not work correctly, the product must be replaced. To do this, you need to remove the fitting on the left side and turn the cylinder slightly to the side (if possible). Unscrew the hose from the check valve, and in the vehicle interior, remove the locking bracket of the lever pin and the pin itself.
Using wrench No. 13, unscrew the 4 nuts securing the vacuum to the car body. Now you can replace the old unit with a new one.
It is best to secure the vacuum and the brake pedal with a cracker finger, and then screw the frame to the body. It is also possible to change the vacuum hose for better functionality of the main mechanism.
How to extend the service life of a new fuel pump
Before installing the part, you need to know the rules that will further extend the service life of the part:
- Choose the best products in the store, created by experienced manufacturers you can trust. By saving on brakes, you won't end up cheap.
- Pay attention to marriage. A defective product is characterized by the pistons coming out of the cylinder structure by a couple of millimeters. However, this is quite enough to cause another breakdown and replacement of the part.
- Buy good brake fluid.
- Ideally, you need to change not one cylinder, but two at once. As practice shows, if one element of the system has already failed, the second one will not be long in coming either.
Dismantling
To carry out dismantling work that entails replacing the master brake cylinder, it is necessary to prepare a certain set of tools and materials. It includes:
- Brake fluid;
- Tool for unscrewing fittings;
- Pliers;
- Dry rags;
- Metal brush for cleaning contacts;
- Key for 17, 13 and 10 millimeters;
- Spring tensioner;
- New brake cylinder.
Before starting work, prepare yourself a site where you can place all the elements to be removed. Write down or photograph, or otherwise record where this or that unit was removed from. This will greatly simplify the reassembly procedure.
After all the preparatory activities, you can start working.
- Be sure to remove the negative terminal from the battery of your VAZ 2114. Without this, almost no repair or maintenance work on the car can begin.
- Raise the hood and lock it securely.
- Use a syringe to remove any remaining brake fluid from the container.
- Unscrew the brake fluid supply pipes using an open-end wrench. Unscrew it carefully so that the brake fluid does not get on other units in the engine compartment.
- In some cases, the thread becomes stuck, making it very difficult to remove. In such a situation, we recommend treating the threads with brake fluid and letting it sit for a while. Then the hoses are removed using a 10 mm wrench.
- If these measures do not help, you will need a special wrench with a clamping bolt and a cap slot. It is attached to a nut, clamped with a bolt and rotates the part.
- After dismantling the brake fluid pipes, be sure to mark them with a marker or corrector so that you know which pipe is connected where during reassembly.
- Now you need to remove the brake master cylinder. To do this, first remove the two main nuts that hold the GTZ to the amplifier.
- That's it, the damaged element can be removed from its seat.
Dismantling works
- Clean the installation sites so that there are no problems with the new cylinder in the very first months of operation.
- Follow the reverse assembly sequence so as not to confuse the location of certain elements.
- Do not clamp the brake fluid hoses too tightly, otherwise there is a risk of stripping the threads. Restoring connections is a hassle.
- It is recommended to replace the brake fluid used before repair, and then be sure to bleed the brakes.
- To level up, you will need help, so make an agreement with a friend in advance. One will gently press the brake from inside the car, and the other will wait for brake fluid to start coming out of the holes. At this very moment it will be necessary to return the front tubes to their places.
Be sure to simultaneously check the correct operation of the vacuum booster. If it is faulty, it will need to be replaced.
Expert advice
Experience is useful. Therefore, listen to some very practical advice regarding replacing the brake cylinder and interfering with the brake system in general.
- Before reassembling the unit, be sure to treat all dismantled elements with isopropyl alcohol. Blow out the openings of the units and wipe them thoroughly with a dry cloth. This will significantly increase their service life and avoid a number of problems in the early stages of operation.
- Try to prevent rubber, plastic elements, seals, and pipes from coming into contact with gasoline, kerosene and other chemically powerful substances. Their contact can lead to damage and loss of integrity of the elements.
- Before changing the GTZ, put the device body in order. It is necessary to remove all traces of oxidation, dirt, and plaque.
- Make sure the device is sealed. Carry out periodic checks of the sealing rings even if the gas turbine engine does not show any signs of malfunction.
- When assembling the unit, treat all elements with brake emulsion.
- Under the screws securing the GTZ there are sealing gaskets that will need to be replaced during the repair process of the device.
- After replacing the master cylinder, do not forget to bleed the brakes. This is necessary in order to remove air trapped in the system. The presence of air locks can lead to accidents, since the brake pedal simply will not work at some point.
- When removing the block with wires (when replacing the vacuum booster), be sure to close all open holes so that dust, dirt, and brake fluid do not get there.
- When carrying out dismantling work to remove the main brake cylinder, it is recommended to first remove the main brake reservoir, and only then unscrew the mounting screws. This will make it much easier to remove the unit and all other elements of the system.
- Most often, the turbocharger fails due to leaks in the brake fluid supply system. Lift the hood and look at the joint of the device. The presence of traces of leakage indicates that the gas turbine seal is worn out and needs to be replaced.
Always remember that any intervention in the brake system requires mandatory bleeding of the brakes after completion of the work. Ignoring this step can have serious consequences.
Installation of a new gas turbine engine
As you can see, it is more than possible to carry out work on replacing the gas turbine engine yourself. This will save an impressive amount of money, since such services at professional service stations will cost at least 1,000 rubles. Moreover, this is in ideal situations and the presence of good friends at the service station.
Source
Main elements of the front brake system
This:
- Brake disc – position 1 in the photo.
- Caliper, pos. 3.
- Brake pads – 4.
- Cylinder – 5.
- Piston – 6.
For the front wheel, the brake mechanism has automatic adjustment of the gap between the disc and pads, with a pad wear indicator and a floating caliper. The bracket includes the front brake cylinder of the VAZ 2110 and the caliper; they are secured to each other with bolts. The piston is installed in the cylinder cavity with an o-ring. The optimal clearance between the brake disc and pads is maintained due to the elasticity of the installed ring. How to change the brake cylinder of a device with your own hands is suggested in the article.
Detailing
Assembly elements on the front brake mechanism:
- Dustproof cover;
- Pad holder;
- Noise protection gasket and spring;
- Two pads: internal, with a wear indicator, and external;
- Fastening plates;
- Cylinder cover and piston;
- Caliper;
- Bracket;
- Air release valve;
- Gasket, bushing, pin, seal.
For the tenth to twelfth VAZ models, these units are structurally the same, only the VAZ 2110 caliper bracket is different. Therefore, it becomes possible to install not only the “native” unit, but also from “related” models. Naturally, this requires replacing the bracket itself.
Is it possible to repair the rear brake cylinder?
This is indeed possible, you just need to have the skills to disassemble the part and know the design features. To properly disassemble the product, repeat the following steps:
- Remove the protective caps.
- Remove the pistons and elements that regulate the automatic gap from the body; this mechanism appears between the drum and the brake pads.
- After turning the piston and fixing it, you can already unscrew the stop screw.
- Slide out the O-ring and spring support cup.
- Disconnect the thrust ring and screw from each other.
Now carefully inspect the details:
- All surfaces must be smooth; scratches and roughness are unacceptable, as this will cause brake fluid to leak.
- If there are defects on the mirror base, use grinding or lapping - the latter method is gentle. The inner diameter of the cylinder must retain its dimension.
- Replace seals and protective caps.
Step-by-step video instructions for replacing the rear brake cylinder are presented below:
Disassembly and assembly of the unit
To remove the pistons, springs, and rod from the cylinder body, you will need to unscrew two bolts at the bottom. They are designed to be secured so that the pistons do not fall out of the housing. It is advisable to hold the hole in the cylinder with your finger. This mechanism cannot be understood just like that; there must be good reasons for this. Usually this is the appearance of a leak, so the rubber seals are replaced during disassembly
It is worth noting that the rings must be changed in any case, it does not matter whether they are in good condition
Even if it is close to ideal, they need to be changed to avoid problems. After the repair, the entire assembly is assembled in the reverse order; do not allow dirt, dust, or foreign objects to enter the cylinder. This will lead to its destruction. Install the cylinder on the brake booster and connect the pipes and expansion tank to it. And then the most difficult procedure is pumping. It is impossible to replace the master brake cylinder of a VAZ without bleeding it.
The process of replacing the VAZ-2110 brake cylinder
If the cause of the non-functioning brakes on one of the rear wheels is determined, then you need to begin the replacement process. First you need to dismantle the old part. It happens like this:
- First you need to remove the rear wheel.
We unscrew the wheel by jacking up the car and placing additional support under the bottom.
It is better to unscrew the tip of the brake pipe with a slotted wrench.
It is more convenient to unscrew the brake cylinder mounting bolts using a ratchet head.
When working with fittings and tubes, the main thing is not to break the threads, otherwise you will have to change them too.
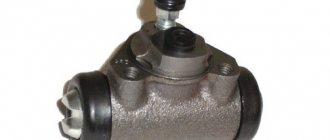
Old brake cylinder.
If the parts are difficult to unscrew, it is better to spray them generously with WD-40. When rotating the nuts, you need to make sure that they rotate without tubes. If the tube turns together with the nut, it means it is rusty and stuck to the nut. This part is not allowed for use and must be replaced.
The process of installing a new cylinder
Before you begin the cylinder installation procedure, it is imperative to clean the entire rear wheel brake mechanism from dirt. If you really had to climb into the drum, then you need to carefully examine its condition, at the same time inspecting the pads. If worn, they must be replaced.
- If there has been a cylinder leak, then before installing it, you need to thoroughly clean the pads from all traces of brake fluid. To do this, you can use a file or sandpaper. Under no circumstances should stripping machines be used, as the pad can be seriously damaged.
- The inside of the rear brake drum also needs to be cleaned of dirt, rust and degreased from traces of brake fluid. If the liquid remains in the drum, the shoe will slide during operation. Only after thorough cleaning of all mechanisms can a new cylinder be installed. The assembly procedure takes place in the reverse order of disassembly.
Bleeding the brakes after replacement, should I do it or not?
After the procedure for replacing the brake master cylinder, some inexperienced car owners do not consider it necessary to pump the brakes. If you neglect this procedure, the brakes may fail at the most crucial moment.
It is necessary to bleed the brake system . This procedure is simple, although two people must be involved. The pumping procedure is as follows:
- We need to pump up the brakes. To do this, the pedal is pressed several times, after which it is held down.
- At this time, you need to partially unscrew the brake pipe fitting on one wheel.
- This should remove air from the system. Periodically, an assistant should pump the brakes by pressing the pedal. This procedure must be repeated until fluid sprays out of the tube when you press the brake pedal.
We pump the brakes on each wheel one by one.
This procedure is repeated on each of the four wheels of the car . Before bleeding the brakes on each wheel, you need to add brake fluid to the reservoir. Only after bleeding the brakes can you go out on the road without fear that the brakes will fail at the most inopportune moment.
Tools that will be needed during the replacement process
To replace the brake cylinder you will need a tool.
Before starting any repair work, you should prepare thoroughly. Replacing the brake master cylinder is no exception. To replace this part you will need:
- Set of keys. Having a variety of sockets and socket wrenches will be a huge advantage.
- Screwdriver Set.
- Round nose pliers will help when changing cuffs.
- Special “brake” wrench for 10.
In addition, during the replacement process, brake fluid will spill out, which is generally advisable to replace with new one. DOT-4 brake fluid is suitable for the VAZ-2110.
The process of removing the old part
In order to remove the brake master cylinder, you need to open the hood and do the following:
- To get to the part, you will first have to remove the sound insulation. You should not try to tear it off, as it is secured with bolts. Therefore, you should arm yourself with a screwdriver and unscrew all the fasteners. If the sound insulation is not removed after this, it means that not all fasteners have been unscrewed. If you pull the element, it can be damaged. After this, you can start replacing.
We unscrew several screws using a Phillips screwdriver to remove the sound insulation.
Disconnect the terminal with wires.
We disconnect the tubes and put rubber caps on them.
Unscrew the fastening bolts.
Remove the brake cylinder.
At this point, the dismantling process can be considered complete.
Malfunctions and ways to check them
It is possible that you may need to replace the vacuum booster on your VAZ 2110. The cause may be various malfunctions, the characteristic symptoms of which are as follows:
- When you press the brake pedal, a hissing noise occurs, and at the same time, the engine speed often increases;
- The car starts to shake;
- Spark plugs stop working efficiently;
- Fuel consumption increases noticeably.
You yourself understand perfectly well that if the vacuum brake booster hisses on a VAZ 2110, there is nothing good about it. Therefore, it is necessary to take appropriate action. This applies to all malfunctions that may occur.
Before replacing the vacuum booster on a VAZ 2110, it should be checked.
This procedure is performed as follows:
- As with normal bleeding of brakes, with the engine not running, press the gas pedal several times;
- After 5 or 6 presses, keep the pedal in the down position, resting it on the floor, and start the engine;
- After starting, the pedal itself will move forward a little.
This situation is typical only for a working vacuum amplifier. Therefore, if a vacuum has not formed, check the connections and the hose for leaks, plus examine the condition of the check valve. Often the reason lies in the destruction or deformation of rubber components, which can be easily replaced.
There is also a high probability of damage to the diaphragm, on which a hole is formed over time. You can purchase the diaphragm with a repair kit, the cost of which is no more than 500 rubles.
Replacement
To replace an element, you need to understand the main issue - how to remove the vacuum booster from a VAZ 2110. Directly replacing the old element with a new one will not be difficult, just like the reassembly process.
Therefore, we will tell you about the main thing - dismantling the amplifier. Let's start with the fact that the procedure is not complicated, but it requires accuracy and sequence of steps. If you follow the recommendations, the work will take little time and will not take much effort.
- Disconnect the block with wires, which includes brake fluid level sensors in its design.
- Hold the booster check valve with one hand and carefully disconnect the hose with the other. It is advisable to disconnect the hose with a strong hand, since this will require a lot of force.
- Remove the two bolts connecting the booster and master cylinder.
- Carefully remove the cylinder from the amplifier.
- There is no point in disconnecting the brake lines.
- Give access to the dashboard, which will allow you to unscrew the nuts holding the brake pedal bracket. There should be 4 of them.
- It is recommended to dismantle the bracket and amplifier through the engine compartment, since there is enough free space for such manipulations.
- Remove the pin lock plate. To do this, pry the finger with a screwdriver and squeeze it out.
- Now you can easily disable the brake pedal and booster.
- To disconnect the amplifier and bracket, you will have to unscrew the two nuts on the mount.
- A new one is installed in place of the dismantled old vacuum amplifier, and the reassembly procedure is performed in strict sequence of the dismantling process.
Which cylinder is best to buy for replacement?
Rear brake cylinder from Kraft.
If you definitely decide for yourself that you will not go to a service station for repairs, then the spare part necessary for repairs will need to be purchased at a car store. Since spare parts for domestic cars are inexpensive, there will be no problems when purchasing.
When purchasing, you can buy both the original, which has the article number 21050-3502040-00, and a “non-original” from another company. Unlike spare parts for foreign cars, where the original spare part is always better, the situation with spare parts for VAZ is the opposite. It often happens that non-original spare parts turn out to be of higher quality than the original.
Rear brake cylinder replacement instructions
Replacing the rear brake cylinder of a VAZ-2110 looks like this:
- Raise the car on the lift.
- To securely secure the VAZ-2110, lock the front wheels.
- Unscrew the fasteners and remove the rear wheels.
- Using a rubber hammer, remove the brake disc.
- Carefully remove the end of the tension spring installed at the top, this spring is located right next to the brake pad.
- Lift the handbrake lever all the way to the top, you will see how the pads have moved apart, now they can be removed without any problems.
- Unscrew the brake pipe from the cylinder.
- Remove the broken cylinder and install a new one in its place.
- Assemble the knot following the reverse order of these instructions (starting from the last point to the first).
- Replacing the rear brake cylinder of a VAZ-2110 involves pumping the brakes at the final stage.
Sources
- https://avto-lover.ru/drugoe/remkomplekt-tormoznogo-cilindra-vaz-2.html
- https://AutoBroker-sng.ru/kalina/zamena-zadnego-tormoznogo-cilindra-vaz.html
- https://k-SportRacing.ru/avtoservis/zamena-zadnih-tormoznyh-cilindrov-vaz-2111.html
- https://litezona.ru/remont-zadnih-tormoznyh-cilindrov-vaz-2110/
- https://autobryansk.info/remont-zadnih-tormoznyh-cilindrov-vaz-2110.html
[collapse]