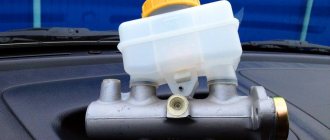
Main brake cylinder VAZ 2110
The GTZ is the main part of the brake system; when you press the brake pedal, it distributes the brake fluid through the lines to the calipers and creates the necessary pressure to compress the brake pads.
Below are signs that indicate the need to replace the brake master cylinder.
Signs of a malfunction of the GTZ:
- Traces of brake fluid leaking through the O-rings are noticeable;
- The force on the brake pedal disappears and when you press the pedal, the car does not brake;
- The pedal does not engage due to the jamming of the GTZ rod;
With these signs, it is not recommended to delay replacing the gas turbine engine.
Malfunctions and ways to check them
It is possible that you may need to replace the vacuum booster on your VAZ 2110. The cause may be various malfunctions, the characteristic symptoms of which are as follows:
- When you press the brake pedal, a hissing noise occurs, and at the same time, the engine speed often increases;
- The car starts to shake;
- Spark plugs stop working efficiently;
- Fuel consumption increases noticeably.
You yourself understand perfectly well that if the vacuum brake booster hisses on a VAZ 2110, there is nothing good about it. Therefore, it is necessary to take appropriate action. This applies to all malfunctions that may occur.
Before replacing the vacuum booster on a VAZ 2110, it should be checked.
This procedure is performed as follows:
- As with normal bleeding of brakes, with the engine not running, press the gas pedal several times;
- After 5 or 6 presses, keep the pedal in the down position, resting it on the floor, and start the engine;
- After starting, the pedal itself will move forward a little.
This situation is typical only for a working vacuum amplifier. Therefore, if a vacuum has not formed, check the connections and the hose for leaks, plus examine the condition of the check valve. Often the reason lies in the destruction or deformation of rubber components, which can be easily replaced.
There is also a high probability of damage to the diaphragm, on which a hole is formed over time. You can purchase the diaphragm with a repair kit, the cost of which is no more than 500 rubles.
Replacement
To replace an element, you need to understand the main issue - how to remove the vacuum booster from a VAZ 2110. Directly replacing the old element with a new one will not be difficult, just like the reassembly process.
Therefore, we will tell you about the main thing - dismantling the amplifier. Let's start with the fact that the procedure is not complicated, but it requires accuracy and sequence of steps. If you follow the recommendations, the work will take little time and will not take much effort.
- Disconnect the block with wires, which includes brake fluid level sensors in its design.
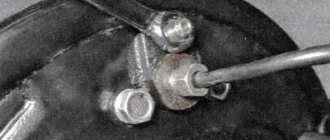
- Hold the booster check valve with one hand and carefully disconnect the hose with the other. It is advisable to disconnect the hose with a strong hand, since this will require a lot of force.
- Remove the two bolts connecting the booster and master cylinder.
- Carefully remove the cylinder from the amplifier.
- There is no point in disconnecting the brake lines.
- Give access to the dashboard, which will allow you to unscrew the nuts holding the brake pedal bracket. There should be 4 of them.
- It is recommended to dismantle the bracket and amplifier through the engine compartment, since there is enough free space for such manipulations.
- Remove the pin lock plate. To do this, pry the finger with a screwdriver and squeeze it out.
- Now you can easily disable the brake pedal and booster.
- To disconnect the amplifier and bracket, you will have to unscrew the two nuts on the mount.
- A new one is installed in place of the dismantled old vacuum amplifier, and the reassembly procedure is performed in strict sequence of the dismantling process.
Consequences of brake fluid leakage from the GTZ
When brake fluid leaks from the master cylinder, brake fluid can get onto various parts of the car. As you know, TZ is quite chemically active and often damages other parts of the car.
For example, when liquid leaks, it can fall on the vacuum booster membrane, which will soon lead to its rupture and, as a result, air leakage from the receiver, and of course, replacement of the vacuum booster itself.
VUT membrane rupture
Also, when brake fluid leaks, it gets into part of the engine compartment, behind the steering rack, and causes great damage to the paintwork.
Main causes of malfunction
The VAZ 2110 caliper is structurally an element that holds the brake pads and is responsible for the degree of their pressure on the brake discs. It is also responsible for uniform wear of the brake pads and guarantees the driver reliable braking in extreme situations.
Thus, the importance of the caliper in the operation of the car is difficult to overestimate.
If by this time you have a completely reasonable question, what can happen to the caliper on a VAZ 2110 (2112), we will be happy to answer you. The main cause of malfunctions is “acidification” of the moving elements, coating them with an oxide film, clogging due to the destruction of protective boots or the use of improper lubricant, namely:
- acidification of the main piston mechanism;
- acidification of guides.
A clear sign of problems that the caliper can cause on VAZ cars is uneven wear of the brake pads and an increased braking distance. In this case, the VAZ pads must be changed, and the caliper mechanism itself must be subjected to comprehensive diagnostics:
- check the condition of the piston, its degree of freedom, the presence of moisture, metal oxide, oxide formations and build-ups, the condition of the protective boots;
- Similarly, check the condition of the guides, make sure that there are no uncharacteristic scuffs, abrasions or deformations of the rod on the surface.
We must also not forget about regularly replacing the brake fluid in the system. This should be done approximately every 40 thousand km. mileage of VAZ-2110.
Since brake fluid is hygroscopic, it easily absorbs moisture, thereby oxidizing the piston mechanism and causing it to fail. The piston stroke becomes difficult and uneven wear of the brake pads and wheel wedge occurs.
Replacement without bleeding the brake system
Below are instructions that allow you to replace the GTZ without bleeding the brake system and without a large loss of brake fluid. To carry out repairs, you need to prepare the necessary tools and DOT-4 brake fluid.
When replacing, it is necessary to dismantle the brake fluid reservoir from the old GTZ; when dismantling it, breakdowns of the tank occur; it is recommended that when replacing the GTZ, you also purchase a new TJ reservoir.
Required tool:
- Ratchet with extension and 17mm socket;
- Open-end wrench 10mm;
- Syringe;
- Phillips screwdriver;
Step-by-step instruction
- Remove the hood seal and unscrew the interior heater insulation with a Phillips screwdriver;
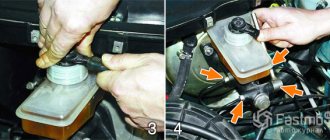
- We unscrew the cap of the brake fluid reservoir and use a syringe to pump out the brake fluid into a previously prepared container;
- Using a 10mm wrench, unscrew the fittings of the TJ tubes;
- Using a ratchet with a 17mm head, unscrew the 2 nuts securing the GTZ to the vacuum booster and pull the GTZ towards you;
- We remove the tank from the GTZ (if you haven’t bought a new one). We install the reservoir on the new GTZ, lubricating the rubber seals with brake fluid;
- We install the new GTZ on the vacuum booster and fix it;
- We insert the brake fluid fittings into the GTZ, but do not tighten them;
- Fill the TJ tank up to half;
- We wait for brake fluid to flow out of the holes into which the brake pipe fittings are screwed;
- Then we twist and tighten the fittings of the TJ tubes;
- Add brake fluid between the MIN and MAX marks and close the cap;
The replacement process is complete. With this replacement, bleeding the brake system is not required.
We hope our article was useful to you.
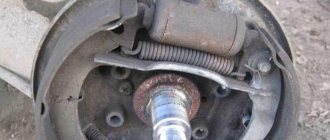
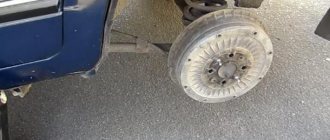
Troubleshooting possible replacement problems
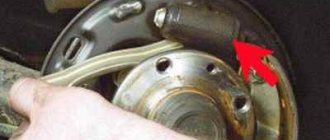
There are relatively few difficulties when replacing brake pads. As a rule, they are associated with souring of bolts due to rust. The drum elements that are most susceptible to corrosion are the mounting pins. In case of possible difficulties, the drum is removed along with the rear wheel hub, and when unscrewing the studs, it is allowed to use a penetrating lubricant such as WD-40
However, when working with brake mechanisms, lubricants should be used extremely carefully, avoiding their contact with the working surface of the pads or disc (in the case of the front wheels). Otherwise, the efficiency of the brakes may be significantly reduced, up to severe slipping between the working surfaces of the pad and drum linings or disc
To summarize, we can note the ease of replacing brake pads on a VAZ-2110. The procedure does not require special skills or tools; it can be done in an ordinary garage without any particular difficulties. Knowing the order of operations when replacing allows you to complete this procedure quickly and efficiently.
Home →
Maintenance and Repair →
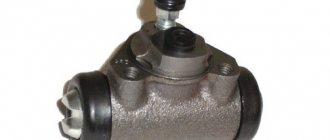
Which cylinder is best to buy for replacement?
Rear brake cylinder from Kraft.
If you definitely decide for yourself that you will not go to a service station for repairs, then the spare part necessary for repairs will need to be purchased at a car store. Since spare parts for domestic cars are inexpensive, there will be no problems when purchasing.
When purchasing, you can buy both the original, which has the article number 21050-3502040-00 , and a “non-original” from another company. Unlike spare parts for foreign cars, where the original spare part is always better, the situation with spare parts for VAZ is the opposite. It often happens that non-original spare parts turn out to be of higher quality than the original.
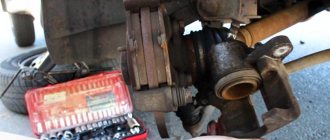
Tools that will be needed during the replacement process
To replace the brake cylinder you will need a tool.
Before starting any repair work, you should prepare thoroughly. Replacing the brake master cylinder is no exception. To replace this part you will need:
- Set of keys. Having a variety of sockets and socket wrenches will be a huge advantage.
- Screwdriver Set.
- Round nose pliers will help when changing cuffs.
- Special “brake” wrench for 10.
In addition, during the replacement process, brake fluid will spill out, which is generally advisable to replace with new one. DOT-4 brake fluid is suitable for the VAZ-2110.
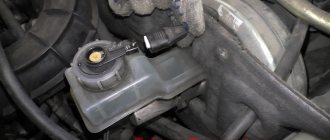
The process of removing the old part
In order to remove the brake master cylinder, you need to open the hood and do the following:
- To get to the part, you will first have to remove the sound insulation. You should not try to tear it off, as it is secured with bolts. Therefore, you should arm yourself with a screwdriver and unscrew all the fasteners. If the sound insulation is not removed after this, it means that not all fasteners have been unscrewed. If you pull the element, it can be damaged. After this, you can start replacing.
Diagnostics and repair
From the signs listed above, it is easy to understand that in most cases there is only one source of problems - rubber products that have become unusable. The cuffs crack and swell, as a result they leak liquid and close the discharge holes. Hence the recommendation: all “rubber bands” of the brake system should be changed at intervals of approximately 100 thousand km, without waiting for critical wear.
Reference. Many auto mechanics express the opinion that after replacing the cuffs, the main hydraulic cylinder will not last long. The statement is true if the car owner purchased cheap, low-quality spare parts or installed new o-rings in the cylinder, where internal wear has formed in the walls.
Before checking the GTZ for operability, make sure there are no other faults:
- Inspect the wheel assemblies from the inside for leakage of brake fluid from the working cylinders.
- Check the integrity of the expansion tank and the fluid level in it.
- Start the engine and at idle speed, press the vacuum take-off pipe to the amplifier. If the engine speed has increased noticeably, there is an air leak and the master cylinder is most likely working.
A clear symptom indicating a breakdown of the main hydraulic cylinder is drops of brake fluid on the body . If you discover a leak, feel free to dismantle the unit and disassemble it to look for the cause. Another common problem - fluid flowing through the seals - is diagnosed as follows:
- Open the cover of the expansion tank and place an assistant in the driver's seat.
- Listening to sounds in the tank, give the command to an assistant to press the pedal.
- If the pedal moves easily and gurgling is heard in the reservoir, liquid is entering there. The reason is that worn cuffs are unable to create pressure in the circuits; liquid seeps through the leaks and enters the container.
Also, problems with the GTZ are indicated by jamming or too little pedal travel.
Sit behind the wheel, press it several times, and start the engine while holding the pedal with your foot. If it sinks to the floor or does not budge, disassemble the hydraulic cylinder. To replace or repair the master brake cylinder, you need to remove the unit from the vehicle. Work is carried out in the following order:
- Suck out the liquid from the tank with a syringe. If the cuffs are leaking, press the pedal several times and suck out the excess fluid.
- Remove the expansion tank.
- It is not necessary to drain all brake circuits. Substituting a small container, unscrew the nut of the first tube and carefully move it to the side, plugging it with a wooden stick.
- Repeat the operation with the second tube, unscrew the fastening of the GTZ flange and remove the unit.
Further actions depend on the design of the master cylinder. If the element is completely disassembled, change the rubber seals. Otherwise, you will have to replace the pistons assemblies. Pre-wash the body and all openings with alcohol; do not use gasoline. After assembly, add fluid and bleed the brake system to remove air.
Source