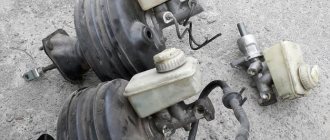
There are no major or minor components and assemblies in a car, but our health and safety directly depend on the failure of some of them. Therefore, stable operation of the brake system, its constant diagnostics, adjustment and timely repair of the devices it consists of should become a priority. Even if you have the slightest suspicion that the working or master brake cylinder is leaking, you should not put off repairs and adjustments, but deal with them immediately. To diagnose, repair or replace faulty parts with your own hands, you need to understand the operating diagram of the entire brake system, what are the signs of possible breakdowns and how to repair the brake master cylinder.
Replacing the master brake cylinder
Find out how to properly replace the brake master cylinder yourself.
Step-by-step instructions for new car enthusiasts. Do-it-yourself car repair is not an easy job, it requires certain knowledge and skills. But what about a broken master cylinder? Naturally, an urgent replacement is necessary, because without good brakes you won’t go far. And in this article I will tell you in detail how to replace it without resorting to the services of a service station, because it is cheaper, and you will gain new skills in repairing your own car, and faster. In fact, there is nothing complicated; the whole procedure can be done easily in your own garage or on the street.
The entire procedure for replacing the master brake cylinder must be carried out with an assistant (at the end he will need to press the brake pedal several times). You also need to have a standard set of automotive tools (wrenches) for disassembling parts of the brake system and trim, and brake fluid of the same brand (preferably). The diagram of the main brake cylinder will be suitable for those who decide to understand its operation.
The principle of operation of the GTZ and its main problems
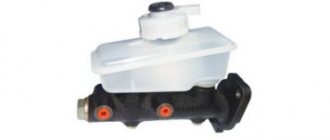
The master brake cylinder of the VAZ 2114 is a device that converts pressing the brake pedal into increased pressure inside the system. It works on the vacuum principle and requires complete sealing of the brake fluid path.
Any violation of this tightness becomes the reason for the “disappearance” of the brakes, namely:
- air entering the system;
- the appearance of cracks in the line and leakage of brake fluid;
- wear or damage to the integrity of the gaskets.
Checking the tightness of the brake system is very simple - you need to press the brake pedal with the engine not running, and then, without releasing it, start the engine. If immediately after this the pedal “fails,” then the line is completely sealed and the brakes are working properly.
Brake master cylinder replacement process:
1. Disconnect the voltage from the battery - just remove the wire from the “–” terminal.
2. Carry out the procedure for removing the soundproofing upholstery of the engine compartment. In principle, there is nothing complicated here, the main thing is to find and unscrew all the fastening bolts, and also unfasten the clamps securing the hoses to the upholstery. Do everything carefully and don’t pull too hard.
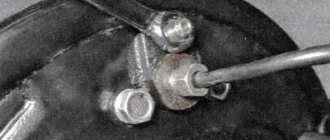
4. Next, you need to slightly loosen the four nuts that hold the brake pipes.
5. To remove the master cylinder from the studs, you need to unscrew the two nuts that secure it to the vacuum brake booster. After removing it, you need to completely unscrew the previous four nuts securing the tubes. But before doing this, place a reservoir under the master cylinder, otherwise some brake fluid will leak out of it.
6. Now drain all the liquid from the reservoir into the new inverted cylinder.
7. Place the reservoir with bushings on the new cylinder. If you bought a new brake cylinder without a reservoir, then there is nothing to worry about; you can easily install a reservoir from the old one. But also do not forget to remove from the old cylinder the two rubber sealing bushings that secured the brake fluid reservoir. If they are worn out and cracked, then you should buy and install new bushings.
8. Now reinstall the master cylinder to the vacuum booster and tighten the two mounting nuts. Then place the empty reservoir underneath again and fill the reservoir with brake fluid. It is better to pour in the liquid of the same brand as it was, without mixing several types.
9. This is where you need the help of a second person, who will press the brake in the cockpit on command. Close the four brake pipe holes in the master cylinder with your fingers. Now the assistant should press the brake pedal smoothly and slowly until brake fluid comes out of the front cylinder holes.
10. As the liquid begins to flow, you can connect two pipes to the front holes of the master cylinder and tighten their fastening nuts. But at this time the assistant must keep the brake pedal in the clamped position.
11. Install the remaining two tubes to the rear holes in the same way: pinch them with your fingers; the assistant presses the brake pedal; As soon as the liquid flows, insert and tighten the remaining two tubes.
12. Reinstall all the parts that were removed: connect the block with wires and soundproofing padding.
13. Upon completion of assembling the car, press the brake pedal and, if it is “soft,” then you need to bleed the brake system.
Installation and pumping of the gas turbine engine
Perform installation in the same way as dismantling, only in reverse order. After tightening the tube ends, fill in the brake fluid. Now you need to bleed the main brake cylinder. Ask an assistant to press the brake pedal smoothly and all the way 4 times, then press it again and do not let go. Loosen the rear right brake pipe tip to allow brake fluid to flow out from under it. Once fluid and air stop escaping, tighten the tip and have an assistant release the brake pedal. Repeat this procedure 3 – 4 times for each tube.
In half the cases, this approach avoids completely bleeding the brakes. After bleeding, the brake pedal should be very tight. Start the engine and press the brake pedal several times. If it easily pushes through more than 1/6 of the stroke, the brakes need to be fully bled. Drive onto any straight section where you can accelerate and brake without interference. Accelerate to 5 - 10 kilometers per hour and apply the brakes to make sure the brakes work. If everything is fine, accelerate to 30 kilometers per hour, then press the brake pedal sharply and firmly. If the car brakes quickly and without pulling to the sides, you did everything right. If the car pulls to the side, the brakes need to be fully pumped.
Replacing the master brake cylinder
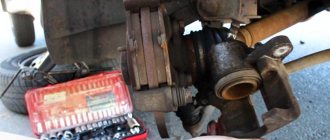
You will need: a TORX T20 wrench, a 24mm socket and a special 13mm wrench for the brake lines.
The brake line nuts are usually very tight. When you try to unscrew them with a regular wrench, the edges of the nuts become crushed, so we recommend using special wrenches for brake pipes.
1. Disconnect the wire from the negative terminal of the battery.
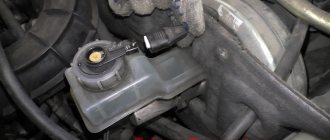
2. Disconnect the expansion tank from the mount and move it to the side without disconnecting the hoses from it or draining the coolant (see Replacing the master cylinder reservoir).
Removing the expansion tank is necessary to gain access to the supply hose of the clutch master cylinder and the right nut securing the brake master cylinder.
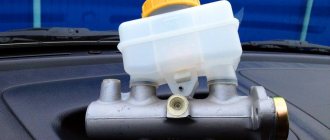
3. Unscrew the cap of the master cylinder reservoir and pump out the brake fluid from the reservoir, for example, with a large medical syringe. Install the plug to prevent dirt from entering the master cylinder reservoir.
4. Squeezing the clamps of the brake fluid level sensor wiring harness...
5. ...disconnect the wiring harness block from the sensor.
6. Pulling up the brake fluid level sensor wiring harness...
7. ...disconnect the harness from the tank.
8. Disconnect the hose from the reservoir to the clutch master cylinder.
Immediately after disconnecting the hose from the tank, plug its hole without lowering the hose down. There will be some working fluid left in the hose; after installing the reservoir and connecting the hose to it, there will be no need to remove air from the clutch release hydraulic drive.
On a vehicle with an automatic transmission, a spring-loaded plug is installed on the brake master cylinder reservoir fitting instead of a hose tip. There is no need to remove it unless necessary.
9. Unscrew the nuts securing the two pipelines to the cylinder...
10. ...and move the pipelines to the side.
Plug the lines in any way possible (for example, by placing protective bleeder caps on their ends) to prevent brake fluid from escaping.
11. Disconnect the wiring harness from the battery mounting shelf and move it to the side (see Removing and installing the battery mounting shelf).
It is necessary to disconnect the wiring harness because it makes it difficult to access the right brake master cylinder mounting nut.
12. Unscrew the left...
13. ...and the right nuts securing the main brake cylinder to the vacuum booster.
14. ...remove the nuts from the bolts securing the vacuum brake booster...
15. ...and remove the brake master cylinder complete with the reservoir.
16. If the new master cylinder does not have a reservoir or there is a need to replace the rubber connecting sleeves of the reservoir, remove the reservoir by unscrewing the screw securing it and removing its pipes from the connecting sleeves (see Replacing the master cylinder reservoir).
17. If during operation there was any leakage of brake fluid through the connecting bushings, remove the bushings from the holes in the cylinder body.
Reuse of connecting sleeves is not allowed; replace them with new ones.
18. Remove the rubber O-ring from the brake master cylinder body.
Replace the master cylinder sealing ring with a new one each time the connection is disassembled.
19. If during operation the brake fluid level sensor fails, to replace it, turn the sensor clockwise until it stops...
20. ...and remove the sensor from the tank.
21. Install the master brake cylinder and all removed parts in the reverse order of removal, fill in brake fluid and remove air from the system (see Bleeding the brake system hydraulic drive).
Removal process
- Remove the engine cover. Unscrew screw 3.
- Place the air filter housing aside. Remove the battery.
- Remove battery bracket arrows;
- Hang the battery bracket in front on the air duct. To protect against escaping brake fluid, simply place a lint-free cloth in the area under the master cylinder;
- Using the brake bleeder unit -VAS 5234- or the brake bleeder accessory kit -VAG 1869/4-, pump out as much brake fluid as possible from the brake fluid reservoir;
- Clamp the brake fluid supply hose to the clutch master cylinder using 25 mm hose clamps, (3094) ;
- Disconnect the clutch master cylinder hose;
- Disconnect the connector from the contact of the brake fluid level indicator;
- Unscrew brake lines 3 on the master brake cylinder, close the brake lines with plugs from the repair kit;
- Unscrew the mounting nuts 1 of the main brake cylinder. If present, remove the heat shield with holder. Remove the brake master cylinder from the brake booster. Disconnect the brake fluid reservoir from pos. 2 and remove it upwards.
How to replace the main brake cylinder on a VAZ 2110 with your own hands
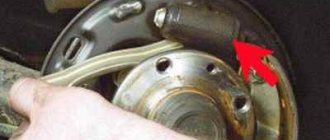
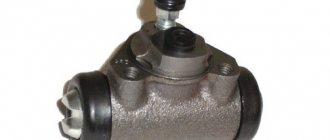
There always comes a time when some problems arise in the operation of a part. If the brakes fail during a trip, this means there is a danger for the driver and passengers. The brake wheel cylinder is a very important part of the entire brake system. It converts the pressure exerted by the fluid into a force that is exerted on the brake pads. Therefore, it is necessary to replace the master cylinder in time if irreparable problems arise with it.
When the driver brakes, he exerts an effect on the brake pedal, and in order for this effect to be realized, there is a part - a rod that acts on the piston of the main cylinder. It affects the brake fluid, which then affects the cylinders. During this process, special pistons press the brake pads against the discs (sometimes drums). The differences arise from different types of braking systems.
Below are instructions for replacing the master cylinder. She will help you make quality repairs with your own hands:
- reasons why the brakes failed;
- the ability to repair the brake master cylinder;
- tools necessary for work;
- replacing the main cylinder;
- its final removal;
- cylinder installation;
- improvement of the main brake cylinder.
Repair work
Disassembling, replacing or repairing the brake cylinder of a VAZ car is not particularly difficult. Having purchased the necessary repair kit for the working brake cylinder, unscrew the wheel and, having disconnected the pipes, remove the faulty cylinder (the dismantling diagram will be described in more detail below). For convenience, by holding the body in a vice and removing the boot, we gain access to the retaining ring that secures the piston, after removing which we remove all the working parts.
After disassembling the housing, you need to rinse everything with brake fluid and inspect the housing mirror for mechanical damage.
If no damage is found, then open the repair kit for the working brake cylinder and replace the faulty parts.
A prerequisite, regardless of their condition, is the replacement of all rubber parts included in the repair kit for the working brake cylinder. This list includes: boot, cuff, etc.
Reasons why the brakes might fail
Any problems during the braking process reduce its effectiveness, which can lead to dire consequences for everyone - the driver, passengers, and other road users.
Very often, problems arise simply because the driver uses low-quality brake fluid. If your car suddenly loses brakes, this may be due to several reasons, the main thing is not to blame the master cylinder for all the problems.
Below are the reasons why the brakes on a car fail:
- One of the main causes is usually a leaking slave cylinder. Gradually, slowly or quickly, all the contained liquid flows out of it.
- You should also check the level of brake fluid in the reservoir and the condition of the main brake.
- If traces of smudges are noticeable on the main brake, then this is the reason.
- Another possible cause of brake failure could be that the brake line is torn. For example, rubber brake hoses could fray, partially rot in some places, or get punctures.
- The working cylinders may have jammed;
If it is nevertheless noticed that the main brake cylinder is not working:
- it will show where traces of brake fluid leaks appeared;
- it will be impossible to press the brake pedal;
- on the contrary, the brake pedal can move on its own without the driver making any effort to do so.
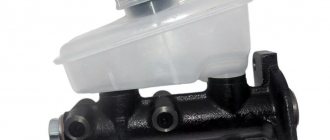
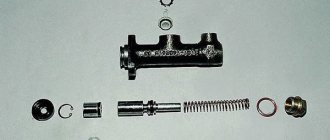
Master brake cylinder with reservoir: 1 — master cylinder body;
2 low pressure o-ring; 3 — drive piston of the “left front-right rear brake” circuit; 4 - spacer ring; 5 - high pressure sealing ring; 6 — pressure spring of the sealing ring; 7 — spring plate; 8 — piston return spring; 9 — washer; 10 — locking screw; 11 — drive piston of the “right front-left rear brake” circuit; 12 — connecting sleeve; 13 - tank; 14 - emergency brake fluid level sensor; A - gap.
Therefore, it is possible to repair the VAZ 2110 brake cylinder, but not always. Most often, if it leaks, a repair kit will help fix the problem and restore the cylinder’s functionality. If the internal mirror in the cylinder is damaged, then, unfortunately, nothing can be corrected, since grinding is prohibited. If everything is not so scary and repairs are possible, you can do it yourself, because the price of the repair kit is quite reasonable, and almost every motorist can afford it.
What tools are required to replace a brake master cylinder?
- key to 17;
- key to 10;
- half-liter bottle of brake fluid;
- syringe;
- brake fluid.
Brake master cylinder replacement process
- First you need to disconnect the brake fluid level sensor from the main brake cylinder.
- Unscrew the cap on the expansion tank.
- Using a syringe, pump out the liquid contained in the expansion tank.
- Disconnect the pipe from the brake system.
- Using a 10mm wrench, disconnect 4 tubes in series: 2 on each side.
- Bend these tubes so that when removing the brake cylinder they do not interfere with the process.
- Now you need to unscrew several screws with a Phillips screwdriver in order to get to the bolts securing the main cylinder and the brake booster (vacuum).
- Then you need to bend the upholstery so that 2 nuts are visible.
- Using a 17mm wrench, you need to unscrew these nuts and remove the main cylinder (remove directly with the tank);
- Remove the brake reservoir and install a new one in its place.
How to install the cylinder correctly:
- Before installation, the tank should be replaced;
- install the main cylinder in the reverse order described above;
- Take the pusher rod and place it exactly into the hole located in the main cylinder;
- Place the pusher rod on the 2 studs and tighten the fastening nuts tightly using a 17mm wrench;
- connect all pipes of the brake system pipeline;
Important! Don't tighten the pipes too much, as they will have to be loosened anyway to bleed the main brake, so it's best not to do extra work.
- after connecting all the pipes, you need to unscrew the cap from the reservoir and fill it with brake fluid;
- After that, install the trim back into the engine compartment, securing it with self-tapping screws. This completes the installation.
If you still have questions about removing and installing the brake master cylinder, I recommend that you familiarize yourself with this video:
After the cylinder is installed, it must be bled to improve its performance.
This can be done by following simple rules:
- find a partner who will help and seat him in the cabin;
- make how much pedal motion;
- hold down the pedal and, using a 10mm wrench, slightly unscrew the fitting of one of the brake system pipes;
- wait until the air and some brake fluid come out;
- Using a 10mm wrench, tighten the fitting;
- Now you can release the car pedal;
- repeat these steps until air bubbles come out of the fitting;
- perform this operation with all contours.
It is important to remember that you should always have brake fluid in the trunk as a reserve, you never know what happens on the road.
In this way, you can solve the problem with the brakes on the road yourself, without resorting to the help of specialists, it is only advisable to have a partner nearby.
How does the GTZ work?
The unit includes several important elements that need to be taken into account:
- a metal housing containing holes for supplying brake fluid;
- pistons with rubber seals (2 pcs.);
- return springs in the amount of two pieces;
- guide bushings;
- end cap with gasket.
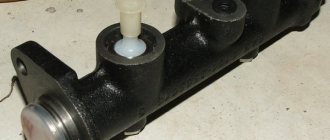
An expansion tank is attached to the top of the brake master cylinder body. Excess (we mean brake fluid) enters it through special compensation holes. And inside the element there are two cylinders equipped with separate pistons located within the same axis. In the cylinder, the blind end of the body part is closed using a plug (threaded). On the other side there is a flange that facilitates attachment to the amplifier from a vacuum.
How does GTZ work?
The functioning mechanism of a classic brake cylinder is as follows.
- When the car pedal is pressed, both pistons move forward. This allows all fluids to be pushed into the circuit tubes. When pressure is applied, the brake wheel cylinders are activated. They compress the pads on the discs.
- The liquid, or rather some part of it that did not have time to penetrate the tubes, flows into the expansion container through special through holes.
- When the driver releases the pedal, the springs push the pistons out in the reverse order. As a result, they acquire their original position. The liquid coming from the tubes and reservoir again ensures that the cylinder is filled.
- To compensate for the expansion that occurs with the brake fluid, the developers create several additional holes that lead to the expansion tank.
If you need to replace the brake master cylinder, you need to contact our company. We employ highly qualified craftsmen to replace this part, who will carry out the work as cheaply and accurately as possible.
Signs of problems
The main brake unit breaks down under the influence of several factors. And the malfunctions that he experiences are associated with certain symptoms.
- After the driver presses the brake (pedal), the car stops extremely slowly. The reason is that the cuffs lose their sealing properties.
- To slow down the vehicle, apply strong pressure to the brake pedal. This is due to the fact that the rubber elements and fastenings swell.
- The brake pedal has an extremely short travel. This leads to the fact that the liquid inside the cylinder cannot escape anywhere. This leads to breakdowns, as well as the need to replace the unit.
- The brake pedal falls. This indicates that the brake seals are completely worn out. As a result, the liquid is forced to penetrate beyond the piston area and rush into the tank.
- The pads cannot release the brake drums and discs, and during movement they heat up. The piston is probably stuck, or the brake passage is clogged.
Replacement measures are carried out by our specialists in compliance with all safety standards and regulations. We carry out work on any makes and models of cars, including VAZ, Ford Focus 2, etc. If necessary, we can unscrew other nuts of the brake system, cylinder, hoses, and also check the condition of the brakes in general. You will be offered a personal assistant who will check the brakes, as a result, the braking system will function at its best.
We are located in the Chertanovo-Southern Administrative District, so you can get there from the north or south. Nearby is the Prazhskaya metro station and Varshavskoe highway.
Main brake cylinder VAZ 2101
The central unit of the brake system of the VAZ 2101, like any other classic Zhiguli model, is the master brake cylinder (MBC). Due to this element, the force applied to the brake pedal is converted into hydraulic pressure in the system. We will consider the purpose, functions, malfunctions and repair work of this mechanism in more detail.
Purpose and functions
When you press the brake pedal, the GTZ pistons begin to move and compress the brake fluid, increasing its pressure. Under the influence of fluid, the brake wheel cylinders (BWC) are activated. From them come pistons that press the pads against the brake discs (front) and drums (rear). The essence of the GTZ operation is that brake fluid under pressure transmits force from the controls to the working elements.
The master cylinder has two main functions:
- transmit mechanical action from the pedal to the wheel cylinders;
- ensure effective braking of the vehicle.
The VAZ 2101 is equipped with a GTZ, consisting of two sections, i.e., designed to work with a dual-circuit braking system. In cars with rear-wheel drive, one circuit is dedicated to the front brakes, and the second to the rear brakes. This design is convenient in that if problems arise with one of the circuits, the second will remain operational and the car can be stopped, albeit with less efficiency. The GTZ on the “penny” is located in the engine compartment next to the reservoir into which the brake fluid is poured.
Principle of operation
The main parts of the master cylinder are:
- frame;
- tank (reservoir) of the GTZ;
- piston (2 pcs.);
- return springs;
- sealing cuffs.
Brake fluid from the expansion tank is supplied to the mechanism from above via hoses. Structurally, the main distributor is divided into 2 cylinders, each of which has its own piston. A threaded plug is installed at the end facing the front of the car. On the opposite side there is a flange through which the GTZ is attached to the pedal assembly. The force from the brake pedal is applied to the first piston through the rod, and fluid is supplied to the RTC through the corresponding tubes.
The main hydraulic cylinder functions as follows:
- When the pedal is pressed, the pistons of the main cylinder begin to move and push fluid through the circuit tubes. Under fluid pressure, the wheel cylinders are activated, affecting the brake pads.
- Part of the liquid that did not have time to get into the tubes returns to the tank through special holes.
- When the driver releases the pedal, the pistons return to their original position under the force of the return springs. The liquid from the tubes and reservoir returns to the GTZ.
Video: how the master cylinder works
Which GTZ is better
When you need to replace a gas turbine engine, you have to think about which manufacturer to give preference to. Based on the practical experience of many owners of the VAZ 2101 and other “classics”, the best option is to install a standard part from AvtoVAZ with catalog number 2101–350–500–8. Other manufacturers include:
Cylinders from the Italian brand LPR are somewhat popular, as evidenced by numerous reviews from car enthusiasts. However, the cost of such a mechanism is slightly higher than the factory one. So, buying an AvtoVAZ GTZ will cost 750 rubles, and for LPR you will have to pay about 900 rubles. In each specific case, the choice depends on your personal preferences and financial capabilities.
What needs to be done to maintain full functionality of the stopping system
A week later, or after completing a run of 500 km.
IntroductionPurpose, design, principle of operation of the brake system of the VAZ 2112
1. Checking the pressure indicators in the wheels.
2. Diagnostics of the level and condition of the working mixture in the brake system.
As you know, the mixture has an important role in the system. The use of low-quality or used fluid leads to premature wear of the components of the shutdown system.
3. Diagnosis of the sensitivity of the brake pedal and checking the smoothness of its movement.
4. Diagnostics of the performance of brake lights and warning lamps.
1. Diagnostics of front brake axle components.
2. Checking the tightness of the system conductors.
Every year or after completing 20,000 km.
1. Diagnostics of the rear brake axle.
2. Diagnostics of the brake pedal bracket and check of the working bushings.
3. Thorough diagnostics of the condition of the working fluid in the system. Replace brake fluid when used.
After two years or after completing a mileage of 50,000 km.
GTZ as part of a car
1. Forced replacement of the working mixture.
2. Diagnosis of GTZ. During the inspection, it is necessary to examine the system element for leaks and seal failures.
After five years or 120,000 km.
1. Repair of the GTZ, overhaul of calipers and wheel cylinders.
During the operation of the vehicle, it is also necessary to pay due attention to the condition of the discs and pads. Pads must be changed if the maximum permissible wear is exceeded
The level of permissible wear is indicated by the manufacturer of certain pads.
In this article we will take a closer look at one of the most important stages of brake system maintenance - replacing and bleeding the master cylinder. But, first, let’s get acquainted with the structure and operating principle of this element, as well as its purpose in a vehicle.
The main role of the GTZ in the vehicle system is the conversion of the energy placed by the motorist on the brake pedal.
GTZ malfunctions
The VAZ 2101 brake system has many parts that can fail due to wear, poor quality or untimely maintenance. The following characteristic symptoms of problems can be identified:
- slow stopping of the vehicle after pressing the brake pedal. One of the reasons is that the lip seals of the pistons have become unusable, which led to a loss of tightness;
- high pedal effort. This problem appears when the cuffs increase in size, for example, when installing a low-quality repair kit;
- The brake pedal has a short stroke. The working environment, i.e. the brake fluid, has nowhere to go due to the fact that the compensation hole is clogged. In addition, the canal may be blocked by swollen cuffs;
- The car only brakes when the pedal is pressed to the floor. This indicates a complete failure of the lip seals when the liquid goes into the tank and not into the system;
- Brake pads do not move away from the discs and drums, causing them to become hot while driving. The reason lies in the jamming of one of the pistons or the formation of a blockage in the bypass hole.
These symptoms may also appear in the event of problems with other parts of the braking system . For example, a pedal may fail if there is no fluid in one of the wheel cylinders or if air gets into the system. Therefore, for a final diagnosis, it is necessary to pay attention to additional features of the car’s behavior. For example, there are certain signs that clearly indicate problems with other components of the brake system, and not with the GTZ:
- pulling the car to the side when braking;
- jamming of the brake mechanisms on one of the wheels;
- the appearance of sounds uncharacteristic of normal brake operation (creaking, squeaking, grinding);
- heating of brake pads or discs on one wheel.
Checking the brake master cylinder
The most common cause of GTZ problems is wear of the seals. When replacing cuffs, you need to take into account that repairs only make sense if the piston and cylinder walls do not have wear. Otherwise, replacing the rubber seals will not bring any results and soon you will still have to install a new part. Before you start checking the main hydraulic brake drive, you should make sure that there are no problems with other elements of the system:
- Inspect the wheels from the inner surface to identify any leaks of brake fluid from the brake fluid brake system.
- Check the integrity of the tank and hoses connecting it to the gas turbine engine, as well as the presence of fluid and its level.
A clear sign that there is a problem with the master cylinder is the appearance of liquid on the unit body . A working mechanism should always be dry without a hint of leakage. If the hydraulic drive has lost its seal, it must be dismantled for further disassembly and repair. You can determine that the gas turbine engine bypasses fluid, i.e., it does not enter the system, but returns to the expansion tank when you press the pedal:
- Open the tank lid.
- An assistant is seated in the driver's seat. The engine does not start.
- Your partner presses the brake pedal, and you listen to the sounds coming from the reservoir.
- If gurgling is heard from the container, and the pedal is pressed lightly, it means that the liquid is entering the tank instead of the system. The malfunction lies in the wear of the seals, which are unable to create the necessary pressure in the cylinder circuits.
Malfunctions and methods for diagnosing a hydraulic cylinder
Checking the brake system in general and the GTZ in particular is performed when characteristic signs appear:
- the red lamp for insufficient brake fluid level came on on the instrument panel;
- the free play of the pedal has increased greatly or it openly fails;
- to slow down the car you have to press the pedal hard;
- uneven braking - the car pulls to the side when pressed sharply;
- the vehicle slows down with difficulty, the pedal presses to the floor.
The easiest way to diagnose hydraulic cylinder problems is to carefully inspect it for leaks. Usually the liquid is visible on the vacuum booster housing or on the side member under the turbocharger. If the expansion tank is intact, you need to remove and repair the master cylinder.
How to quickly and accurately identify a faulty turbocharger without checking other elements of the system:
- Using a 10 mm wrench, unscrew the brake pipes of all circuits one by one, screwing plugs in their place - M8 x 1 bolts.
- Also plug the removed ends of the tubes with caps or wooden wedges.
- Sit behind the wheel and apply the brake several times. If the hydraulic cylinder is working properly, after 2-3 pumping the chambers will be filled with liquid from the tank and the pedal will stop pressing.
On a problematic GTZ, the o-rings (cuffs) will begin to leak fluid back into the reservoir, and the pedal failures will not stop. To make sure the breakdown is complete, unscrew the 2 flange nuts of the cylinder and move it away from the vacuum booster - liquid will flow out of the hole.
It happens that the cuffs of the second chamber become limp, but the rings of the first section remain operational. Then during the diagnostic process the pedal will fall slower. Remember, a working turbocharger will not allow you to press the pedal more than 3 times and will not allow it to fail, since there is nowhere for the fluid to escape from the chambers.
Repair of GTZ VAZ 2101
There are two ways to restore the operation of the hydraulic cylinder:
- repair the old mechanism;
- install a new product.
Many car owners, when problems arise with the GTZ, simply replace it with a new one. However, there are those who prefer to save money and install a repair kit, doing the repairs themselves. The cost of such a kit is about 100 rubles.
Removal
To dismantle the mechanism you will need the following list of tools:
- open-end and ring wrenches in sizes 10, 13 and 22 mm;
- wrench for loosening brake pipes;
- small flat-tip screwdriver;
- pliers for retaining rings;
- syringe or medical bulb;
- a lot of rags.
The GTZ is removed in the following order:
- Use a syringe to pump out the liquid from the expansion tank.
- Using a wrench, unscrew the brake pipe fittings from the hydraulic cylinder.
Disassembly
To repair the GTZ, we disassemble it as follows:
- Use a screwdriver to tighten the boot, which is located on the flange on the side of the mounting holes.
Before installing pistons with new seals, it is recommended to lubricate the inner surface of the hydraulic cylinder, as well as the cuffs themselves, with brake fluid.
Video: replacing the GTZ repair kit on a “classic”
One day I had to change the lip seals on the rear wheel cylinder because fluid started leaking from it. I purchased a repair kit in advance in the hope that the repair would not cause much trouble. Everything would be fine, but when I disassembled the cylinder, removed the old seal and tried to install a new cuff from the repair kit, it simply tore. The element looked more like a product made of fragile rubber. There were 4 seals in the repair kit and all of them turned out to be unsuitable for use. My repair ended with installing the old cuff on the piston, since the nearest store was quite far away. Surprisingly, this brake cylinder still works today without leaking fluid or replacing the seal.
Repair and replacement instructions
Problems with the main hydraulic cylinder can be resolved in two ways:
- Disassembling, cleaning the unit and installing new seals from the repair kit.
- Replacement of the GTZ.
As a rule, Zhiguli owners choose the second path. The reasons are the poor quality of the new cuffs and the deterioration of the inner walls of the cylinder, which is why the malfunction recurs 2-3 weeks after replacing the rings. The probability of failure of the GTZ with parts from the repair kit is approximately 50%; in other cases, the repair ends successfully.
On my VAZ 2106, which has an identical hydraulic cylinder, I have repeatedly tried to change the cuffs in order to save money. The result is disappointing - the first time the pedal failed after 3 weeks, the second time - after 4 months. If you add up the fluid losses and the time spent, you will get a full replacement of the gas turbine engine.
Bleeding the brakes
After repairing the GTZ or RTC, as well as replacing the fluid, brake hoses or pipes, the brakes need to be bled. The essence of the event is to remove air from the braking system. For this procedure you will need:
- 8 (10) mm key;
- silicone transparent tube according to the diameter of the fitting;
- capacity;
- brake fluid.
All classic Zhiguli models use DOT-3 or DOT-4 brake fluid. Its volume in the “penny” hydraulic drive system is 0.66 liters. It is more convenient to bleed the system with a partner.
You need to start pumping the brakes from the right rear wheel . The process consists of the following steps:
- We install the machine on an overpass or inspection hole.
- Unscrew the filler plug of the expansion tank and check the fluid level. If necessary, bring it to the mark on the tank.
If the brakes are pumped correctly and there is no air left in the system, the pedal should feel tight when pressed and braking should be effective.
Video: how to bleed the brake system on a “classic”
I have repeatedly had to bleed the brakes alone, because there is not always an assistant available, for example, if a breakdown occurred on the road. For such situations, I always carry an expansion tank cap with a valve from a tubeless tire in stock. To make such a simple device, just drill a hole in the lid and insert a valve into it. When it becomes necessary to bleed the brakes, I screw this cap onto the reservoir. Using a piece of hose, I connect the valve to the spare wheel, having first unscrewed the valve valve from it. This creates pressure in the tank. Then I bleed the brakes according to the above scheme, ensuring that all air leaves the system, not forgetting to control the fluid level. I bleed the clutch in a similar way.
If there is a problem with the master brake cylinder, as evidenced by characteristic signs, the part needs to be diagnosed and subsequently repaired. If the unit has severe wear, then the problem can only be solved by completely replacing it. To carry out repair work, it is not necessary to visit a service station. It is enough to prepare the necessary list of tools and materials, read the step-by-step instructions and follow them during the work.
2 1 vote
Article rating
Restoration of working cylinders
The feasibility of replacing the RC cuffs can only be checked during disassembly. If critical wear and other defects are discovered, there is no point in installing new seals. In practice, most drivers change the rear cylinders completely, and only the cuffs in the front calipers. The reason is obvious - the brake mechanisms of the front wheels are much more expensive than the rear wheel brakes.
Characteristic signs of a malfunction of the working cylinder are uneven braking, a decrease in the level in the expansion tank and wet spots on the inside of the hub.
To repair the DC, you will need the above tools, new o-rings and synthetic brake lubricant. The order of work when replacing the front caliper cuffs:
- Raise the desired side of the car with a jack and remove the wheel. Unlock and remove the pins and remove the pads.
- For convenience, turn the steering wheel all the way to the right or left, and use a 14 mm socket to unscrew the bolt that presses the brake circuit hose to the caliper. Plug the hole in the pipe to prevent liquid from leaking out.
It is not necessary to separate the cylinders from the body; this is done more for convenience. To lose a minimum of fluid during disassembly, use the “old-fashioned” trick: instead of the standard expansion tank plug, screw on the clutch reservoir cap, sealed with a plastic bag.
To change the rear brake seals, you will have to thoroughly disassemble the brake mechanism:
- Remove the wheel and rear brake drum by unscrewing the 2 guides with a 12 mm wrench.
If the brake fluid leaked as a result of a malfunction, clean and thoroughly wipe all parts of the brake mechanism before reassembling.
After installation, bleed off some of the liquid along with the air by pumping up the pressure in the circuit with the pedal and loosening the relief fitting. Do not forget to replenish the supply of working substance in the expansion tank.