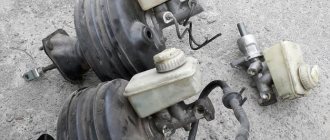
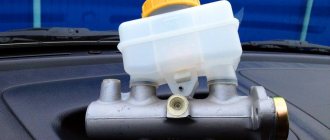
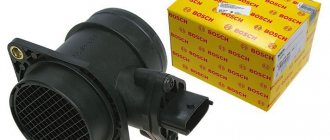
The brake system of the VAZ 2114 car contains a master brake cylinder (GTC). The main task of this unit is to convert force when the driver presses the brake pedal. The brake cylinder is located on the cover of the vacuum booster, and above it is the brake fluid reservoir. Like any other part, the GTZ can be damaged and fail. To replace it, you don’t have to go to a car service; you can do this work yourself.
Symptoms of a GTZ malfunction
When the device fails, the driver may notice the following signs:
- Reduced efficiency when braking.
- Depressurization of the brake system.
- Wear of seals.
You can check the performance of the master cylinder in a simple way - with the engine off, you need to hold down the brake pedal. After this, the VAZ 2114 should be started, leaving your foot on the pedal. If it fails, then the system is working properly. In another case, diagnostics and sometimes restoration of the tightness of the connection are required. Of course, you can use a repair kit, but then the parts will wear unevenly. The best solution would be to completely replace the unit.
IMPORTANT! Malfunctions of the master cylinder can also negatively affect the operation of the power plant. This manifests itself in a decrease in dynamics, fluid leaks, and also in a decrease in acceleration. In this case, experienced motorists clamp the vacuum hose while the engine is running. If after this there are signs, then it is necessary to change the brake booster.
Examination
You should make sure that the master cylinder is the culprit for the malfunction of the brake system. This is easy to do; you don’t even have to go to a service center and spend money on it.
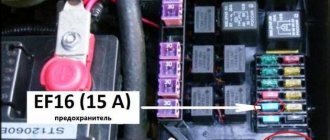
Unit location
- Press the brake pedal with the power unit off.
- Start the engine without taking your foot off the gas pedal.
- During normal operation, the gas turbine engine fails under the influence of vacuum.
- If the pedal does not fail, you will need to conduct more thorough diagnostics and restore the device to functionality.
Required tools and materials
Replacing the master cylinder should only begin if the necessary tools and materials are on hand. It's worth starting with the tools:
- Pliers.
- Head on "18".
- Keys for "17", "13" and "10".
- Metal brush.
- Device for removing fittings.
- Tool for tensioning springs.
As for materials, these include only liquid for the system.
Of course, it is worth purchasing a new brake unit. An oilcloth or other clean covering should be laid out near the work area. Parts should be placed there during the process. The unit must be purchased directly for the VAZ 2114, since there are differences with the 2109 and 2111.
The process of replacing the turbocharger and brake fluid
When the tools, new mechanism and fluid are prepared, you can begin dismantling the old VAZ 2114 spare part:
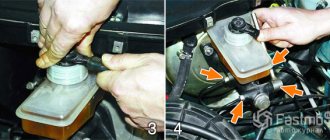
- The first step is to disconnect the negative terminal from the battery. Replacing the master cylinder involves completely removing the old brake fluid - this is best done with a syringe;
Advice! When assembling the system, motorists often confuse brake pipes. To make your work easier, it is recommended to sign them with a marker. This applies to any parts in the VAZ 2114 car.
- Once the threads have been removed, dismantling the main unit can begin. Using the “18” socket, you need to remove the nuts that attach the main cylinder to the amplifier;
The vacuum booster may also need to be replaced. In this case, remove the fitting and turn the main unit to the side. After this, you need to unscrew the hose and go into the interior of the VAZ 2114 car, where the pin locking bracket is located. After removing all the fasteners, you can install a new fluid pressure booster.
Vehicles include a large number of elements that ensure full operation. Needless to say, among such systems there are no insignificant ones. Especially when it comes to the braking system, which directly ensures driver safety.
The main brake cylinder can easily be called a key part in the brake hydraulic drive circuit. Therefore, they try to make the GTZ as reliable as possible. And yet, malfunctions can only be prevented by timely prevention, since without maintenance, sooner or later any system in a car stops working.
What is a brake master cylinder and what is it for?
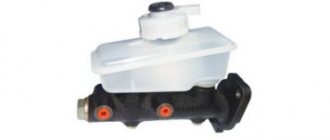
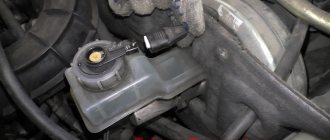
Brake master cylinder and reservoir.
Braking is accomplished by pressing the pads against the disc. This is done by pistons that are driven by a hydraulic system containing brake fluid. However, for brake mechanics to work, pressure must be somehow transmitted by pressing the pedal. For this purpose, a master brake cylinder is needed, which transmits the mechanical action of the driver to the hydraulic system through a booster.
Considering the importance of the part, they try to make it as reliable as possible. But even greater reliability can only be ensured by an additional system, which is why all modern cars have a two-section GTZ. Each section serves an independent circuit, which, in the event of a breakdown of the first, will be duplicated, although with less efficiency.
The circuits can be connected in the following ways:
- Parallel (4+2). One circuit is used for all wheels and has insurance on the front ones.
- Parallel (2+2). One circuit is responsible for the front wheels, the second - for the rear.
- Diagonal (2+2). Each circuit operates on one front and one rear wheel diagonally.
As a rule, a diagonal system is used in front-wheel drive cars, and a parallel 2+2 in rear-wheel drive cars.
Purpose of the GTZ in a car
Braking begins by pressing the pedal. For now, there is no need to consider all sorts of smart driver assistance systems that work great even without his participation.
The maximum that will support the foot of a person who wants to slow down the car is a vacuum brake booster (VBS), located between the pedal assembly and the first hydraulic device in the chain ending with the brake pads.
The combined action of muscular force and the atmosphere through the VUT membrane should increase the pressure in the entire hydraulic system. If the valves and pumps of the ABS system do not interfere, then this pressure is the same at any point.
Fluids are incompressible, which is why they are used in passenger car brakes. Before this, no less incompressible solids were used in the form of rods and cables to drive the pads of the first machines.
The pressure is directly created by the piston of the main brake cylinder (MBC). Due to incompressibility, it increases very quickly; every driver felt the pedal harden under his foot after selecting its free stroke.
Relieving pressure after releasing the pedal and replenishing the lines with liquid when required are also functions of the GTZ.
How does a brake master cylinder work?
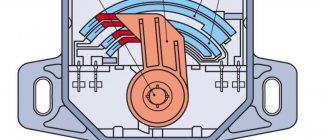
The structure of the main brake cylinder: 1 - Housing with compensation holes; 2-3 - Circuit drive piston; 4 - Spacer washer; 5. Rod;
To make it easier for the driver to brake comfortably and confidently, in modern cars the pressure on the pedal is transmitted through a brake booster, often a vacuum one. Often the brake master cylinder is mounted on the booster cover, forming a single unit with it. In this case, a compensation tank is located above the cylinder, which contains a reserve of brake fluid, which can be useful in case of minor leaks or natural evaporation.
The rod coming from the vacuum booster rests against the double piston. Since the pistons are located on the same axis, the force of the rod moves them simultaneously, allowing pressure to be created in two circuits at once. At the same time, liquid also enters the compartments expanding behind the working cavities from the tank. This will avoid vacuum in the circuits, which can occur if the pedal is released abruptly. Having removed the force on the rod, the piston is returned by springs to its original position, after which the pressure in the cylinder is equalized.
Device
The GTZ includes:
- a housing with fittings supplying fluid from the supply tank and discharging it to the lines of the working cylinders;
- pistons of the primary and secondary circuits;
- sealing rubber cuffs located in the piston grooves;
- return springs that compress when the pistons move;
- a boot covering the entry point of the rod from the VUT or pedal into the recess on the back side of the first piston;
- a screw plug that closes the cylinder from the end, by unscrewing which you can assemble or disassemble the cylinder.
Compensation holes are located in the upper part of the cylinder body; they can overlap when the pistons move, separating the high-pressure cavity and the supply tank with a supply of liquid.
On the subject: What is a brake caliper and how does it work (types, device, repair)
The tank itself is usually attached directly to the cylinder through sealing collars, although it can be moved to another location under the hood, and the connection is made through low-pressure hoses.
Signs of a faulty master cylinder
Cars are often equipped with pressure sensors that can detect a drop in pressure in the circuit. They will notify the driver of problems on the dashboard. Still, it would be useful to find out the symptoms of certain brake system malfunctions, since the causes may be different.
First, let's look at the symptoms that do not indicate a broken cylinder:
- Pull to the side when braking;
- Creaks when braking;
- Heating the pads on a specific wheel.
All this may indicate problems with the wheels, circuits, or jammed pads. Leaks from the working cylinders may also occur, there may be problems in the vacuum booster, or the integrity of the compensation tank may be compromised. Increased pedal travel may indicate pad wear.
As for the GTZ, its main problems are:
- wear of cuffs, gaskets and seals;
- using low-quality brake fluid;
- small particles such as shavings or grains of sand getting into the hydraulics;
- leakage from connecting joints.
Signs of a faulty brake cylinder include the following:
- Slow braking. This may indicate a loss of sealing of the cuffs.
- Great force when pressing the pedal. Often caused by swelling of the rubber in the piston seals.
- Short brake pedal travel. It speaks of a clogged compensation hole due to which the fluid in the cylinder has nowhere to go. Sometimes the hole is blocked by swollen seals.
- The pedal falls towards the end of its stroke. This indicates wear on the cuffs, which leads to fluid flowing behind the piston.
- The pads continue to hold the discs. There may be a piston wedge or a blockage in the bypass hole.
How to check the brake master cylinder
Car maintenance and diagnostics include checking the brake fluid level every week: if it drops sharply, you can judge about leaks. In addition, it is important to change it in a timely manner, since over time the quality of the fluid deteriorates, which leads to premature wear of parts. It is also worth paying attention to compatibility with the cuffs, as some auto chemicals can damage them. And, of course, you should promptly change all rubber seals, paying attention to the service life declared by the manufacturer. It would be optimal to resort to a repair kit with all rubber bands every 100 thousand km, and it is better not to skimp on the quality of components.
If symptoms of a gas turbine engine malfunction appear, it is advisable to check it, and you need to start with a visual inspection. If, when inspecting the housing, drops of brake fluid are found, the hydraulic cylinder should be removed to look for a leak problem. Also common problems include fluid flowing through the seals, which is easy to check: if gurgling is heard from the reservoir when you press the pedal, the seals must be replaced. And, of course, special attention should be paid to the behavior of the pedal: as already noted, a short stroke or dips may indicate the need to clean the cylinder and replace all rubber elements. The best way to judge their condition is by dismantling the part and disassembling it: sometimes, in addition to minor damage to the gaskets, you can also find a crack in the cylinder itself. In this case, the entire part will have to be replaced.
FAQ
When the engine is running, the pedal slowly sinks to the floor with constant force, is it necessary to change the turbocharger?
Smooth subsidence of the pedal is a frequent sign of leaking GTZ seals. In this case, it is possible to repair the part by installing new cuffs from the repair kit.
Brake fluid leaves the reservoir, but then appears, is it the GTZ?
Changes in the level of brake fluid in the reservoir are not necessarily a sign of a breakdown of the turbocharger. The fuel fluid can also either go down or rise due to airing, boiling due to overheating of the pads, or jamming of the actuator cylinders.
Does it make sense to install a repair kit or is it better to replace the GTZ?
It makes sense to install a repair kit when only the rubber parts are worn out. If the piston is severely worn or the housing is damaged, it is better to replace the entire turbocharger.
Video on the topic
Increased brake pedal travel
1. Leakage of brake fluid from the wheel cylinders
1. Replace failed parts of the wheel cylinders, wash and dry the pads, discs and drums, bleed the hydraulic drive system
2. Air in the brake system
2. Bleed the system
3. Damaged rubber O-rings in the master cylinder
3. Replace the rings and bleed the system
4. Damaged rubber hoses for hydraulic brakes
4. Replace hoses and bleed the system
5. Increased runout of the brake disc (more than 0.15 mm)
5. Sand the disc; if the disc thickness is less than 10.8 mm, replace it
6. Fluid leakage through the O-rings of the pressure regulator pusher
6. Replace O-rings
Insufficient braking performance
1. Oiling the brake pad linings of Lada Samara 2
1. Clean the pads with a wire brush using warm water and detergent. Eliminate the cause of fluid or grease getting on the brake pads
2. Jamming of pistons in wheel cylinders
2. Eliminate the causes of jamming, replace damaged parts, bleed the system
3. Complete wear of the brake pads
3. Replace brake pads
4. Overheating of brake mechanisms
4. Stop immediately and let the brakes cool down.
5. Using pads with mismatched linings
5. Use only pads recommended by the manufacturer
6. Incorrect pressure regulator adjustment
6. Adjust the pressure regulator drive