On cars of the “classic” series, the installation of power steering was not provided. All of these machines use steering gears. And the electric power steering on the VAZ-2107 is a good tuning element. While driving on the highway, driving is very simple, the steering wheel rotates effortlessly. But as soon as you slow down and maneuver in a parking lot, it becomes more and more difficult to turn the steering wheel.
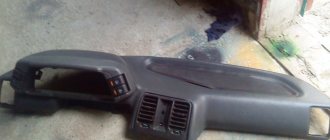
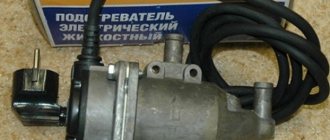
It is precisely in order to facilitate maneuvering at low speeds that it is necessary to install electric power steering on the VAZ-2107. This is a separate unit that is mounted in the steering column. Its installation and connection will not take much time. For installation you will only need a set of keys, an electric booster kit with all fasteners and wiring, and a drill.
Advantages of using an electric booster
“Classic” cars can easily be fitted with Priora electric power steering. But for this you will have to additionally buy a plate and a cardan. Tasks that the EUR copes with:
- Increasing the level of safety, comfort and ease of driving.
- Easier control during maneuvering. This is especially useful for women, the elderly, and novice drivers who find it difficult to turn a stiff steering wheel.
- The electric amplifier acts as a tuning element.
But even if you have been driving for many years, you are unlikely to be able to refuse such an improvement to your car. After all, installing electric power steering will make driving on city streets easier.
Why not hydraulic?
There are two types of power steering:
- Electromechanical.
- Hydraulic.
When the hydraulic power steering operates, high oil pressure is created in the system. The design of the hydraulic booster consists of supply pipes, a pump, a special reservoir and working fluid. The pump creates oil pressure, which affects the entire mechanism, making it much easier to turn the wheels.
Therefore, turning the steering wheel will be much easier. In general, the design of a hydraulic booster is very complex, installation takes a long time, and all mechanisms need to be regularly maintained. Only in this case will the hydraulic booster work perfectly.
If the car does not have a hydraulic booster installed, it is very difficult to install it. You will have to purchase additional parts, as well as make very serious changes to the steering mechanism. It is for this reason that it is not advisable to install a hydraulic booster on the “seven”.
Electric amplifier
It has one big advantage - the cost is almost half that of a hydraulic booster. Installing the device on the “seven” is very simple, there will be no difficulties. When using an electric amplifier, there is no need to carry out a technical inspection; it is very reliable and durable.
Unlike a hydraulic booster, normal operation does not require refilling fluid or maintaining the pump and pipelines in working condition. You just need to connect the device to the car's electrical wiring. It is for these reasons that this power steering design is installed on “classic” series cars.
Equipment
Without modifications, you can install the Priora’s electric power steering on the “seven”. Products manufactured by are used with the same success. Device contents:
- Directly electric amplifier.
- Intermediate cardan shaft.
- Fasteners.
- Wiring.
- Brackets for fastening the electric power steering on the steering wheel of the “seven”.
- Decorative plait.
When purchasing, be sure to check the equipment included with the device. If some item is not in the box, you must immediately inform the seller about it. Otherwise, problems will arise during installation.
How does an electric booster work?
The electric power steering on the VAZ-2107 starts to work and creates additional torque, which reduces the force required to turn the wheels. Moreover, it begins to work simultaneously with the driver turning the steering wheel. The device is able to reduce the load required to turn the steering wheel by 5.7 times.
In other words, if you applied a force of 20 kg before installing the device, then after that only 3.5 kg will be enough for a similar action. Stages of device operation:
- Using a torque sensor, it is determined in which direction the driver rotates the steering wheel.
- The control unit allows you to read all data related to engine speed and vehicle speed.
- Using an electric motor, the propeller shaft of the steering mechanism rotates. As a result, the force required to turn the steering wheel is reduced.
Using a speed sensor, a normal relationship is ensured between the gain of the device and the intensity of vehicle traffic. If the speed is low, it becomes harder to turn the steering wheel. Therefore, the control unit understands that the gain needs to be increased. Conversely, if you are moving at high speed, then you need to apply less force. Therefore, the electric power steering is not involved in steering.
The device starts operating 5 seconds after the driver turns on the ignition. If suddenly any breakdown occurs in the electric amplifier, the automatic control system will turn it off, as a result the car will be switched to manual mode. This ensures 100% safety in case the device suddenly breaks down. Therefore, you don’t have to worry about the safety of your life.
Simpler, but even more expensive: what breaks in steering racks with electric power steering, and how they are repaired
Features of work
Before we start talking about the types of electric amplifiers and their characteristic problems, let's say a few words about the algorithm of their operation.
Immediately after starting the engine, a self-diagnosis of the system is performed to confirm its functionality. In the neutral position, the electric motor does not work: the entire system is waiting for active action. As soon as you start turning the steering wheel, the signal from the steering angle and torque sensor goes to the ECU, which in turn gives a command to the electric motor, which makes your life easier. Moreover, the nature of the operation of the electric booster will be different depending on the speed of the car: in this way, progressive operation of the electric power steering is achieved. After going through a turn and gradually removing force from the steering wheel, the system will return the wheels to the neutral position.
Articles / Practice Expensive and difficult: what breaks in steering racks with power steering, and how they are repaired A rack and pinion steering mechanism with an integrated power steering system or, more simply put, a rack with power steering is something that the owner of any vehicle hopes to avoid repairing… 38787 0 5 01/25/2017
Surely, owners of front-wheel drive cars with a transverse engine have noticed how the car pulls a little to the side during an active start. This is due to the different lengths of the drive shafts on the right and left sides. So, models with electric power steering can also steer the wheels a little, thereby compensating for the slip. In general, the force on the steering wheel is completely under the control of the EUR - and therefore it is on its conscience that the “emptiness of the steering wheel” and the “artificial force” that is so often talked about and about which numerous journalists complain.
What are electric amplifiers?
These systems are divided primarily according to the location of the power unit (electric motor): on the steering column (almost under the steering wheel) or on the steering rack. In the first case, the steering mechanism will be the most common, for example, as in a V8 or Nissan Micra, and in the second, an electric motor or drive is integrated into the design. Today, in practice, we will look at a more interesting option with a rail-mounted amplifier.
On the steering mechanism itself, the electric motor can be installed in different ways - either separately, or as part of the body of this steering mechanism. There is also a distinction between the type of rack rod drive: an additional gear or a movable screw-nut connection.
1 / 3
2 / 3
3 / 3
In the latter case, the electric motor can transmit rotation through a belt drive, or the drive can be direct (as in Lexus GS racks).
To understand when and how much it is necessary to “help” the driver turn the steering wheel, the system uses data from several sensors - a torque sensor on the steering gear shaft, a steering wheel position sensor, a crankshaft speed sensor and wheel speed sensors. The only sensor that relates directly to the power steering system is the torque sensor.
More about the device
Now let's look at three different designs: rack-and-pinion steering, parallel-drive racks, and direct-drive racks. Each of them has its pros and cons – now we will outline which ones.
Racks with an additional gear incorporate an electric motor that rotates a gear through a worm gear, very similar to the one we rotate through the steering shaft. In this case, on the rack itself there are two notches of teeth. Everything about this design is not bad, but the friction losses are high: after all, it is a worm gear. With this design, the electric motor often has its own housing.
Parallel drive racks are the name given to a mechanism in which rotation from an electric motor is transmitted through a belt to a nut, or, more precisely, to a “screw-nut” pair.
The screw here is a rod with a thread on one side and a serration of teeth on the other.
Between the nut and the screw there are balls through which rotation is transmitted - they also act as a bearing. It works like this: when you start turning the steering wheel, an electric motor comes into action, rotating the nut in one direction or another, helping you turn the steering wheel.
Direct drive racks are a third option in which the steering rack housing is partly an electric motor housing, and the rack rod runs inside it. The rotation from the electric motor is transmitted through the already familiar “screw-nut” pair.
So, these are the main types of structures. Communication with the service technician allowed us to find out another important feature: there is a fundamental difference between Japanese and European slats. The Japanese “hide” the electric power steering control unit away from the steering mechanism itself - as a result, a long trail of wires stretches to the electric motor for control, communication and diagnostics. Europeans mount the control unit next to the electric motor or directly on it.
It’s hard to say which approach is correct. In the case of the “Japanese”, in order to remove the entire system, you need to pull out several meters of wiring and find the control unit itself - but in this case the unit is safe. With a European rail there will be no problems in terms of dismantling: disconnect two or three connectors, unscrew a couple of fastening bolts - and that’s it. However, the control unit in such a scheme is subject to various external influences.
Primary diagnosis
The initial diagnosis of a car arriving at the service area is based on data received from the car owner: for example, a constant knocking noise or only when turning, a biting steering wheel, uneven force on the steering wheel or its absence. Based on this, the rail is dismantled and connected to a special stand (ours is MSG MS561) and errors are read. Using the stand, they simulate the operation of the engine in various modes and study the operation of the steering mechanism in more detail. This is done to localize the fault and understand whether the problem lies in the hardware or in the electrics.
1 / 5
2 / 5
3 / 5
4 / 5
5 / 5
In order about the problems
First, let's talk about the mechanical part of the system. Everything here is the same as with other slats: almost any problem is associated with the rupture of the slats’ boots and the ingress of water and dirt into it. Water means inevitable corrosion, and dirt means excessive wear of rubbing surfaces.
Wear of the side bushing is perhaps the most harmless thing that can happen to the rack rod. Washing out the lubricant from the screw-nut pair can lead to the pair biting or even jamming of the steering mechanism in one position.
In parallel drive mechanisms, moisture entering the belt leads to a sharp increase in its wear and, ultimately, rupture. A sharply increased force on the steering wheel is what the driver feels in this case.
It is rare, but it happens that due to moisture, the bearing of the electric motor is corroded - then you will hear the frantic howling of the latter during operation.
Wear in the gearing of the pinion shaft and rack rod is also a potential cause of boot rupture. But here you can try to cure the disease by tightening the rod stop.
When inquiring from the mechanic about the effect of water on the electric motor, if the drive is direct, we learned that there cannot be any special problems with the motor itself - good insulation of the wires does its job.
Having dealt with the mechanics, we move on to the “source of power” - the electrical part. There are not many potential problems here, but almost all of them are associated with significant costs.
For example, if the electronic system control unit is installed on a rail, it is often not protected in any way, so a pebble flying from somewhere can break the unit cover. And even if you notice this right away (which is unlikely), the unit will still have to be sent for replacement. At the same time, when we say “block,” we mean the entire rail, because blocks are not supplied separately, and at the moment only modest attempts are being made to repair this element. But all attempts are broken against the impregnable wall of the lack of software for programming ECU processors.
Failure of the torque sensor is another unpleasant situation on the road. In this case, the EUR “does not understand” with what frequency and force to help you turn the steering wheel and in which direction.
The amplifier will not turn off completely, since it will “take” the data from the speed sensor and steering wheel angle, but the EUR malfunction indicator will start to light on the dashboard. Moreover, it may happen that you need to turn the steering wheel to the right, but the electric motor will “turn” it to the left.
The sensors themselves can be analog or digital, which is why they have corresponding problems. Analog ones “suffer” from wear: this manifests itself in different forces on the steering wheel or the movement of the mechanism from the central position.
Digital ones, however, also suffer from wear and tear, but not of the sensor itself, but of the cable, which can simply fray.
We treat the rail
Mechanical problems with the rack rod cannot be treated in any way. Corrosion, excessive wear of threads or teeth will send you to purchase a new rod - no grinding or any other treatment is provided here. If everything is in order with the rod, and the cause of the knocking is wear of the side bushing or an increased gap in the gearing, then the bushing can be replaced without problems, and the gap can be adjusted by tightening the rod stop (the same as in the case of hydraulic boosters). Actually, there are simply no other solutions to hardware problems.
Articles / Practice Steering wheels and listen: how to diagnose problems with the steering rack, and what they entail The steering mechanism in the hierarchy of importance, undoubtedly, is on the same level as the brakes - that’s why attention to its technical condition should be appropriate, and “listen” to the car... 22806 2 6 11/16/2016
But with electrics, as mentioned above, everywhere you look there are problems everywhere. If the errors being read are related to improper operation, then you can try to remove them - but if these are breakdowns... Then the solutions are simple, but expensive. Judge for yourself: the slightest crack in the block cover means, in most cases, replacing the entire steering rack. Corrosion of an electric motor bearing means two ways to solve the problem: replacing the electric motor with the control unit or, again, replacing the entire rack assembly. By the way, replacing the assembly is the verdict of any official dealer: the manufacturer usually simply does not provide the possibility of repairing and restoring the steering mechanism with an electric steering gear.
And if the drive is direct, and water gets inside, then what will happen to the electric motor? Fortunately, nothing: it will be washed with gasoline, dried and sent back to service. Regarding this element of the EUR, the master generally noted that he had never encountered problems associated with the failure of the system’s motor.
A broken torque sensor can be treated by replacing the sensor. The only consolation for a design with an analog sensor may be the possibility of a slight adjustment (±1°) of the EUR. But if the sensor socket is significantly broken, then the adjustment will no longer help.
One of the most common reasons for sensor failure is damage to the boot that is installed above it. It begins to rot due to constant moisture and eventually collapses, sending the sensor for replacement - if such a possibility exists. If it is not there, then... You probably already guessed it: replacing the rack assembly. But the most annoying thing that can happen is a banal breakdown of the connector on the rail, because in this case, nothing other than replacing the rail assembly will help.
If you are lucky and the rack was repaired
Upon completion of the work, the rack is assembled and installed on the car.
After installation, it is necessary to initialize or adapt the EUR. This action is extremely important, since it allows you to “teach” the rack to see all the sensors and extreme positions. If this is not done, then the electric motor will spin “until victory”, as a result of which at the end of the stroke the rod will hit the stop with considerable force. After adaptation, the system will sharply reduce the force 5 degrees before the extreme position, protecting the rod from impact.
By the way, there is another small plus associated with adaptation and the very principle of operation of the electric amplifier. If you remember, in systems with hydraulic booster, you cannot hold the steering wheel in the extreme position for a long time - this can lead to overload and damage to the pump. But with a properly adapted electric power steering, everything will be fine in any position.
In conclusion
Despite the apparent simplicity of the electric power steering system and the virtual absence of the need to maintain it, it is worth remembering that it is still one of the most important systems in the car. After all, the EUR helps control the direction of movement - in other words, it makes movement subject to your will. Using the readings of the wheel, engine, and steering wheel sensors, the EUR requires double attention - therefore, if the slightest oddity appears in its operation, do not wait for a “revolt of the machines,” but go for diagnostics.
Special thanks for the preparation of the material and consultations to the company Master Service (MSG), contact details +7 (800) 350-99-23 (Moscow), +380 (57) 738-33-08 (Kharkov).
Survey
Have you encountered problems with the EUR?
Your voice
Total votes:
Installation of an electric amplifier on the “seven”
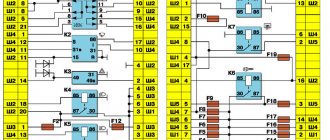
The block diagram of connecting an electric amplifier (can be used with any VAZ car) is presented below.
To install electric power steering on the 2107, you need to follow these steps:
- Disconnect the battery from the battery to prevent a short circuit during work.
- Remove the screws that secure the cover to the steering column.
- Remove the steering cardan and replace it with the new one, which is included with the device.
- In the instructions you will definitely find a diagram according to which you need to drill holes with which the amplifier housing will be secured.
- Secure the entire mechanism.
- Connect the wires coming from the engine speed and speed sensors.
- Connect power to the device using a fuse.
- Then you need to replace the casing and connect the battery terminals.
The installation work will take no more than two to three hours. The guaranteed service life of the electric amplifier is one year.
Possible malfunctions of the EUR on the Lada Grante Liftback (Sedan)
| Malfunction | Diagnosis | Elimination method |
| The diode on the side pillar glows due to a faulty speed sensor. | Checking the serviceability of the speed sensor by dismantling it and ringing it with a multimeter. | Replacement of the sensor with a new one, since the design is not subject to repair (partial, complete). |
| Low voltage in electrical wiring. | Checking the integrity of the insulating layer and contact terminals. | Replacement of damaged cable sections, insulation of connection points. |
| The electric amplifier rotates slowly. | Checking the voltage supply to the input contacts from the relay regulator. | Replacing the relay regulator. |
| During rotation, a characteristic creaking, metallic grinding sound is heard. | Dismantling the EUR, disassembling it into its component elements, checking the condition of the rolling bearings. | Replacement of two rolling bearings with new ones. |
How to pass a technical inspection
The electric power steering on the 2110, as on the seven, must be installed correctly. The problem is that with such tuning you formally make changes to the design of the steering, which is prohibited by traffic rules. Therefore, when passing the technical inspection, you may encounter certain difficulties.
You can try to hide the fact that the car has an electric booster. To do this, simply disconnect it from the power supply. If this is not done, then when diagnosing the backlash, the mechanic will understand that modifications have been made. And he won’t give you a technical inspection ticket. Therefore, in order for everything to be legal, you need to print out the letter issued by the EUR manufacturer. It states that a specific model of the electric amplifier meets all the requirements that are necessary for installation on a VAZ-2107. A copy of this letter must be carried with you during the MOT.
Along with this letter, you must have a certificate issued by the car service center where the device was installed. Only if you have all these documents can you be given a diagnostic card. If, even if you have these documents, you are not given a diagnostic card, you must request a refusal in writing with a precise indication of all the reasons. If the electric power steering on the VAZ-2107 is installed correctly and in compliance with all requirements, they cannot refuse to issue you a technological map.
On the VAZ "classic" the installation of power steering is not provided from the factory. However, the owners of these cars experience certain inconveniences in driving at low speeds due to the tight rotation of the steering wheel. To make control easier and more comfortable, you can install an electromechanical amplifier on the VAZ 2107.
Lada Granta 2012, 87 hp - vehicle breakdown
Comments 4
Recently I was driving to the dacha after rain on a gravel road. The road is like a washboard. The EUR began to fail again. I opened the hood, moved the fuse, drove on, the error did not appear again.
I sold my original EUR for 9,000, at least returning some of the wasted money.
I don’t understand, so what’s the problem?
In the shit wiring of a VAZ craft. Stupidly bad contact in the power fuse block, everything there came loose from the shaking. I had a 99th carburetor, so it stalled while driving, all the electrics turned off completely, and the problem was in the same fuse box, which was flooded with water, because it was located under the windshield next to the windshield wiper motor. Everything there just turned sour. The car was produced in 1997, but this grant was from 2012 and nothing has changed. I also had a 12, a new Priora from the showroom and this “craft”, I wouldn’t be surprised if something like this turns up in the West)))))
Source
Electric power steering VAZ 2107 - is it needed?
Whether to equip your “Seven” with electric power steering (EPS) or not depends only on your personal wishes and capabilities. To decide and understand whether there is really a need to install this mechanism, you need to consider the positive and negative aspects of this type of modification, and then draw the appropriate conclusions.
The main advantages of introducing electric power steering include:
- reliability, efficiency, compactness, which is ensured due to the lack of hydraulics;
- easier, more convenient and safer driving, especially for women and the elderly;
- easy installation;
- Possibility of installation on any classic Zhiguli model;
- no additional maintenance is required during operation.
The installation of an electric power steering system can be classified as tuning, i.e. improving the initial characteristics of the car.
The disadvantages include:
- material costs;
- expensive repairs;
- the need to install a more powerful generator on the car (from 100 A).
A powerful generator is required due to the fact that the EUR engine alone consumes about 50 A. Therefore, if you have extra funds and a desire to improve car control, then why not do it. In addition, installing an electromechanical power steering is noticeably cheaper than a hydraulic booster.
The introduction of a hydraulic booster on a VAZ 2107 is a complex and expensive procedure that requires the use of additional components and major modifications to the steering.
Operating principle of an electric amplifier
Before considering the installation of electric power steering (EPS) on the “seven”, it is necessary to understand what this mechanism is. The main elements of the node are:
- electric motor;
- mechanical transmission gear;
- steering wheel sensor;
- steering torque sensor;
- control unit (CU).
The control unit receives signals about the speed at which the car is moving and the crankshaft rotation speed synchronously with the rotation of the steering wheel. The control unit calculates the magnitude and polarity of the power supplied to the electric motor. Additional force is created from the electric motor through a mechanical gear transmission, which makes it easier to control the front wheels. The force can be applied to both the steering shaft and the steering rack, which depends on the class of the car and the specific design of the electric booster. Since we are talking about classic Zhiguli cars, no steering rack was installed on these models.
Design of the electromechanical power steering: 1-electric motor; 2-worm; 3-worm wheel; 4-sliding clutch; 5-potentiometer; 6-casing; 7-steering shaft; 8-connector for torque sensor on the steering shaft; 9-motor power connector
The design of the EUR for passenger cars has small dimensions and is mounted directly on the steering column. The mechanism is located inside the car, which protects it from moisture, dirt and dust and extends its service life. The electric power steering has two main operating modes, which depend on the speed of the vehicle:
- When driving at low speeds, the device applies the greatest force to the steering mechanism to make driving easier. Thus, the steering wheel becomes “light”, which allows you to rotate it with the finger of one hand.
- When moving at high speeds, the steering wheel becomes heavier, which creates the effect of the wheels returning to the middle position. This operating principle increases traffic safety.
Frequently asked questions about EUR
Hi all. I decided to write a publication in the logbook, in which I will try to answer frequently asked questions, namely: 1. What kind of ESD are there and what cars are installed on them. 2. Why the EUR fails. 3. Which EUR is most reliable. 4. What you need to pay attention to when purchasing an EUR. 5. How to choose from whom to buy EUR on Avito.
This publication will concern EURs installed on VAZ cars. So, let's go:
EUR
— electric power steering, designed to reduce the control force applied to the steering wheel.
1. What kind of ESD are there?
1.1 EURs manufactured by Aviagregat, Makhachkala, were installed on the Kalina car. These EURs have been installed on Kalina cars since 2006. EUR data has never been installed on Prioras. The design of the EUR is geared. Kalina was also equipped with EUR manufactured by Avtoelektronika, Kaluga.
1.2 The grant car was equipped with EUR manufactured by Mando Korea. These ESD data were installed on Grant cars from 2012 to 2014. Fragile body. In the event of an accident, the EUR housing breaks. The design of the EUR is geared. EURs manufactured by Avtoelektronika, Kaluga were also installed on Granta and are still installed to this day.
1.3 EURs manufactured only by Avtoelektronika, Kaluga, have been installed on Priora cars since 2007. From 2007 to 2008 version 646 was installed In 2009 version 660 was installed From 2010 to 2011 version 670 was installed (the most reliable version) In 2011 version 702 was installed In 2012 version 10301 was installed And so on
2 Why does the EUR fail?
2.1 Unstable power supply to the unit. Most of the clients who come for EUR repairs have faulty car generators. The problem is standard and familiar to everyone; over time, the generator wears out and begins to produce a low voltage level under load. Remember, if the generator is faulty, the first thing that fails is the EUR. If your light bulbs or fuses are constantly on, then you need to first check the generator, and not change the burnt out element and scold the manufacturer. It is necessary to eliminate the cause, not the effect. Your diode bridge or relay regulator may be faulty. There may be a problem in the wiring (Bad or damaged ground wire of the battery - Housing, Housing - EUR). The 50A fuse, located in the fuse box next to the battery, may have burned out. You can check the wiring with a multimeter. Turn on the low beams and the heater at full power. We measure the voltage at the output of the generator, the voltage should be no lower than 13.8 volts, otherwise it’s time to check your generator when it’s cold and when it’s hot, not lower than 13.4 V. We check the voltage drop on the wires and 2 fuses (60A) as follows: One probe We place the multimeter on the output of the generator, the second one on the + terminal of the battery. Look at the voltage drop. The voltage drop should not be more than 200 mV (0.200 V). It’s the same with the mass, only we take measurements between the generator housing and the car body. The voltage drop should not be more than 50 mV. (0.05 V). All figures are taken from personal experience and are not supported by tabular values. If the voltage drop is greater than that indicated above, look for the cause or add dubbing. 2.2 Power consumers are connected incorrectly. Are you a loud music lover? Then this section is for you. To connect powerful consumers, you need to correctly calculate the load current and the current that your generator can provide. If the current consumption exceeds the current supplied by the generator, then you will always have “light music” in your car. As a result, the battery and, as a result, the EUR will suffer. Installation of wires should be done on terminals and with brake shrinkage, and not with electrical tape and twists. When installing non-standard electrical equipment, it is necessary to study the theory and only then move on to practice. Unfortunately, most often the opposite happens. This applies not only to music, but to any powerful consumer, for example, heated windshield. 2.3 Incorrect operation of the ESD. Often during operation, people using the ESD do not even know that it is impossible to hold the ESD in extreme positions! Having twisted the EUR to its extreme position, the driver continues to press the steering wheel further, tries with all his might to spin the wheels, but they have already reached the extreme position of the steering rack, but the EUR does not know about this. The EUR does not have the concept of “extreme position”. If the driver continues to press on the steering wheel, it means the wheels need to be turned more. At this moment, the current on the power transistors of the EUR increases significantly. Which in turn leads to overheating of the transistors and failure of the control unit. 2.4 Steering problems. The rack began to knock and the owner of the car, without thinking about the consequences, took and tightened the rack. The noise seems to have become quieter, or maybe disappeared altogether, but the load on the power steering has increased. As a result of overheating of the transistors in the EUR control unit, a failure occurs and the owner of the car begins to swear, then the rack, then the EUR... “not a car, but junk.” With a working steering system, the steering shaft force should be no more than 20 N*m. The power supply current consumption is within 15 A.
Friends, sometimes the failure of your EUR is you yourself, but a person by nature is ready to blame himself on anything, but not on himself.
3. Which EUR is most reliable.
In my opinion, the most reliable EUR Priora is version 670. It’s a pity that it was produced only from 10 to 11. By the way, 11 years old already come across with 0204 transistors, which is not very good. Why 670? 1. Non-contact torque sensor from Valeo. Increases reliability many times over 646 and 660. (Photo of Valeo sensor) 2. Very reliable transistor bridge from IXYS. Increases reliability many times over 702 or 10301 and newer versions. (Photo of transistors) 3. All-milled aluminum case, which is a very good heatsink for power transistors. Compared to the blocks of the new sample, they cannot be compared. (Photo of buildings)
Which EURs, in my opinion, are the weakest: 646 and 660. (photo of control units) The year of their release was 2007-2009. Their torque sensor is of contact type. And over the years of operation, they have exhausted their entire resource. The tracks on the sliding contacts are frayed. As a result, the signal from the torque sensor is either there or not. Such work of the DM leads to the fact that the steering wheel begins to twitch on its own. I do not recommend buying EUR versions 646 and 660. I would not recommend installing 646 or 660 EUR on cars like Gazelle, Niva or UAZ, these EURs are very “delicate”, they will suit the maximum front-wheel drive VAZ and classics.
My advice to you: If you are going to buy an EUR, then under no circumstances do not take the 660 and especially the 646 EUR. These models have already exhausted their entire service life and are complete rubbish, it’s like buying yourself a washing machine that’s 13 years old. It wouldn’t even occur to you, would it?
Source
Which EUR to install on a VAZ 2107
The VAZ Seven can be equipped with one of two options for electric power steering:
- from Niva;
- special kit.
In the first case, purchasing the mechanism will cost 20 thousand rubles. In the second, the device is suitable for installation on any classic Zhiguli and costs about the same money. The VAZ 2107 can be equipped with both mechanisms. However, there are complaints about electric boosters from Niva: some car owners complain about their unexpected failure, which is dangerous while driving, since control becomes impossible. As for, there are no complaints about them.
Review of prices of manufacturers of electric power steering for the Lada Granta
| Name/article | Price, rub.) |
| OJSC "AVTOVAZ" 11117-3450008-02, voltage 13.5 V, current 55 A, weight 9.0 kg. | From 23500 |
| OJSC "AVTOVAZ" 11186-3450008-02 | —/— |
| OJSC "AVTOVAZ" 2172-3450008-02 | —/— |
| JSC "Prosport" RE-49114 | From 24000 |
| RE-49113 | —/— |
| OJSC "LadaCenter" FR-00001716 | From 25000 |
| JSC "Autoelectronics", 11186-3450008-02 (122.3405010-02) | —/— |
*prices are current as of October 19, 2018.
What is included in the scope of delivery of the electric amplifier?
- electric booster;
- adapter plate;
- intermediate shaft;
- steering column switches;
- wires;
- egnition lock;
- steering wheel from Priora or Kalina;
- decorative casing;
- speed sensor.
How to install
To install the EUR on a VAZ 2107, in addition to the parts from the kit, you will need a standard set of tools consisting of keys and screwdrivers. The assembly procedure is carried out in the following sequence:
- We de-energize the vehicle's on-board network, for which we remove the negative terminal from the battery.
- Remove the decorative cover of the steering column by unscrewing the corresponding fastening screws.
- We dismantle the old steering wheel and cardan.
- According to the instructions, we mount the new mechanism through a special plate.
- We get down under the car, unscrew the speedometer cable from the gearbox and install a speed sensor onto which we screw the cable.
- We connect the wiring according to the diagram.
- We install the protective cover.
- We connect the terminal to the battery and check the functionality of the electric amplifier. If installed correctly, there should be no problems.
Video: installation of EUR using the example of VAZ 21214
Diagnostics
To check the amplifier in a car, you need to remove the plastic trim on the steering column; to do this, unscrew the bolts securing it from the bottom.
Then you will need to get to the 8-pin plug, its pinout is as follows:
- The blue contact is connected to the ignition switch, this is 12 volt power;
- the red-brown contact is the connection cable to the tachometer;
- the gray contact goes to the car speed controller;
- white and pink wire - amplifier control indicator;
- black-yellow contact is a diagnostic line;
- the next contact is empty, the wire is not connected to it;
- brown contact is ground;
- empty.
More accurate results will be obtained by checking the amplifier using a scanner. But since such equipment can usually only be found at service stations, you can try to check the operation of the system with a paper clip.
To check you need to do the following:
- First the ignition is turned off.
- Then, using a paper clip, you need to close contacts numbered 6 and 7 of this plug, while the plug itself does not need to be removed.
- Next, the ignition must be turned on.
- After completing these steps, the EUR failure indicator located in the dashboard will begin to blink; by the number of blinks, you can determine whether the system is broken (the author of the video is Gosha Vakhromeev).
How to understand where to look for the cause by the blinking indicator icons:
- one long signal and one short signal - the electric amplifier is working;
- one long and two short - no engine speed signal;
- one long and three short - the torque controller is out of order or there is no power supply;
- one long and four short blinks—problems in the operation of the electric power steering motor;
- one long and five short - the steering shaft position controller has failed;
- one long and six short - the motor rotor position controller has failed;
- one long and seven short - problems with the electrical network - the voltage is either too high or very low;
- one long and eight short - the control module of the electric amplifier has failed;
- one long and nine short - the speed controller is broken.
Error codes
c1044 - incorrect sequence of the rotor position sensor (RPS)
c1621 - incorrect voltage 5V
c1622 - speed signal circuit failure
c1011 - car engine speed signal circuit, no signal - the signal from the idle sensor (or the standard tachometer through a voltage limiter) is divided by 4 and applied to the tachometer input,
c1022 - error, voltage of the main output of the torque sensor - it is possible that the shaft cover has rubbed the insulation and the middle, green wire shorts to ground
Passing technical inspection and certificates
Before installing the ESD on your G7, you should think about passing a technical inspection. The fact is that installing such a device means making changes to the design of the vehicle, which will result in difficulties when passing maintenance in the absence of appropriate certificates. To avoid any problems, it is necessary to install the product in a certified VAZ car service center. In addition, you need to obtain the appropriate documents: a certificate from the manufacturer and the service where the installation was carried out. If you have all the necessary papers, then you can pass the technical inspection without any nuances. If conflict situations arise, the inspection station staff must request a written refusal indicating the reasons.
Despite the apparent complexity of such a device as electric power steering, its installation and connection will not take much effort and time. You need to prepare a mechanism kit with the necessary tools, and then follow the step-by-step instructions according to which you can install and connect the device.
Many have probably heard that in the VAZ 2110 you can install electric power steering from Priora
.
Is it difficult to install the EUR from Priora on a VAZ 2110 with your own hands
?
What is the price of the EUR from Priora
and where can I
order
? I tried to answer all these questions in this article.
There are two types of mechanisms
which make turning the steering wheel easier:
power steering
(hydraulic power steering) and
electric power steering
(electric power steering).
- In general terms, power steering is
: a pump driven by the crankshaft pumps oil or a similar fluid, and through a rather complex set of small parts in and outside the rack and fluid pressure helps to rotate the steering wheel. - The EUR is simpler
: an electric motor, a torsion bar, a pair of sensors and an ECU. Principle: the torsion bar is twisted, the torque is read by the sensor, and the electric motor applies a little Newton meters of force to the output shaft.
Pros of EUR:
- During operation, the power steering does not require intervention/maintenance, unlike the power steering (it is at least worth keeping an eye on the oil and tubular connections).
- The electric motor of the EUR works only when it is necessary to turn the steering wheel (when the torsion bar begins to twist), in a stationary position it practically does not work, nor does it work after reaching a certain speed prescribed in the ECU. Power steering, unlike its brother, works constantly, its motor constantly spins at the knee and threshes fluid, even if the car is standing without a driver.
- In cold weather, the EUR performed better. It doesn't need to warm up like the power steering.
Disadvantages of EUR:
- The EUR is weaker. Although on light cars, like our dozens, this is practically not noticeable.
Approximate price for the set:
- EUR -
9715 rub. (21700-3450008-01) - Promval
- 1000 rub. (21100-3401092-10) - Plate
- 800 rubles and above - Wiring
- 1500 rub. - Steering wheel and casing VAZ 2170
- 2000 rub. (11180-3402015-00, 21700-3403065/3116-00)
Total price
a new set will cost you about 15,000 rubles.
Where to buy a set of EUR Priora for VAZ 2110?
You can order in Kaluga from the factory directly. In the online store “Everything for Auto”
Is it worth installing EUR on our VAZ 2110?
A question without a clear answer.
It is impossible to say that this is a waste of money
.
Since the effect of installing the EUR is very good. Turning the steering wheel really becomes easy. But it cannot be said that there are no negative sides
. For example, the price of an EUR kit from Priora is about 15 thousand rubles. not many people will like it. In addition, the kit also needs to be installed, and this is a separate, not easy story with sawing, drilling and swearing all day long. After installation, not everything will be smooth with cracks, steering wheel height adjustment, etc. In general, look at how others independently install the EUR on a VAZ 2110 and you will understand everything yourself:
———————————————————————————————————— At disassembly I purchased a Viburnum steering wheel with a small bonus
I bought an EUR, here it is in a box, a control unit, markings of the EUR itself
The pads are the same as on the 10th EUR
Papers included with EUR
Then I bought a drain from Priora with a tricky mechanism
I measured the length of the drain shafts. The difference was 4 cm with an error on the larger side. The length was 25.5 cm in the most expanded form. So, taking into account the experience of the installers, that the drain shaft must be shortened by 3 cm, nothing needs to be lengthened, it seems
Then the ordered wiring arrived
This is what the blocks look like, that is, there will be no need for any twists, I removed the terminal from the block, inserted it onto the block in the harness and inserted the free terminal of the harness into the place where I removed the standard wire, it is already set to 50A
EUR connectors and harness blocks in them
As for the wiring too - you can do without a special harness - all you need to do is run two power wires from the battery with a cross-section of 4 squares, a 50 A fuse from Shnivy, the rest is all low current - to the tachometer, to the speed sensor, + 12V after the 3Z, ground, to -line and wire to the control lamp.
But since there was not enough adapter plate and it was unknown when it would arrive, I decided to cut it out myself. We take the workpiece, mark it and cut it out with a jigsaw. Thickness approximately 4mm.
We remove the casing, switches, ignition switch.
We adjust the plate in place
We put the shaft on the EUR, we put the EUR in place and we see that the shaft is too small. It fits literally 1 mm onto the rail, I had to take it off and think about it. It was not possible to distort the drain shaft, since it was hollow and had to be chemically mixed with the plate and priorol. Prioral has undergone changes in this part
Well, I had to re-drill the plate in order to drive the EUR deeper, this did not give much benefit, I installed spacers between the plate and the body. So the EUR is installed, the shaft has more or less climbed onto the rail, but not completely, the bolt cannot be inserted. I had to take a smaller bolt and clamp it to death and sculpt a limiter onto the shaft so that the cardan could not slide back in any way.
Next we hook the central part of the switches
The next step is wiring. You need to stretch two wires to the battery from the passenger compartment; you need to pull them through the left fender; to do this, open the fuse box and look for the bundle of wires going under the hood. We remove the washer reservoir, take the wire and stick it into the wires
From here she climbs out.
We attach the wires to the other end and pull them into the engine compartment
We remove the instrument panel, pull out the red block, drag the wiring into the under-panel space and remove the orange wire from the red block.
We attach the block that came with the wires to it. We connect it to the EUR wiring, with the orange wire (this is the 1st leg in the EUR block, +12V power supply) And we poke the end with the bare terminal of the EUR wiring into the place of the standard one in the red block.
We do the same with the gray wire of the red block. The gray end (this is the 3rd leg of the EUR control block, the signal from the speed sensor) and with the brown-red white block (this is the 2nd leg of the EUR signal block, the low-voltage signal from the tachometer)
If you decide to install electric power steering on a VAZ 2107, then you have two options.
1. Take it from Priora or Niva, modify it and insert it. It will cost approximately 20-23 thousand rubles.
2. Or buy an electric power steering specifically for the VAZ 2107. Purchase and installation will cost approximately the same amount.
We cannot give specific advice on what to choose, because (regarding the installation of Niv or Prior electric amplifiers) someone says that they fail unexpectedly. Some argue that this causes the steering wheel to jam. This is dangerous when driving, as the car cannot be controlled.
As for the factory ESD, we haven’t heard any complaints so far.
We install the EUR on Granta Standard. Part III
The EUR is installed, now all that remains is to connect it.
To be honest, for me this part turned out to be the most time-consuming due to the fact that it took a long time to find suitable terminals, some were never successful...
Even before inspecting the ECU connectors, we managed to find out from the Internet that AMP connectors with square contacts are more common, so an instrument cluster connector from Kalina was purchased as a donor of contacts for the instrument panel and ECU:
We take out the contact you like with the wire and install it in place of the 20th contact of our tidy connector
For easy access to the ECU, you need to fold back the upholstery and remove the glove compartment, in the figure below the location of the ECU is marked in red, the OBDII diagnostic connector is marked in yellow (already removed from the seat, it is located behind the plastic lining in the place where the blue arrow points)
If you purchased the necessary contacts for the ECU connector X2 in advance, then simply insert them into the connector and assemble them in the reverse order.
I was unlucky - at the time of installation I could not get them, since I needed round MOLEX contacts, and time was running out, so “be careful, collective farm!”
Since the square shell acts as a tightening body and limiter, it is necessary to replace it with something, and this something should be cylindrical in shape - I settled on PVC insulation of the contact wire, cut two thin rings and put them on the contact, something like this :
We do the same with the second contact.
We assemble the connector and connect it to the ECU. We check the presence of contact just in case - measure the resistance between the new wires and ground, I got 4.98 and 5.83 kOhm, although I don’t remember which one is which)
On the EUR side, we run 3 wires from connector X2 in the corrugation: 2 to the ECU and 1 to the diagnostic connector.
We connect the corrugated wires to the new contacts of the ECU and OBDII connectors, assemble everything, insulate it and lay it down. To check, you need to check the resistance between contacts 2.3 and ground on the EUR connector; it should not differ much from the previously measured 4.98 and 5.83 kOhm.
The second low-current corrugation goes from connector X2 of the EUR towards the fuse block with two wires: a wire for connecting to pin 20 of the device and a wire for connecting + 12V ignition from pin 56 of the fuse block.
The fuse block is fixed with one self-tapping screw - although in a very “fortunate” place
After that, access to the spider's lair opens from electrical tape wires, it's good that the wire to which you need to solder is located quite successfully.
Let's put this horror back together. We solder the device contact, insulate everything and lay it down.
It remains to connect the ground of the signal part of the EUR. According to the diagram, it goes to the S22 twist, which in turn is attached to the body, I couldn’t find this point, so I had to make my own - an M6 bolt was screwed into the side guide of the center console, which will be a “pin” for connecting the signal mass of the EUR.
At this stage, we have installed the EUR and connected all the signal conductors; the next part will talk about connecting the “power”.
Source
Do I need to modify anything during installation?
In any case, no matter which option you choose, you will also have to configure the transmission speed sensor. If this is not done, then when starting from a stop and at low speeds you will not notice any changes. That is, it will still be difficult to turn the steering wheel. And only when you pick up high speed, the steering wheel will give in to you with less resistance.
And if there is no speed sensor, then it must be installed. Here's what it should be: 6-pulse pass-through from 214 Niva (usually included with the factory electric amplifier)
In addition, some other changes will need to be made to the design. Here they are:
- take another choke cable (included with the electric booster from the VAZ 2108) and move it;
- replace the gearbox - take one so that it has a short worm shaft, but the bipod remains original;
- if the VAZ 2107 has a contact ignition system, then you need to install a MUR1100E diode.
How to tighten the electric power steering rack?
The appearance of a knocking sound in the operation of the electric power steering is associated with the need to tighten the steering rack.
How to do it right:
- First you need to disconnect the battery; to do this, disconnect the terminals from it. Unscrew the battery mount; to do this, you need to unscrew two more nuts located at the edges. After this, the battery is removed and put aside.
- Then you need to lift the plastic stand, there are four more screws under it, they can also be unscrewed.
- Having done this, it is necessary to move this stand forward until the platform is disconnected from the air filter housing retainer pad. After this, the trim can be moved back, this will provide freer access to the rail itself.
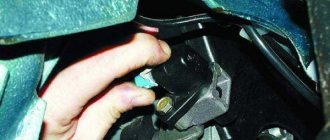
- At the next stage, you will need to crawl your hand under the rail. Directly below it, as shown in the photo, there is a rubberized cap; it will need to be removed, this will allow the key to access the adjusting nut.
- To perform adjustment work, you will need a special wrench to tighten the rack; without it, the adjustment procedure will not be possible. Using this wrench, you need to crawl under the car rail to install the tool in the required hole.
- When adjusting, be careful not to overtighten the rack. If its tightening is very strong, then when cornering the rack will bite, and this, in turn, may affect the safety of movement. The angle of adjustment is always different, it depends on how much the nut is loose, but usually when performing such work the nut is tightened by approximately 30 degrees. This should be enough to get everything right. After the adjustment is completed, it will be necessary to check that this task was performed correctly. That is, you will need to make sure that the steering wheel turns normally to any position all the way and there is no knocking. If the knock remains, then the adjustment continues.
Source
What else is included in the ESD kit for the 7?
In addition to the EUR itself, the kit includes:
- steering column cover, ignition switch, steering column switches - all from a VAZ 2110;
- speed sensor;
- choke cable;
- fasteners;
- passport and instructions on how to install the EUR.
Since the production of the VAZ-2114, it has been planned to install additional control kits. These are such as power steering and electric power steering, but they are not included with the new car. So, every motorist would not refuse to have one of these systems to simplify driving.
Video about installing electric power steering on a VAZ family car
The video will tell you how to install electric power steering on a car, and also tell you about some of the nuances and subtleties of the process.
Electric power steering
As you know, all foreign-made cars are equipped with power steering, which is initially included in the basic configuration of the car. But with the domestic auto industry, not everything is so simple. So, almost all cars, on the contrary, are not equipped with this design, and the function comes as an additional option, for some money.
EUR or power steering - which is better to choose for a VAZ-2114?
So, should you install a hydraulic booster or an electric booster? This question plagues many motorists. Of course, in all respects, the EUR is inferior to the power steering, but there is one that negates all the advantages of the “hydrika”. This indicator is the price.
So, an electric power steering with installation will cost 20,000 rubles, while a power steering kit without installation costs 25,000 rubles. So, as practice shows, most motorists choose to install electric power steering.
Summary topic about EMUR for VAZ [Kalina, Priora] operation, diagnostics, repair.
Welcome to ChipTuner Forum.
Theme Options
METAfizik
Deemon
METAfizik
Hello gentlemen. There is a problem with EMUR MANDO. At the moment, the grant has a mileage of 615,000 km and after a strong hit in a hole, the amplifier began to periodically turn off. There was a problem before, but it went away after cleaning both fuses. And now it doesn’t go away. Of the scanners I tested only with ELM. But at the moment the error itself is no longer recorded. But the following errors constantly flicker: c1632, c1633, c1656 and c16ff. And it doesn’t matter if I turn the steering wheel in different directions slowly, quickly, or if I don’t touch the steering wheel and align the wheels. I feel in my gut that the time has come to fork out (at the moment it costs 27 thousand rubles), but there is hope that something from the outside is still making a contribution. Either the fuses (they are too easy to remove), or the generator brushes are about to screw in (because twice while driving the charger completely fell off), or the DC (because I notice small dips near the needle on the speedometer when accelerating).
And there was also a moment when there was no scanner, but an error was recorded and the steering wheel turned off, the relay inside the EMUR brains clicked, and no matter how much you restarted the steering wheel did not turn on. but as soon as the switch in the brain clicked again, voila everything started working until the next shutdown.
Something like that. I really hope for a solution with little bloodshed.
Sergey1982
angtar
layman
What is needed for installation
Before you begin installation, you need to assemble all the necessary equipment. What does a motorist need in this case:
- Electric booster.
- Control block.
- Promval.
- Wiring.
Amplifier control unit
Electric amplifier installation process
Now that everything is ready, you can proceed directly to the process of installing the electric power steering on the car. Before starting the procedure, it is worth noting that the steering column wiring needs to be replaced. In this case, there will be no wire cutting or twisting. Everything connects to standard terminals.
We insert the free terminal of the harness exactly into the place where the standard wire was. You don't need a special harness for this. We connect two wires with a cross-section of 4 squares to the battery. It is imperative to install a 50A fuse. The “weak current” will connect to the tachometer, ground, K-line and wiring to the control lamp.
Don't forget to check the presence of speedometer and tachometer signals.
So, everything has been prepared, and now you can proceed directly to the process of installing the EUR. Let's look at the step-by-step installation instructions:
- We remove the negative terminal with.
Remove the “-” terminal from the battery - Remove the steering wheel.
- We dismantle the steering column trim casing.
- Having disconnected the wires, we remove the switches and the ignition switch.
The process of dismantling the switches on the steering wheel - Having unscrewed the fasteners, we dismantle the steering shaft.
- Now you need to install the shaft on the electric booster.
- The next step is setting up the wiring, which is not as difficult as it seems at first glance.
- We pull 2 wires from the passenger compartment to the battery.
Many people recommend doing this inside the left wing. For greater convenience, it is recommended to remove the following elements: windshield washer reservoir, battery and battery shelf. Connecting power supply wires - We make fastenings for the electric power steering.
Installing mounts for electric amplifier - We install the part into the seat and fix it with nuts.
Installing the electric power steering on the seat - The final stage of installation is connecting the EUR electronics.
There is a red connector under the instrument panel with an orange wire in it. It is to this that you need to connect the electric amplifier. Exactly with the previous step, you need to connect to the gray wire. We find the necessary wires and connect to them - Now, in order for the electric amplifier to work, you need to connect to the plus and minus.
- The installation procedure for the EUR is complete and if everything is done correctly and accurately, then everything will work.
- The rest of the assembly is carried out in the reverse order and according to the technical diagrams.
Steering wheel adjustment
Also, if after installation the position of the steering wheel is inconvenient and the electric power steering is too low or high, then this inconvenience can be slightly corrected by adjustment. This can be done by grinding off the edges of the shaft or by additionally installing gaskets and bushings.
It is worth remembering that, unlike the hydraulic booster, the automatic electric booster will turn off when the speed becomes over 50 km/h.
But don’t despair and get upset because at this speed you can’t feel in the controls whether this function is on or off.
Product selection
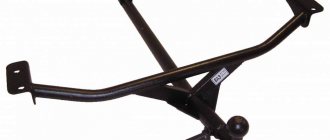
Comparison of the standard steering column and with electric power steering
2172-3450008
– original catalog number of the electric power steering, which is intended for installation on the VAZ-2114.
So, this is the most suitable option in this case. The average cost is about 20,000
rubles.
Advantages and disadvantages of installing EUR on a car
All issues of selection and installation have been considered, but I would also like to tell you about the advantages of an electric amplifier over a power steering:
- Maintenance takes less time and has much lower requirements. So, there is no need to monitor the oil and connections.
- Unlike power steering, the electric booster does not need to be heated in winter, in cold weather.
- Installing an EUR is much easier and cheaper than a hydraulic booster.
- High level of reliability.
- Product cost. EUR is several times cheaper than power steering.
We install the EUR on Granta Standard. Part I
It was necessary to transfer my wife from Kalina to Grant, and therefore difficulties arose with the steering, since Kalina has an ESD, but Grant does not and the tires cost 195.
As a result, a kit was ordered for installing the EUR on the Grant:
1. Gearless electric power steering manufactured by JSC Avtoelektronika, 11186-3450008-02 (122.3405010-02); 2. Intermediate bracket for installing the EUR, 11186-3403172-00; 3. Intermediate non-separable steering shaft “TAYA”, 72780. 4. Wiring harness for connecting the EUR, 2110-3724155;
Assignment of EUR contacts
According to fragments of the diagram from the document “ELECTRICAL CONNECTION DIAGRAMS OF LADA GRANTA CARS”, the following contacts of connectors X1 and X2 of the EUR are used:
X1-1 - power +12V. Connect to the positive terminal of the battery through a 50A fuse; X1-2 - power mass of the electric power steering. Connects to the ground point of the body EUR;
X2-1 - signal +12V. Used to power control circuits. Connects to pin 56 of the fuse block; X2-2 - ECU tachometer signal output (X2-F4); X2-3 - ECU speed sensor output (X2-E3); X2-4 - instrument panel ESD malfunction lamp (pin No. 20 of the instrument panel connector); X2-5 — K-line output for connection to the OBDII diagnostic block (pin No. 7); X2-6 - L-line output. It is not used in the circuit, but it may be present in the harness - just pull out the terminal with the wire from the connector so as not to get tangled. By closing the 6th contact to ground or the 7th contact, the EUR diagnostics is started. The error code is generated by the number and duration of flashes of the dashboard ESD malfunction lamp; X2-7 - signal mass of the electric power steering unit. According to the diagram, it is connected to the S22 twist, which is connected to the car body, but I could not find the connection point, so it was connected separately to the center console.
I don’t know for sure whether special harnesses for Grants are sold, but in the one that came to me, only the connectors for connecting the EUR itself and the wires were useful from the terminals and contacts, the rest of the contacts: instruments, diagnostic connectors, ECU are some kind of ancient and do not fit anywhere. In this regard, before installation, it is advisable to
purchase the necessary terminals/contacts (I didn’t do this myself, of course, so I tried my best):
1. Two pins for 32-pin ECU connector X2 for connecting tachometer and speed sensor signals. As far as we could find out from the Internet, the ECU uses two types of connectors: AMP (AMP 1719675) - with square contacts and MOLEX (MOLEX 0643193211) with round ones. Accordingly, the contacts that are needed are: AMP 928999 or MOLEX 0643221019. I was unlucky - I got a MOLEX connector with round contacts, so the contacts from the dashboard connector for which there was great hope did not fit;
2. One contact of the Delphi diagnostic connector 12129484 for outputting the EUR K-line signal to the OBDII diagnostic block;
3. One contact for the AMP 928999 instrument cluster connector (the same type of contact is used for the X2 ECU connector made by AMP) to connect the instrument panel ESD malfunction indicator. This indicator is also used for simplified diagnostics of the ESD;
4. One contact AMP 962928-1 for connecting the power fuse in the power fuse block of the engine compartment. There is a seat for installing a 50A EUR fuse there, but there is not one response contact. It looks like this:
Intermediate steering shaft
Before installation, it is advisable to clean the steering shaft splines from excess paint, and then make sure that the shaft fits easily onto the EUR shaft from either side. This will help save nerves and time.
We align the wheels and steering wheel straight, after which we apply marks on the steering shaft o-ring of the rack (it rotates with the shaft and sits quite tightly), I used aluminum tape for this, you can use paint or whatever your imagination allows:
Since the steering wheel is equipped with an airbag, before removing it it is necessary
Disconnect the negative terminal of the battery and wait 10 minutes to discharge the starting capacitor.
We begin to remove the steering wheel; to do this, we pierce holes covered with decorative material on the sides of the steering wheel with a thin Phillips screwdriver:
Then, using thin flat screwdrivers, we feel for the spring clips that hold the upper part of the airbag. Press down on the right bracket and release the right edge of the pillow. We hold it so that it does not snap back and similarly release the left edge of the pillow. To make it easier to navigate where to press, here is a photo of the insides:
After the upper fastenings of the airbag are disconnected, it will be held by the lower fastenings (circled in yellow in the photo above), they are rubberized and just fit tightly, so here we simply pull the airbag towards ourselves by the lower part, but very carefully - you need to be prepared that the airbag will pop out, so we pull with sharp movements with a small amplitude. If you overdo it, the airbag connector will break off, since there are no wires there at all.
We freed the pillow from its fastenings, lay it down comfortably and disconnect its orange connector; it feels very flimsy to the touch, so we do everything carefully.
Source