The thermostat is an integral element of the cooling system of the VAZ-2110, requiring careful care, performance monitoring and timely replacement.
In this article we will consider the following questions:
- What is a thermostat, and what are the features of its operation?
- What engines are installed on various modifications of the VAZ-2110?
- How to recognize a device malfunction?
- How to replace on injection and carburetor cars?
- How to check performance, and what pitfalls are possible?
- Should you do the work yourself or trust the professionals?
The information provided is sufficient to promptly identify the malfunction, decide on further actions and replace the failed device.
Purpose of the VAZ-2110 thermostat, design and principle of operation
Thermostat is a unit installed in the car’s cooling system that regulates the direction of coolant in a large and small circle (depending on the engine temperature).
The node performs two tasks:
- Helps the engine warm up faster in cold weather;
- Eliminates the risk of overheating.
Both functions are realized thanks to temperature control and the ability of the main valve to change its position (open or close under the action of the trigger element).
Structurally, the VAZ 2110 thermostat is a unit with a cylindrical cross-section and three, five or six outputs, depending on the design.
Main exits:
- To the pump;
- From the radiator;
- From the engine.
The functionality of the device is ensured by the following elements:
- Bypass valve;
- Main valve and its spring;
- Piston and its holder;
- Heat sensitive composition;
- Bypass valve spring.
Operating principle:
- Inside the device there is a valve with a special substance inside, which expands (contracts) as the temperature increases (decreases).
- When a certain temperature level is reached (80.6-81.5 degrees Celsius), the mentioned substance presses on the valve, gradually opens it and directs the flow of coolant through the outlet pipe to the radiator (large circle).
When 94 degrees Celsius is reached, the main valve opens to its maximum (about six millimeters), and the bypass valve closes. - At low temperatures, the thermostat bypass valve is in the open position (the main one is closed), and the coolant flows in a small circle (without the participation of the radiator). This ensures quick warm-up of the engine.
Read more about the principle of operation of the thermostat here.
A stuck or other valve malfunction can cause the following problems:
- Overheating of the motor with the ensuing consequences;
- Inability of the power unit to reach the required temperature (relevant in winter).
Which one is better to choose as a replacement?
Experts do not advise experimenting with analogues, but using those components that AvtoVAZ develops directly for the VAZ 2110 model.
Although the company recommends using another technique - setting the thermostat from the VAZ 2111 to “ten”. Here is the answer to the question which thermostat for the VAZ 2110 is better.
The advantages of using an element from the eleventh model are manifested in the following:
- It is smaller in size;
- One hose and two clamps are used, which reduces the likelihood of leaks;
- The design of the product is compact and monoblock;
- The reduced cross-section of the small circuit guarantees better circulation through the stove;
- Relatively easy replacement.
What engines does the VAZ 2110 come with?
The VAZ-2110 car has been produced since 1996. At the same time, the power part gradually underwent changes:
- 21100 - base model produced in 1996-2000. The car was equipped with an engine with 8 valves and a volume of 1.5 liters (power 69 hp);
- 21101 is a model produced since 2004. Engine - injection, 1.6 liters, 8 valves;
- 21102 - 8-valve engine, 1.5 liters, injector;
- 21103 - 16-valve unit, 1.5 liters, injector.
- 21103 M - 16-valve engine, 1.5 liters, injector (produced since 2002);
- 21104 - 16-valve engine, 1.6 liters, injector;
- 21104M -16-valve engine, 1.6 liters, produced since 2004;
- 21106 GTI - 16-valve engine, 2.0 liters, 150 hp;
- 2110 “Premier” - 16-valve power unit, volume -1.5 liters;
- 2110 “Consul” - limousine, volume - 1.5 liters;
- 2110-91 - rotary piston engine, 1.3 liters.
Best models
The following will be a list of the most suitable thermostats for the Lada Granta in terms of price and quality.
HQ-mech
The company specializes in the production and resale of spare parts, including for VAZ cars. HQ-mech thermostats for Lada Granta are marked with article number HQ-2190-1306010. The device valve is made of stainless steel and has an additional anti-corrosion coating. Thermostats under the article number HQ-2190-1306010 have an opening threshold of 85 degrees. Suitable for car operation at temperatures down to −20 degrees.
Advantages:
- Low price;
- High build quality;
- Use of anti-corrosion coatings and materials.
Thermostats of this brand have proven themselves to be excellent among domestic car enthusiasts.
LUZAR
Thermostats of this brand are available with an opening threshold of 85 degrees. Some LUZAR models are labeled “winter”, their response threshold is up to 92 degrees. This model is perfect for operation at −20 and below. The brand has long established itself as a manufacturer of high-quality automobile spare parts.
Advantages:
- Average price;
- Build quality;
- Low operating error.
- Long service life.
When purchasing, you should pay close attention to the opening temperature markings.
PEKAR
PEKAR are excellent for use on Lada Granta.
They have an opening temperature threshold of 87 degrees, with a very low operating error. The valve bowl is made of stainless steel, the thermoelement tube is made of purified copper. The company has been on the Russian and CIS markets for quite some time.
Among the advantages:
- Average price.
- Great build.
- Long service life.
- Low error.
The thermostat of this brand is perfect for use at low temperatures.
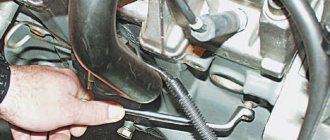
Where is the thermostat installed on the VAZ-2110?
Regardless of the type of power unit, the thermostat is located in one place - below the air filter housing. There you can see the cover of the device, under which the required element is installed.
This simplifies the search and replacement of the thermostat on a VAZ 2110 of any modification.
Checking the thermoelement
To check, we need a container of clean water, a liquid thermometer and a gas (electric) stove or boiler. To test the thermocouple for functionality, place it in a container of cold water and start heating it. When the liquid is heated to 80.5-82 o C for a working device, the pusher should move forward. If this does not happen, then replacing the thermostat for your VAZ-2110 is a necessity.
Additionally, inspect the device body and its pipes. If everything is in order with them, you can only get by by purchasing a thermoelement.
How to recognize a malfunction?
The device changes in two cases:
- The main valve does not open and does not allow coolant to circulate in a large circle. In such a situation, the engine quickly overheats, which can cause its failure. If nothing is done, the cylinder head gasket burns out, and due to the rise in temperature and expansion of the metal, the friction of the pistons against the cylinder walls increases.
- The valve jammed and remained open all the time. With such a malfunction, the engine practically stops heating or gains operating temperature slowly. If this happens in winter, then replacing the thermostat is mandatory.
Thus, the signs of a broken thermostat valve are as follows:
- Overheating of the power unit;
- Slow increase in temperature, and when operating in difficult conditions - boiling of the coolant;
- Increased fuel consumption.
As a rule, all these signs appear simultaneously.
READ ON THE TOPIC: Malfunctions of the VAZ 2110 and other cars of the series.
Tips before starting the procedure
- Before you begin removing the thermostat on a VAZ 2112, be sure to ensure that it has completely cooled down after operation.
- The thermostat is removed when it is replaced due to unstable engine temperature conditions (overheating, insufficient heating). To carry out this procedure, completely draining the coolant is not necessary.
- To check the condition of the thermostat, start the car engine and touch the lower radiator hose, at first it should remain cold, and only after the coolant temperature reaches about 90 degrees, the hose will begin to gradually heat up. If there is no such reaction to the manipulations performed, remove the thermostat from the car and check its functionality; if defects are detected, it must be replaced with a new one.
This is interesting: Resetting errors on a BMW E39 on your own without the help of specialists
Replacing the thermostat on a VAZ-2110 with an injection 8-valve engine
To replace thermostats on an 8-valve VAZ-2110 engine (injector), proceed as follows:
- Prepare your instrument. You will need a tee with tubes with a cross-section of 1.9 cm (not necessary to redo the connection diagram), a half-meter hose, a container (a plastic bottle will do), several clamps 2.5 cm in diameter (two or three pieces), a key to “ eight", screwdriver, hex wrench 5.
- Purchase the necessary materials - gasket for the case, silicone-based sealant, thermostat, rags, antifreeze.
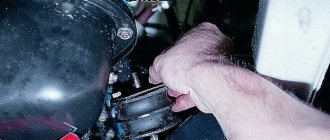
- Unscrew the bolts holding the filter shell.
- Loosen the clamps on the throttle pipe and crankcase ventilation hoses, and then tighten the throttle cable fixing bolt.
- Separate the electrical connector.
- Remove the rubber cushion from the hole in the housing bracket, and then remove the air filter.
- Tighten the bolts on the clutch housing and cylinder block, and then remove the ignition module. The described action is necessary to gain access to the coolant drain plug.
- Unscrew the drain plug on the radiator and cooling system block, and then drain the coolant.
- Loosen the clamps on the thermostat pipes, remove the device and twist the temperature control sensor. Here, remove the controller connector.
- If the design allows you to replace the main valve, then use a hex wrench to disassemble the thermostat and replace it.
- Install the new device and connect the pipes to the same places. If possible, replace the hose with a longer one.
Wipe the pipes and housing terminals with a rag, change the gasket between the housing and the motor and tighten the clamps. Add antifreeze and check the system for leaks. After 10-20 kilometers, inspect the joints again.
Stories from our readers
“Fucking basin. "
Hi all! My name is Mikhail, now I’ll tell you a story about how I managed to exchange my two-wheeler for a 2010 Camry. It all started with the fact that I began to be wildly irritated by the breakdowns of the two-wheeler, it seemed like nothing serious was broken, but damn it, there were so many little things that really started to irritate me. This is where the idea arose that it was time to change the car to a foreign car. The choice fell on the melting Camry of the tenth years.
Yes, I had matured morally, but financially I just couldn’t handle it. I’ll say right away that I am against loans and taking a car, especially not a new one, on credit is unreasonable. My salary is 24k a month, so collecting 600-700 thousand is almost impossible for me. I started looking for different ways to make money on the Internet. You can’t imagine how many scams there are, what I haven’t tried: sports betting, network marketing, and even the volcano casino, where I successfully lost about 10 thousand ((The only direction in which it seemed to me that I could make money was currency trading on the stock exchange, they call it Forex. But when I started delving into it, I realized that it was very difficult for me. I continued to dig further and came across binary options. The essence is the same as in Forex, but it’s much easier to understand. I started reading forums, studying trading strategies. I tried it on a demo account, then opened a real account. To be honest, I didn’t manage to start earning money right away, until I understood all the mechanics of options, I lost about 3,000 rubles, but as it turned out, it was a precious experience. Now I earn 5-7 thousand rubles a day. I managed to get the car buy after half a year, but in my opinion this is a good result, and it’s not about the car, my life has changed, I naturally quit my job, I have more free time for myself and my family. You’ll laugh, but I work directly on the phone)) If If you want to change your life like me, then here’s what I advise you to do right now: 1. Register on the site 2. Practice on a Demo account (it’s free). 3. As soon as you get something on the Demo account, top up your REAL ACCOUNT and go to REAL MONEY! I also advise you to download the application to your phone, it’s much more convenient to work from your phone. Download here.
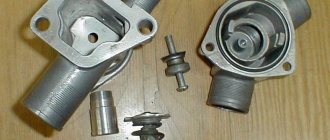
They are warmer not because a sixth fitting has appeared there, but because the bypass channel has been reduced. And the new fitting serves to get rid of the constantly leaking stove return tee.
| Comparison of bypass channels of a 6-hole thermostat - 11mm (left) and 5-hole - 16mm (right) |
What does bypass affect? Through the bypass channel, the coolant circulates in a small circle. And the smaller the diameter of the bypass channel, the more coolant flows through the heater. Because additional resistance is created when coolant flows in a small circle, bypassing the stove. That is, by reducing the diameter of the bypass you increase the flow through the stove, that is, the car interior will be warmer.
Reducing the bypass channel for a 5-hole thermostat:
I would like to note right away that when the bypass channel in a 5-hole thermostat (TC) is narrowed, problems may arise: Problems associated with washing the thermoelement . That is, if in a 6-hole thermocouple the bypass coolant and coolant of the outlet (cold) pipe of the stove are washed, then in a 5-hole thermocouple only the bypass coolant is washed.
In order to reduce the bypass to the required value, you can cut a plate out of an aluminum plate . The plate should fit exactly inside, as shown in the figure. Next, the plate needs to be secured ; for this you can use cold welding or rivets. Make sure that the rivets do not interfere with the closure of the small circle. Then we drill a new hole in the plate .
How to change the thermostat on a VAZ-2110 with an injection 16-valve engine?
When replacing a faulty device with a 2110 with a 16-valve engine, the required tool and algorithm of actions remain virtually unchanged:
- Drain the coolant from the system;
- Remove the air filter;
- Loosen the fixation of the water pipes (inlet and outlet) connected to the thermostat;
- Tighten the bolts holding the device to the block.
- Remove the cover (if necessary);
- Remove the main valve from the casing;
- Return everything to its place in reverse order. Be sure to change the rubber used to seal the case.
How to quickly and easily check the operation of the thermostat without removing it from the car
Hi all! When the engine is running, it will definitely heat up. The colder the internal combustion engine, the more fuel it will need to consume. But the engine should not be allowed to overheat, since this is fraught with serious consequences. An important element in the power unit temperature control system is the thermostat. It may fail. Therefore, it would be logical to talk about how to check the operation of the thermostat and determine the malfunction of the unit.
Every motorist should know this, since such trouble can await you at any turn.
Previously, when talking about the reasons for engine overheating, one of the key points was the thermostat.
Today I’ll tell you in more detail about its functions, operating features, and also directly discuss the issue of self-checking without removing it.
How to change the thermostat on a VAZ-2110 with a carburetor 8-valve engine?
If the thermostat fails on a “ten” with a carburetor and an 8-valve power unit, the algorithm remains unchanged:
- Prepare the tool (described above);
- Drain the coolant (optional), if you drain it, do not forget to open the expansion tank cap;
- Discard the three pipes that fit the device body (first loosen the broach using a hexagon);
- Loosen the clamp and remove the thermostat with the hose.
Otherwise, the actions remain similar to those described for the injection 8-valve engine.
Removal
Before replacing a broken thermostat, you need to remove it:
- Unscrew the cap from the expansion tank; this is necessary so that antifreeze flows normally out of the system;
- Remove the plug from the drain hole at the bottom of the radiator tank, first replace it with a clean container and drain the antifreeze;
- Remove the entire thermostat assembly. Or, if you prefer, just its thermocouple.
In the latter case:
- Remove the hoses located on the thermostat cover pipes;
- Remove the cover with the thermocouple. Now you can check it, as already described.
Late detection of cooling system defects can lead to costly repairs. One of the most vulnerable elements is the fan switch sensor. The following material will help you check it yourself:
How to check if the thermostat on a VAZ-2110 is working or not?
Before replacing the device, make sure it is faulty.
We highlight the following options:
By heating (without removal).
Let the car cool down after the trip, grab the lower pipe and ask an assistant to start the engine.
The temperature of the pipe should gradually increase (after 2-3 minutes it becomes warm). If this happens, then the thermostat is intact.
Read more about how to check the thermostat without removing it from the car on this page.
According to the condition of the thermoelement (with dismantling).
The algorithm of actions is as follows:
- Dismantle the thermostat and remove the starting element from it;
- Take water into a metal container, install a thermometer in it (the one for measuring water temperature), and heat the liquid to 94 degrees Celsius. If the thermostat is working properly, then a special rod extends from the starting unit (it should begin to move already at 82-84 degrees Celsius). If there is no reaction, there is no need to change the entire device - just purchase a new heat-sensitive element and replace it. New thermostats are checked in the same way.
- By appearance. Inspect the condition of the device. If there are chips or cracks on the case, then do not save money on the purchase. Such a device is likely to fail soon.
Be careful when purchasing a new thermostat.
Do the following:
- Carry out the experiment with it described in point 2. If, when reaching 80-85 degrees Celsius, the rod does not begin to extend, then the device is faulty.
- Inspect the condition of the unit for mechanical damage.
Verification methods
There are several ways to check the VAZ 21102 thermostat, in particular:
- check without removal;
- checking a removed thermostat
To check without dismantling, start the engine and wait until it reaches operating temperature. Next, grab the lower pipe with your hand (it comes from the thermostat). At first, the pipe should be warm, and after a few minutes it should gain temperature. If the lower pipe is cold and the coolant temperature approaches 100-110 degrees, then the thermostat is not working and needs to be replaced.
There is also a simple and working way to check the thermostat removed from the engine. Heat the water to 80 degrees and lower the thermostat into it. Next, heat the water another 10 degrees and watch the thermostat; the valve stem should gradually come out.
It is not advisable to repair the VAZ 2112 thermostat due to the low cost of a new spare part.
What pitfalls are possible during the installation process?
- To avoid problems during the part replacement process, consider the following:
- Allow the engine to cool before starting work;
- It is not necessary to completely drain the coolant (but it is better to do so);
- Before replacing, make sure that the problem is in the thermostat (use the recommendations above);
- During the assembly process, change the clamps, since the old ones are unlikely to withstand repeated broaching;
- Install a new gasket between the body and body (even if it looks fine);
- The old pipe between the expansion tank and the thermostat may be short, so buy a new one. The best option is to buy a pipe for 2211 (it fits perfectly).
How to replace a temperature maintenance device
There is nothing difficult about replacing. Even a person who has little knowledge of cars can do the job after familiarizing himself with the basic steps. If you follow all the recommendations, you can replace the device in a few minutes. For work you will need.
- Silicone sealant.
- Clamps.
- Pipes (if the old ones have become unusable and cracked).
- Antifreeze.
- Container for draining coolant.
- Set of keys and screwdrivers.
Place the car on a level surface and remove the engine protection. When draining the liquid, it will interfere and you will lose a lot of antifreeze. Remember the main rule: do not carry out repairs on a hot engine. The temperature of the antifreeze sometimes reaches 100-120 °C, which can cause burns and serious damage to the skin.
Now place a container under the drain hole on the radiator. Open the stove tap just in case. You don't need to drain all the fluid, just make the level lower than the thermostat position. The second drain hole is located on the engine block and is unscrewed with a 13mm wrench. Replacing an old-style thermostat involves loosening all the clamps on it and removing them.
When installing a new device, it is advisable to lubricate the outer part, which will fit onto the pipes, with sealant. Just first you need to degrease the surface of both the body and the internal cavity of the tubes. Replacing the new thermostat is a little more complicated: there are slightly more pipes, you will have to unscrew two nuts from the engine block. Most often, the breakdown consists of a jammed thermal valve: it is either constantly open or closed.
Deposits and scale inside the housing directly indicate that it is time to clean the system. If it is such a “mess,” then the engine jacket is even worse. To get the job done, water with vinegar will come to your aid. If you do not want to use such a solution, you can purchase a special liquid in the store, the composition of which is less aggressive.
Source
New and old VAZ-2110 thermostats: installation features and differences
The type of thermostat used on the VAZ-2110 depends on the year of manufacture of the vehicle.
Initially, the same devices were installed as on the “eights” and “nines”, but due to low efficiency and frequent breakdowns they had to be replaced.
The main differences of the new design (5-hole thermostat) are the ability to disassemble and replace only the starting (heat-sensitive) element.
On older machines, the device was connected to the motor block using a short pipe.
In new models, fixation is carried out using a pair of studs. In this case, between the thermostat and the power unit there is a paronite gasket, which can be treated with silicone-based sealant (this procedure is not always necessary).
After 2003, 5-hole thermostats gradually changed to 6-hole ones.
According to the manufacturers, they are stable and provide better performance in extreme cold.
Advantages of the new device:
- Stable coolant temperature;
- No malfunctions in the heater operation;
- Greater work resource.
After installing a 6-hole thermostat, the engine easily reaches operating temperature at 20-30 degrees below zero, even with the heater on.
You also need to know that the bypass channels in 5 and 6 hole thermostats are different. In the first it is 16 mm, and in the six hole it is 11 mm.
This affects the fact that the circulating antifreeze through the bypass channel of 11 mm in a small circle flows faster than through the channel of 16 mm, which means that the flow (volume) of coolant through the stove increases, so it will be warmer inside the car.
The device is installed in two ways:
- Classic;
- Alternative.
In the first and second cases, to complete the work you will need three liters of antifreeze, a gasket for the thermostat, filler and supply hoses, as well as a new thermostat.
In addition, stock up on 15-28 mm clamps (5-6 pieces will be required).
To avoid spilling coolant during installation, remove the pipe from the throttle assembly (going to the saxophone) and gradually drain the antifreeze until the leak stops. After that, continue working.
Selection of the necessary thermostat parameters
The choice of this spare part must be approached wisely, since the temperature, as described above, should depend on the operating conditions. Try to take into account conditions such as where the vehicle is used and the loads under which the vehicle is used. Choose a part so that your car's engine does not overheat, but at the same time, so that it does not operate in low temperature ranges - the second case can lead to increased wear of engine components.
In addition to benefiting the engine, the thermostat affects the comfort of the driver and passengers. The temperature in the cabin directly depends on what parameters the new valve has. If you operate the car mainly in winter, then choose a part with a higher valve opening temperature. Otherwise, the antifreeze temperature will not be sufficient to heat the interior to a comfortable temperature.
What are the features of the classic and alternative connection options?
In the first case:
- The main thermostat valve is flushed with coolant from the main radiator and engine;
- The thermostat opens for additional cooling - in this case, there is control not only over the entire coolant temperature in the system, but also over the temperature of the coolant leaving directly from the engine, and this, as is known, is the hottest place in the cooling system.
The standard connection diagram for a six-hole thermostat will look like this.
Connection example.
In the second case:
- The thermostat is additionally washed with coolant from the heater and bypass.
- The device controls the temperature, which is lower than the motor temperature (from the thermostat output or from the bypass). It turns out that in winter such a thermostat will work later than according to the classic connection scheme. The functioning of the stove also improves, which works more actively the lower the temperature outside.
The alternative connection diagram has two options.
As for the speed of warming up the engine, it remains unchanged, because the path of coolant flow until it reaches 82 degrees Celsius has not changed, as has the heat capacity of the system.
The role of the thermostat in the engine cooling system
The engine cooling system is divided into two circuits: large and small. The small circuit encloses the internal elements of the engine and the heater radiator for heating the interior. The large circuit includes the small one, but in addition passes through the cooling radiator located in front of the engine. Thus, when the coolant temperature reaches a set level, the valve opens the flow into a large circuit and the antifreeze is cooled by oncoming air, entering the cooling radiator. If there is not enough oncoming air, the engine temperature sensor transmits a command to the control unit, which in turn turns on the cooling fan located in front of the radiator.
As soon as the air entering the radiator cools the liquid to a certain temperature, the valve closes and the antifreeze again flows through the small circuit. As a result, the engine temperature is maintained in operating condition.
Signs of thermostat malfunctions and diagnostics
During operation, the thermostat valve is subject to operational and temperature loads, that is, it can fail for many reasons. Among the main ones:
- low-quality or used coolant (antifreeze);
- mechanical or corrosive wear of the valve drive, etc.
A thermostat malfunction can be determined by the following symptoms:
- The internal combustion engine of the car, without being subjected to special loads, overheats - the thermostat thermocouple has ceased to perform its functions. If everything is normal with the cooling fan, to check, dismantle the thermostat and check the functionality of the valve;
To check the thermostat on a VAZ 2110, you can use several methods, since there are several methods for diagnosing the thermostat for failure:
- Start the car and warm up the engine to the desired temperature, first opening the hood. Find the lower pipe coming from the thermostat and feel it for heat. If the thermostat is in good condition, the pipe will heat up quickly;
- Dismantle the thermostat and remove from it the thermoelement responsible for starting the coolant circulation. Place the thermocouple in water heated to a temperature of 75 degrees and keep it until the water warms up further (up to 90 degrees). In good condition, when the water is heated to 90 degrees, the rod from the thermoelement should extend.
If problems are found with the operation of the thermostat, it needs to be replaced. By the way, when buying a new thermostat, you need to check it by blowing into the fitting (no air should escape). Also, some owners, before installation, immerse the new device in hot water for insurance, as described above. This eliminates the risk of installing a faulty device.