It often happens that the gearbox on a VAZ-2110 begins to work incorrectly. Some motorists are beginning to panic, believing that the gearbox will soon fail. In fact, often The culprit of all extraneous squeaks, noises and crackling noises when changing gears is the gearbox rocker. As practice says, in most cases this part does not need to be changed; it is enough to simply adjust it correctly.
But there are times when adjustment does not lead to the desired results. In this case, the part will have to be replaced.
How to identify signs of a broken rocker on a VAZ-2110
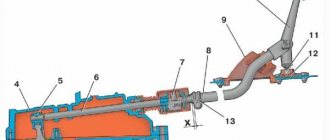
Gear shift drive diagram.
It is enough for an experienced owner of a VAZ-2110 to easily determine if the link is broken. This is indicated by a number of the following signs:
- Unable to engage first gear.
- The gearbox does not want to turn off first gear.
- It happens that the first gear is engaged without problems, but then the transmission itself switches to reverse gear.
- First and fifth gears do not engage, but other modes engage normally.
To avoid expensive gearbox repairs, if even one of the above symptoms is detected, you need to immediately go for diagnostics to a car service center or to a garage to independently determine and repair the breakdown.
What should I change?
Most types of breakdowns can be diagnosed independently, after which they should be promptly eliminated:
- If the gearbox lever has a lot of play, this is the result of wear on the rocker . In this situation, adjustment will not help. The backlash can only be eliminated by replacing the backstage.
- The rocker makes a characteristic ringing sound when changing gears . One of the most difficult cases. Replacing the slide may not help. This defect is usually related to the gearbox. It is possible that this is a manufacturing defect, or the result of unqualified intervention in the gearbox.
- The gear is engaged with great difficulty, it can “get knocked out” . In this case, you can try adjusting the scenes. If this does not help, it will have to be replaced.
- When trying to engage first gear, it always shifts into reverse . In this case, you need to change the backstage. In some cases, a repair kit may help.
- When the engine is running, there is strong vibration of the gear shift lever . In this case, it is possible that there is play in the hinges of the box.
All detected breakdowns must be promptly repaired, otherwise serious gearbox repairs cannot be avoided.
Replacement
If the steps described in the previous paragraph did not help you, then, apparently, you need to replace the element yourself.
What will you need?
In order to replace the backstage, you will need to prepare everything that may be required to complete the work:
- directly new rocker for VAZ 2110;
- screwdriver;
- side cutters;
- set of wrenches;
- ratchet;
- lubricant "Litol-24".
New rocker for VAZ 2110 transmission
Flat head screwdriver
Side cutters - you will need to use them to cut through the clamp
Prepare a set of wrenches - you will need different sizes of wrenches
Ratchet for loosening bolts
Lubricant "Litol-24"
Step by step instructions
- Sit in the interior of your VAZ 2110 and use a screwdriver to dismantle the decorative cover of the gearshift lever. Pull the gear selector up and remove it along with the protective cover.
- Take a 10" wrench and unscrew the two fastening nuts one by one, as well as the bolt securing the rear gear lock bracket trim.
- Next, take a “13” wrench and unscrew the nut securing the gearbox lever axis. Then unscrew the screw securing the axle. This is where you may need a ratchet.
- Dismantle the axle. Then remove the set of bushings from the gearbox selector (so as not to lose them during the replacement process).
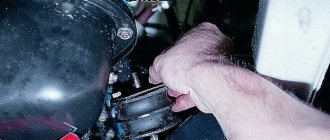
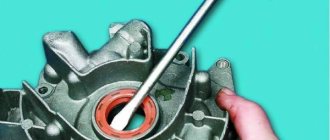
- After this, you need to dismantle the jet thrust from the rocker pad. To do this, take a spanner wrench with which you will hold the nut on top, and using the “13” wrench, unscrew it, as shown in the photo.
- Then you need to remove the facing part of the floor and the plastic console - otherwise it will not be possible to dismantle the backstage. To do this, unscrew all the bolts around the perimeter of the console. After removing the top of the console, do the same with the bottom. Be careful not to damage the electrical wires.
- Next, unscrew the four screws securing the gearbox selector to the car body.
- Get under the bottom of the vehicle and, using a 13mm wrench, unscrew the nuts of the rocker pad bracket, and then remove the bracket itself.
- Dismantle the rocker assembly with the gearshift lever. Carefully visually inspect all elements of the device. Perhaps only the cushion has worn out, and the drawstring itself has not yet reached the end of its service life. Then replace the pillow and install the element in place.
- If the transmission component itself has failed, that is, mechanical damage is clearly visible on it, for example, the ears have broken off, then the link should be replaced with a new one. Before doing this, lubricate all rubbing elements, including the gearbox lever, with engine oil or Litol-24 to avoid squeaks.
1. Using a screwdriver, remove the gearbox protective cover.
2. Unscrew the nuts and screw securing the reverse locking device bracket.
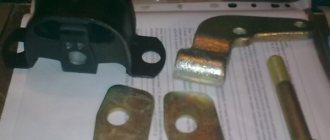
3. This is what the reverse gear locking device looks like when disassembled.
4. Unscrew the bolts securing the rocker to the VAZ 2110 body with a wrench.
5. Dismantle the backstage through the bottom of the car.
6. This is what a failed link with cracked mounting lugs looks like.
This completes the replacement of the VAZ 2110 backstage with your own hands. Reassemble all components in reverse order.
Modification by installing a different type of backstage
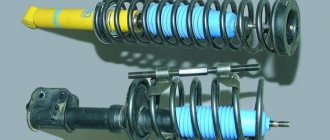
In the photo above there is a short-throw rocker, below is a standard one from a VAZ-2110.
Currently, VAZ-2110 owners have the opportunity to install an improved gearbox linkage on their car. This tuning includes replacing a standard part with a short-stroke rocker. Thanks to this procedure, gear shifts begin to shift much more clearly. Installation of the modernized backstage occurs according to the following algorithm:
- First, you need to disassemble the ball from the outside.
- You need to unclench the iron ring of the support and spread the plastic legs. After this the ball will come out.
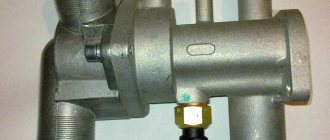
- The thrust from the support is switched off. A piece of pipe and a piece of sheet metal need to be welded to the rod itself.
The diagram shows the incision locations.
New lever, welded from 8th and 10th.
Insertion into the original 10th slide.
We replace the cardan with a trimmed Kalinovsky one.
- The hinge with the hook must be lifted up.
The result of the work done.
View from above.
Of course, installing a short-throw shifter is not a completely standard procedure, which entails working with a welding machine, but after installing it, gears will shift much more clearly and smoothly.
On the other hand, the force that will need to be applied to the lever will become much greater. Therefore, for those who do not like to change gears with force, installing a short-throw shifter is not recommended.
Airbag malfunctions
Understand that pillows
They have become unusable based on the amount of engine vibration. If it operates in normal mode, and the body begins to rattle, transmitting vibration to the steering rack, pedal block, and instrument panel, you can be sure that the reason for this is the wear of the pillows.
The greatest vibration is usually observed when the engine starts, as well as when it is turned off. When the rubber cushions are completely worn out, a knocking noise may appear caused by the contact of the engine elements and its supports.
Read:
To be more convincing, start the engine, open the hood and visually inspect the engine mounts and the cushions themselves. Replacing the VAZ 2110 clutch without removing the box and draining the oil. Place your palm on the motor and feel how much it vibrates.
The causes of failure of engine mounts can be:
- deformation due to spent life, mechanical or temperature effects;
- loss of elasticity due to “aging” of rubber and temperature changes;
- delamination or cracking caused by exposure to chemically active liquids.
Is there any point in repairing the gearbox?
It happens that the metal parts of the scenes are in good condition, and only the plastic parts wear out.
The rocker repair kit includes all plastic parts.
In this case, you can get by with a repair kit. It is inexpensive, although the operations of disassembling and assembling the stage will take much longer than replacing the entire assembly.
In any case, everything will become clear when disassembling the scenes:
- It is enough to replace a deformed bushing with a new one.
- The hole in the lever axis must also be checked for wear.
- The cardan is also checked for play. If it is found, then a repair kit will not be enough.
It also happens that all extraneous sounds during operation of the gearbox are associated not with the rocker itself, but with its cushion.
Adjustment
You still need to engage first gear and drive onto the overpass. Naturally, put the car on the handbrake and put wheel chocks under the wheels. Don't turn off first gear!
From below, find the clamp that secures the rocker and loosen it. Returning to the car, you need to move the lever to the left as far as you can. You cannot move the lever back or forward; the link may come off.
Go back under the car and tighten the clamp. Sometimes it is enough to move the rocker relative to the cardan by a few millimeters, and the gearbox will work perfectly again, gear shifts will occur as expected.