Welcome, friends, to the DIY auto repair website. Timely diagnosis and repair of the brake system is primarily your safety.
Replacing the rear brake cylinder of a VAZ 2110
If you do not pay attention to the brakes, ignore noises or leaks, then a decrease in efficiency or complete failure of the system is possible.
At the same time, experts consider malfunctions of the brake cylinder to be the most dangerous and common problems.
Features of the system
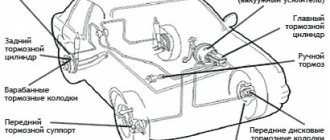
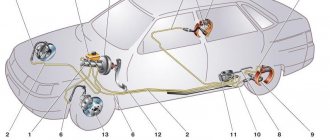
VAZ 2110 cars have a special design. In them, the brake drums are controlled by different hydraulic drives, that is, the front and rear left wheels are controlled by one hydraulic drive, and the front left and rear right wheels are controlled by another.
The peculiarity is that these systems are interchangeable. If any circuit fails, the second one is able to provide insurance and prevent an accident.
The hydraulic drive is based on four main elements - a brake cylinder, a brake pad, a rear brake shield and a guide spring. Moreover, the efficiency of the entire system depends on the integrity of the cylinder and its serviceability.
During operation, the unit may wear out, become damaged and fail. The only solution here is to replace the rear brake cylinder of the VAZ 2110.
Reasons why the brakes might fail
Any problems during the braking process reduce its effectiveness, which can lead to dire consequences for everyone - the driver, passengers, and other road users. Very often, problems arise simply because the driver uses low-quality brake fluid.
If your car suddenly loses brakes, this may be due to several reasons, the main thing is not to blame the master cylinder for all the problems. Below are the reasons why the brakes on a car fail:
- One of the main causes is usually a leaking slave cylinder. Gradually, slowly or quickly, all the contained liquid flows out of it.
- You should also check the level of brake fluid in the reservoir and the condition of the main brake.
- If traces of smudges are noticeable on the main brake, then this is the reason.
- Another possible cause of brake failure could be that the brake line is torn. For example, rubber brake hoses could fray, partially rot in some places, or get punctures.
- The working cylinders may have jammed;
If it is nevertheless noticed that the main brake cylinder is not working:
- it will show where traces of brake fluid leaks appeared;
- it will be impossible to press the brake pedal;
- on the contrary, the brake pedal can move on its own without the driver making any effort to do so.
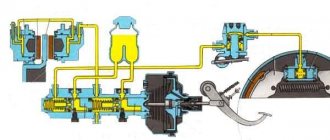
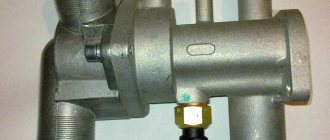
Master brake cylinder with reservoir: 1 — master cylinder body; 2 ~low pressure sealing ring; 3 — drive piston of the “left front-right rear brake” circuit; 4 - spacer ring; 5 - high pressure sealing ring; 6 — pressure spring of the sealing ring; 7 — spring plate; 8 — piston return spring; 9 — washer; 10 — locking screw; 11 — drive piston of the “right front-left rear brake” circuit; 12 — connecting sleeve; 13 - tank; 14 - emergency brake fluid level sensor; A - gap.
Therefore, it is possible to repair the VAZ 2110 brake cylinder, but not always. Most often, if it leaks, a repair kit will help fix the problem and restore the cylinder’s functionality. If the internal mirror in the cylinder is damaged, then, unfortunately, nothing can be corrected, since grinding is prohibited. If everything is not so scary and repairs are possible, you can do it yourself, because the price of the repair kit is quite reasonable, and almost every motorist can afford it.
What tools are required to replace a brake master cylinder?
- key to 17;
- key to 10;
- half-liter bottle of brake fluid;
- syringe;
- brake fluid.
Brake cylinder malfunctions
A breakdown can be recognized by several main symptoms:
- Reduced efficiency of the braking system (the braking distance of the vehicle increases noticeably);
- the appearance of “softness” when pressing the pedal.
The first thing to do in the situations described above is to bleed the brakes and check the condition of the pads. If no problem is identified, then most likely the cause is a failure of the brake cylinder.
The appearance of a leak in the cylinder area. This can be diagnosed by the appearance of an oil stain on the brake support disc. In such a situation, you cannot hesitate, because we are talking about depressurization of the system.
In such a situation, the pedal simply “falls” to the floor, and braking does not occur. Disassembling the unit and installing new cuffs most likely does not help. The rear brake cylinder needs to be replaced.
Vacuum booster
The braking system of a car certainly cannot be called perfect, so it has to be supplemented with devices that help improve efficiency. One of them is a vacuum booster.
Application and purpose
Today, a vacuum amplifier is in great demand because it is highly efficient. Its tasks are extensive, but the amplifier copes with them all perfectly:
- The degree of resistance of the brake pedal increases;
- Reduces the load on the brake system;
- Acts as a highly efficient auxiliary unit;
- Has a positive effect on the service life of the brake system, etc.
This element has the following components:
- Dense body, for the manufacture of which a high-strength polymer is used;
- The diaphragm, which is also called the collecting node;
- Monitoring or control specialized valve;
- Pusher. It allows you to return the engine elements to their original position when there is no power;
- Main piston rod of the brake system cylinder (main);
- Switch return spring.
The body of this spring has two cellular divisions, which are divided into vacuum and atmospheric. Cells are often called chambers.
- The vacuum chamber is a cell directly connected to the brake master cylinder.
- The atmospheric chamber is a cell located opposite the brake pedal. Its open part of the body rests on the brake pedal.
It is also worth noting the diaphragm, which performs two very important tasks:
- Corrects the position of the piston in space;
- Pumps brake fluid to the main brake cylinders.
Installing a vacuum booster involves a serious change in the sensitivity of the pedal, so it is strongly recommended not to apply a large and sudden force to it in the “first couple”. Pressing should be done carefully and smoothly.
Malfunctions and ways to check them
It is possible that you may need to replace the vacuum booster on your VAZ 2110. The cause may be various malfunctions, the characteristic symptoms of which are as follows:
- When you press the brake pedal, a hissing noise occurs, and at the same time, the engine speed often increases;
- The car starts to shake;
- Spark plugs stop working efficiently;
- Fuel consumption increases noticeably.
Before replacing the vacuum booster on a VAZ 2110, it should be checked. This procedure is performed as follows:
- As with normal bleeding of brakes, with the engine not running, press the gas pedal several times;
- After 5 or 6 presses, keep the pedal in the down position, resting it on the floor, and start the engine;
- After starting, the pedal itself will move forward a little.
There is also a high probability of damage to the diaphragm, which forms a hole over time. You can purchase a diaphragm with a repair kit, the cost of which is no more than 500 rubles.
Replacement
To replace an element, you need to understand the main issue - how to remove the vacuum booster from a VAZ 2110. Directly replacing the old element with a new one will not be difficult, just like the reassembly process.
Therefore, we will tell you about the main thing - dismantling the amplifier. Let's start with the fact that the procedure is not complicated, but it requires accuracy and sequence of steps. If you follow the recommendations, the work will take little time and will not take much effort.
- Disconnect the block with wires, which includes brake fluid level sensors in its design.
- Hold the booster check valve with one hand and carefully disconnect the hose with the other. It is advisable to disconnect the hose with a strong hand, since this will require a lot of force.
- Remove the two bolts connecting the booster and master cylinder.
- Carefully remove the cylinder from the amplifier.
- There is no point in disconnecting the brake lines.
- Give access to the dashboard, which will allow you to unscrew the nuts holding the brake pedal bracket. There should be 4 of them.
- It is recommended to dismantle the bracket and amplifier through the engine compartment, since there is enough free space for such manipulations.
- Remove the pin lock plate. To do this, pry the finger with a screwdriver and squeeze it out.
- Now you can easily disable the brake pedal and booster.
- To disconnect the amplifier and bracket, you will have to unscrew the two nuts on the mount.
- A new one is installed in place of the dismantled old vacuum amplifier, and the reassembly procedure is performed in strict sequence of the dismantling process.
The process of replacing the rear brake cylinder of a VAZ 2110
Once you have diagnosed the problem, proceed with the replacement. At the same time, learn that it is better to install new cylinders on two wheels at the same time.
Attention! Practice shows that when one device fails, the “life” of the second also comes to an end. So it's better to save your time and do the work in one go.
The sequence of actions for replacing the brake cylinder is as follows:
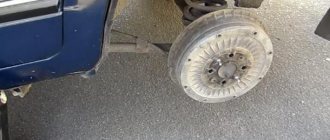
1. Place the car on the pit (you can use a lift or find an overpass nearby). The main thing is that there is full access to the bottom.
2. Secure the front wheels (install locking shoes).
3. Remove the rear wheels.
4. Using a hammer with a rubber base, “knock out” and then remove the brake drum.
5. Remove the edge of the upper lag spring from the brake pad.
6. Raise the handbrake all the way to the top. Thanks to this simple manipulation, the brake pads are moved apart and removed much easier.
5. Unscrew the brake pipe from the cylinder.
6. Remove the brake cylinder itself from the rear support disk.
7. Assess the condition of the old node. Replace it if necessary.
8. Reassemble everything in reverse order.
9. Bleed the brake system.
Please note that all work on removing the brake cylinder and replacing it must be carried out in strict order. Particular attention should be paid to the subsequent tightness of the system and high-quality bleeding of the brakes.
Cylinder removal video
Diagnostics and repair
From the signs listed above, it is easy to understand that in most cases there is only one source of problems - rubber products that have become unusable. The cuffs crack and swell, as a result they leak liquid and close the discharge holes. Hence the recommendation: all “rubber bands” of the brake system should be changed at intervals of approximately 100 thousand km, without waiting for critical wear.
Before checking the GTZ for operability, make sure there are no other faults:
- Inspect the wheel assemblies from the inside for leakage of brake fluid from the working cylinders.
- Check the integrity of the expansion tank and the fluid level in it.
- Start the engine and at idle speed, press the vacuum take-off pipe to the amplifier. If the engine speed has increased noticeably, there is an air leak and the master cylinder is most likely working.
A clear symptom indicating a breakdown of the main hydraulic cylinder is drops of brake fluid on the body. If you discover a leak, feel free to dismantle the unit and disassemble it to look for the cause. Another common problem - fluid flowing through the seals - is diagnosed as follows:
- Open the cover of the expansion tank and place an assistant in the driver's seat.
- Listening to sounds in the tank, give the command to an assistant to press the pedal.
- If the pedal moves easily and gurgling is heard in the reservoir, liquid is entering there. The reason is that worn cuffs are unable to create pressure in the circuits; liquid seeps through the leaks and enters the container.
Also, problems with the GTZ are indicated by jamming or too little pedal travel. Sit behind the wheel, press it several times, and start the engine while holding the pedal with your foot. If it sinks to the floor or does not budge, disassemble the hydraulic cylinder.
To replace or repair the master brake cylinder, you need to remove the unit from the vehicle. Work is carried out in the following order:
- Suck out the liquid from the tank with a syringe. If the cuffs are leaking, press the pedal several times and suck out the excess fluid.
- Remove the expansion tank.
- It is not necessary to drain all brake circuits. Substituting a small container, unscrew the nut of the first tube and carefully move it to the side, plugging it with a wooden stick.
- Repeat the operation with the second tube, unscrew the fastening of the GTZ flange and remove the unit.
Further actions depend on the design of the master cylinder. If the element is completely disassembled, change the rubber seals. Otherwise, you will have to replace the pistons assemblies.
Pre-wash the body and all openings with alcohol; do not use gasoline. After assembly, add fluid and bleed the brake system to remove air.
Tags: control systems, braking system
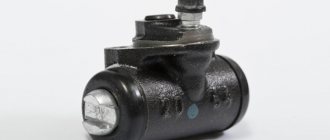
There always comes a time when some problems arise in the operation of a part. If the brakes fail during a trip, this means there is a danger for the driver and passengers. The brake wheel cylinder is a very important part of the entire brake system.
It converts the pressure exerted by the fluid into a force that is exerted on the brake pads. Therefore, it is necessary to replace the master cylinder in time if irreparable problems arise with it.
When the driver brakes, he exerts an effect on the brake pedal, and in order for this effect to be realized, there is a part - a rod that acts on the piston of the main cylinder. It affects the brake fluid, which then affects the cylinders. During this process, special pistons press the brake pads against the discs (sometimes drums). The differences arise from different types of braking systems.
Below are instructions for replacing the master cylinder. She will help you make quality repairs with your own hands:
- reasons why the brakes failed;
- the ability to repair the brake master cylinder;
- tools necessary for work;
- replacing the main cylinder;
- its final removal;
- cylinder installation;
- improvement of the main brake cylinder.
How to repair a brake cylinder?
If the brake cylinder is intact and only some parts are worn out, then you can try to disassemble and repair the device.
For this:
- Remove the protective caps from the device;
- remove special pistons from the housing along with elements for automatically changing the gap;
- turn and remove the thrust screw;
- remove the support cup and sealing ring. These parts are removed along with the spring and “crackers”;
- separate the thrust screw and the ring.
After disassembly, pay attention to the following points:
Inspect the working parts of the cylinder - they should not show any damage, roughness or scratches.
If there are serious defects, a reliable option is to replace the brake wheel cylinder. Minor damage can be removed by lapping and sanding;
- Check the condition of the “crackers”, support cup, springs and screw. If one of the devices is damaged, the part will need to be replaced;
- replace seals;
- install new caps.
avtoexperts.ru
The GTZ is an integral part of the brake system, which performs one of the key tasks - converting the force applied to the brake pedal to generate pressure in the system. The GTZ interacts through the “vacuum valve” rod with the brake pedal directly. The task of the GTZ is to evenly distribute pressure across all circuits.
The brake cylinder is located on the brake “vacuum reservoir” cover. A brake fluid reservoir is mounted above it. The sections of the tank and the GTZ are interconnected by bypass holes, and are responsible for a specific section in the system. The reservoir itself is designed to replenish the loss of “brake fluid”. Visually, the tank has a transparent body, with a scale for monitoring the liquid level. In addition to the scale, sensors installed in the tank are used to signal the liquid level, displaying information on the “tidy”.
Types and design of GTZ
Structurally, gas turbine engines are divided into the following types:
For clarity, we will consider the design and principle of operation using the example of double-circuit GTZ. They are more popular than their predecessors. The latter were installed mostly on cars of the last century (various models of Moskvich, Zhiguli, GAZ, GAZ-53, 33 (first modification) trucks, etc. The dual-circuit system is considered more effective in terms of braking. Now it is equipped with Most of the modern cars are both domestic (Lada Kalina, Priora, “Ten” family, “Samar”, Granta, Vesta, Xray) and foreign (Renault Logan, Volkswagen Polo, KIA RIO, Hyundai Solaris, Opel Astra, Vectra, Chevrolet Lanos, Aveo, Cobalt, etc.) The advantages of a dual-circuit brake cylinder system are that if, for example, one circuit fails, the brakes on one pair of wheels are lost, but another circuit remains in the “battle” another pair of wheels, and therefore brakes, of which there are none.
Each of the circuits is responsible for a specific pair of wheels. So, if the car is rear-wheel drive, that is, there is a division, the first circuit is responsible for the front pairs of wheels, the second for the rear ones.
However, if we are talking about a front-wheel drive vehicle, then the distribution of responsibility occurs diagonally: L.P./P. Z. and P.P./L.Z.
The brake master cylinder has two main types:
• With bypass hole directly in the cylinder body.
• With bypass valve in the piston.
GTZ, where bypass valves are installed on the piston, are used for installation on cars with ABS systems. The fact is that in addition to bypass valves, such devices include valves to maintain excess pressure in different circuits, which is especially important when ABS is operating.
To make it clear, pistons are placed one behind the other in the brake cylinder body. The first piston is acted upon by a rod from the brake booster while the second piston is secured, essentially "free" and moved by increasing pressure or "direct" force from the other piston. In order for the pistons to “move” tightly along the cylinder, cuffs are installed at the edges. There is an additional seal in the space between the pistons. In addition, the device includes two springs, a travel stop, locking rings and a plug.
Principle of operation
From the pedal, a force is supplied to the first piston of the GTZ through the “vacuum chamber”, from which it begins to move. When moving, the holes in the cylinder are blocked, thereby increasing the pressure in the current section. Then, due to the pressure of the first section, the second piston begins to move, similarly blocking the hole of its “block”, increasing the pressure in it. When the desired pressure is reached, the machine slows down. Next, the springs “pull” the pistons back. Passing again through the same holes, the pressure decreases to its original value. Excess brake fluid used in operation is returned to the reservoir.
Replacement of rear brake cylinders in VAZ 2110, VAZ 2112.
The owner of the car lost his brakes, the brake pedal sank, and the car began to slow down at the very end. The rear right brake cylinder has failed and is leaking, that's what caused the whole problem. They must be replaced in pairs. Let's get to work, lift the rear of the car, dismantle the wheels. If you do this with a jack, be sure to place stones or wheel chocks under the front wheels. Unscrew the 2 guide drums:
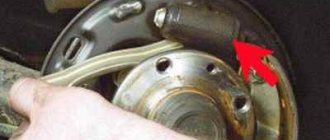
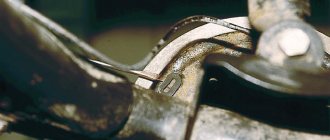
Remove the brake drum. We unscrew the brake cylinder, for this we use a split wrench, an ordinary wide one didn’t work, maybe you’ll get:
Be careful, it is very easy to damage the brake pipe, which will then have to be replaced. Next we unscrew the cylinder fasteners, this can be done using a regular spanner wrench:
Using a bottle of brake cleaner, wash out all the dirt from the brake drum. After this, we install a new original brake cylinder from VAZ. We remove the plug from it and attach it to the tube:
We attach two of its fastening elements. After this, tighten the cylinder itself. Turning the pistons:
Some tips
- If you start having problems with the brakes, first of all you need to carry out an external inspection of the vehicle: check the fluid level in the reservoir, make sure that the front/rear cylinders are not leaking. There should not even be stains of brake fluid in the brake hydraulics.
- “Brake fluid” must be filled with the same brand; it is recommended to completely replace the brake fluid at least once every two years.
- If faults are identified in the gas turbine engine, and it has already served for at least a year, it is more advisable to replace it completely than to repair it. The same can be said about the rear working cylinders.
- Before changing the turbocharger, the brake fluid should be removed from it; this operation is usually done using a syringe.
- Usually a leak in the master cylinder is not visible, but if there is any suspicion that this part is faulty, you should remove the main cylinder - there will be traces of leaks at the rear, and this indicates its faulty condition.
- If, during an external inspection, cracks were found on the brake hoses, it is better not to take risks and immediately replace the defective parts.
Didn't find the information you are looking for? on our forum.
We recommend reading:
Which gasoline is better for VAZ 2114
Air leakage through injectors symptoms of VAZ 2114. Possible malfunctions, cleaning and adjustment
Vibration in the cabin when idling VAZ 2114 injector causes
Repair of the underbody of a VAZ 2107
VAZ 2114 injector boils, reasons
Error p1602 vaz 2114 how to fix
What is an ESD for a VAZ or an ECU for a VAZ 2114
Master cylinder, slave and clutch VAZ 2101. Replacement and repair, fluid pumping
Replacement of rear brake pads in VAZ 2110, VAZ 2112.
Let's start replacing the rear brake pads on the drums. An original set of rear brake pads was purchased in advance, which is suitable for cars of the tenth family of VAZ, Samara, Kalina and Priora. First we put on the springs:
We assemble the block itself and put a new spring on it:
We remove the handbrake lever and put it on the cable. After this you can put on the pads:
Using a special hook, we put springs on them:
Install the lower spring on the pads:
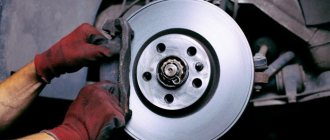
New pads are installed, let's see how the drum stands up. If everything is fine, then lubricate the hub with copper grease. After this, we finally install the drum and screw it on. Tighten the handbrake cable:
Now we need to bleed the brakes.
Required spare parts
Just 10 years ago, old pads were not replaced; they were glued on, linings were changed, or they were riveted. Today on the market you can easily purchase the entire mechanism. To replace, you need to prepare new pads. Experts believe that it is better to install replacement factory parts, article number 2110-3501080-60 (TIIR-260), 21100350180082 or 2110-3501080. There are other opinions. Some motorists believe that pads from well-known brands provide the best braking parameters on the VAZ 2110, 2111, 2112. These are parts from brands such as Brembo, ABS, Ferodo, TRW, Bosch, Optimal or Delphi.