Ventilation and heating system VAZ 2109
As you know, on the VAZ 2109, interior heating is provided by air heated by a radiator. On the VAZ 2109, heating and ventilation of the interior are interconnected and represent a special system. In this article we will look at the general principles of operation of the heating and ventilation system of the VAZ 2109.
Internal structure and principle of operation
The heating system installed on the VAZ-2109 has its own differences and features compared to other cars in the AvtoVAZ line.
The heater consists of a pair of plastic casings (on the right and on the left), which are connected to each other along the entire perimeter with clamping brackets. A special flagellum is placed in the grooves of the casings to seal it well. The fan supplies air flow to the interior of the machine. The VAZ-2109 stove is designed so that the fan can be easily removed independently from the engine compartment.
An electric motor of type 45.37230 is attached to the casing, and a fan is located on its shaft. To obtain its desired rotation speed, additional resistance was provided. It was attached to the left side of the hole in the heater casing using a screw.
Heating system radiator
A radiator is built into the stove body to heat the air flows, which then blow into the cabin. Using three screws, this element of the system is screwed to the right casing and sealed with a polyurethane foam gasket.
The radiator design is a combination of:
- 2 rows of tubes.
- 2 rows of cooling plates.
- 2 plastic tanks.
It has two pairs of pipes, it is connected to the cooling system by rubber pipes, where coolant circulation is ensured using a pump. In the valve casing, on the axis of the supply line, there is a plate valve, which has a hole; it allows the coolant to pass through. The valve lever is connected by a rod to the handle lever, which also controls the process of heating the air flow. If you turn this lever, the hole in the valve will open the line for coolant to enter the radiator.
To ensure uniform heating of the car interior, the stove has two central nozzles, as well as left and right, to which air ducts are connected.
Exhaust ventilation
The car is equipped with exhaust ventilation, which circulates air from the interior to the street. It is located behind the body openings for the side windows.
Air also passes out through the deflectors when the car moves. The ventilation process is carried out due to the vacuum that occurs at the deflectors during movement. Air is sucked out from the rear of the cabin under the deflector trim; for this purpose, the rubber valves are pressed out and the air flow goes out through the deflector hole to the street.
Rubber valves are needed to prevent outside air from entering the car interior.
Execution of work
The car must be placed on a pit or ramp. Its wheels are fixed with stops. You should start working no earlier than the engine has cooled down. Don't forget to apply the handbrake! You will also need to disconnect the battery - it will be enough to remove the negative wire from it.
It will not be possible to do without draining the antifreeze. Therefore, the prepared container is placed under the hole intended for this purpose and, unscrewing the plug, wait until the coolant drains out completely.
Next, you need to disconnect the pipes connecting the engine directly to the mechanism that has become unusable. The fastening clamps on them are loosened. Use a brush to clean the threads on the two studs that hold the heater tap itself. As reviews indicate, without WD40 it is most likely impossible to easily remove a faulty unit.
Only after this can you completely unscrew the clamps and remove the pipes. Please note that sometimes some antifreeze remains in them. You should be prepared for this and have a vessel ready. To avoid getting your hands dirty, you should also wear gloves.
Having completed the work on the hood side, you need to go to the interior. It will also be impossible to do without removing the torpedo, or rather, its side panel. Having opened access to the remaining pipes, they are dismantled. In those situations when it turns out that they have completely retained their properties and do not need to be replaced, they will only need to be disconnected from the tap. And coolant often leaks from these pipes - be prepared for this.
After the tap has been rid of the tubes, we move again under the bottom of the vehicle. Here, using a 10mm wrench, unscrew the nuts holding the above element in place. Then, returning to the salon, they pull out the tap itself, removing the spring retainer. Only after this is it possible to dismantle the cable leading to the regulator.
When installing a new mechanism, do not forget to return the rod to its place.
Reassembly is carried out in reverse order.
As practice shows, quite often car owners leave the old gaskets behind when replacing the faucet itself. This should not be done under any circumstances. Even if the seals look good, they still have a very limited life and can quickly become unusable. The new ones are supplied complete and you won’t have to spend extra on them.
Electrical component of the stove
Below is an electrical diagram for turning on the fan. For it to work, you need a temperature sensor, which is located in the radiator. When the coolant reaches a certain temperature, the sensor gives a signal and the fan turns on automatically.
- Mounting block.
- Ignition.
- Additional resistance (resistor).
- Motor.
- Button that controls the motor.
A – to the terminal with a plus sign “30” of the generator.
Some cars still have an old mounting block installed, in which case the fan is turned on via a relay.
Determining faults
We identify a radiator malfunction. The first signal that there is a malfunction is the frequent pouring of antifreeze into the tank. In this situation, it is impossible to say for sure that the problem lies precisely in the radiator. The culprits may be the pipes or tap of the heating system. To isolate the option with a tap, it is enough to check the interior of the car for an unpleasant odor and drops of antifreeze on the floor covering. If there are none, the problem is definitely not in the faucet. To determine the condition of the pipes, gain access to them to visually inspect them. This way you will understand whether they are leaking or not.
If there are no problems as such, the problem lies in the radiator. The problem must be solved quickly enough, since antifreeze can get into the interior and ruin the carpeting.
Heating system elements
The stove diagram clearly shows the location of its main functional elements. It should be noted that the design of the stove on the VAZ-2108, 2109 and 21099 models is the same. Many car owners know that the heater in these models is not fully developed. As a result, the interior is not heated properly, so a decision is made to modify the stove with your own hands. Just in this case, it is important to know the design of the heater so as not to confuse anything.
The design of the stove of the VAZ-2109 car, whether it is a high panel or a low one, is absolutely identical. Therefore, the information presented will be useful to owners of this model with any instrument console.
Knowing the main points and what is located where, you can already try to independently deal with the problems that arise and fix the malfunctions that appear, while saving money and time on trips to the service station.
Signs of trouble
A leaking faucet on a VAZ-2109 indicates that it is time to replace it. This type of breakdown is indicated by the persistent smell of antifreeze in the car interior or a puddle of liquid on the floor. If one of the signs makes itself felt, then the first thing you need to do is check the stove. It is worth noting that this is a very important move, since in the initial stages of a breakdown the part can still be reanimated, but in a neglected state, you will have to replace the valve of the VAZ-2109 stove, which most likely will only be possible to do in a car service center.
The inspection is carried out under the hood of the car from the internal combustion engine side. Liquid leakage occurs in different places of the cooling system, so you need to check it completely. For a detailed inspection, it is better to use a flashlight. Fluid may leak from the radiator or from the pipes, as well as from the places where the hoses are connected.
Replacing the VAZ-2109 heater valve is most likely inevitable and this needs to be done as soon as possible. In winter, there is no point in delaying repairs at all.
Construction and operation of the VAZ-2109 stove. Repair instructions.
Heating of the interior of any car is provided by air, which is heated in the heater radiator. The VAZ 2109 heater radiator is connected in parallel to the main radiator, which is part of the cooling system of a car engine.
The heater itself is secured with four nuts in the passenger compartment under the instrument panel to bolts that are welded to the air supply box. The air heated in the heater is directed through an air duct system into the passenger compartment. The air ducts are attached to the instrument panel from below and sealed with gaskets.
How is the replacement made?
If the tap does not open and you discover a problem in the summer, then there is no need to rush, but the leak requires prompt elimination - after all, the cooling system is constantly losing antifreeze, and this, in turn, calls into question the normal functioning of the power plant.
You should know that in both older and new 2109 models, the tap is located opposite the front passenger seat, under the panel.
To replace the unit in question you will need the following:
- new tap;
- a set of gaskets (usually it is sold complete with the above unit);
- a can of WD40 or its equivalent;
- wire brush;
- wrenches for 13 and 10 (both socket and ring);
- screwdrivers;
- container for antifreeze;
- new coolant.
Features of the VAZ 2109 stove design
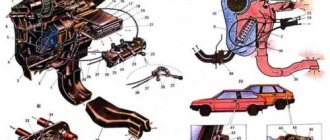
1. Heater casing mounting bracket; 2. Heater control damper; 3. Left heater casing; 4. Leg heating damper rod; 5. Radiator gasket; 6. Radiator; 7. Heater gasket; 8. Electric motor; 9. Fan shrouds; 10. Fan impeller; 11. Heating damper; 12. Heated windshield air duct; 13. Side nozzle air duct; 14. Side nozzle; 15. Central nozzle flap; 16. Blade pusher; 17. Blade axis; 18. Shoulder blade; 19. Lever for shutting off the central nozzle; 20. Windshield heating damper rod; 21. Lever for changing the direction of air flow; 22. Air heating control handle; 23. Windshield air supply handle; 24. Leg air supply handle; 25. Control lever bracket; 26. Bracket for fastening the rod shell; 27. Crane control rod; 28. Heater control damper rod; 29. Foot heating flap; 30. Axes of air heating control levers; 31. Screw clamp; 32. Heater valve; 33. Crane body; 34. Valve lever; 35. Hoses connecting the tap to the heater radiator; 36. Internal ventilation duct; 37. Windows for heating the feet of rear passengers; 38. Heater valve; 39. Driver's foot heating window; 40. Facing the central pillar; 41. Internal cavity of the central pillar; 42. Exhaust ventilation duct; 43. Upholstery of the central pillar; 44. Exhaust ventilation deflector lining; 45. Rubber valve; 46. Deflector housing; 47. Exhaust ventilation deflector; 48. I. Heater; 49.II. Heater operation diagram; 50.III. Heater valve; 51.IV. Interior exhaust ventilation
The stove consists of 2 plastic casings (right and left), which are connected to each other along the perimeter with fastening brackets. A special harness is placed into the grooves of the casings for sealing. The electric fan, which forces air into the passenger compartment, is secured with two screws on top of the heater. The design of the stove is made in such a way that the electric fan can be easily removed from the engine compartment.
An electric motor of type 45.3730 is attached to the fan casings, on the shaft of which an electric fan impeller with three rotation speeds is installed thanks to two resistor spirals. To obtain the required rotation speed of the impeller, an additional resistor is provided, attached to the hole in the stove casing on the left side with a screw.
The radiator for heating the supplied air is installed in the heater casings. It is attached to the right casing with three screws and sealed with a polyurethane foam gasket. It consists of:
- two rows of tubes,
- cooling plates,
- two plastic tanks.
The heater tap, consisting of a housing with two pairs of pipes, is connected to the cooling system by rubber hoses. The cooling system pump circulates fluid through the radiator. On the supply line in the faucet body, a plate faucet valve is installed on the axis, which has a hole that allows coolant to pass through. The valve lever is connected by a rod to the handle lever, which can be used to control air heating. When you turn this lever, the hole in the valve will open the line so that fluid begins to flow into the radiator. Read more about replacing the heater valve here.
The stove is controlled using three handles, the levers of which are mounted on the axes of a plastic bracket attached to the instrument panel with four screws. The heating control handle acts on the valve lever through the rod and on the damper drive lever. When it moves completely to the right, both the valve and the damper are fully opened, and air is supplied by an electric fan through the radiator, where the heated coolant flows.
When the handle is in the middle position, the valve and damper are in intermediate positions; in this case, part of the air passes through the radiator, and part bypasses it. This reliably ensures the required degree of air heating at the moment. If the handle is placed in the extreme left position, the valve and control damper are completely closed, and the air supplied to the cabin is not heated.
Radiator pipes VAZ 2114
Next comes the upper radiator inlet pipe, connecting the radiator to the engine block head.
This hose goes to injection engines. Its internal diameter is 32mm, see catalog number 21082-1303025.
The next one is the lower radiator outlet pipe, which connects the radiator to the engine cooling system thermostat.
Its catalog number is 21082 – 1303010, internal diameter is 32 mm.
“Angle” pipe for connecting the thermostat to the water pump (pump).
Catalog number – 2109-1303093-01. This pipe fits almost all front-wheel drive VAZ models.
The expansion tank pipe is popularly called the “filler pipe.”
It serves to connect the expansion tank to the thermostat. Through it, antifreeze enters the cooling system when the system is filled or topped up through the expansion barrel. See catalog number 21082-1303080 for its number.
Stove pipes VAZ 2114
The pipe that connects the heater to the block head is often called “big goose” in everyday life because of its resemblance to this bird.
The hose supplies coolant from the block head to the heater radiator. We look at the catalog number 2114 – 8101206.
These considered rubber hoses are reinforced, except for the throttle heating hoses and antifreeze steam exhaust hoses.
The goose curve hose is located under the hood of the car and serves to drain coolant from the heater radiator to the water pump.
Catalog number of the crooked goose 2114- 8101208, factory BRT.
The “short” pipe connects the thermostat to the engine block head.
Shorty catalog number 2108-1303082, BRT plant.
The “small” cabin pipe of the stove supplies coolant to the radiator of the stove, through the tap, from the “crooked goose”.
Its VAZ catalog number is 2114-8101200 from the BRT plant.
The cabin “large” outlet pipe is designed to drain coolant from the heater radiator through the “big goose” hose to the water pump.
Catalog number 2114-8101204 from the BRT plant.
Under the hood, the “big goose” supplies coolant to the heater radiator through a tap. And it takes the liquid to the pump from the radiator of the “goose curve” stove through the “large” cabin hose. For example, thanks to a set of rubber pipes, coolant circulates through the heater radiator.
The rubber pipe, the so-called injection “breather”, serves to connect the valve cover of the block head with the “snail” (2111) for supplying air to the engine.
The upper catalog number of the factory breather is 2111-1014058-10.
All connections presented in the video are located under the hood and in the interior of the VAZ 2114 car, related to the cooling system. In addition to the large breather pipes, small breather pipes and volutes, which serve for the passage of air.
The car also contains well-known gas supply hoses, brake hoses, a vacuum hose, as well as windshield washer fluid supply and others. They will also need to be viewed on video and described in the article.
All rubber hoses in a car need constant replacement, as they are exposed to aggressive liquids and gradually lose their properties. They lose their elasticity, become tanned, crack and sometimes break when used for a long time without replacement.
Therefore, it is recommended to periodically review their condition and replace them if any malfunction is detected.
This video ends the review; I hope that the video will be useful to someone both for information and when servicing their car.
Watch the video
Thank you for watching the video, subscribe to the channel, write comments and ask questions.
Features of operation and repair of the VAZ 2109 stove
Many owners of a domestic car of this brand know that the VAZ 2109’s heater does not heat well. As a result, the interior warms up poorly, and driving in such a car is not comfortable. In such cases, the stove is modified. Most often this is done within the framework of VAZ 2109 tuning with your own hands. Video and photo instructions for do-it-yourself tuning work can be found on the Internet. But sometimes it is enough to remove the VAZ 2109 stove and take it for repairs.
The operating procedure is described below.
- Loosen the clamps and disconnect the two hoses from the tap pipes under the instrument panel from inside the cabin.
- Loosen the clamps and disconnect the hoses in the engine compartment from the tap pipes.
- Unscrew the nuts securing the stove faucet.
- Remove the valve from the front panel.
- Remove the crane rod holder.
- Disconnect the rod from the crane lever.
- Remove the cover protecting the gear shift lever from the floor tunnel lining.
- Remove the floor covering.
- Unscrew the fastening screw at the rear of the floor covering tunnel.
- We remove the floor tunnel lining with a shift back.
- We remove the internal ventilation duct and disconnect it from the stove body.
- Disconnect the wires from the heater motor.
- Disconnect the wires from the resistor.
- Unscrew the mounting nuts on the right side of the heater.
- Unscrew the fastening nuts and remove the heater along with the control panel.
After these manipulations, it is enough to choose a good workshop and take the stove there.
When the stove blows weakly, you can adjust the dampers. How to do this is shown in the video.
The radiator may be the culprit for leaving a cold heater in your car.
Instructions for replacing it are presented below:
- Open the heater valve completely and drain the coolant from the system.
- We remove the instrument panel: first disconnect the wire from the battery terminal with a minus sign, set the wheels in a straight position, disconnect the drive cable and the choke rod.
- Remove the heater control knobs, the fan switch and disconnect the trim.
- We disconnect all connectors with wires: fog lamps, exterior lighting, hazard warning lights, cigarette lighter illumination, rear window heating.
- We unscrew the screws that secure the control panel and the canopy over the instruments.
- Disconnect the fitting hose, speedometer cable and block with wires.
- We remove the devices from the panel.
- Remove the hydraulic light corrector handle and unscrew the nut that secures the headlight corrector socket.
- We remove the steering wheel and all switches.
- We take out the ignition switch with the steering column pipe.
- We remove the handle from the rod, disconnect the screws that attach the rod guide to the dashboard.
- Unscrew the screws securing the instrument panel on the left and right sides.
- We take out the panel.
- We unscrew the screw from the right edge of the stove, which secures the damper rod clamp, which is responsible for heating the glass.
- We take out the heater radiator by unscrewing the 3 mounting bolts.
- Loosen the clamps securing the hoses and remove them from the pipes.
The radiator must be thoroughly cleaned, and in case of serious problems, it is better to replace it with a new one.
Replacement
Having discovered that the problem lies precisely in a faulty, failed faucet, it will have to be replaced.
The heater valve is located on the front passenger side under the console.
To replace you will need the following set of tools and materials:
- New faucet. A ball or ceramic one will do, but at worst you can use a factory one;
- Set of gaskets and seals. It should come with the new faucet;
- The almighty WD40;
- Metal brush;
- Socket and socket wrenches for 10 and 13;
- Set of screwdrivers (phillips and flat);
- Silicone based sealant;
- Container for draining coolant;
- Fresh antifreeze or antifreeze;
- Lift, pit or overpass.
When everything is ready, you can start working.
Dismantling works
- Drive the car into a pit, put supports under the wheels, wait until the engine cools down, apply the handbrake and disconnect the negative terminal from the battery.
- Take a container to drain the coolant, unscrew the drain plug from the radiator and drain the antifreeze or antifreeze from the system.
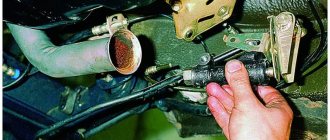
- After draining all the coolant, go to the pipes that go from the engine to the heater tap. Loosen the tension of the clamps on the pipes, clean the threaded connection of the pair of studs. They hold the heater tap.
- Using WD40 penetrating agent and a metal brush can effectively clean the joints. Practice shows that without this procedure, problems may arise when dismantling the stove faucet.
- Unscrew the clamps with a screwdriver.
- Remove the pipes one by one. Be careful here as coolant may continue to leak. This is due to imperfections in the coolant drain system. It is better to work with gloves and keep a container ready.
- Let's go to the car interior. Here, remove the side trim of the dashboard, dismantle the pipes, if necessary.
- If the pipes are intact and replacement is not needed, it is not at all necessary to completely dismantle them. Again, there are antifreeze residues in the pipes, so keep dry rags on hand.
- We return to the hole under the car and use a 10 mm socket wrench to remove the faucet mounting nuts.
- We go back to the salon, where we pull the tap towards us and remove the spring clamp. Now you can disconnect the control cable from the faucet.
- This way you can easily remove the old faucet, replacing the worn, damaged element with a new faucet.
- Before you put it in place, connect the cable. Only now is it possible to tighten the valve on the body.
- Assembly is performed in reverse order.
- But here many people make the mistake of leaving behind the old gaskets and seals between the body and the faucet along with the new faucet. Do not do that. Moreover, gaskets and seals are always included with a new part.
- When connecting pipes, it is advisable to use silicone-based sealant. This will help minimize the likelihood of leaks occurring at the joints in the future.
- Be sure to tighten the drain plug, and then feel free to fill the system with new coolant.
Heater valve (stove) on cars VAZ-2108, VAZ-2109, VAZ-21099, VAZ-2114, VAZ-2115
should be changed for two reasons.
First, the stove tap turned sour. And accordingly, the ability to open or close the tap disappeared. But this breakdown is not critical and does not require urgent repairs. But the second reason is a leaking stove tap, which can bring many more problems. And it requires urgent elimination. If this is not done or is not done immediately after detecting a breakdown, then you cannot avoid a major leak of coolant into the cabin. And this will entail both an unpleasant smell and a wet carpet, which is very difficult to wash and dry after antifreeze (antifreeze). So, if you notice that liquid is disappearing somewhere from the expansion tank, then look for the cause of the leak not only in the engine compartment, but also in the passenger compartment. To do this, you don’t have to take a flashlight and try to get to the tap itself; it will be enough to just lift the rubber mat and run your hand over the carpet. If your hand turns out to be wet and greasy, then this is a serious cause for concern. Then, to make sure (in addition to the tap, the cause of leakage into the car interior can be the pipes and the heater radiator itself), take the flashlight in your hands, make yourself comfortable and look for traces of fluid leakage. what a leaky stove faucet VAZ 2108-2115
in the first photo. If you have a similar picture, then there are two options left. Read the article to the end, run to the store, buy spare parts and urgently do everything yourself. Or finish reading the article and just as quickly go to the service station. In that case, read on))) And only after that, we decide what to do….
We start with the purchase of a heater valve (heater) for VAZ-2108, VAZ-2109, VAZ-21099, VAZ-2114, VAZ-2115 cars
.
There is a lot of choice here. You can, of course, not split hairs and stop at the VAZ stove tap, but if you’re interested in my opinion, then for now I’m installing and recommend buying Russian Ceramic stove taps
(photo 2). Firstly, the stove faucet from this manufacturer leaves a good impression - good equipment (fastening nuts, washers, rubber sealing rings), aluminum body, ceramic “filling”. Secondly, so far none of the installed taps have had to be replaced due to “sticking” or leaking. And it's nice. We can also recommend immediately buying two pipes going from the heater tap to the radiator, four clamps of the appropriate diameter and silicone sealant. Since these rubber pipes, after a certain service life, lose their elasticity and after re-installation they can leak, no matter how you tighten them. But, as they say, this is a recommendation. If you decide not to take the pipes, then it’s better not to give up the sealant)))
A few words about the tools needed for the job. Although it is better to first choose a location for work. To replace the stove tap
In any case, you will need an inspection hole, overpass or lift. You won’t be able to do without one of these options, since it will be very difficult to unscrew the tap itself and the pipes “from the ground.” Now let's move on to the list of tools: a container for draining the coolant, a pair of screwdrivers (flat and Phillips), socket or cap wrench 10, spanner 13. If you have a set of socket heads with a cardan, this will make your life much easier (from the article and photographs it will be clearly visible how this tool helps out).
Now, let's talk about the main thing - a detailed description of replacing the heater tap (stove) on VAZ-2108, VAZ-2109, VAZ-21099, VAZ-2114, VAZ-2115 cars
.
The work will be carried out using the example of a VAZ-21099 with a torpedo from a VAZ-2115. Replacing the heater valve
on cars with a high and low dashboard is carried out in the same way.
1. First of all, place a container under the engine, unscrew the plug on the block and drain the coolant. 2. After the liquid is drained, do not hide the container far away. We get to the pipes going from the engine to the stove tap. We loosen the pipe clamps and clean the threads of the two heating valve studs with a metal brush, moisten them with brake fluid or VD-40 (photo 3). This point is very important for further work, because if you do not prepare the threads, then unscrewing the nuts can become a problem. I'll explain why. Studs are nothing more than simple bolts, the heads of which are buried in the plastic body of the faucet (this is clearly visible in photo 2). The fastening nuts are self-locking, with a plastic ring, which will not be unscrewed easily. Plus, clogged and rusted threads. And as a result, when unscrewing, such tension can be created on the bolt that it begins to rotate in the body! Then dismantling the crane becomes impossible. More precisely, it is possible, but with great difficulty, it comes to destroying the plastic casing around the bolt heads in order to fix them with a key or pliers.
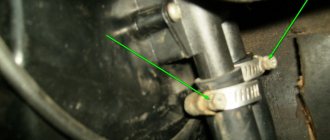
3. While the threads are “acidifying”, remove the pipes one by one. As I said earlier, keep the container at hand, since liquid will drain from the pipes. 4. We climb into the salon. Remove the side trim of the torpedo (photo 4). And we get to the pipe clamps (photo 5). The photo shows how convenient it is to unscrew the clamps using a socket wrench with a universal joint. If you decide to change the pipes at once, then unscrew the clamps on the other side, near the radiator. We are preparing a rag, as some more liquid will leak out.
5. The pipes have been removed. Again we climb under the car and use a 10mm socket wrench to unscrew the heater valve mounting nuts. Let's hope that all our efforts were not in vain and the nuts will come off without any problems. 6. We return to the salon. And the last thing we do is pull the faucet towards ourselves (to the passenger side) and in this position remove the spring clamp and disconnect the control cable from the faucet (photo 6). From this moment we begin the installation of a new heater tap, first we connect the cable, and only then we screw it to the body. On an installed heater tap, it is very difficult to secure the cable with a spring clamp, so we do it right away.
We can say that the trick is in the bag! I think the answer to the question is - How to change the stove tap?
You received)). We carry out assembly in reverse order. Be sure to install rubber O-rings between the tap and the body (photo 7). When installing pipes, do not forget to use sealant)).
When using an article or photographs, an active direct hyperlink to the website www.!
Usually I change the heater valve on a VAZ 2109 car in two cases, if it has become faulty and does not switch from cold air to hot air. In this case, repairs usually do not require any urgency and are done as needed. But in the second case, when the heater valve on a VAZ 2109 car leaked, there is no place to put off repairs, since coolant gets into the cabin and leaves the cooling system, which in itself is not good and can lead to bad consequences., but besides this The cabin immediately smells unpleasant, the carpet becomes wet, and in general there is a lot of inconvenience.
Therefore, in this article we will talk specifically about replacing the heater tap on a VAZ 2109 car.
When choosing to replace the heater valve itself on a VAZ 2109, we would strongly recommend that you purchase a domestically produced ceramic heater valve. These stove taps are more reliable and have earned their respect among owners of nines.
Necessary tool for work:
— container for draining coolant
Screwdrivers
Key to "10"
Socket wrench "13"
Well, of course, the work will be carried out either in an inspection hole or on lifts, since you will later see for yourself that it will be very difficult to unscrew some of the pipes from the ground.
Now let's move on to replacing the heater valve on a VAZ 2109:
First, you need to drain the coolant; to do this, place the prepared container under the car engine, which is already on a pit or lift, and unscrew the drain plug, thereby pouring the contents of the cooling system into this container.
Now that you have drained the liquid, you still shouldn’t move the container far away, since now we will be unscrewing the pipes in which there is probably still liquid left. Having reached the pipe leading from the engine to the heater tap, you should release the clamps and clean the threads of the two studs of the heater tap with a metal brush, after spraying them with WD-40 (image 3). This is very important, because if you do not prepare the thread, you may encounter a problem during the unscrewing process. After all, studs are ordinary bolts, the heads of which are buried in the plastic body of the faucet (as shown in image 2). And the fastening nuts are self-locking, with a plastic ring, but it won’t unscrew easily. Moreover, if the threads are clogged and rusty, then rotation in the housing is practically guaranteed. In this situation, it will be practically impossible to disassemble the stove faucet, or it will not be so easy, don’t be lazy and spend an extra couple of minutes and save at least an hour on this.
Now remove the pipes, draining their contents into a container with coolant
Now let's go to the interior of the VAZ 2109 car, you should remove the side trim of the torpedo (shown in image 4), after removal you should get to the pipe clamps (see image 5). If the clamps don’t look very good and you decide to replace them too, then you should unscrew them from the other side near the radiator. Most likely, coolant will still leak from the radiator, so a rag will not hurt us.
Now that the pipes have been removed, you should crawl under the car and unscrew the fastening nuts of the heater tap using a “10” barb. Since we prepared the nuts and they have already acidified during this time, I think this should not be a problem.
When they are unscrewed, we will return to the interior of the VAZ 2109 car. We must pull the heater valve towards ourselves (from the passenger side) and in this position remove the spring clamp and disconnect the control cable from the valve (shown in image 6). Now we can begin installing a new heater tap; first we need to connect it to the cable, and only then screw it to the body. If you do it the other way around, it will be very difficult to install the spring cable with the clamp.
Next, everything should be done in reverse order. You should also give some useful tips: when installing the pipes in place, use sealant, this will protect you from leaks at the joints of the pipes, and rubber seals should be placed between the tap and the body as shown in image 7
Well, that’s all, now you can easily replace the heater on a VAZ 2109 car yourself
How to perform an inspection? You will need to get under the hood on the engine side. It should be noted that leaks can occur in various places in the cooling system, so you will need to inspect the entire system. It is more convenient to do this with a flashlight. Coolant, in particular, often drips from:
- radiator;
- joints of hoses and pipes.
When it turns out that the faucet is the culprit of the malfunction, the owner needs to start replacing it as soon as possible.
This requirement is even more relevant if it is winter, because without heating in a car it will be very uncomfortable to move and, moreover, dangerous if you have a long trip through a sparsely populated area.
VAZ 2109: interior heating and a detailed description of all components of the system
Ventilation and heating system VAZ 2109
As you know, on the VAZ 2109, interior heating is provided by air heated by a radiator. On the VAZ 2109, heating and ventilation of the interior are interconnected and represent a special system. In this article we will look at the general principles of operation of the heating and ventilation system of the VAZ 2109.
Three main ways to eliminate an air lock from a VAZ-2109 stove
Before the onset of cold weather, every car enthusiast is puzzled by checking the heating of the interior of his car. Heating the car is greatly hampered when air builds up in the heating system, as it prevents the heater from heating up quickly. There are several simple ways to remove air from the VAZ - 2109 . Now we will look at them in more detail.
- Why is aeration dangerous?
- How can you remove air from the system?
- Prevention of aeration
Heating system
As a rule, the heating system of a VAZ 2109 car consists of several main elements and components, shown below.
Heater
VAZ 2109 interior heating system
The heater or stove itself is the main link in the heating system. It is secured with 4 nuts in the car interior under the dashboard to the bolts. There are air ducts installed on the stove, which are fixed to the instrument panel from below. Their design requires sealing gaskets.
What does the stove consist of?
The VAZ 2109 system heater consists of:
- 2 plastic casings connected to each other with brackets (fastening brackets are connected along the perimeter);
- A special harness placed in the grooves for sealing;
- An electric fan that forces air into the cabin and is attached with screws on top of the stove;
Note. The motor is installed on the stove so that its removal is convenient and does not cause any difficulties.
- Heating radiator, which is installed in the heater casings;
- faucet;
- Cooling system pump, which circulates fluid through the radiator;
- Stove handles that allow you to control the heater.
Controlling the stove handles
You can achieve the most comfortable conditions in the cabin by moving the heater control knobs and adjusting the position of the nozzles in the following way:
- The upper right handle regulates the air supply to the feet of the driver and front passenger (if the position is to the extreme left, the supply is maximum, if the handle is in the extreme position to the right, the supply is blocked).
- The upper left knob controls the air flow to the windshield.
- The lower handle regulates the temperature of the air that enters the cabin (the extreme left position is cold air, the extreme right position is hot air).
- The left rotary button, visible in the photo above, connects the stove fan. It will increase the air supply. The button has 4 positions: 0 – off state, 1 – initial speed, 2 – average speed, 3 – maximum speed.
If the outside air temperature is minus 20 degrees Celsius, the stove begins to provide maximum heating mode automatically. The indicators in this case are as follows:
- +20 degrees Celsius is provided in the vehicle interior;
- +25 degrees Celsius is provided in the passenger and driver foot area.
Radiator
Heater radiator "nine"
This is one of the most important parts of a car's heating system. Unfortunately, the radiator in the VAZ 2109 begins to leak after a certain amount of time. Traces of antifreeze on the passenger carpet or under the carpet are a symptom of a leaking heater core. In this case, the interior heating of the VAZ 21093 will be completely compromised and the radiator will have to be replaced.
Types of radiators
For the VAZ 2109 there are several main types of radiator. The most popular are:
- Aluminum original;
- Aluminum non-original;
- Copper.
Of all this trinity, the most expensive is the copper radiator, which can be soldered if necessary and which is significantly more reliable than the others. Aluminum radiators are less reliable, but cheaper. The original one costs about 700 Russian rubles, while a non-original one can be bought for 400 rubles. The design of both types of aluminum radiators is different:
- The plates in the original radiator are located much denser than in the non-original version.
- The heat exchange area in a non-original radiator is smaller than in the original one.
- The design of the original aluminum radiator is much stronger.
- On an original radiator, the air begins to warm up already at a coolant temperature of 60 degrees, and on a non-original radiator only at 90 degrees and above.
- Inside the original radiators there are special coolant swirlers made in the form of spiral ribbons. They significantly increase operating efficiency, because the coolant does not “fly” through the radiator, but circulates slowly, releasing heat more efficiently.
Self-replacement
Like most repairs, this procedure is carried out on an overpass. Replacement requires the following tools:
- Container for draining coolant;
- Classic set of wrenches and screwdrivers;
- Sealant;
- WD – 40;
- New faucet with a set of rubber gaskets.
Operating procedure:
- 1. Display the VAZ 2109 car;
- 2. Place the prepared empty container under the motor and, opening the drain hole, allow the coolant to drain;
- 3. Next, you need to unscrew the pipes running from the engine to the heater. To do this, just loosen the fastening clamps. It happens that they do not give in, then it makes sense to use a “bucket” and clean the threads of the crane bolts;
- 4. Remove the pipes and drain the remaining antifreeze;
- 5. Remove the side trim of the dashboard in the car interior. Here, too, unscrew the pipes;
- 6. Then, using a 10mm wrench, loosen and unscrew the faucet fastening nuts. It's under the car. Continue working inside the car again and tighten the tap on the passenger seat side. Then remove the clamp. Disconnect the control cable;
- 7. The next stage is the installation of a new tap. First of all, it must be connected to the control cable. Now put the spring clip in place. Tighten the fasteners. When installing pipes, use sealant.
Having finished installing the new heater part, you need to pour coolant into the system and check how the replacement went as a whole.
Features of the stove operation and its modification
VAZ 2109 interior heating
Owners of a VAZ 2109 car are often concerned that over time the stove begins to heat poorly. Needless to say, driving in such a car will no longer be comfortable. In such cases, only upgrading the stove can solve the problem.
Refinement methods
There are many ways to modernize a stove. Below are a few of them.
Damper control lever
- You can simply tighten the heater damper control cable to solve the problem. Make 1-2 turns of the cable located on the damper control lever (the lever itself is located on the stove body, near the gas pedal).
Note. The joints of the air ducts and the edges of the heater damper are covered with foam rubber, which does not compress completely. In this regard, a gap of several millimeters is formed, and the damper does not close completely. The above method will help you adjust the lever properly.
- There is another way to get to the control lever. There is a place on the driver's side and you need to try to reach with your hand and pull the lever, always with the heater fan on. During the adjustment process, the left ear will be in the area of the air duct nozzle and thus it will be possible to hear how the sound of the escaping air changes.
Heater valve
The reason for the ineffective operation of the heating system can also be incomplete opening of the stove faucet. This problem, by the way, occurs in almost all front-wheel drive cars of the VAZ family.
- The solution to the problem can be to tighten the valve control cable and then adjust the control lever to the maximum open position.
Note. In this case, it is possible that the valve will no longer close completely. But this is not the problem, but the fact that after adjusting the lever, the damper may lose its tightness and begin to leak (seen in the photo). In this case, we can recommend wrapping the leak area with a cloth that has been soaked in sealant and fixing it all with cold welding.
Heater valve leak location
Air ducts
Poor functioning of the heating system may be caused by leaky air ducts. The air that is pumped by the heater fan partially goes into the cracks, and the air flow thereby weakens and cools.
- The solution could be complete sealing and gluing of the connections that are located in the places where air flows from the stove to the outlet.
Air jams
VAZ 2109 interior heating system
In addition, the cause of poor operation of the stove can be air pockets formed in the heater radiator.
- The solution would be to stop the front of the car on some hill. Then you should open the heater tap completely and press the accelerator pedal several times.
Above were some ways to eliminate problems with the heating and ventilation system of the VAZ 2109. Instructions and advice given by experts are a chance to “cure” your car with your own hands, thereby saving a lot on repairs. As you know, the price of technical procedures at a service station is not low, and if they are carried out regularly, the family budget will become noticeably poorer. It is recommended to use photo and video materials in the process of independent work.
Prevention of aeration
Follow these simple rules when replacing the cooler and you can avoid the problem of airing:
- Pour in coolant slowly, slowly, in small portions.
- When pouring coolant, compress the pipes, pumping it.
- First remove one of the hoses on the carburetor heating block or on the throttle pipe on an injection engine, as excess air will be squeezed out there. After which you can fill in coolant.
Usually, after replacing the coolant on a VAZ -2109, an air lock occurs in 90% of cases. The stove begins to not cope with its task. But you can avoid this problem by following our simple recommendations for replacing the coolant.
The device of the VAZ-21099 stove
There would be no question of any comfort while traveling in a VAZ-21099 car if the interior of this sedan were not equipped with a heating system. Moreover, ensuring a comfortable temperature in the cabin can be considered a secondary task, and the main one is heating the glass (windshield and side front doors) to ensure visibility in conditions of reduced temperatures.
The VAZ-21099 uses a heating system that is classic for all cars, in which the air is heated using an additional radiator of the cooling system installed in the cabin under the dashboard. Thanks to this location, it is possible to provide heating for several zones - airflow onto the windshields and side windows, under the feet and directly into the cabin itself.
To ensure the efficiency of the stove, it is necessary that the flow movement is not spontaneous (due to temperature changes), but forced. And for this purpose, the heating system is additionally equipped with an electric fan.
How to restore normal operation of the stove
First, let's look at the first case of defective operation of the heater of the "nine" with a high panel, when only cold air enters the side deflectors. The operation of the side nozzles is controlled by separate flaps with a polyurethane seal. In turn, the VAZ-2109 heater dampers are controlled using levers located on the control panel. Quite often there are cases when a significant gap forms between the damper and the walls of the gutter, which significantly reduces the efficiency of the stove. The problem is eliminated by forcing the damper to the optimal position.
So, get your pliers ready and remove the upper part of the dashboard. By the way, you can do without dismantling, but this way you can clearly see where the central damper of the VAZ-2109 heater is located, assess its condition and control the adjustment process. After removing the panel, find the fastening cable, which is located to the right of the accelerator pedal and, using pliers, carefully bend the wire. This creates additional tension, which reduces the free play of the spring. As a result, the damper will be able to tightly close the air duct, blocking the movement of cold air flows.
Design of the VAZ-21099 heater
And then everything is simple: the created flow passes through the radiator honeycombs, where heat exchange occurs, as a result, heat is transferred to the air, which then blows into the required zones through the air ducts.
The design of the VAZ-21099 stove includes several main components:
- stove body made of plastic;
- heating system radiator (connected to the cooling system);
- electric fan;
- air ducts;
- heater control mechanism.
This car used heaters of two modifications (old and new), which were slightly different in design, but their components were completely identical.
Housing, radiator, dampers
Thanks to the housing, the required redirection of heating is ensured, since the movement created by the fan motor is immediately fed into it, rather than being dissipated. The body of the VAZ 2109 stove itself consists of two halves, connected to each other with special brackets. To reduce flow losses, a seal is placed between its halves. Partitions are made inside both halves, which provide the correct direction.
There is also a niche inside this case into which the radiator is installed. Initially, the radiator was made of brass, but now it is almost always made of aluminum. The design of the stove radiator 2109 is identical to the main one (consists of two tanks, tubes through which coolant circulates, and plates that form honeycombs), but is significantly smaller in size.
Video: The stove in the VAZ 2108, 2109, 21099, 2110, 2111, 2112, 2113, 2114, 2115 HEATS poorly
Air is blown through the stove dampers, also installed inside the housing. These elements are movable, and thanks to them it is possible to close some and open other air ducts. There are three of them in total - the main one (heater control), an air duct that redirects between the foot area and the supply to the cabin, and a damper for supplying flow to the windshield.
Additional flaps are installed on the side and central deflectors. It turns out that by default, air from the housing constantly blows onto the deflectors and this is done so that the flow always has an exit. Thanks to the existing dampers, it is possible to provide simultaneous supply of hot air to several zones at once (the interior and the windshield or the windshield and the footwell area).
Choice
When choosing a new radiator for the stove of your VAZ 2109, you should understand what exactly you want to achieve and what budget you have.
Today, consumers are offered two types of units to choose from.
| Radiator type | Peculiarities |
| Aluminum | A relatively inexpensive radiator option, which is characterized by high thermal conductivity. However, such a device cannot be repaired, which is its main drawback. But in practice, repairs are not carried out so often, so few people pay attention to this disadvantage |
| Copper | If necessary and a leak is detected, the copper radiator can be repaired - soldered. Thermal conductivity indicators are slightly higher when compared with aluminum analogues. But at the same time, the price is quite high - both for repairs and for the radiator itself |
Due to unprofitability and high cost, most VAZ 2109 owners choose aluminum radiators. But it all depends on your personal decisions and preferences. When actively using a car in harsh winter conditions, a copper radiator is fully justified.
Copper stove radiator
Heaters old and new
Finally, we note that the VAZ-21099 of different years of production used heaters with certain design features that related to the angle of the radiator and the location of the main damper.
In so-called old-style stoves (on cars before 1998), the radiator was installed almost vertically, and the main damper was located under the heat exchanger. There was a partition between the rear wall of the case and the radiator, which formed a channel that provided air supply down the case.
When the damper was open, the air flow moved through the radiator, where it was heated and supplied to the air ducts. In ventilation mode, the main damper closed the heat exchanger, forming, together with the front wall of the housing, another channel through which the flow went directly to the air ducts.
In the new model stoves (on cars produced since 1998), the radiator position angle was significantly smaller than on old heaters, which is believed to provide a larger contact area of the air flow for heat exchange.
The position of the main damper and its shape also changed (it became arched). It began to be located above the radiator. In the closed position (ventilation mode), the damper ensures air movement along the shortest path to the air ducts. In heating mode, it blocked the cold air supply channel to the air ducts and directed the flow down the housing, from where it went to the heat exchanger.
How to make a car heater burn fiery in winter
Useful lifehacks
And, finally, a few useful life hacks to improve the operation of the stove in the Russian winter.
Closing the radiator
On some car models sold on the Russian market, electric cooling radiator shutters are installed as standard or plastic screens are applied, by installing which you can partially block the flow of incoming air to the cooling radiator. This is a simple and effective way to speed up the heating of the interior and improve the operation of the stove in extreme cold. If such devices are not available, you can make them yourself
However, it is important to take all precautions to prevent self-ignition of the screens - they should not come into contact with hot elements of the engine compartment
Reducing the air flow through the stove
In extreme cold, some car enthusiasts increase the air flow through the heater radiator to the maximum, and are surprised that the heater still does not warm up the interior well. The secret is simple: passing through the stove at high speed, impressive volumes of cold air simply do not have time to warm up. By reducing the speed of the motor, you will increase the heating of the interior.
Open the window slightly
In some cases, good heating of the interior is hindered by the design of the car itself, or more precisely, by an ill-conceived ventilation system. If the body ventilation valves are not working and the doors are well sealed, increased pressure is created in the cabin, and almost no air escapes outside. Every minute it becomes more and more difficult for the heater motor to pump oxygen into the car. By lowering one of the windows slightly, you will increase the flow of air through the heater and, possibly, improve the climate in your car.
Experiment and you will undoubtedly find the best way to improve the efficiency of the heater specifically for your car!
. WINTER COLD - INSTRUCTIONS FOR REPAIRING OVEN 2109
. WINTER COLD - INSTRUCTIONS FOR REPAIRING OVEN 2109
The cold weather has arrived, and most owners of the VAZ 2109 are once again faced with a problem: from the nozzles of the heater pipes at the operating temperature of the coolant (about 90 degrees), barely warm, and often completely cold air is blowing into the cabin; in short, the heater does not heat well. In this state of affairs, in severe frost, even frosty side windows in the cabin “do not come off.”
The simplest solution to this problem is as follows. It is necessary to tighten the heater damper control cable. To do this, you can make one or two turns of this cable on the damper control lever. This lever is located on the body of the VAZ 2109 stove, next to the gas pedal (see photo).
All the joints of the air ducts and the edges of the stove damper are covered with foam rubber, which is difficult to fully compress using the damper control lever. This leaves a gap of several millimeters. In this case, the damper directing the flow of air either from the street directly or through the heater radiator does not close completely. It closes “up”, while air flows into the front nozzles through the heater radiator, and into the top and side nozzles from the street, through those same millimeters. When the heater fan is running, and the car is moving, these millimeters are quite enough.
You can even get to this damper lever on the driver's side and try to tighten this lever with your hand while the heater fan is on. In this case, the left ear will be in the area of the air duct nozzle, and you can hear how the sound and temperature of the air leaving the nozzle changes. Also, the reasons discussed below may be the reason for the ineffective operation of the Samara interior heating system:
Incomplete opening of the heater tap
This problem occurs in most front-wheel drive VAZ cars. You can check this by comparing the temperature of the inlet and outlet pipes of the heater radiator; if it is different, most likely the valve is not fully open. The solution is to tighten the control cable for this valve and adjust the valve control lever to the maximum open position. In this case, it is possible that now the valve will not close completely, but as they say, the heat does not break the bones. But here lies another problem. It is known that this valve in Samar is a weak point, and after a certain number of “open-close” operations, the valve at the location of the axis connecting the control lever and the valve itself inside the valve loses its tightness and begins to leak. Some owners simply set the “heat-cold” lever to a certain position and leave it out of harm’s way. In this case, attempting to move the heater tap valve will most likely cause it to leak. If this happens, you can wrap a strip of fabric soaked in sealant around the leak site and fix it all with “cold welding”; this can also be done in the field if the necessary materials are available.
A radical solution to the problem with a leaking heater tap on the VAZ 2109 would be to completely remove it from the system, or install a water supply ball valve. True, in the first case, the ability to adjust the volume of coolant entering the heater radiator is lost, and in the second case, this adjustment can only be made by looking under the hood. But, having got rid of a obviously unreliable unit, we get rid of possible problems in the future, and the remaining adjustment of the temperature of the air entering the cabin by the damper is enough for the eyes. By the way, in the “tens” the manufacturer removed this ill-fated valve.
Air duct leaks
The air forced by the stove fan partially goes into the cracks in the air paths, while the air flow weakens and cools. The solution would be to seal and seal all connections along the air path from the stove to the outlet nozzles. True, this operation is very labor-intensive, since you will have to disassemble the entire front panel, but the result will be a noticeable increase in air flow from the heating system deflectors.
Air locks in the heater core
How can you remove air from the system?
There are several simple and effective ways to remove air from the heating system of a VAZ-2109, which are also suitable for other cars.
There are three most popular methods; they are based on the principle: oxygen molecules are lighter than water molecules and, therefore, they accumulate at the top, where they are removed.
It is important to fully open the heater valve to maximum air temperature before starting work.
- The first method is universal for cars in which you can unhook the hose, which heats up the throttle assembly or carburetor. These steps can be done on most VAZ cars.
Here the carburetor is the highest point of the engine cooling system. Therefore, this place is most suitable for removing air.
- Remove both protective covers and anything that prevents access to the heater.
- Unscrew the heating hose clamp and remove it from the fitting.
- Unscrew the cap of the expansion tank and pump air into it until coolant flows out of the throttle body or pipe.
- The moment liquid appears from the hose or fitting, quickly put the hose back in place and screw everything back as it was.
The above-described manipulations will allow you to get rid of the airlock by 99%.
- The second method is implemented by removing the pipes that heat the throttle assembly. It is a little similar to the one described above, but it does not require blowing out the tank.
- Similar to the first method, you need to remove the protective covers and warm up the engine to operating temperature and turn it off.
- Leave the cap on the expansion tank, but remove the hose from the fitting.
- When the cooling starts, put all the pipes in their places and put everything back together.
- One attempt may not be enough and the procedure may not give a positive result; it may need to be repeated a second time.
Important! Remember self-safety measures. The coolant in the circuit may be under pressure and its temperature may be above 85 degrees. If it gets on your skin, it may cause a burn. Try to protect your hands using at least improvised methods. For example, wear cloth gloves with rubber gloves on top.
- The third method is the simplest; it does not require disassembling the system. But unfortunately, this method is not as effective as the previous 2.
- Drive the car uphill so that the top is raised and the radiator cap is the highest point.
- Remove the cap from the expansion tank and radiator.
- Turn on the ignition and warm up the engine to operating temperature.
- Antifreeze will gradually enter the system. It will be necessary to add it from time to time to maintain the desired level.
- To increase coolant flow, increase engine speed. In this case, the antifreeze level may drop sharply and should be added urgently. The procedure should be continued until bubbles from the return line stop appearing.
A hot stream from the stove air ducts is a sign that the air has disappeared.
Cooling system pipes VAZ 2114, 2115
Greetings, Lada VAZ car enthusiast on the RtiIVAZ website!
A YouTube channel subscriber came up with the idea to make a video about the rubber radiator pipes of the VAZ 2114 and the heater pipes of the VAZ 2114, just like his car. This video was filmed at the request of Boris Zverev, and the article was edited on the initiative of Albert Aukhadullin.
Let's start with the steam exhaust hose of the cooling system. This hose serves to remove steam from the radiator to the expansion tank. The length of this product is slightly more than one meter, the diameter of the internal hole is 8 mm.
This hose is installed on VAZ 2108, 2109, 21083, 2113, 2114 and VAZ 2115 models with injection and carburetor engines.
On models of the “ten” family, the same hose is installed as in the photo above, catalog number 2110-1303095.
Next we will consider the hoses installed to heat the throttle assembly.
These are inlet and outlet hoses for coolant. The diameter of the hose when measured with a school ruler is about 10 mm, and the length is 48 cm.