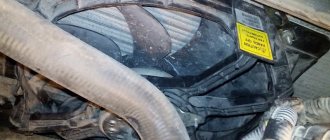
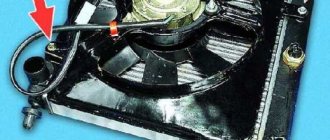
Where is it located?
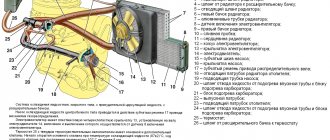
The fan is located on the inside of the radiator between the engine and radiator. Bolted to the radiator housing. In luxury versions of the Lada Priora, a dual cooling radiator is installed, one for the engine cooling system, and the other for the car's air conditioning system. It should be noted that when the car reaches a critical temperature, these radiators begin to work in pairs and cool the engine more intensively.
The main reasons for sensor malfunctions
So, for what reasons on Kalinas and Prioras, and on all VAZs in principle, the controller may not work:
- The first reason is the thermostat not working. This problem is one of the most difficult; when it occurs, the fan will not work correctly. To make sure that the thermostat is working, you will need to touch the lower hose - if it is cold, then the device has really failed. In general, for Kalina, thermostat failure is a fairly common occurrence.
- If the thermostat is working, then it is necessary to diagnose the safety elements. You should also check the condition of the circuits themselves; use a multimeter to do this. The fuse diagram should be indicated on the back of the unit cover. In the case of Kalina, the unit is located under the dashboard, you are interested in fuse element 3, its capacity is 50 amperes. If the fuse is working, then you need to diagnose the fan relay, it is marked with the number 1. If these elements are working, you will have to remove the fan control unit - to do this, move the air duct and, using a 10-mm wrench, unscrew its fastening. There should be two relays on the block, they should be checked.
- It would also be a good idea to climb into the engine compartment and ring the contacts of the fan itself. The problem may be a break, broken wiring, oxidation of contacts, or a burnt-out winding inside the device. Problems with wires and contacts are solved without problems - bad wiring is replaced, and contacts are cleaned. But if the problem lies in the winding, then the device will have to be completely changed.
- The problem may also lie directly in the sensor itself. To start the ventilating unit, you will need to reset the terminals from the device. Diagnosis of the controller is carried out by dismantling the thermostat and placing it in a container with hot water - the thermostat should open at this moment.
- Another reason, which happens quite rarely, is a break in the circuit. This problem can be diagnosed using a multimeter - broken wires must be replaced (the author of the video about diagnosing the regulator with your own hands is Dmitry Maznitsyn).
Protection system
Since the fan is an electrical part, it must have some kind of protection against short circuits or overheating. To provide this protection, it uses a relay and a fuse, which quite often fail, resulting in the fan not working.
Priora cooling fan fuse
To protect the circuit from short circuits and overloads, a fuse is used, which breaks the circuit when it overheats or a short circuit occurs in it.
The Priora uses several fuses to protect the cooling fan circuit: power and control. The cooling fan power fuse is located under the hood in a block near the battery number F3 at 60A. The control circuit fuse is located in the fuse box under the steering column and is numbered F1 at 25A.
Priora cooling fan relay
The location of the relay depends on the vehicle configuration.
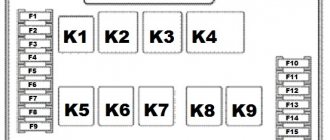
In the “NORM” configuration, the fan relay is located on the main fuse block under the steering column and has the number K1.
In the “NORM+” and “LUX” configurations, the relays are located in the engine compartment and there are 2 of them. For the right fan, relay number 3, for the left fan, relay number 5.
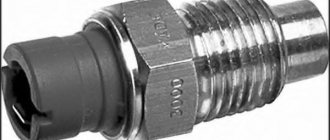
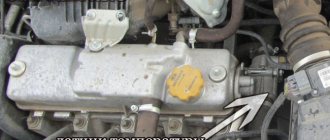
Priora cooling fan sensor
The cooling fan on the Priora turns on automatically when a certain temperature is reached. The coolant temperature is determined by a special sensor installed in the thermostat housing, which sends signals to the ECU when the engine temperature reaches a high temperature, after which the cooling fan turns on and begins to create an artificial air flow through the radiator.
The sensor is a simple part inside which houses a thermistor. As the temperature changes, it changes its resistance.
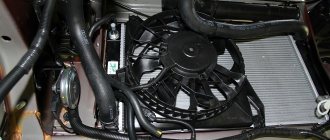
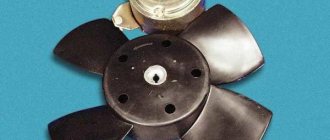
Design of a cooling fan on a Priora
From a constructive point of view, the product is quite simple and consists of the following elements:
- electric drive;
- plastic blades;
- relay responsible for turning on or off;
- connecting wires.
The electric drive is powered by a battery and is activated depending on the coolant temperature.
Causes of failure
Quite often it happens that the cooling fan on a Priora stops working, this may be due to the following reasons:
- The fuse has blown;
- The fan control relay has burned out;
- The fan switch sensor is faulty;
- The motor winding has burned out;
- The fan power connector has come off;
If the engine cooling fan does not work on your car, then you need to examine all possible options for its malfunction, which are indicated above.
content .. 41 42 43 44 ..Lada Priora (2013+). The radiator cooling fan does not work (does not turn on) - reasons, troubleshooting
- the thermostat is faulty
— blown, check the fuse that controls the fan
— the fan switch sensor (DVS) is faulty
- faulty fan relay
- faulty fuse box
- power cable break
— break in the output path to the radiator sensor wire
— the gasket under the head is burned out (coolant does not pass into the cylinder)
Problems with the cooling fan usually occur in used cars with decent mileage. This breakdown manifests itself in different ways; the fan may not work stably, may turn on late or not turn on at all.
There can be quite a few reasons why the fan does not turn on, from a banal fuse blown to more complex problems associated with a malfunction of the thermostat or problems with the electrical wiring of the vehicle's on-board network.
If the engine boils, but the fan still does not turn on, then the first thing that comes to mind for most motorists is problems with the fan wiring. However, very often the wiring has nothing to do with it, and the real reason lies precisely in the thermostat. The device designed to monitor the temperature of the coolant (coolant) may fail or simply jam, after which the coolant stops circulating through the radiator, as a result, the radiator sensor does not work, and the fan itself does not turn on.
Then check the fuse that controls the fan; if the fuse is blown, replace it with a intact one. If the cause is not a fuse, you need to check the fan itself directly. The power wires come to it; often they simply crumble or break off due to age. Alternatively, the reason may lie in the plug, so if everything is fine with the wiring, turn off the power to the fan and check the plug for a malfunction. Connect power to the fan directly, for example, from the battery; if the fan does not react in any way, we conclude that the fan is faulty.
Check the fan switch sensor (FSW) located on the radiator. To do this, you need to disconnect the plugs and then connect them together; if the fan does not work, the DVV is faulty and requires replacement.
It is necessary to connect the wire going to the fuse box directly to ground (usually white with a black stripe). If after this the fan starts working, we can conclude that the second black wire has broken; try to find the break and check whether its connection to ground is reliable. After that, we connect the two wires together and see what happens, if the fan turns on, then the problem was a bad connection.
Check the fan relay, it is quite possible that the problem is there. In order to find out, simply replace it with an adjacent relay, then connect the radiator sensor wires to each other, see above. The fan will turn on - the problem is a faulty relay.
Next, you need to check the voltage to see if it is supplied to the fan through the fuse box. To do this, take a piece of wire and install it in the relay connectors; if the fan is working, the reason why the fan does not work is in the fuse box.
It is likely that voltage is not being supplied to the fan relay. To check this, you can use the “old-fashioned” method. We take a light bulb that will serve as a “control”. If there is no light bulb, just lightly strike the other end of the wire against ground, if you see a spark, there should be no problems, most likely this is not the reason. If you don’t see a spark, most likely there is no voltage in this connector, that is, there is a break in the track in the fuse block.
If, after checking all of the above, you find the reason why the radiator fan does not turn on, you only have to check one wire - the radiator sensor wire. To do this, you must remove the switch as it does not allow access to the fuse box plugs. This means we remove the plug from the fuse block and check the radiator sensor wire for a break.
We check as follows: connect the wire to the “+” terminal of the battery, install the other end into the connector of the chip. Next, remove the plug from the sensor and connect the light bulb. If there is no light bulb, make a “teal” to ground. If there is no voltage, most likely this wire is broken.
If the fan does not turn on, the reason may be completely unexpected, for example, a burnt gasket under the head. Switching on does not occur for the reason that the coolant does not enter the cylinder, while gases from the cylinder penetrate into the coolant, creating an effect known as an air lock. This plug prevents normal coolant pumping. How to understand that you have a burnout? It is enough to look into the expansion tank, if bubbles come out of it every now and then during operation - you have a burnt gasket, or there is a crack in the cylinder.
WHAT TO DO IF THE RADIATOR COOLING FAN DOES NOT WORK
Making sure that the radiator cooling fan has failed and is not working is quite simple. To do this, you need to start the car engine and let it idle for some time. When the dashboard shows that the coolant temperature is approaching the critical zone, the sensor will notify the radiator fan so that it starts working. At this moment, the driver will hear additional noise from under the hood, and when he opens it, he will see that the fan impeller is spinning near the radiator. If the coolant temperature has reached a critical value, and the radiator cooling fan does not turn on, you need to find out why this is happening. The following are the main reasons why the radiator cooling fan does not work:
Problems with the electric motor. If the electric motor fails, its rotor will not spin, and accordingly, the impeller will not rotate. You can check the performance of the electric motor by connecting it directly to the battery. To do this, you will need to take two wires, connect them to two battery terminals and two electric motor terminals. If the fan does not spin when connected directly to the battery, we can conclude that the electric motor needs to be replaced; Problems with the sensor. If the sensor is unable to detect the coolant temperature and transmit a signal to turn on the electric motor, it will need to be replaced. To make sure that it is not working, you need to disconnect two wires from it and short them together. If the electric motor starts to spin the impeller, this will indicate that the sensor is faulty and needs to be replaced; There is no tension. The third and most common reason for a non-working radiator cooling fan is the lack of voltage in its power supply circuit. If there is a break in the wires or a fuse fails, the circuit will be de-energized. To make sure that this problem exists, you need to “ring” the wires and check the fuses. If the radiator cooling fan does not turn on, it is quite easy to find the cause of the problem; just perform the checks described above.
RADIATOR COOLING FAN IS NOT WORKING: HOW TO USE THE CAR
If the radiator cooling fan fails, it is better to immediately figure out the cause and fix the problem. But the problem can arise suddenly, and the driver must know the basic rules of how to drive a car with the fan turned off so that the engine does not overheat:
Try turning on forced operation of the fan from the battery; If the fan is not forced, you should drive at a constant speed of about 60 kilometers per hour or higher so that the oncoming air flow cools the fluid on the radiator without the help of a fan. It is also recommended to turn on the heating system in the car interior so that some of the heat from the coolant escapes into the cabin. Remember that if the coolant is overheating, it is better to stop and wait a while for it to cool, rather than continue driving the vehicle and risk overheating the engine.
content .. 41 42 43 44 ..
Additional block
Additional relays are mounted on a bar and located under the dashboard, near the front passenger's feet. To get to them, you need to remove the right tunnel lining. Next to the additional relays is the electronic engine control unit (ECU).
If its connector interferes with access to the relay, disconnect it by first removing the negative terminal from the battery.
Circuit breakers
F1 (15 A) – main relay circuit, starter interlock.
DIY fault repair
We will not talk about solving problems such as failure of fuses or the sensor itself. Everything is so simple here - failed elements are removed from their installation locations and replaced with new ones.
Separately, it is necessary to highlight the replacement of the ventilation unit - read about this below:
- So that during the repair process you do not have to dismantle the radiator, do everything carefully, since there is a possibility of damage to other elements.
- Open the hood and disconnect the battery. Remove the air filter.
- Having done this, you can dismantle the radiator grille.
- Next, you will need to unscrew the top mountings of the optics - the right and left lights.
- Using a 10mm wrench (it will be more convenient to take a socket wrench), you will need to remove the upper front panel.
- After these steps are completed, you will need to disconnect the plugs that are connected to the ventilation unit. Having done this, the wires can be twisted a little.
- Next, using a wrench, you will need to unscrew the four screws that secure the device to be replaced. The arrows in the photo indicate the screws that secure the assembly; they will need to be unscrewed.
- Only after the unit is freed will it be necessary to dismantle it and replace it with a new one. After removal, just in case, clean the connectors themselves so that in the future you will not be bothered by the problem of poor contact. Further assembly of the system and installation of all elements is carried out in the reverse order.
1. Remove the air filter.
2. Unscrew the mounting bolts marked with arrows.
Lada Priora fuses: where are they located, replacement - AutoExpert
These include air conditioning, heated and controlled side mirrors, front airbags, a primitive ABS system, and if we compare the old “ten” modifications, then also electric power steering. Each of these electrical circuits is controlled by a relay and protected by appropriate fuses. All of them are distributed and located in separate blocks.
Relay and fuse blocks
The VAZ-2170 has three relay and fuse blocks:
- main block;
- mounting block;
- additional mounting block.
Luxury "Priors" with air conditioning have another additional block in which relays and fuses are located that are responsible for the operation of climate control equipment.
Main power fuse block
The main unit is located in the engine compartment of the car next to the battery and expansion tank. It is protected from above by a removable plastic casing. The main unit contains only six fuses that are responsible for the operation of the main (power) electrical circuits of the car.
| Fuse designation | Rated current, A | Case color | Electrical circuit |
| F-1 | 30 | Green | Electronic motor controller |
| F-2 | 60 | Blue | Ignition switch relay, power window control module, rear window defroster, radiator fan |
| F-3 | 60 | Blue | Signal, ignition switch, cigarette lighter, hazard warning lights, brake light unit, radiator fan circuit, interior lighting |
| F-4 | 60 | Blue | Electric generator |
| F-5 | 50 | Red | Electric power steering (EPS) |
| F-6 | 60 | Blue | Electric generator circuit |
To replace the fuses in the main unit, you need to disconnect the ground on the battery, remove the cover and replace the faulty part. VAZ-2170 mounting block
Relays and fuses in the cabin
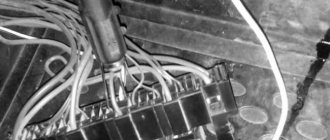
The mounting block is located in the car interior under the dashboard on its left side. It is protected by a removable plastic panel attached to the “torpedo” using three latches. To remove the panel you need to turn each of these latches 900 degrees. After this, the panel will be completely removed.
The location, number, and markings of relays and fuses in the Priora mounting blocks may differ depending on the type of vehicle equipment.
| Relay designation | Purpose |
| In the “Norma” package | |
| K-1 | Radiator fan |
| K-2 | Rear window defroster |
| K-3 | Starter |
| K-4 | Additional relay |
| K-5 | Socket for backup relay |
| K-6 | Windshield wiper and washer motors |
| K-7 | High beam lamps |
| K-8 | Signal |
| K-9 | Alarm |
| K-10, K-11, K-12 | Sockets for backup relays |
| Available in “Lux” and “Lux Plus” configurations | |
| K-1 | Headlight and low beam lamps |
| K-2 | Rear window defroster |
| K-3 | Starter |
| K-4 | Additional relay |
| K-5 | Reserve socket |
| K-6 | Wiper mode switching module |
| K-7 | High beam lamps |
| K-8 | Signal |
| K-9 | Anti-theft alarm (sound signal) |
| K-10 | Fog lamps |
| K-11 | Seat heaters |
| K-12 | Relay for wiper operation mode |
Mounting block fuses
| Fuse designation | Rated current, A | Electrical circuit |
| In the “Norma” package | ||
| F-1 | 25 | Radiator fan |
| F-2 | 25 | Rear window defroster |
| F-3 | 10 | High beam lamp (right) |
| F-4 | 10 | High beam lamp (left) |
| F-5 | 10 | Signal |
| F-6 | 7,5 | Low beam headlight bulb (left) |
| F-7 | 7,5 | Low beam lamp (right) |
| F-8 | 10 | Signal |
| F-9 | 25 | Electric stove fan motor |
| F-10 | 7,5 | Interior lighting, instrument panel lighting, brake light lamps |
| F-11 | 20 | "Windshield wipers" (control) |
| F-12 | 10 | Connector “15” of the instrument panel |
| F-13 | 15 | Cigarette lighter |
| F-14 | 5 | Side lamp (left headlight) |
| F-15 | 5 | Side lamp (right headlight) |
| F-16 | 10 | Connector "15" ABS |
| F-17 | 10 | Left fog lamp |
| F-18 | 10 | Right fog lamp |
| F-19 | 15 | Front seat heater |
| F-20 | 5 | Immobilizer control module |
| F-21 | 7,5 | Fog lights (rear) |
| F-22–F30 | Reserve sockets | |
| F-31 | 30 | Electric package control module |
| F-32 | Reserve socket | |
| Available in “Lux” and “Lux Plus” configurations | ||
| F-1 | Reserve socket | |
| F-2 | 25 | Rear window heater, electrical package module, relay and connector “10” for connecting the rear window heater |
| F-3 | 10 | High beam lamp (right), instrument panel, high beam warning lamp |
| F-4 | 10 | High beam lamp (left) |
| F-5 | 10 | Protection of the mounting block, signal and its relay |
| F-6 | 7,5 | Low beam (left headlight) |
| F-7 | 7,5 | Low beam (right headlight) |
| F-8 | 10 | Anti-theft alarm relay, anti-theft alarm horn |
| F-9 | Reserve socket | |
| F-10 | 10 | Brake light switch, brake light lamps, connector "20", interior lighting |
| F-11 | 20 | Windshield wiper mode switching module relay, wiper mode switch, connector “53A”, rear window heater relay, rear window wiper motor (for VAZ-2171, 2172), connector “25” of the front airbag control module |
| F-12 | 10 | Connector “21” of the instrument cluster, connector “9” of block X2 of the dashboard, connector “1” of block X2 of the electric power steering control module, reversing headlight lamps, parking sensor control module |
| F-13 | 15 | Cigarette lighter |
| F-14 | 5 | Left side light, trunk light, warning light for license plate light, connector “12” of block X2 of the glass unit control module |
| F-15 | 5 | Right side light, glove box light |
| F-16 | 10 | Hydraulic unit of the ABS system |
| F-17 | 10 | Fog lamp (left headlight) |
| F-18 | 10 | Fog lamp (right headlight) |
| F-19 | 15 | Heated front seats relay |
| F-20 | 10 | Side and low beam relay, heater fan relay, lighting control relay, windshield wiper control module, climate system control module |
| F-21 | 5 | Connector “30” of the light alarm switch, connector “16” of the diagnostic block, clock, connector “14” of the automatic climate control unit |
| F-22 | 20 | Wiper motor, wiper motor relay, wiper control module relay |
| F-23 | 7,5 | Connector “20” of the wiper control module |
| F-24 - F-30 | Backup fuse sockets | |
| F-31 | 30 | Connector “2” of block X1 of the electrical package module, threshold illumination lamps |
| F-32 | Reserve fuse socket |
To remove the mounting block from its seat, you only need a screwdriver with a Phillips bit. She needs to unscrew the screw securing the block, then, pulling it towards you, disengage it from the fastening hooks.
Before replacing relays and fuses, you must disconnect the negative terminal from the battery. To remove the main unit, you will need to disconnect all terminals with wires connected to it, having previously marked their location.
Additional mounting block
The additional VAZ-2170 mounting block is located behind the panel of the right tunnel trim on the left leg side of the front passenger. To get to it, you need to unscrew the screws securing the cladding and remove it.
The additional mounting block contains three fuses and two relays.
| Designation | Rated current, A | Purpose of protection |
| K-1 | Ignition relay (main relay) | |
| K-2 | Fuel pump relay | |
| F-1 | 15 | Starter and main relay interlock circuits |
| F-2 | 7,5 | Motor controller circuit |
| F-3 | 15 | Fuel pump |
To replace fuses and relays in the additional unit, there is no need to remove it from its mounting location. To remove the relay, use an “8” key to unscrew the corresponding nut securing it.
Before carrying out work to replace relays, fuses or the entire unit, it is strongly recommended to disconnect the ground wire from the battery, and also disconnect the electronic engine controller wiring harness block from the additional mounting block connector.
Video “How to properly replace the thermostat on a Lada Kalina?”
If the problem of a non-functioning sensor in a Lada Kalina car lies in the failure of the thermostat, then this unit will also need to be replaced; detailed instructions for replacing it at home are presented below (the author of the video is Alexey Golubkov).
The cooling fan on Lada Priora is the most important element of the system for maintaining the operating temperature of the car engine. It provides rapid cooling of the radiator, which cools the coolant in the system. The temperature sensor activates the device. When the desired temperature is reached, the sensor sends a signal to the ECU, which activates the fan until the temperature in the system drops to the operating temperature. Quite often, an element of the cooling system fails for one reason or another, which negatively affects the engine.
If the cooling fan on a LADA Priora fails, this can cause serious damage to the car’s engine and urgent measures must be taken. Initially, it is worth studying the main causes of this malfunction and taking a number of measures to eliminate them.
Advertisements on NN.RU – Auto
Lengthen Gas 331043, 331063 Valdai-farmer for installation of a body 5.1/6.5 m. The chassis is lengthened by increasing the wheel size.
I offer repair of automobile pumps for foreign and domestic cars. Cleaning the throttle valve. Cleaning the injectors.
A specialized company for the conversion of trucks produces extensions for man man, iveco and iveco truck tractors.
A specialized production enterprise for the conversion of trucks invites you to: 1. Lengthen the frame, re-extend it.
Imagine, you wake up in the morning, open the curtains, bright sunlight bursts into your apartment, and outside the window is a stunningly beautiful landscape.
Two more recycling collection points have been launched in the capital of the Volga region, the administration of Nizhny Novgorod reports. Total in the city now.
A video from a surveillance camera has appeared on the Internet, where you can see how a man enters the Bristol store in Dzerzhinsk and approaches.
Already today, the most impressive starfall of 2022 can be observed in the sky of the Nizhny Novgorod region. Nizhegorodsky reports this.