Regardless of the design of the internal combustion engine, this important element of the car needs careful cooling to avoid overheating and, as a result, breakdown of moving structures. Modern internal combustion engines are equipped with coolant (coolant) circulating through a water pump. To prevent it from boiling, a special radiator is used, consisting of several thin tubes and lamellas.
During the movement, air hits the metal surface and passes between the lamellas, which helps cool the metal. As a result, the temperature of the liquid gradually decreases. In order to prevent a critical situation from occurring, it is important to quickly determine the location of the breakdown and find out why the cooling fan does not work.
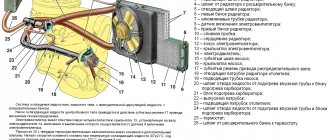
General understanding of the cooling fan
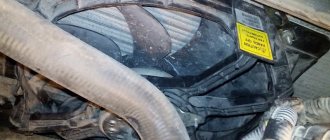
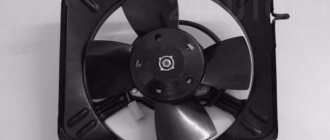
The design is presented in the form of an ordinary electric motor, which is powered by 12V from the on-board network. The shaft has a special impeller, through which an air flow is formed, directed to the surface of the radiator. The fan is attached to the front of the frame, and is covered with a radiator grille on the reverse side.
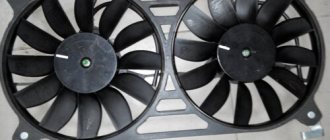
Using the VAZ as an example, it is worth noting that most often there is only one fan in the system, but there are exceptions among the domestic auto industry, as well as foreign cars. For example, NIVA is equipped with an impeller with two independent electric motors. This design helps to increase the cooling rate of the liquid, which is an additional guarantee of engine safety.
Replacement
Tools:
- socket wrench 10;
- socket wrench 8;
- screwdriver with a Phillips bit.
Execution order
- We park the car on a flat surface and immobilize it with the parking brake.
- Open the hood and disconnect the negative terminal.
- Using a 10mm wrench, unscrew the fastenings of the air filter housing.
- Using a screwdriver, loosen the air duct clamp on the air flow sensor and remove the corrugation.
- We unscrew the screws securing the cover of the air filter housing and remove the filter element.
- Using a size 8 wrench, unscrew the air intake mount and remove it.
- Using a 10mm wrench, then an 8mm wrench, unscrew the nuts securing the fan casing around the perimeter (6 pieces in total).
- Disconnect the wire block on the fan connector.
- Carefully remove the fan casing along with the drive.
- Using a 10mm wrench, unscrew the 3 bolts holding the electric motor to the casing.
- We put a new one in its place.
- We install the structure in place, fix it, and connect the connector.
- We carry out further installation in the reverse order.
How the device is activated
The cooling fan can be activated in several ways. It all depends on the make and configuration of the vehicle. If the car has a carburetor engine, then the fluid temperature should reach the range of 105-107 degrees. Then the sensor is automatically turned on, sending a signal to the relay. This, in turn, supplies power to the electric motor and closes the circuit.
Machines equipped with an injector have a slightly different cooling system and fan operation. All processes are started by an electronic control unit. Initially, information from the sensor is processed by the controller and then transmitted to the relay.
Modernization
If you want to improve the operation of your radiator fan on the VAZ 2109, we offer the appropriate instructions.
To upgrade, you will need to install a second sensor and modify the system somewhat.
- The standard power sensor will be responsible for the operation of the fan at maximum speed.
- An additional sensor will include a reduced speed. It is installed at the top of the cooling system.
Now let’s talk more specifically about how to organize all this.
- Take a temperature sensor whose response temperature is similar to the standard regulator.
- Install it in the upper pipe fitting to the radiator.
- To mount the element, you will need a pair of washers and a nut. Be sure to lubricate the washer with sealant to prevent leakage from the installation hole.
- Buy a resistor to install on the stove fan. It has several outputs, so if desired, you can make several operating speeds.
- It is necessary to make an additional control circuit. Through it, less voltage will be supplied to the motor winding.
- The temperature sensor located in the upper part of the cooling system is responsible for turning it on.
- It is better to do control not by plus, but by weight.
- The system will work through a button in the cabin. To the left of the dashboard there is a grille with two plugs. Cut out one of them and set it to turn off on two modes. You can take the heater switch from a VAZ 2107.
- In the first position the low frequency will be switched on, and in the second – the maximum speed.
- One common wire is fed to the minus.
Such modernization is not provided for by the design of the VAZ 2109. These are modifications made by car enthusiasts. Therefore, installing a second sensor is entirely your personal responsibility.
The fan is an important component of the cooling system of VAZ 2109 injection and carburetor engines. If you wish and have time, you can easily replace or repair it yourself.
Causes of malfunction
When the fluid temperature rises to a critical level, this means that the cooling fan does not work. The main goal is to locate the fault as quickly as possible and eliminate it. There are a number of the most common reasons why the cooling fan does not turn on:
the electric fan motor has stopped working;
violation of the integrity of the wiring, which provides continuous power to the electric motor and connection to the power sensor;
the contact between the sensor and the electric motor is no longer reliable;
the fuse is blown;
the fan relay turned out to be faulty;
the sensor is broken;
The expansion tank valve fuse operates intermittently.
It is possible to determine the malfunction in each case independently. Let's look at each point in more detail.
If the fan motor is broken
If the cooling fan does not work, then first of all it is important to check the condition of the electric drive. To do this, you will need to take 2 wires, make a connection to the fan and organize power from the battery directly. If the startup was successful, it means that the element is working and you need to carry out further diagnostics.
It is also worth paying attention to the connectors and contacts in the electric motor. Sometimes a malfunction occurs due to the accumulation of dirt and dust, as well as oxidation of metal elements.
If nothing happens after connecting to the battery, then the problem is in the electric drive. Failure occurs for several reasons:
the brushes are worn out;
the collector collapsed;
The rotor winding is closed.
In the first option, it is enough to install new brushes. In the second and third cases, the situation cannot be corrected. Need a new fan.
Wiring check
An equally common reason why the cooling fan stops working. A wire break or short circuit may occur. To check, it is enough to use an ordinary tester and first activate the detector mode. Check the wiring that connects the controller to the fuse, relay and electric motor.
Checking the fan fuse and relay
First you need to check the fan fuse. As a rule, it is located in the mounting block under the hood. Most often marked with the designation F7. Check it using a tester. If everything is in order, you need to find the power relay. To find the required relay, it is recommended to use the vehicle manual. There should be 3 relays under the hood.
In handicraft conditions, it is almost impossible to determine operability, so the easiest way is to plug the relay into an adjacent socket.
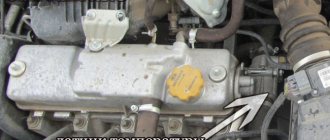
Power sensor test
Another popular reason why the fan does not work is a sensor malfunction. It is possible to accurately determine that the sensor is broken only in cars with injectors. If you turn off the power, the electronic system will perceive this as a malfunction and start the fan in emergency mode.
When the fan switch sensor fails, you should be careful. The check should be carried out as follows: warm up the car until the fluid temperature reaches 100 degrees. Next, turn off the engine, open the hood and disconnect the sensor by disconnecting the connector. Next, start the engine. If the fan starts working, then the problem is a sensor malfunction.
It is important to note that in cars with carburetor engines, it is impossible to check in this way. In this case, you can only replace a new sensor and warm up the engine to operating temperature.
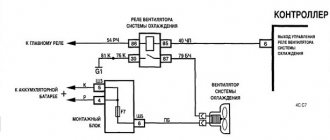
Where is the regulator relay located?
It is located in an additional block.
4 – electric fan relay;
5 – electric fuel pump;
6 – ignition relay.
Relays and fuses may have a different order. Therefore, you need to focus on the color of the wires. The main relay is always located at the bottom. Find the relay that has a thin pink wire with a black stripe coming from it. It comes from the main relay through pin 85. Be careful! Do not confuse this with the red thin wire, which also has a black stripe and extends from the controller. And find a thick white wire with a black stripe (pin 87). This is where the cooling fan relay is located. There is always a fuse next to it. It is an element of the chain.
Changing the safety valve
Another equally common problem that can lead to fan interruptions. If the above checks have been previously performed and all elements are in order, then you need to check the safety valve of the expansion tank.
The main function of the valve is to maintain the operating pressure above atmospheric pressure. Thus, the water present in the liquid does not boil when the temperature reaches 100 degrees. If the valve stops working, the pressure becomes the same as atmospheric pressure, and the liquid will begin to boil when it reaches a certain temperature.
The sensor will only work at 105-107 degrees. The liquid will begin to boil and the fan will not work. It is impossible to check the operation of this element in artisanal conditions. But it’s realistic to buy a new part and make a replacement.
If you need to replace the sensor, it is important to buy the same model with identical characteristics. Otherwise, the cooling system will start working too sooner or later. You can do the replacement yourself using the following procedure:
disconnect the battery terminal;
empty the radiator of liquid;
disconnect the two wires that are connected to the sensor. Use a 30 mm wrench;
Apply sealant to the new sensor and install it in the appropriate place;
do not tighten the sensor too much;
Fill with coolant, start the engine and wait until the temperature rises.
If all steps are done correctly, the procedure does not take much time. On average, replacing a new sensor takes no more than 30 minutes. You can contact a specialized center, but a simple procedure can be expensive.
Description of DTOZH and DVV
Where is the coolant temperature and fan activation sensor located in 2109 with an injector or carburetor engine, what should I do if the device does not work? First, let's look at the basic questions regarding the purpose, device and principle of operation.
Purpose and functions
The main purpose of the DVV is to activate and deactivate the ventilation device on the engine radiator in order to cool the power unit. The device turns the fan on and off based on the temperature of the liquid in the cooling system. On injection machines, this is DTOZH; turning the fan on and off is controlled by the brain according to the readings of this sensor.
As for the TOZh controller in the VAZ 21093, this device is intended to display readings about the antifreeze temperature on the car’s dashboard in the cabin. With its help, the driver can find out about possible overheating of the power unit.
Location
As for the location, in models 2108, 2109 and 21099 the DTOZH is located between the engine cylinder head and the thermostat, in particular, on the intake hose. The DVV is installed in the threaded hole of the expansion tank with coolant. If you look in the direction of travel of the car, the refrigerant container is installed on the right.