The fan is designed to create an artificial air flow directed at the engine radiator in order to cool the liquid circulating in it. When the car is moving at high speed, there is, of course, no particular need for it, but at low speeds, and also when the car is idle with the engine running, you cannot do without it.
The radiator fan is turned on by a signal from the electronic control unit based on data received from the temperature sensor, which is triggered when the coolant heats up to 103-1050C. In a VAZ 2114 car, the fan is located in the engine compartment on the back side of the radiator.
What to do if the VAZ-2114 injector cooling fan does not work
It should be noted that if the car is moving at high speeds, there is, of course, no particular need for a working fan. But as soon as the speed of the car decreases, and also when the car is idling, you simply cannot do without a fan. This device turns on automatically as soon as it receives a signal from the electronic control unit. This signal is based on data received from a temperature sensor, which is triggered when the coolant temperature rises to 103 degrees.
Price issue
Before dealing with a radiator that isn't working, it's important for many to know the cost of the components and labor.
A new element will cost about 1.5-2.5 thousand rubles today, depending on the model and region. The cost of replacement at a service station will be from 400 rubles or more. Although you don't need to spend money on this, since replacing it yourself will take no more than half an hour. And there is nothing particularly difficult here.
temperature sensor
Finding possible causes of fan malfunction
The search for possible reasons why the fan on the VAZ-2114 does not work must first begin with the fan itself.
To do this, disconnect the fan connector and connect it directly to the battery terminals, while maintaining the polarity. If the fan starts working, it means that it is fully operational and the reason lies in something else. But if the fan still does not turn on after the above manipulations, you should check the condition of the sensor contacts and whether the wiring is intact. If in this case everything turned out to be fine, it’s time to check the fan relay and fuse. Both of these parts are located under the hood of the car, closer to the driver's side in a special mounting block.
It should be noted that fuses 20A and F4, responsible for the fan and sound signal, are double on the VAZ-2114. Therefore, if the reason for the fan not working lies precisely in the fuse, then the sound signal will not work. You can check the functionality of the fuse using the most common automotive tester.
But, unfortunately, you will have to tinker with the relay.
In order to confirm or rule out the relay problem, you should acquire a similar device that has been tested for performance. You need to temporarily install it in place of the old one and check whether the fan starts working. If in this case a miracle did not happen, we move on to inspecting the sensor.
After de-energizing the sensor, the fan should start in emergency mode and provide constant airflow. To do this, disconnect the sensor from the connector and turn on the car ignition. If the fan finally starts working, this indicates a sensor malfunction. The latter, by the way, cannot be repaired, which means it can only be replaced.
How to check the ignition relay?
There are several ways to make sure that the relay has burned out. You can do this on your own. Sometimes it is enough to remove it and see the melted or broken parts. It may crack or develop other visible defects.
After a long drive, the transmission can become very hot. This indicates its malfunction or low power.
The main relay for this model is designed for a current of 70 Amps. But perhaps the part has less power or there are many additionally installed consumers on the car. You can check this by disconnecting several of the devices.
If after this the element stops heating, then its power is too low. It is necessary to buy a part of a similar design, but designed for a higher current.
You can check the functionality of the ignition relay with a multimeter. To do this, set it to voltmeter mode. They need to measure the voltage on the starter winding and the output of this part. If voltage is present, the element is working.
You can test the part with a multimeter in ohmmeter mode. Measurements are carried out in a similar way. The value on the device screen is completely unimportant. The presence of any indications indicates the serviceability of the relay. If there is no indication, it needs to be replaced.
You only need to buy a similar element designed for this car model. Defective products are often found on sale. Therefore, if after installing a new relay the problem does not disappear, you should check this part again. All the previously mentioned methods are suitable for this. In the case discussed above, it is necessary to purchase an electrical component of slightly higher power. Most likely it will be from another car. Therefore, for selection you need to take the old relay with you. If, after replacing the element and if it is known to be in good working order, problems with starting the engine or the heater persist, you should look for another reason. It is a good idea to test all the wiring of the machine. It could rot or fray over time. Other parts of the car may also be to blame for the malfunction. If self-diagnosis of electrical equipment is difficult, you need to contact an electrician at a car service center.
When do you need to change the fan on a VAZ-2114
If the reason for the non-working fan lies in the fan itself, you can still try to repair this part.
As a rule, the problem lies in the bearings. But sometimes it also happens that due to a break in the windings or a short circuit, the fan motor itself fails. If this happens, then it is better not to try to repair anything, but to replace this part. By the way, driving a car with a non-working fan is strictly prohibited. As a result of this action, the coolant can warm up significantly, which will lead to complete destruction of the pipes and rubber hoses. Driving a short distance with the fan not working can also cause the cylinder head and valve cover gaskets to fail. But that's not all. Overheating of the engine can also destroy some elements of the piston group.
Simply put, a non-working fan (its cost, by the way, is not that high) can cause much more serious problems, the elimination of which will entail significant material costs. On average, the cost of a new fan for a VAZ-2114 varies from 1.5 to 2 thousand rubles. Replacing it at a service center will cost another 500 rubles. But replacing all the above parts and gaskets can cost more than tens of thousands.
Checking the functionality of the regulator
When diagnosing the generator voltage regulator, it is necessary to determine what breakdowns may be revealed during inspection (in order to avoid further malfunctions and effectively carry out preventive procedures).
Malfunctions while driving the car
- The light on the panel and other light sensors do not light up.
- The battery is low/overcharged and the regulator button is dark/bright.
The breakdowns can be as simple as a loose belt, a burnt-out relay, or worn out brushes.
To check the device you will need the following tools:
- sets of keys and screwdrivers;
- various testers;
- lamp 12 Volt 3 Watt;
- wires for connection;
- regulating current sources.
Checking the voltage regulator of the VAZ 2114 generator is carried out together with brush holders in order to immediately check the entire mechanism. You should carefully examine the condition of the brushes, their fragility, mobility, and length.
Check without removal. Using a voltmeter, we measure voltage readings. The optimal result is 13.5 - 14.2 V. If the data does not correspond to the norm, then there is a high probability of mechanism failure.
Before checking the voltage regulator and removing it from the car, you need to make sure that the fault lies in it and not in other components of the generator. How can I check this?
The first test option is diagnostics with the engine running using a voltmeter
What should be done? Start the engine and check the indicator light; if it does not go out and flashes brightly, it means there are problems in the generator. After a few minutes, when the engine increases speed and creates maximum conditions for the network load, we connect the meter and set 3500 rpm. Less than 13 Volts - the battery is completely discharged, when more - the regulator on the car needs to be replaced.
When you hear unusual noise from the unit, it means the bearings have failed, resulting in the drive belt being too tight. To adjust it, you need to turn off the ignition and release it. The deflection when pressed should not be less than two centimeters.
The second option is to check the mechanism on a stand
Before placing the electrical unit on the stand, you need to visually assess the condition of the brushes and slip rings of the commutator. Rings must be clean and dry. At the output, the current indicator gives at least 13 Volts, and the rotor speed is 6000 min-1. After 10 minutes of generator operation, the power output force can be measured. For a working unit, the indicators vary within 80 A.
If the indicator is less than normal, you need to look for faults in the starter windings or generator valves. If the indicators are not within the acceptable values, then we need to change the brush holder.
There are three valves with a red mark that provide a positive charge on the housing, they are located in the same plate of the rectifier block. Three more mechanisms have a negative charge, indicated by a black mark, connecting to ground.
Third option - check the serviceability of the winding and diodes
The multimeter shows the level of winding resistance; if there are malfunctions, there may be no indicators (break), or they will differ significantly from the norm - 4.5 Ohms. To fix the problem, the correct solution would be to replace or rewind the product.
To diagnose the relay-regulator, it is necessary to connect it to a regulating power source. This is a control lamp, the minus goes to the body of the electrical unit, and the plus goes to the terminal. The measuring device is turned on between the brushes, when the voltage increases to 17 Volts, the lamp should stop burning. When the opposite happens (the lamp burns brightly or dimly), then you need to change the voltage regulator.
You can ring the diodes with a tester; to do this, bring the probes of the device to the diode terminals. If a squeak occurs, then the probes should be changed, but when this sound does not stop, then there is definitely a breakdown of the diode. To eliminate it, the faulty unit or the entire unit is replaced.
When diagnosing the regulator, you need to inspect the electrical equipment protection capacitor. You can detect a fault with a megger. Visually inspect the fastening of the product. If there is no break, then the arrow of the device will first sharply deviate in the direction of decreasing voltage, and then return back again. The permissible capacitance of the capacitor is 2.2 µF ±20%.
How to verify that a regulator that is located far from the car is faulty. The 12V power source can be a car battery and 2 or 4 AA batteries connected in series, which will give a result of 16 V. If the lamp lights up during the test in both cases, and does not go out the second time of diagnosis, then a break has occurred and the unit needs to be replaced.
The fourth option is to check the removed regulator
Checking the VAZ 2114 voltage regulator
Above is a diagram of checking the voltage regulator after it has been removed. You need to connect exactly as indicated in the diagram. If everything is connected correctly and the lamp is on, then the regulator is working, and if the lamp remains extinguished, then it is faulty and requires replacement.
To get rid of on-board network voltage sags, you can use a three-level voltage regulator, which is used in many cars today, but that’s another article and new interesting information.
The cooling fan does not turn on on the VAZ 2114
The engine cooling fan on the VAZ 2114 does not work. Tell me why the radiator fan stopped turning on? What is the reason and where to look?
Hello. Tell. I replaced the main radiator with a VAZ 2114, year 11, 8-valve. I filled it with antifreeze. Heated up the car. The fan didn't work. Changed the fuse. Sensor.
The fan does not work when it should. You turn off the car, then turn on the ignition and it works. What could it be?
The cooling fan does not turn on. What can you do?
VAZ 21099 injector. The radiator fan itself did not turn on, so I brought the toggle switch directly into the cabin through a relay (so that I could turn on the fan myself). And today I drove up to the house and turned around.
Is it possible to flush the cooling system with well water? What if you flush the system with the drain hole open until clean water flows? Will well water work for this? (No oho.
The fan on the VAZ 2114 may not work for several reasons:
- The power sensor has failed.
- There is a break in the wiring to the sensor or there is no contact in the connector itself.
- Power failure in the mounting block.
- The fuse or relay has blown.
- The fan motor has failed.
- ECU problem.
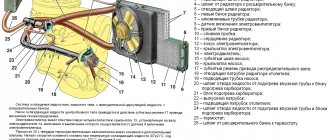
You need to go through all the elements of the diagram:
First, check the fuse, it is located in the mounting block under the hood near the windshield, according to the diagram it is number five (F5). In addition to the fan, a signal is connected to this fuse; if it works for you, then you don’t have to look at the fuse.
If the fan fuse is intact, then you need to check the main relay fuse. It is located in the cabin near the passenger's left leg (to access it you need to remove the plastic cover). There are three relays installed in the block and, depending on the year of manufacture, the main relay can be the first, second or third. Most often it is located at the bottom. The photo below shows the main relay and fuse.
If the fuses are ok, then next you need to look at the electric fan. Disconnect the power connector coming to the electric fan and supply 12 volts directly from the battery. Apply a plus to the contact with the red-white wire, and a minus to the contact with the white-black wire. If the fan does not work, then the electric motor is probably burnt out and the fan needs to be replaced. If the fan works, then you need to look at the wiring to it next.
Using a multimeter, check the power on the red and white wire. When the engine is running, there should be a constant 12 volts. If there is no power and fuse F5 is intact, then the problem is a malfunction of relay K6 or the contacts of the mounting block. In order to determine the malfunction of the mounting block, disconnect the chip from it near the relay and apply 12V to the red-white wire if the fan is triggered by a replacement mounting block. The photo below shows the installation location of the K6 relay. But often everything is much simpler - the terminal (wire “+”) in the mounting block falls off due to overoxidation.
Next, ring the negative wire. It goes to the main relay in the car interior. If the wire does not ring, then look at it along the spit, there is probably a break. The wire runs near the left shock absorber cup and then goes through the engine shield into the passenger compartment. The photo below shows the white and black wire coming to the main relay.
To check the fan switch sensor, the wiring to it, as well as the computer, remove the connector from the sensor and turn on the ignition. If the sensor is not working, the fan will spin constantly (work in emergency mode).
Main unit
The main fuse and relay box is located in the rear part of the engine compartment, in the installation department, under a protective cover.
p, blockquote 4,0,0,0,0 —>
p, blockquote 5,0,0,0,0 —>
The current diagram for your vehicle can be printed on the back of the protective cover. Check your appointment!
p, blockquote 6,0,1,0,0 —>
p, blockquote 7,0,0,0,0 —>
Option 1
Scheme: 2114/ 2115 — 3722010, -3722020, -3722010-30, -3722010-38, -3722010-40, -3722010-48, -3722010-60, -3722010-68
p, blockquote 8,0,0,0,0 —>
p, blockquote 9,0,0,0,0 —>
Description of fuses
p, blockquote 10,0,0,0,0 —>
| F1 | 10A Rear fog lights, rear fog light indicator lamp |
| F2 | 10A Turn signals and turn signal breaker relay. Alarm system. Hazard warning lamp |
| F3 | 7.5A Interior and luggage compartment lighting systems (interior lamp, luggage compartment lamp, ignition key illumination). Stop lamp - brake signal, on-board computer backlight lamp. Engine control lamp |
| F4 | 20A Control of heated rear window. Portable lamp connection socket |
| F5 | 20A Relay for control and activation of the sound signal. Cooling system engine switch fuse and relay |
| F6 | 30A Control and relay for switching on electric glass lifts |
| F7 | 30A Electric motor control - heating system, interior heater, windshield washers, headlight cleaners. cigarette lighter , glove box lamp. Turn on the heated rear window. |
| F8 | 7.5A Turning on the right fog lamp |
| F9 | 7.5A Turning on the left fog lamp |
| F10 | 7.5A Side light of the left side body, indicator light for turning on the side lights (on the display), lamps for illuminating the license plate and engine compartment, illumination lamp for switches, cigarette lighter, heater control levers. Instrument lighting switch. |
| F11 | 7.5A Right side body marker light |
| F12 | 7.5A Front right low beam headlight |
| F13 | 7.5A Front left low beam headlight |
| F14 | 7.5A Front left high beam headlight. Light indicator lamp. |
| F15 | 7.5A Front right high beam lamp. |
| F16 | 15A Body turn signals, relay - turn signal and hazard warning light breaker. Control relay and reverse lamps, indicator lamps for the on-board instrument control system, lamps for oil pressure, handbrake activation, brake fluid level, battery charge. On-board computer, engine generator winding. |
| F17 - F20 | Spares |
Fuse number 7 at 30A is responsible for the operation of the cigarette lighter.
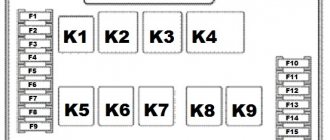
Relay purpose
p, blockquote 12,1,0,0,0 —>
- K1 - Relay for turning on headlight cleaners
- K2 - Relay interrupter for direction indicators and hazard warning lights
- K3 - Windshield wiper relay
- K4 - Relay for monitoring the health of stop lamps and side lights
- K5 - Window lift relay
- K6 - Horn relay
- K7 - Rear window heating relay
- K8 - High beam relay
- K9 - Relay for low beam headlights
Option 2
Scheme: 2114/ 2115 — 3722010, -3722020,
-3722010-08, -3722010-10, -3722010-18
p, blockquote 13,0,0,0,0 —>
p, blockquote 14,0,0,0,0 —>
Fuse designation
Fuse number 4 at 20A is responsible for the cigarette lighter.
Relay
p, blockquote 17,0,0,0,0 —>
- K1 - relay for turning on headlight cleaners
- K2 - relay-interrupter for direction indicators and hazard warning lights
- K3 - windshield wiper relay
- K4 - lamp health monitoring relay
- K5 - power window relay
- K6 - horn relay
- K7 - rear window heating relay
- K8 - headlight high beam relay
- K9 - relay for low beam headlights
Why the cooling fan does not work on the VAZ-2114
A fan on any car, and the VAZ-2114, equipped with an injector, is no exception, is necessary for forced ventilation of the radiator. Thanks to this, the liquid circulating there is cooled more actively, and a more or less acceptable constant temperature is maintained on the motor. When the car is driving fast, the fan will not work - in this case, the power unit has enough natural air pressure. Standard cooling starts during stops (without stopping the engine) or when driving slowly. Like any other car component, the fan can break. How to find the cause and eliminate the malfunction is described below.
How to perform a check on injection VAZ cars
It is quite possible that this can also be done on other cars, but I will not vouch for the result, since I tested it with personal experience only on domestic injection cars VAZ (2109-2115), Kalina, Priora, etc.
To quickly check whether your fan is working or not, just follow these steps:
- open the hood of your car
- turn on the ignition
- we find the coolant temperature sensor (most often it is located on the thermostat housing)
- disconnect the electrical connector from it
DTOZH VAZ
If the fan motor is working properly, it should turn on immediately when you remove the “terminal” from the sensor. If this does not happen, then the fan is faulty.
Yes, you can, of course, remove the connector directly from the fan itself and check everything using the battery power supply, but you must agree that this is a much more labor-intensive process than removing the connector from the temperature sensor.
Operating principle of the cooling system
The cooling system on a car is a closed pipeline in which a special liquid circulates. It constantly transfers heat from the running engine to the radiator, where cool air lowers its temperature.
In hot weather, when driving slowly or during stops, without stopping the engine, the power plant may overheat. To avoid this trouble, the VAZ-2114 injector has an electric fan, which is turned on automatically by a special sensor when the engine reaches a critical temperature. On the model under consideration, the response threshold is 85 degrees. When the engine cools down, the thermostat stops the forced airflow.
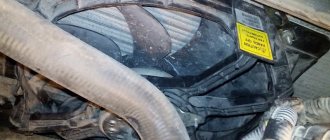
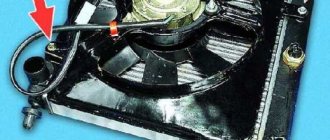
The location of the fan on the VAZ-2114 injector is the engine compartment. It is screwed to the inside of the radiator. The unit in question consists of a blade and an electric motor enclosed in a frame casing. It is supplied with power and, indirectly (via the ECU), a temperature sensor.
Using an electromagnetic relay
Using a simple relay will slightly complicate the circuit, but will relieve the temperature sensor from the presence of high current. A large current will flow through the relay contacts. It is cheaper and easier to replace the relay than the temperature sensor to turn on the electric fan. To carry out the upgrade, you will need a wire and a relay with a bracket for mounting to the body.
Disconnect the temperature sensor, and the wires that were on it must be connected to the normally open pair of contacts of our relay. Half the job is done, the power part is ready. Now control. We connect one terminal of the temperature sensor to ground, but connect the second to the relay coil.
From the second terminal of the coil you need to stretch the wire to the positive terminal of the battery. It is advisable that the connection be made through a fuse, the operating current of which can be 1 Ampere. The coil consumes a small amount of current, so the worst thing that can happen is a short circuit in the wiring. Subsequently, you can connect a forced activation button in parallel with the temperature sensor, which you will install in the car interior.
Symptoms of a problem
It is not difficult to identify a problem with the fan - if it does not work, then the antifreeze quickly heats up. The on-board computer receives a corresponding signal and an indicator flashes on the dashboard, informing the person behind the wheel about a critical situation.
In this case, the driver is obliged to turn off the power plant and wait until it cools down, and only then move away, taking all precautions.
Operating a vehicle with a faulty cooling system is very dangerous. A non-working fan, especially in the summer heat, can cause very serious damage. As a rule, the cylinder head is the first to be damaged by overheating.
It’s easy to confirm a refusal:
- turn the car on to idle speed;
- open the hood;
- wait until the antifreeze warms up.
If the electric motor of the fan is not going to work, then turn off the injection engine and start looking for the cause. Fortunately, repairing a key element of the cooling system is not very difficult. We will tell you further how to find the problem and fix it.
Ways to control the operation of a cooler on a laptop
In laptop computers, the BIOS is responsible for the normal functioning of the cooling system. At the same time, the factory settings provide for the fan to operate at only 50% of its maximum power . This is done so that during operation the cooler does not buzz too much and does not consume a lot of electricity.
Almost all motherboards provide the ability to programmatically control the performance of the cooling system. There are several ways to force the fan on your laptop:
- Via BIOS.
- Using special software.
Changing the cooler settings can lead to unpleasant noise during its operation, as well as accelerated battery drain. Therefore, before taking radical measures, you should disassemble the laptop, and then clean the fan and motherboard from dust, because it reduces heat transfer and, accordingly, leads to an increase in the temperature of the PC.
https://youtu.be/https://youtu.be/wdpTUvxVWFU
_
Why the fan may not work
The signal from the control unit indicating engine overheating cannot be ignored. The faster you repair your cooling, the lower the risk of other breakdowns.
There are several main reasons why the fan stops working on a VAZ equipped with an injector. We are talking about:
- relay failure;
- broken wiring;
- fuse blown;
- poor contact in the pads;
- failure of the electric motor of the fan itself.
First of all, it is necessary to check the functionality of the blower. It's easy to do:
- disconnect the power connector from it;
- connect the terminal directly to the battery (the current is constant, but polarity is not necessary).
If the unit works, then the problem must be looked for in the electrical circuit, but when the problem is not resolved, it means that the electric motor is clearly faulty.
Forced fan activation using the SpeedFan program
Another way to improve the performance of a cooler is to use special software, which includes the free SpeedFan utility. To overclock the fan using this application, you must:
- Download and install SpeedFan on your laptop. The installation file takes about 3 MB, so low-speed Internet is suitable for downloading.
- Launch the program via a shortcut on the desktop, and then in the “Settings” tab change the interface language to Russian.
- Go to the “Indicators” menu and set the fan power as a percentage. Here you can view data on the temperature of the hard drive, motherboard and all processor cores.
- In the “Temperature” window, located in the “Configuration” section, specify the temperature for the HDD, CPU and motherboard that the cooler will support. In the “Alarm” line, you can set the temperature value, when exceeded, the program will notify the user about system overheating. This will allow you to respond faster to critical situations.
There are other programs that allow you to force the laptop fan to start. Thus, using the AMD OverDrive utility, you can make changes to the operation of a PC cooler built on an AMD processor. The Riva Tunes application has been developed for Intel processors.
Electric circuit
So, you have made sure that the propeller itself is spinning, that is, the directly connected motor is working. In this case, it is necessary to do the wiring, inspect all connecting blocks and terminals for poor contact.
The first thing you should pay attention to is the fuse. A 20 ampere protective device is installed on the VAZ injector discussed in this article. It is not difficult to find it - look in the block located under the hood - the one designated as F4 is responsible for the fan. In fact, the device rarely burns out, since it does not experience constant high loads. It is very simple to make sure that the element is in good working order - turn on the ignition and press the horn. The signal is also fed through F4, and therefore, if it burns out, you will not receive sound.
Forced fan start via BIOS
To make your laptop cooler work more efficiently, you can change its speed and set the CPU temperature it needs to maintain. To do this you need to do the following:
- Enter BIOS. When booting the laptop, press the Del, F8 or F12 key. It all depends on the motherboard model. If your PC uses the quick startup function of the OS, then to launch the BIOS you will first need to go to the “Power Options” section and in the “Actions of the Power Buttons” tab, uncheck the box next to the “Enable quick startup” line.
- Open the “Power” menu and go to the Hardware Monitor tab.
- Specify at what power the cooler should operate (set as a percentage of the maximum value), or activate the intelligent mode of operation of the cooling system.
- Leave the BIOS after saving the changes you made.
The software shell of the Hardware Monitor tab may differ in different BIOS builds. However, if you know what parameters need to be changed, you can easily switch the fan to the required operating mode:
- in the CPU FAN speed line it is written at what speed the cooler will rotate;
- CPU Temperature controls the CPU temperature that the fan will maintain;
- CPU Q-Fan Control starts the intelligent operation mode of the laptop cooling unit (you need to put Enable opposite this line).
In intelligent mode, the cooler can operate with the following parameters:
- Silent – the emphasis is on silent operation of the system and saving battery power;
- Standard – the fan will operate at half its capacity;
- Performance and Turbo – the fan is overclocked to its maximum (in this case, the battery life of the laptop will be slightly reduced, since the cooler will consume a lot of energy).
Broken fan
When the cooling system element in question shows no signs of life, many simply buy a new one, but this is not at all necessary. Most often, failure occurs due to abrasion of the electric motor brushes or bearing wear. Both are sold separately and can be easily changed.
It will not be possible to save the old fan of your VAZ when it has a short circuit or the winding wire has broken. Eliminating these breakdowns is impractical.
The cost of a new cooling unit is relatively high. The cheapest one sells for 1,500, and the most expensive option costs 2,500.
Professionals usually charge between 400-500 rubles for replacing a fan. But, fortunately, those who wish will be able to repair their own VAZ without resorting to their services, since the procedure is not particularly complicated.
Where is the fan relay located?
It is located in an additional block.
4 – electric fan relay;
5 – electric fuel pump;
Relays and fuses may have a different order. Therefore, you need to focus on the color of the wires. The main relay is always located at the bottom. Find the relay that has a thin pink wire with a black stripe coming from it. It comes from the main relay through pin 85. Be careful! Do not confuse this with the red thin wire, which also has a black stripe and extends from the controller. And find a thick white wire with a black stripe (pin 87). This is where the cooling fan relay is located. There is always a fuse next to it. It is an element of the chain.
How to change
To replace a cooling fan, you will need a working assembly, as well as:
- Phillips screwdriver;
- 10 and 8 mm socket wrenches.
First of all, put your injection VAZ-2114 on the parking brake. Additionally, secure the wheels with stops, as required by safety regulations. Then proceed as follows:
- open the hood;
- remove the negative wire from the battery;
- unscrew the bolts holding the air filter in place;
- using a screwdriver, slightly loosen the air duct clamp (it is located near the mass air flow sensor);
- dismantle the corrugation by unscrewing it from the air filter, and then remove the last unit;
- remove the air intake by first tightening its bolts with an 8 mm wrench;
- Once you have full access to the fan, disconnect its casing (it is held in place by 6 nuts);
- unplug the power connector;
- remove the faulty element from the engine compartment;
- put a new one in its place.
The assembly process is carried out in the reverse order described above.
HOW TO REPLACE THE TEMPERATURE SENSOR
Before starting work, you need to partially drain the coolant from the cylinder block.
- Remove the wire.
- Using a 21 wrench, unscrew the temperature sensor.
- Take it off.
- Install the new one in reverse order.
OTHER REASONS FOR NO CHARGING
If the battery is not charged or is insufficiently charged, in addition to a faulty voltage regulator, there may be other reasons related to the generator:
- The belt is poorly tensioned;
- Poor contact or break in the wires supplying power;
- Faulty rotor or stator winding;
- Poor contact of the brushes with the rotor commutator, the brushes are simply worn out.
New and worn alternator brushes