July 29, 2015 Lada.Online 307 852 183
Owners of Lada Priora have to periodically deal with malfunctions of power windows (ESP). In some cases, the problem lies in some small detail that can be easily fixed with your own hands; in other cases, you will have to contact a service center to repair the ESP. We decided to look into the main reasons why power windows do not work.
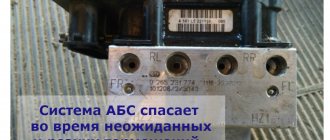
Central unit of body electronics VAZ 2172 Priora (electrical package controller)
Dear customers, in order to avoid errors when sending the electrical accessories control unit, in the “Comment” line indicate your car model, year of manufacture and vehicle equipment (standard, standard or luxury).
The central body electronics unit (CBEC) -21900-3840080-11/21 is responsible for all the electronics on the car - except for the operation of the engine, its sensors and everything related to the fuel mixture and automatic transmission.
TsBKE there are two types of blocks 21900-3840080-11 / 21 designed to perform the following functions:
— control of the windshield wiper in the “manual control” mode;
— control of the windshield wiper in the “automatic control” mode (for TsBKE 21900-3840080-21);
— control of the windshield heater;
— control of the rear window heater and electric side mirror heaters;
— control of low beam headlights, side lights and daytime running lights in the “manual control” mode, provided for by UNECE Regulation No. 48-04;
— control of low beam headlights, side lights, daytime running lights in the “automatic control” mode (for TsBKE 21900-3840080-21);
— control of daytime running lights in accordance with UNECE Regulation No. 48-04;
— high beam headlight control;
— control of direction indicator and hazard warning lamps;
— control of the interior lamp;
— energy saving management of vehicle interior lighting devices;
— central locking: locking/unlocking the side door locks from the key, from the driver’s door lock button from the passenger compartment, from the button in the driver’s door module;
— opening the trunk lid (tailgate) from a button in the cabin;
— control of electric window lifters;
— control of electric drives of side mirrors (for TsBKE 21900-3840080-21);
— control of heated front seats;
— trunk lighting control (for TsBKE 21900-3840080-21).
Applicability: 21900-3840080-21 only on Priora NORM and LUX.
TsBKE 21900-3840080-11 (standard) this is for all other Priora modifications - without electric mirrors, rain sensor and auto lights, rear windows and trunk lighting controls.
Ambient temperature from minus 40 to plus 45 °C;
Relative humidity of ambient air at a temperature of 27 °C 90%;
Atmospheric pressure from 84 to 106.7 kPa (from 630 to 800 mmHg);
The operating supply voltage range is from 9 to 15 V.
Other article numbers of the product and its analogues in the catalogues: 21900384008011, 21900384008021.
VAZ 2170, VAZ 2171, VAZ 2172.
Any breakdown is not the end of the world, but a completely solvable problem!
How to independently replace the electrical package controller on a Lada Priora?
With the online store DiscounterAvtoAzbuka, repair costs will be minimal.
Priora window lift buttons in Vladimir
VAZ-2110 window control unit with 2 keys
VAZ-2110 window control unit with 4 keys
Power window switch 2170 Priora 51.3769
Window control kit Vympel R01-2W-B
OAT Window lifter VAZ-2110 rear left (DAAZ)
Block of buttons for power windows VAZ 2110 four buttons
VAZ-2110 window control unit with 4 keys
Power window switch block (4 doors) 2110-12 18.3763
Window lifter button Francecar fcr210345 Francecar art. FCR210345
Front electric windows of VAZ-2110 and LADA Priora | Pomegranate
Power Window Button With Block 92.3709 With 7 Wires
Power window switch block (2 doors) 2110-12 181.3763
Block of buttons for power windows VAZ 2110 two buttons
Window lifter button for VAZ, GAZ cars
Right window lifter switch (button) 935804F000WL PORTER2 PORTER2
Window lifter button block VAZ 2110, GAZ four buttons 18.3763
Block of buttons for power windows VAZ 1118 two buttons with locking
Power window button 2110 Block 4 Keys 18.3763
Axiom RK Block for the window lifter button VAZ-2113-15,2110-12 with wires (Cargen)
Power window button VAZ, GAZ
Window lifter electric grenade VAZ 2110, 2170
Motor super door limiter VAZ 2110-12, VAZ 2170-72 Priora front.
Front right electric window lifter VAZ-2110 | Metprom LLC
Window lifter button VAZ 2170
Power window button 1118 Kalina 2190 Granta 921.3709
Window lifter button VAZ 1118, 2190 Granta
Rear window lift button Asam 30989
Window lifter 2110 rear (right) (electric) (assembled) “DZS”
Window lifter button block VAZ 2110, GAZ two buttons 181.3763
NBN power window button nexia nbn
Window control unit 2170 Priora (2 buttons) 2170-3763080-20
Window lifter button Rus (11796) – Window lifter
Window lifter button VAZ 1118, 2190 Granta
Block of Buttons for Windows VAZ 2110 Two Buttons
Window control unit (driver's door) Mazda 6 (GG) (02-07) GJ6A-66-350 / RUGJ66350M6
Electric rear windows of VAZ-2110 and Lada Priora | Pomegranate
Mobis Power window button right Porter 93692-43600
Priora power window switch
Window lift motor 2110 right (electric) “Olympus Motors”
Window switch Lada Priora
Window lifter VAZ 2110, 2170 Priora electric. front right (D) 2170-6104010-30
Power window switch VAZ 2170 Priora 51.3769
Button renault sandero/logan/duster/largus 09 - window regulator ASAM-SA art. 30624
DZS Window lifter VAZ-2110 rear right, electric. Dimitrovgrad
LADA Priora Lux driver door module (4 switches, mirror adjustment)
Rear electric windows of VAZ-2110 and Lada Priora | Pomegranate
Power window button VAZ, GAZ
VAZ-2110 window control unit with 2 keys
Power window button 2170 Priora 51.3769
Block of Buttons for Windows VAZ 2110 Four Buttons
Power window button Lada Largus Renault Logan 10- Sandero Front Manover Mr6000004
About the repair of the comfort unit
This is a very tricky issue. It’s worth clarifying right away that an ordinary car enthusiast has no business even trying to do this. For such an operation, you need to have at least a professional kit for soldering microcircuits on hand. Or better yet, a soldering station. No service station will undertake this work. So it’s easier to replace the failed unit with a new one.
In the video below, a specialist checks the serviceability of the Priora comfort unit.
lekha=60, I don't know. I'm having a hard time finding my way around here. Now I tried, the right mirror to the right and down is still not working. What to do ?
Added after 1 hour 32 minutes Can anyone help me figure it out?
Can anyone help me figure it out? To diagnose the EP controller, there are no psychics on the forum who can identify errors in your ECP through a monitor.
The learning key does not fit into it. Pull the chip out of the old learning key and insert it into the learning key of the new lock.
Maybe there is a link on how to teach when changing the comfort unit? Just as always teach https://www.priorovod.ru/showthread.php?t=22169
Gyzmi58, So do I need to change my key with buttons to a new one? It seems like he can be trained once?
Added after 2 minutes Gyzmi58, So do I need to change my key with buttons to a new one? It seems like he can be trained once?
Thank you very much for your attention to me. Please;)
If I connect it there and just check the locks and mirrors and then put my old BC back, the engine will start. You can only connect the connectors and check everything, you don’t have to remove the unit. Although it is not difficult to remove it. The engine will start with its block.
Gyzmi58, In general, I went to pick up the block and dropped it off on the spot. Nothing changed. I came home and decided that I would go for diagnostics, but... weekend I decided to dig deeper and for good reason. When opening the rear right door, everything started to work; when closing it stopped, everything was clear. It turns out that the door actuator wire got under the limiter loop inside the door and got jammed there. That's why there was whistling at that door. I fixed everything, reconnected the wire, reassembled everything and it works. Thanks everyone for the advice.
Added after 1 minute Look for the shorty by whistling from the BC and probably from the place where the short was lost.
I came home and decided that I would go for diagnostics, but... weekend I decided to dig deeper and for good reason. Well done for figuring it out yourself: good::good: It’s much more difficult to understand in virtual reality..
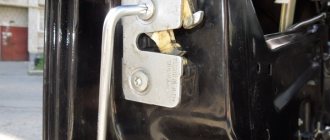
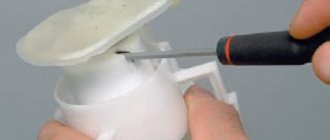
Removing the Power Window (ESP) on a Priora
The front ESP on the driver's side stopped working, at first I thought it was a button, but then I listened closely - the relay clicks, there are sounds, but it doesn't work. It was decided to disassemble. Step by step:
We unscrew the door closing pin, unscrew the self-tapping screw of the door opening handle:
Unscrew the 3 screws from the bottom of the upholstery.
We secure the glass with tape (I only had double tape)
Carefully unscrew the 2 bolts securing the glass (the last bolt shoots =)) Unscrew the nuts of the entire ESP mechanism
We pull it out through the hole.
Unscrew the large fasteners (I easily unscrewed them by hand)
Carefully remove the cable mechanism.
Using a 6 or 7 wrench, unscrew the 2 bolts securing the motor. And carefully pull it out. At the same time you need to relax the 2 wires that go to the plug.
Watch out for brushes and springs, they pop out.
Having disassembled the mechanism, I looked at the brushes - they flew out. Placed it neatly in place. We insert the spring from the brush inside the brush seat, and immediately poke the brush there. We fix it with a wire that comes out on the other side, simply bending it around the corner of the plastic.
We put it back together in the same sequence. Personally, I lubricated the pin of the mechanism with lithol (it won’t hurt).
I also taped all the holes with splendid tape (moisture got on the motor)
I collected everything and connected it. It works =) Hallelujah.
I began to assemble everything in reverse order, it took 2 hours to do everything (I wasn’t in a hurry). I immediately taped the technological holes with splen.
I covered the ESP and mirror control unit with splendid tape.
pinout, electrical package control controller and circuit
Almost all modern cars today are equipped with electric windows, which allow you to control the opening of the windows at the touch of a button. And the Russian Priors in this case are no exception. The control device, with the help of which the windows are raised and lowered, as well as many other functions, is called the Priora comfort unit. You can learn more about its structure, as well as repair, from this article.
Description of the electrical package control unit
The electrical package controller in Priora is a device used to control the functionality of the vehicle. This unit is responsible for the operation of turn signals, power windows, control panel lighting, dimensions, fog lights, interior lighting, and rear window heating system. This device also ensures the normal operation of the reversing lights. The fact that the car is equipped with this device makes it even more practical.
Location
The control device on the Priora is located above the electronic engine control unit, at the bottom of the center console, in the middle. In this case, the device is connected using two connectors - power and information. The power output is used to supply voltage to the control unit, and the information output is used to perform the functions of the device. It should also be noted that the control unit is protected from external influences of dirt and moisture.
In general, this device is a circuit installed in a plastic case. The board itself includes 15 chips, each of them performing certain functions. This is the entire electrical part of the car, including power windows, door open sensors and a control system for external electric mirrors (the author of the video is the CompsMaster channel).
terms of Use
In order for the node to operate normally, certain conditions must be met:
- the air temperature level in the car interior should be from -45 to +40 degrees;
- the air humidity level in the cabin should be no more than 90%;
- The voltage parameter for normal operation should vary around 9-15 volts;
- The atmospheric pressure level should be up to 800 mm Hg.
As practice shows, malfunctions in the operation of this device often appear as a result of its overheating or disconnection of wires or contacts inside the structure. If you are faced with the problem of a device failure, first of all you need to visually diagnose it. It is quite possible that the reason can be discovered only by looking at the device.
Photo gallery “Connection diagram and designation of controller board elements”
Possible malfunctions and ways to eliminate them
What malfunctions may occur in the operation of the electrical package controller:
- Turn signal failure. First of all, you need to diagnose the serviceability of the fuse, light bulbs, and the steering column switch. It is quite possible that the contact in the switch itself is broken; the problem can be solved by resoldering the contacts or replacing it. If this does not help and the problem really lies in the board, then there are two options - either resoldering it in accordance with the diagram, or replacing it. Usually, soldering is done first, and if it does not help, then the controller itself is changed.
Video “Diagnostics of the electrical package control controller”
How to diagnose the functionality of the electrical package controller in a garage environment - see the video below (the author of the video is Vyacheslav Kravchenko).
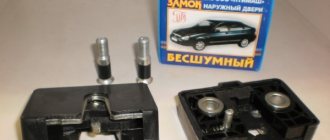
Master class on installing door closers
- First, remove 2 nuts on the door trim near the driver.
- Then we lift the plastic clips and free the car threshold from the lining.
- Carefully remove the noise and temperature insulating materials and get to the power window connector shown in the figure. Be sure to ensure that all openings in the car, on the side of the body, are closed.
- Next, you need to disconnect the existing connector and install the connector of our new device.
This is all that needs to be done to install the power window closer on the Lada Priora. Now you don’t have to worry that when you turn off the ignition in your car, the window glass will remain down. The closer will do his job.
And that is not all! If you want to leave the car ventilated while closing it, the power window closer function can be disabled.
Owners of Lada Priora have to periodically deal with malfunctions of power windows (ESP). In some cases, the problem lies in some small detail that can be easily fixed with your own hands; in other cases, you will have to contact a service center to repair the ESP. We decided to look into the main reasons why power windows do not work.
Malfunctions in the operation of the comfort unit, how to eliminate them
- The turn signals do not light up. First, you should check the continuity of the fuse, lamps and steering column switch. If there is simply no contact somewhere, then the problem can be resolved very simply by resoldering the microcontacts. If there is a fault in the board itself and soldering the contacts does not help, then the controller should be replaced.
- The power window module or central locking does not work. This problem can also occur due to oxidation of the wires. Before removing the comfort unit, you need to check all the wires with a multimeter under the insulation in the control unit, which is built into the driver's door. If only one glass unit is faulty, the wires could become disconnected due to a broken contact.
After checking the wires, if the problem cannot be found. The DA7VN5016A or DA6VN5016A controller should be re-soldered. One of them is responsible for the double-glazed windows and the lock on the right door. The second mirrors the same functions, but on the left side.
Sometimes window lifters only work to lower the windows, but raising them is not available (or vice versa). To do this, check the connection so that all the pros and cons are in place.
Errors occur in the comfort unit when the window lift button to raise the window works to lower the window. With different polarities, when the glass rises instead of lowering, you need to change the connection of two adjacent wires.
- It happens that many problems arise at the same time. The fog lights, side lights, rear lights, heated rear glass, and interior light stop working. In this case, it is obvious that the problem comes from the comfort unit and the DA1 MC33972EW variant is re-soldered. If this does not help, then the entire circuit should be replaced.
- In case of failure of the rear fog lights and instrument lighting in the cabin, the DA9 VND5025AK component is re-soldered. And, as was the case with previous breakdowns. If this does not bring results, the entire scheme is changed.
- The central locking locks begin to operate when the power window keys are pressed. If replacing the comfort unit from another car does not bring any effect, then the essence of this breakdown is in the wiring. To do this, you need to carefully check the integrity of all wires leading to the comfort unit.
Possible causes of malfunctions
Before purchasing a new comfort unit, you need to try to eliminate any malfunction. In order not to make additional costs, because the comfort unit is quite expensive. Often the problem is simply a lack of contact due to aging or chafing of the wires.
Sometimes the comfort unit controllers can burn out, for this you need to inspect them visually or even check them using your sense of smell.
The most common complaints regarding the operation of the comfort unit are the failure of double-glazed windows, turn signals or dimensions.
All problems can occur due to the following events
- break on the W-Line communication line;
- combustion of regulation drivers;
- burnout of controllers responsible for the desired area;
- transponder malfunction;
- burnout or oxidation of contacts.
Before carrying out repair work, to comply with safety precautions, do not forget to disconnect the negative terminal from the battery.
Restoring the power window button
An electric window regulator (ESP) is a car device that allows you to raise and lower the door windows using a button. The ESP consists of a drive mechanism, a lifting mechanism and a control unit.
Like any other systems subject to intensive use, electric windows have an increased service life - about 30 thousand opening/closing cycles.
This resource is sufficient for 10 or more years of uninterrupted operation, however, if handled carelessly and/or under the influence of other negative factors (for example, water ingress), the device may fail much earlier than the stated period.
Most often, problems arise in the mechanical part, that is, some part of the lift itself breaks. In this case, when you press the button, you will hear the sound of a running motor, but the glass will remain in place.
It is worth inspecting the lifting mechanism for damage to the guides along which the glass moves.
To fix this problem, you will have to replace the entire mechanism, since parts are rarely sold separately.
If the ESP electric drive itself at one point suddenly stops responding to the press of a button, you should not rush to a car service center.
Electrical package control unit in Priora
The car electrical package controller is a unit responsible for the functionality of the car.
The node regulates the operation:
- electric window lifts;
- main panel backlight;
- functioning of turn signals;
- side and fog lights;
- rear lights;
- heated rear view window.
All these devices must work clearly and harmoniously. Since the safety of the driver and passengers during the trip largely depends on them.
Also, the control unit for the Priora electrical package adds additional convenience to the driver in driving the vehicle. Hence its running name “comfort block”.
Electrical package control unit: vehicle electrical equipment is under control
March 8, 2018
In modern cars, all electrical equipment is combined into a single system called an electrical package. The control of the electrical package is entrusted to special electronic units - read all about these devices, their design and functionality, as well as the correct selection and replacement in the article.
What is an electrical package control unit?
Electrical package control unit (electrical package controller, comfort unit, central body electronics unit) - a component of the vehicle’s electrical system; an electronic device based on microprocessors/microcontrollers that acts as a central control unit for auxiliary systems and electronic components of the vehicle in order to increase its comfort and safety.
In modern cars and many trucks, various electrical equipment - power windows, external and internal lighting and light alarms, door locks, rear-view mirror drives and others - are assembled into a single system called an electrical package (EP). The functions of monitoring and control of the electric drive are assigned to the central control unit (controller). The use of an electrical package control unit allows you to implement various control schemes for automotive electrical equipment:
- Manual control via appropriate switches on the dashboard, doors, steering column switch, etc.;
- Remote control of electrical equipment using a car alarm or telematics system;
- Automatic control of certain elements in accordance with the state of the vehicle, engine controller and on-board computer;
- Automatic control of the main elements that ensure the safety of the car (central locking, windows, lights) when the status of the car alarm and/or immobilizer changes.
Thus, the electrical package control unit allows you to increase the comfort and safety of the car, as well as expand the functionality of its electrical system by using the advantages and capabilities of the CAN, LIN, K-Line and other data transmission protocols.
A malfunction of the electric drive controller can completely disrupt the functioning of the vehicle's electrical equipment, so this unit must be replaced as soon as possible. To make the right purchase of a new unit, you need to understand the existing types of these devices, their features and functionality.
Internal structure of the electrical package control unit
All modern electronic controllers are built on the basis of microprocessors or microcontrollers, which take on the functions of controlling electrical equipment circuits. The processors contain algorithms for controlling equipment in various situations - during manual control, in automatic mode, etc. Direct control of the equipment is carried out using small-sized electromagnetic relays or electronic switches based on powerful field-effect transistors.
Electronic components are located on a printed circuit board, which is installed in a plastic case; connection to electrical equipment is made using standard electrical connectors. One to three connectors can be installed on one block; often the power and control circuits are separated, and separate connectors are used to connect to them.
The electrical package control unit is located under the dashboard or under the center console; it is usually installed near the relay and fuse mounting block - this reduces the length of cables between these units. The unit is mounted with screws or using a metal bracket.
Types and functionality of electrical package control units
Electrical package control units used in various vehicles may differ in functionality and operating features, but in general they are responsible for controlling the following electrical equipment:
- Windows on all doors and window locking mechanism;
- Drive of external (side) rear-view mirrors;
- Heated exterior mirrors;
- Heated rear window;
- Heated front seats;
- Central locking;
- Locking mechanism and locks of the trunk and hood;
- Front and rear direction indicators;
- Interior lighting - lamp on the ceiling, lamps on the central pillars, lamps on the thresholds, luggage compartment lighting;
- Dashboard lighting;
- Exterior lighting devices - fog lights and rear fog lights, side lights, reversing lights.
Peculiarities
Unlike other models coming off the assembly line of the Volzhsky Automobile Plant, the Priora does not have a separate control unit on the central lock. Its functions are performed by a single electrical package controller. In addition to this unit, the vehicle protection system installed at production also includes an APS-6 type immobilizer. Thanks to this, the car owner does not need to install an additional security system on his car.
In reality, there are quite a lot of reasons for the central locking malfunction. Problems often arise due to:
- controller;
- keys;
- immobilizer;
- driver's door lock;
- broken wiring;
- shorting it to the ground of the car, etc.
If this or that problem occurs, you should pay attention to the window regulators, as well as the adjustment of the mirrors. If they do not function, then, most likely, the failure occurred due to a malfunction of the signal wiring coming from the 5th pin of the driver's door module or from the 5th pin of the HZ terminal, which supplies the controller itself.
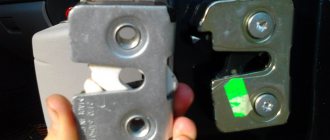
Control module in the driver's door. prior. how to change.
Control module in the driver's door. prior. how to change. » 24 Oct 2013, 13:08
- first message in the topic
Re: Control module in the driver's door. prior. how to change? » 24 Oct 2013, 13:29
Re: Control module in the driver's door. prior. how to change? » 24 Oct 2013, 13:34
PS. I've really read it! Can you take a good photo of the ESP unit board? So that everything is clearly visible.
Exactly YOURS. LIKE THIS:
And on both sides!
Re: Control module in the driver's door. prior. how to change? » 24 Oct 2013, 13:53
Re: Control module in the driver's door. prior. how to change? » 24 Oct 2013, 13:57
I'm not sure that it needs to be fired. Most likely you just have a pizhneas microcircuit.
Re: Control module in the driver's door. prior. how to change? » 24 Oct 2013, 14:04
I'm not sure that it needs to be fired. Most likely you just have a pizhneas microcircuit.
Delivery by Russian Post (cash on delivery, no prepayment)
Advantages: the most widespread network in Russia, delivers to any corner of the country, including remote ones. Flaws:
- high cost of delivery of heavy or large parcels, as well as the weight of one parcel should not exceed 20 kg;
- long delivery times and queues in large cities for receipt.
To send your order by Russian Post:
- Place an order in our online store by phone or on the website (registration is not necessary);
- After we receive it, our manager will contact you by phone to clarify the cost, delivery time and your wishes. Next, we will pack your order carefully and then send it to you;
- You will receive the tracking number of the shipment via SMS from us and from the Russian Post; the message will indicate the full cost of the purchase, including delivery to your locality (that is, the cost of your order plus the cost of delivery by cash on delivery). You can control the status of the order coming to you using our tracking service, as well as independently, on the Russian Post website using the track number;
- To the Post Office, you will only have to pay the cost, including delivery.
Delivery time may vary depending on how far your locality is from Togliatti and usually ranges from 5 to 14 days.
The cost of delivery is calculated based on the volume, weight of the selected product and the distance to the recipient's settlement.
Required for sending:
- indicate full name recipient;
- Your mailing address;
- Your phone number (contact);
- Post office code.
Russian Post commission for cash on delivery service:
- purchase price up to 1,000 rubles. – 70 rubles + 5% of the amount;
- purchase price from 1,000 to 5,000 rubles. – 80 rubles + 4% of the amount;
- purchase price from 5,000 to 20,000 rubles. – 180 rubles + 2% of the amount;
- purchase price from 20,000 to 500,000 rubles. – 280 rubles + 1.5% of the amount.
Russian Post - Delivery of goods up to 20 kg throughout Russia. https://www.pochta.ru
Delivery time and cost Track the parcel Calculate delivery by mail
Basket
Double-glazed window control unit “Norma” 1118 – 6512010 for VAZ 11183 “Kalina”
Aktuator On cars of the Kalina family, 2 types of non-interchangeable (by wiring) glass unit control controller 1118 - 6512010 and 11180 - 3763040 can be installed. 1118 – 6512010 has one 25-pin connection connector, 1118 – 3763040 (1118 – 3763040 – 10) – two connectors.
Remote control system for double-glazed windows “norm” on a VAZ 11183, Kalina. Controls power windows and central door locking. When the connector is removed, the engine does not start; the device performs some of the anti-theft functions.
Connection
| № | Wire color | Purpose, addressing |
| 1 |
External Shock or Volume Sensor Input (Not Used)* 2 Pink/Black To Door Lock Switch in Switch Box
3 Brown/Green K‑Line. To Kl. 71 ECM, Cl. 18 APS‑6
4 Brown Connects to ground when the driver's door is closed
5 Gray To heated rear window element
6 Black Mass
7 Pink/White To door lock switch in switch block
8 Yellow/Blue To the instrument cluster, to the APS‑6 indicator
9 Black/White Connects to ground when the hood is opened. C VK engine compartment lamp
10 Two White/Red Connects to ground when opening the rear doors
11 Brown/Red Connects to ground when opening the right front door
12 Output 12 V power supply for external sensor (Not used)*
13
Not used
14 Yellow Pulse + 12 V, closing all doors and trunk
15 Red/Blue K class. 14 APS‑6
16 Blue with Black To left direction indicator
17 Red/Blue Pulse + 12 V, opening passenger doors
18 Red/Black Pulse + 12 V, driver door open
19 Pink/Red Impulse + 12 V, opening the trunk lock
20 Yellow/Blue To terminal “15”, via fuse F 9, in the mounting block
21 Grey/Black “-” Horn relay
22 White/Blue Connects to ground when the driver's door is opened
23 Red To permanent plus through fuse F 5, in the mounting block
24 Blue To right turn signal
25 White/Black Connected to ground when opening the trunk
* A regular shock sensor from any alarm system (Alligator, Saturn, Clifford, APS) is suitable.
+ 12 V connect to pin 12; body – on the 6th; We connect the signal wire (a ground appears on it at the moment of activity) to the 1st contact.
During normal arming, Kalina now reacts to an impact on the body (it sounds a horn and blinks turn signals). Similarly, instead of a shock sensor, you can connect a volume sensor (for example, single-level MMS‑1).
You can also connect a pager: + 12 V of the pager transmitter on pin 12, minus on pin 21.
Double-glazed window control unit 1118 – 3763040 (- 10 ) for VAZ 11183 “Kalina”
| Controller board | ||
| Controller board |
| The key code is not readable |
1 . 1 Malfunction in the VZ communication coil circuit
1 . 2 Malfunction in the circuit from the block to the communication coil to the APS ECU
1 . 3 Transponder missing in OK
1 . 4 The transponder in OK is faulty (detected during pre-production preparation)
1 . 5 The transponder in the Republic of Kazakhstan is faulty (detected during pre-production preparation)
1 . 6 Malfunction of the input transponder circuit in the APS ECU
1 . 8 The communication coil came off from the VZ pad on the inside
1 . 1 - replacement 1118 – 6105006 (set) - rearrange the transponder - rearrange the remote control 1. 2 - replacing the instrument panel harness 1. 3 -replacement of KSUD -replacement of 1118 – 6105006 (set) -replacement of remote control -train the system 1. 4 - rearrange the transponder (if there is a clean one) otherwise: - replace 1118 – 6105006 (set) - retrain the system 1. 5 - replace the remote control - train the system 1. 6 - replace the faulty unit - train the system 1. 7 - replace the remote control with a “clean” one - train the system 1. 8 - replace 1118 – 6105006 (set) - rearrange the transponder - rearrange the remote control
What kind of engine does the Lada X-Ray have?
2. 1 Check the continuity of the circuit 2. 2 Trial one-by-one replacement of blocks with known good ones 2. 3 1. Check V on KSUD: room No. 12; room No. 13; room No. 44 and room No. 63 2. Check V on the APS: room No. 6; room No. 16; room No. 20 2. 4 Remove the block from the “Norma”, if the fault has disappeared and the internal combustion engine starts, then the electrical package is faulty. Carry out a test replacement of the “Norma” electrical package 2. 5 Check that the coolant is getting into the KSUD (Kalina) 3 sound signals IC flashes 3 . 1 APS ECU – “alien” 3. 2 OK – “foreign” 4 beeps IC lights up constantly The system is not trained - train the system
The KSUD was previously trained with another system. Very rare reason: the IS is blinking, there are no sound signals. The APS is trained, but the KSUD is “clean” - retrain the system
Abbreviations: IS – status indicator; VZ – ignition switch; OK – training key; RK – working key; RC – remote control; KSUD – engine control system controller; ECU - electronic control unit
How the Priora central locking works.
Let's try to figure out how the Priora central locking works. After the keys are activated by the immobilizer unit, the key codes are transmitted to the driver's door module, where they are stored. When the trained key comes into range of the module's antenna, when the doors are opened, the code is read. If the code matches, then when you turn the key and close or open the electrical contacts of the door lock, a signal is sent from the driver's door module via the CAN bus to the electrical package control controller to open or close the doors. In addition, the security alarm is activated or removed.
The Priora central locking works the same way when the immobilizer is inactive. In this case, the code from the key is not read, and the entire system works as described earlier.
Door locks can also be controlled remotely by pressing buttons on the key. In addition, there are two modes when unlocking doors. It can occur simultaneously on all doors or in stages. When you press the button once or turn the key, the driver's door opens. If you press the button again or turn the key within 5 seconds, the passenger doors will unlock. Switching between modes is done by simultaneously pressing the door lock and unlock button on the key with the ignition on. The transition is confirmed by one or two beeps from the buzzer when simultaneous opening and step opening are activated, respectively.
Self-repair of the Priora comfort unit, is this possible?
If you have never encountered soldering, diagnostics of printed circuit boards of varying complexity and configurations, or do not have the necessary diagnostic or soldering equipment, then it is better to address the repair question to qualified specialists. If you have the above skills and understand the causes of malfunctions, independent repairs are carried out quite often. This is due to the fact that various microcircuits or chips constantly fail. For example, having established that the reason for the turn signal failure is a failed control driver, it is always possible to purchase a new part and simply re-solder it to replace the faulty one.
Malfunctions and their possible causes
The cost of a new, original unit is quite high, so do not rush to buy a new product, figure out the causes of the malfunctions. Of course, there are always cases when the board cannot be repaired and it is more advisable to simply install a new product to replace the faulty one. Do not forget that the causes of malfunctions can be frayed or broken wires that are connected to energy consumers.
According to statistical data collected on technical support forums, car owners quite often complain about malfunctions in the operation of power windows, turn signals, and parking lights.
If we talk about the components of the printed circuit board itself, the most common breakdowns are associated with: - a break in the W-Line communication line; — burnout of control drivers; — burnout of controllers responsible for correct operation; - the output of their transponder; — significant oxidation of contacts.
Recommendations for working with car doors
General principles for working with front and rear doors include fixing the structure in one position so that there is no chance of injuring your fingers and simply exposing yourself to discomfort due to constantly moving doors. There are several tips to make repairs easier:
- if the casing is being removed for the first time, it is preferable to use video/photo recording in order not to confuse the fasteners and installation paths of individual elements;
- after dismantling the casing, it is necessary to clean the structure inside: remove all dirt, dust, moisture, and remnants of insulating materials;
- To save money in the future, it is best to eliminate all shortcomings. For example, if there is corrosion under the casing, it must be removed. Similarly with faulty wiring - this will eliminate problems with the speakers (wheezing, broken sound) and other problems;
- When painting doors and correcting defects, dismantling may be required to facilitate further work. When installing back, adjustment of the hinges is required.
Comfort block functionality
The main functions that the comfort unit contains are electrical control in the car. Since the list of tasks performed is extensive. Malfunctions in the operation of the unit can seriously harm the driver, especially during dense traffic around the city.
Comfort block tasks:
- turn signal indication;
- car interior light;
- fog lamps, low beam lights, parking lights;
- electric double glazing unit;
- side mirrors operation, adjustment, heating;
- anti-theft mechanism;
- door blocking;
- security alarm;
- luggage compartment lighting;
- dashboard lighting.
Each of these functions is essential for a car. Therefore, excluding even one of them from work will bring significant inconvenience to the driver.
What functions does the block provide?
The main functional purpose of the device is to monitor and control the electrical system in the car. Some important functions for which the block is responsible:
- fog lights, low beam, side lights;
- lighting in the car interior;
- direction indicators;
- power window system;
- operation, adjustment and heating of side mirrors;
- anti-theft system;
- signaling;
- door locking;
- trunk lighting;
- instrument panel lighting.
Partial, and even more so complete failure of the unit causes significant trouble for any car owner. The biggest problems are caused by the failure of the comfort unit in dense city traffic conditions.
How to repair the electrical package control unit on a Lada Priora
"Lada Priora" drives around the city. Here is the crossroads. Required traffic light signal. And the planned turn takes place. The driver's hand habitually pressed the steering column switch. But the warning light is not blinking. From all sides there are indignant beeps and screams. Turned without signaling! The driver embarrassedly presses the hazard warning button to stop and investigate. However, there is no response here either. Yeah! It's probably the turn signal relay! It needs to be changed, that's all! Fortunately, auto parts stores are everywhere now. But here, too, not everything is so simple. It seems that the “electrical package” or, as it is also called, the Priora comfort unit, has failed.
Removing the comfort block on new models
If you follow the manufacturer's technological instructions, this is a very complex and time-consuming process. Suffice it to say that according to this scheme it is necessary to partially dismantle the entire dashboard of the Priora. Of course, experienced locksmiths do not do this. The process goes as follows. The negative terminal of the battery is removed.
Attention! This must be done during any work related to the electrical equipment of the car. And especially those that are controlled by a computer
You'll have to climb and grope with your hand. As already mentioned, the electrical package controller is screwed behind the mounting one. It is perpendicular to it. It is secured with two bolts
heads 10. Before unscrewing them, you need to disconnect the three wiring harnesses connected to the block. It is not difficult. And it is impossible to confuse them during installation. They have different entry options. After this, you can remove the mounting bolts. Since the ears on the device are not closed, but have a free exit, one of the bolts can only be loosened 3-4 turns. And then take out the block.
Important! The knot comes out only in one position, and if you couldn’t pull it out right away, don’t panic. Just turn it gradually to remove
Install the new one in the same way.
Replacement on the first Priors
This is generally a simple operation. The shield is removed from the bottom of the “torpedo” on the passenger side. The comfort controller is perfectly accessible. Unscrew the fasteners in the same way and remove the device. Replace with new one. The only thing is that the wiring harnesses are on the driver's side. But it is just as easy to remove the side panel, which is secured with 1 bolt.
About the repair of the comfort unit
This is a very tricky issue. It’s worth clarifying right away that an ordinary car enthusiast has no business even trying to do this. For such an operation, you need to have at least a professional kit for soldering microcircuits on hand. Or better yet, a soldering station. No service station will undertake this work. So it’s easier to replace the failed unit with a new one.
In the video below, a specialist checks the serviceability of the Priora comfort unit.
Notes on implementation of schemes
Let us immediately note: if there are no window lifters, the second diagram will not contain parts K2/K3. Then you only need to cut one wire. Sometimes only the rear windows are missing. This means that relay K3 is excluded. And the diodes connected in parallel with the winding can be absolutely anything.
Now we list the requirements for an element called “relay”:
- Operation voltage – 12 Volts;
- Switching current – 10 A or higher;
- The current consumed by all relay windings should not exceed the value specified in the instructions for the signaling. Usually it is 200-300 mA.
It is the last requirement that is often violated.
In order for “scheme 2” to work, it is necessary not only to assemble it, but also to program the main unit: you need to enable the “2-step unlocking” option. And be that as it may, control impulses cannot be made too long. Use values of 0.7-1.1 seconds.
Power cables (cord X1-6) can only be connected using twists.
The cross-sectional area of the wire must be sufficient to withstand a current of “10 Amps” (this does not apply to signal circuits). A fuse protecting the power circuits must be installed. And of course, before installation, remove the negative terminal of the battery.
Glass closer Pandora DWM
Connection diagram for the passenger door button in series through a duplicate button on the driver's door. Contacts 1-6 and 7-3 are always normally closed. When you press the up button, contacts 1-6 open and 1-2 close (window rises). When you press the down button, contacts 7-3 open and 7-2 closes (window down). The 30th contact of a 5-pin relay, without supplying voltage to the winding contacts, is constantly shorted to contact 88, which gives us the necessary negative contact (works like a switch). If voltage is applied to the winding, then contact 30 is disconnected from contact 88 and connected to contact 87. Contact 86 of the winding is connected to ground.
Why is everything so difficult?
It would seem that we only need to manage the locks. Why then connect to the window lift motors?
The opening of the passenger doors is carried out by the second impulse (relay K1 is activated). And elements K2 and K3 at this moment block the power windows. If they are not blocked, the windows in the doors will lower during the entire control pulse. And even in 0.8 seconds they will open noticeably.
Of course, connecting the signaling system in a Priora is more difficult than in many domestic cars. At the same time, the “Grant” in the “Norma” configuration uses a similar scheme. Be that as it may, the Lada Priora is the flagship of VAZ. And probably, difficulties with the electrical part should not confuse a competent car owner. It is also known that the standard control unit can be reprogrammed, and then unlocking occurs in one step. In this case, the connection is made according to “Scheme 1”.