Print this article Font size 16
VAZ 2109 cars are equipped with injection and carburetor engines, each of which has a cooling system. One of the important elements of this system is the fan.
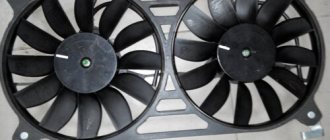
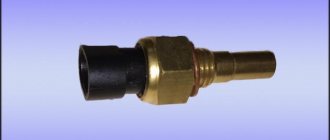
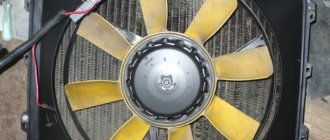
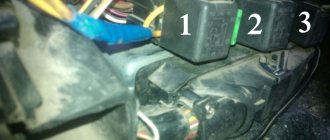
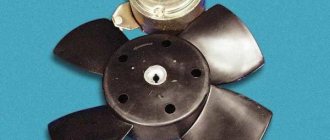
Appearance of the device
Examination
On VAZ 2109 engines, the operating temperature is 90 degrees.
If the indicator needle crosses the 100 degree mark, the car should be stopped immediately, the engine should be turned off and the power unit should cool down. Without doing this, you risk major, expensive engine repairs.
The motor can overheat for various reasons:
- The thermostat has failed;
- The radiator is clogged;
- The radiator fan has failed;
- The fan switch sensor is broken;
- The coolant level in the system has dropped;
- The pump has failed;
- The integrity of the wiring in the fan circuit has been compromised.
All these reasons can and should be checked before purchasing new parts.
Here is an example of checking a fan and sensor.
| Object to be checked | Method |
| Fan | Take one wire about a meter long. Preferably with two crocodiles at the ends. The mass goes to the fan. Your task is to supply voltage directly from the battery to the fan. Apply 12 volts to the second contact of the fan. If he's spinning, he's fine. If not, you'll have to change it |
| Fan sensor | Turning on the ignition, close the sensor contacts with a screwdriver. Normally, when it is closed, the fan should start spinning, and if it is open, it should stop. Please note that different types of sensors have a certain response temperature - from 87 to 90 degrees or more |
Where is the fan switch on VAZ 2112 16 valves located?
The fan switch on sensor on the 16-valve VAZ-2112 engine is located on the cylinder head near the thermostat.
Interesting materials:
What happens if you smear coconut oil on your eyelashes? What happens if you eat gum on an empty stomach? What happens if you put regular cookware on an induction cooker? What will happen if Elbrus starts to erupt? What happens if you write the exam with a ballpoint pen? What happens if you step on a starfish? What happens if you step on a stone on a fish? What happens if you press the stop valve on a train? What happens if you press Win Del? What happens if you don't squeeze pimples?
General characteristics of the model
Dream car in the 90s
The dimensions of the car have changed somewhat due to the lengthening of the wing and enlargement of the hood. In addition, a completely new, improved VAZ radiator grille and, of course, an updated dashboard appeared. The length of the VAZ 21099 compared to other cars in this group has increased by 20 cm.
The VAZ 21099, like other models of this family, has many advantages:
- it is capable of developing a fairly high speed;
- has excellent controllability when driving;
- Stable on completely different types of roads.
In 2004, this model of car was no longer produced in Russia, but its production continues in Ukraine.
VAZ 21099 cars come in two types.
The VAZ 21099 has a carburetor, just like the VAZ 21099 has an injector, the layout of the fuel supply system is almost identical.
In the VAZ 21099 injector, the supply of gasoline when you press the gas pedal is controlled by a computer. In a carburetor engine, such emissions are controlled by special damper plugs.
Quite often, the owners of this car are faced with one problem: the VAZ 21099 carburetor cooling fan does not work.
Fan connection 2108, 2109, 21099
Until 1998, on cars with the old mounting fuse block 17.3722 (finger type fuses), relay 113.3747 was included in the fan circuit. After 1998 there is no such relay.
Also, before 1998, the TM-108 switching sensor was used (the closing temperature of its contacts is 99±3ºС, the opening temperature is 94±3ºС), after 1998 the TM-108-10 with similar temperature ranges or its analogues from different manufacturers. The TM-108 sensor only works in conjunction with a relay; the TM-108-10, reinforced for high current, can work both with and without a relay.
Scheme for switching on the engine cooling fan on a VAZ 2109 with mounting block 17.3722
- Fan motor
- Motor start sensor
- Mounting block
- Ignition switch
K9 - Relay for turning on the fan motor. A - To terminal “30” of the generator
Scheme for switching on the engine cooling fan on a VAZ 2109 with mounting block 2114-3722010-60
- Fan motor
- Sensor 66.3710 for turning on the electric motor
- Mounting block
A - To terminal “30” of the generator
Checking and replacing the temperature sensor
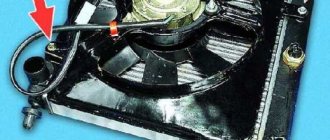
On a VAZ-2109, the cause of untimely operation or complete failure of the fan is often the coolant temperature sensor. Therefore, it needs to be checked secondarily. The sensor is located at the bottom of the radiator, two wires come from it. Before unscrewing it, you need to accurately check the operation of the cooling system:
- Connect the ends of the wires leading to the sensor together. If after this the fan starts working and the sensor gets hot, then this controller needs to be changed. When testing on a hot radiator, you may find that the sensor body is also warm. In this case, check the thermostat.
- If the fan does not work even after shorting the wires, then the problem may lie in the relay or fuse. The relay should be checked if the sound of its operation is not heard. Depending on the type of car, it may be located in the mounting block (for models with carburetors) or in the passenger compartment under the driver’s storage compartment (for injection cars). The easiest way to check this device is to install a similar device in its place. If after replacing the relay the fan starts working, you don’t have to carry out further testing.
- Sometimes the device does not work, but the sound of the relay operating is present. In this case, check fuse F-8.
If you do not find any faults in other systems, then you need to replace the temperature sensor in the cooling system. This is done according to the instructions:
- Turn off the ignition, remove the terminal from the battery and drain the fluid from the expansion tank and the generator. To do this, you need to remove special plugs.
- Then disconnect the sensor from the terminal block.
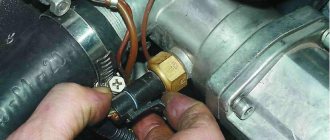
- Using a spanner wrench, unscrew the sensor from its place without applying excessive force.
Finding the reason
First, turn the fan off and on again, observing the correct polarity to the battery terminals. The fan should start, if this does not happen, then the electric drive is working, and the reason lies elsewhere. On the contrary, if after these manipulations the fan still does not work, then you need to check the electrical system on the sensor.
If the wiring is in order, then you should go to the fuse, located in the mounting block, under the hood of the car on the driver's side. There is a double fuse responsible for the sound signal and the cooling system. Therefore, it is very easy to check its performance using an ordinary autotester. If there is no sound signal during the test, then that is the problem.
If the cause cannot be identified, you need to check the functionality of the relay. To do this, you need to find another working relay and insert it into the socket in place of the old one. If the fan does not work in this case, then there may be a problem with the sensor; before checking, it should be de-energized.
After this, the controller starts the fan in forced mode. Next, disconnect the connector from the sensor and turn the ignition key. If the fan starts working, this indicates that the sensor is not correct and requires immediate replacement. It is worth noting that this method is relevant for injection models.
For carburetor models, you need to check the functionality of the fuses in the mounting block. If this fuse is faulty, it is quite easy to notice by the characteristic soot on it. Also, in many Russian cars there is a problem with the relay responsible for turning on the fan. Here the check is carried out in a similar way with injection models.
If in a carburetor model there is a malfunction of the sensor installed in the radiator of the car, you just need to close the contacts located on it. As in injection models, the fan should start, which indicates a sensor failure.
Sensor
Don't rush to change the fan right away. Often the problem was a sensor, relay, fuses, or simply broken wiring. First of all, we will check the sensor and also tell you about the features of replacing it.
Signs of a faulty sensor may include failure to turn on when the coolant temperature is high or turning on when the engine is cold.
The fan switch sensor is located at the bottom of the radiator. A couple of wires come off it.
Searched device
Accurate check
In order not to rush to conclusions, experts first advise checking the sensor for functionality.
- If the fan does not want to turn on according to the standard circuit, try shorting the wires that go to the sensor. If the fan is running and the sensor is hot, the problem lies there. If the radiator is hot during testing, the sensor housing may be warm. This suggests that you should check the condition of the thermostat and the coolant level in the tank. You may need to change and top up accordingly.
- If, after closing the wires, the fan does not turn on, the sound of the relay being activated is not observed, check the condition of the relay and fuse. It is number 4 in the mounting block.
- By shorting the wires, the fan did not start, but the relay worked. Here you should check fuse number 8.
- If the fan starts randomly on a cold engine, it does not turn off for a long time, try disconnecting one wire from the sensor. If the fan stops, the sensor contacts are stuck. If the fan continues to turn, sticking has occurred on the contacts of the control relay.
Having discovered that the regulator has failed, there is nothing left to do but change the radiator fan activation sensor.
Replacing the sensor
Changing the sensor is quite simple:
- Turn off the ignition;
- Drain the coolant from the expansion tank;
- Disconnect a pair of wires from the sensor terminal block;
- Using a 30 mm wrench, unscrew the regulator from its seat. You shouldn’t apply a lot of force; you risk breaking the seat;
- Following the reverse sequence, install the new sensor.
Disabling the sensor
You can change the sensor without draining the coolant. To do this, you need to quickly unscrew the old regulator and screw in a new one in its place. A small part of the coolant will spill out, but you won’t have to drain it for a long time and then pour it back in.
Replacing the stove fan
Interior plastic, washer reservoir (third one already!), heater fan (has been humming and groaning for a long time), arch protection, additional brake light (mine is broken), seat belt clamps, and floor mats in the interior - the top one on the tidy, and in the floor tunnel , and yes, I also took something like a glove compartment into the route PC compartment.
Upon arrival home, without eating or drinking, I ran to install it all)) Having installed all the new plastic and tank, I set to work on the stove fan
Everything went well: I unscrewed the casing, unscrewed the fan mounts, and pulled the wires out of the interior. Well, I think it’s written in the book - “turn, pull and here it is in your hands” - so let’s repeat it now... But that wasn’t the case...
Taking different poses, running back and forth, crying and laughing like a normal person, the right position was finally found...
Here's what we have...
Carefully, without peeling off the foam (it’s better to replace it, of course), without breaking the latch, open the casing,
Change the filling and assemble everything in reverse order.
What about the prices:
- Rack cover 2109 middle bottom (set) - 120 rub.
- Front top strut trim (set) — 80 rub.
- Dashboard mat — 85 RUR.
- Tunnel mat 2108 — 60 rub.
- Heater motor 2108 — 910 rub.
- Washer reservoir 21083(eng) - 130 rub.
- Miniblock console 21083 — 170 rub.
- Additional stop 2109 - 290 rub.
- Wing arch 2108 (set) — 30 rub.
- Seat belt retainer (set) - 50 rub.
Fan
If the problem lies in the injector or carburetor cooling fan, then you will have to remove it. It is quite possible to repair the unit by replacing the electric motor or impeller.
Diagram with casing, radiator, fan and impeller
To remove the valve, perform the following operations:
- Disconnect the negative terminal from the battery;
- Disconnect the wire terminals. One of them is mounted on the fan casing;
- Take a wrench and unscrew a couple of connecting bolts. They fix the vent casing on the left tank;
- Next, unscrew another lower nut holding the device casing;
- Now you will need a socket extension to unscrew the right nut on top that secures the vent housing to the radiator;
- All that remains is to unscrew the fan pressure plate. To do this, remove the pair of left nuts;
- Remove the pressure plate by hand;
- Now remove the fan along with the casing.
You have removed the unit. Now you have a choice - change the entire unit, or try to repair it by replacing the electric motor or impeller if they are damaged.
Replacing the electric motor
- Disconnect the fan motor wire that is held in place by a clamp on the casing.
- The electric motor is held on the casing by three nuts. They all need to be unscrewed.
- Remove the electric motor from the fan housing.
- Be sure to check the condition of the rubber bushings of the electric motor, which will remain on the casing. If cracks or signs of deformation are detected, they must be replaced.
- Check the electric motor for functionality. If it fails, you can purchase a new one and insert it into the old casing.
Electric motor
It is not uncommon that the performance of a radiator fan is impaired due to a deformed impeller. By replacing it, you can restore functionality to the device.
Replacing the impeller
To change the impeller, follow the instructions:
- Pry up the lock washer using a flathead screwdriver. It is located directly in the center of the impeller;
- Lift the washer and remove it;
- In some cases, the impeller is secured to the fan motor with a nut. Therefore, if you have one, unscrew the mount;
- Remove the impeller and assess its condition. If it is worn out or deformed, replace it with a new one;
- Many people, instead of a standard 4-blade impeller, install a more advanced 8-blade impeller.
Changing the impeller
During reassembly, make sure that the motor pin fits into the longitudinal hole on the impeller, as shown in the figure below.
Direct the pin into the longitudinal hole
Instructions for replacing the TOZh sensor with your own hands
Replacing the DTOZH is carried out as follows:
- First you need to turn off the ignition and open the hood of your car.
- Next, you need to place a container under the drain hole of the engine radiator; all the coolant will collect in it. Open the plug and drain the antifreeze, then find the DTOZH and disconnect the connector from it.
- Using a wrench, you will need to dismantle the controller. The device is removed from its installation location. When removing you can see the rubberized seal, when you remove the regulator, do not lose it. If you notice that the rubber band is very worn, it will need to be replaced.
- After this, you will need to install the new controller in the installation location. Using a wrench, screw the device all the way, and then connect the connector with the wire that you disconnected when dismantling. Now all you have to do is pour the working fluid into the radiator device and turn on the ignition, start the engine and check the operation of the device.
Possible causes, their search and solution
There may be several reasons why the cooling fan turns on on a cold VAZ 2114 engine.
The most likely of them are:
- low level of coolant in the system;
- sensor failure;
- fan short circuit;
- thermostat failure.
You should start your search with the first reason, since it is the most probable and at the same time the most quickly resolved. When the coolant level is low, the sensor can operate almost immediately after starting the engine, thus turning on the fan. This is due to the fact that a small amount of liquid heats up very quickly, while the engine itself is still “cold”. In order to solve this problem, you just need to add coolant to the required level.
Coolant level VAZ 2114
If it turns out that there is enough antifreeze in the system, and this is not the reason, then you should check the sensor itself. It happens that it “sticks” in the closed position, as a result of which the fan circuit is always on. You can check the functionality of the device using a multimeter.
If you measure the resistance at the sensor contacts with the engine off, the tester should go off scale or show 0, depending on the model of the device (that is, the resistance will tend to infinity). If the multimeter shows very specific numbers, then the sensor is permanently closed, and it should be replaced with a new, similar one.
Temperature sensor VAZ 2114
If the sensor also turns out to be working, then you should check the fan. Sometimes (especially if the housing is poorly screwed on or the wires are poorly insulated), it shorts to ground, as a result of which the fan starts working directly from the battery, without the participation of an electronic circuit with a sensor. This cause can be eliminated by checking and tightening all fasteners, as well as insulating exposed wire sections.
Checking contacts
It should be remembered that such a malfunction is quite serious and can cause:
- Rapid fan wear.
- Battery discharge (if you leave the ignition on without the engine running).
- Car fires (due to strong heating of wires).
That is why special attention should be paid to searching for possible faults (exposed sections of wires). The last reason that can lead to the fan turning on spontaneously is a breakdown of the thermostat (or rather the control sensor installed on it)
The bottom line is this: if the thermostat sensor fails, the electronic unit automatically starts a fan to cool the system, since the electronic unit cannot accurately control the temperature of the liquid. A kind of “reinsurance” is performed in case of possible overheating
The last reason that can lead to spontaneous turning on of the fan is a breakdown of the thermostat (or rather the control sensor installed on it). The bottom line is this: if the thermostat sensor fails, the electronic unit automatically starts a fan to cool the system, since the electronic unit cannot accurately control the temperature of the liquid. A kind of “reinsurance” is performed in case of possible overheating.
Thermostat VAZ 2114
In order to identify a sensor failure, you will again need a multimeter. When checking, you should measure the resistance between the sensor contacts (with the engine off, of course). Normally, it should be no less than 100 and no more than 500 Ohms. If the values obtained during measurement are outside the limits of this norm, then the sensor should be replaced with a new one. Finishing the conversation about the possible reasons for the fan turning on spontaneously, we should say a few words about how to prevent them.
To do this you will need:
- promptly monitor the coolant level in the system;
- periodically check the condition of the electronic wires of the cooling system;
- clean the sensor contacts from emerging oxides (it is recommended to carry out a similar procedure twice a year - in autumn and spring).
If you notice that the fan begins to turn on on its own, then the search for a breakdown cannot be put off until later, since the consequences (in some cases) can be extremely serious.
Typical faults
As with any mechanism, problems can occur in the heating system (video author: Andrey Kuzemsky).
If the VAZ 2108 heater motor is broken, you can understand this by comparing some symptoms:
- If the motor does not work when switching operating modes, the cause of the breakdown may be hidden in the resistor. When repairing, you need to replace the resistor with a new one, because it cannot be repaired.
- If the fuse is blown, you need to check the insulation of the armature located on ground. There may be a short circuit.
- If, when switching modes, the VAZ 2108 heater fan rotates at the same speed, this may be a consequence of contamination or oxidation of the collector. In case of repair, it is worth cleaning the collector and, if nothing has changed and the fan continues to act up, you can replace the bearings.
If the VAZ 2108 stove motor does not even show signs of life, then the reason is not in its design, but in a broken circuit. To find out if this is true, you can use a voltmeter.
Fan removal and repair
Before removing a burnt-out fan from the car, disconnect the power from the electrical system. Remove the terminal from the negative terminal of the battery. Next follow the instructions:
- Open the hood and remove the air filter from the engine for easy access.
- Disconnect the wiring block from its counterpart attached to the fan casing.
- The casing is attached to the left tank with two screws. Unscrew them completely.
- Remove the nut that secures the lower part of the casing to the body.
- Unscrew the nut securing the casing to the radiator. Use a socket and extension.
- Unscrew the two nuts securing the bracket and remove it.
- Tilt the fan towards the engine and remove it from the engine compartment.
The reason why a fan does not work, as a rule, is the failure of its electric motor. To replace, disconnect the power supply wires, unscrew the three screws securing the motor to the casing and the nut securing the impeller to the engine. When removing the impeller, take care to preserve the key that prevents the impeller from turning on the axis. It is very small and easily lost. After replacing the electric motor, reassemble the unit in reverse order. Do not forget to thoroughly tighten the nut securing the impeller on the fan axis. A poorly tightened nut can cause it to come loose, causing beatings and vibrations to begin, and extraneous sounds to appear.
The fan activation system of the VAZ 2109 injector is much more reliable than that of the 2109 carburetor version. Therefore, there is usually no need to engage in tuning by installing a second fan or installing a button in the cabin to force the fan to turn on. The standard configuration works quite satisfactorily.
From the moment electric fans began to be used on VAZs with carburetors, car enthusiasts often began to experience their failure. Previous mechanical models were considered almost eternal. In most cases, when a VAZ-2109 fan with a carburetor is said to not work, the unit completely stops performing its functions. In this case, the engine temperature exceeds 100 degrees, and the car may fail. To avoid major repairs of the power unit, it is necessary to stop driving after the temperature needle deviates into the red zone. Then you need to find the reason why the fan is not working.
You should start checking with the liquid level in the cooling system (check the expansion tank), and then gradually eliminate faults in other parts of the system:
- fuse;
- temperature sensor;
- electric fan motor;
- impeller (it can be deformed, which leads to jamming).
While performing work, you will have to check the condition of the power circuit along the way. All conductors should be visually normal. It is best to eliminate the probable causes of failure one by one so that the system operates stably.
see also
Comments 60
It always shows like this for me. I set the BC to 95 degrees and everything is fine
The expansion tank cap solved everything))
in the brain it is written to turn on the fan somewhere around 100-103 (personally, the electronic instrument shows me the 103 limit and it turns off at 98 degrees. As an option, re-flash the brains or buy an on-board vehicle with a “safari” function, something like that_ in general, the gist there is this , it is possible to change the temperature at which the fan turns on through it... the sensors are all the same, there is no difference _ it will turn on at the same temperature)))
Thanks for the advice, that's what I'll do)
This is a normal temperature, on all Eng 09 the ventilator turns on like this, don’t worry, it was 2 09 and on both of them it’s like that
They are simply afraid that the cylinder head will lead)))
Don’t suffer from bullshit, don’t interfere with the car’s work, everything is fine with your temperature)
I also want to think so, but the rising coolant level in the expansion tank does not give me peace of mind)))
I don’t know, I’ve been driving like this for a long time and in more than one car, a friend’s 9 does the same thing) and the flight is normal, it’s warm in winter)
What to do if the cooling fan on a VAZ-2109 does not work
From the moment electric fans began to be used on VAZs with carburetors, car enthusiasts often began to experience their failure. Previous mechanical models were considered almost eternal. In most cases, when a VAZ-2109 fan with a carburetor is said to not work, the unit completely stops performing its functions. In this case, the engine temperature exceeds 100 degrees, and the car may fail. To avoid major repairs of the power unit, it is necessary to stop driving after the temperature needle deviates into the red zone. Then you need to find the reason why the fan is not working.
You should start checking with the liquid level in the cooling system (check the expansion tank), and then gradually eliminate faults in other parts of the system:
- fuse;
- electric fan motor;
- impeller (it can be deformed, which leads to jamming).
temperature sensor;
While performing work, you will have to check the condition of the power circuit along the way. All conductors should be visually normal. It is best to eliminate the probable causes of failure one by one so that the system operates stably.
Frequent causes of fan failure on VAZ 21099
In order to carry out manual diagnostics and identify a fan failure on a VAZ 21099, you need to know the basic list of the most common causes of this malfunction.
- Failure of the electric fan drive.
- Fuse failure.
- Relay failure.
- Possible electrical wiring breaks.
- Problems with the temperature sensor (no contact).
To conduct manual diagnostics to identify this problem, you need to start by searching for the causes, which anyone can do.
Modernization
If you want to improve the operation of your radiator fan on the VAZ 2109, we offer the appropriate instructions.
To upgrade, you will need to install a second sensor and modify the system somewhat.
- The standard power sensor will be responsible for the operation of the fan at maximum speed.
- An additional sensor will include a reduced speed. It is installed at the top of the cooling system.
Now let’s talk more specifically about how to organize all this.
- Take a temperature sensor whose response temperature is similar to the standard regulator.
- Install it in the upper pipe fitting to the radiator.
- To mount the element, you will need a pair of washers and a nut. Be sure to lubricate the washer with sealant to prevent leakage from the installation hole.
- Buy a resistor to install on the stove fan. It has several outputs, so if desired, you can make several operating speeds.
- It is necessary to make an additional control circuit. Through it, less voltage will be supplied to the motor winding.
- The temperature sensor located in the upper part of the cooling system is responsible for turning it on.
- It is better to do control not by plus, but by weight.
- The system will work through a button in the cabin. To the left of the dashboard there is a grille with two plugs. Cut out one of them and set it to turn off on two modes. You can take the heater switch from a VAZ 2107.
- In the first position the low frequency will be switched on, and in the second – the maximum speed.
- One common wire is fed to the minus.
Such modernization is not provided for by the design of the VAZ 2109. These are modifications made by car enthusiasts. Therefore, installing a second sensor is entirely your personal responsibility.
The fan is an important component of the cooling system of VAZ 2109 injection and carburetor engines. If you wish and have time, you can easily replace or repair it yourself.
Fan control
If a VAZ 2109 car has an engine with distributed injection and an injector, then it does not have the switch sensor familiar to owners of a carburetor model at all. The fan is turned on and off by the controller of the electronic motor control unit. This controller receives information from the coolant temperature sensor (DTOZH), which is installed in the outlet pipe between the thermostat and the cylinder head. The sensor is used to control not only the operation of the fan, but also the engine. This includes:
- optimization of the degree of enrichment of the air-fuel mixture: in a cold engine the mixture is over-enriched, as it warms up it becomes leaner;
- increasing the crankshaft rotation speed when starting the engine so that the engine does not stall immediately after starting;
- setting the ignition timing to ensure fuel economy;
- holding the recirculation valve in the closed position until the motor enters operating mode.
To determine the temperature of the DTOZH VAZ 2109, the injector uses a thermistor - a resistor whose resistance depends on the temperature. The VAZ 2109 uses a thermistor with a negative temperature coefficient. This means that as the temperature increases, its resistance decreases.
Voltage is supplied to the thermistor; by its change, the sensor determines the temperature of the coolant and transmits it to the ECU. And this unit turns the radiator fan on and off.
Causes of fan malfunction
In a VAZ 2109 car, the cooling system fan may make extraneous sounds during operation. There can be many reasons for this behavior:
- It is possible that the bolt that secures the fan to the engine has simply become loose. Because it doesn't hold up well, it wobbles while riding. Actually, this leads to the formation of incomprehensible sounds.
- The radiator is not installed correctly. That is, he is not in his place. Perhaps it lies on the cross member of the suspension, which is also not very good.
- The fan may have broken on one side, causing an imbalance.
Note: it is not necessary to change it completely. It is enough just to replace the damaged part.
- There is dirt on the impeller. This seems like a complete trifle, but it leads to an imbalance. The result is an incomprehensible tapping sound.
VAZ 2109 turning on the cooling fan
- The cushions are not clamped well, so they do not hold the motor well. The cushions may be compressed (this happens after long-term use). As a result, the motor vibrates.
Note: this problem can be corrected by replacing the pillows or inserting rubber gaskets.
- If the fan makes a loud noise, it means it lacks lubrication (you need to urgently lubricate the engine with oil).
- The bearing broke. This problem occurs because the impeller has been damaged for a long time, so there is an imbalance in the system.
Note: there is only one way to solve this problem - replace the bearing. However, before this, you need to correct the position of the impeller, since another bearing may soon be damaged due to it.
Methods for checking DTOZH
How to check the TOZ index on your own? To do this, you can use one of several methods; diagnostics are performed using a multimeter.
- First, the negative probe of the tester should be connected to the cylinder head, and then activate the ignition by turning the key in the lock.
- Then, using a multimeter, you need to determine exactly what voltage appears at the output.
- If the controller is working, then the value of this parameter should be at least 12 volts, of course, if the battery is fully charged. If the diagnostics showed that the obtained values were lower, then you need to do repairs or change the regulator (the author of the video about diagnostics is the Mechanical Technician channel).
Another check option:
- To implement it, you will need to configure the tester in voltmeter operating mode. The measurement procedure should be carried out in the operating range from 100 Ohm to 10 kOhm. In addition, for diagnosis you will need a thermometer, and it is important that it can determine a temperature value of more than 100 degrees. The controller itself is removed from its seat and lowered into a reservoir with refrigerant, which you will heat. This point must be taken into account when choosing a container for coolant.
- Now you will need to warm up the refrigerant in the system. When the temperature value increases, you need to carefully monitor the values produced by the tester and the thermometer placed in the container.
- Using a tester, you will need to check the fluid resistance level at different temperatures. The readings obtained as a result of the diagnosis must be compared with the normalized ones, which are indicated in the table.
Photo gallery “Self-diagnosis”
How to change the impeller or align it
If, after dismantling the fan, you notice that the impeller is damaged or uneven, you need to remove it:
- There is a lock washer in the center of the impeller; pry it up with a flathead screwdriver and remove it. If there is an additional fastening in the form of a nut, unscrew it.
- Remove the impeller and inspect it. If there is any deformation, it is best to install another impeller.
During this work, you can upgrade the fan by installing an impeller with 8 blades instead of the standard 4.
How to replace a fan
VAZ 2109 cooling fan
If replacing the impeller does not help, then you will have to take extreme measures - replace the cooling fan itself.
VAZ 2109 connecting a cooling fan
To do this you need to do the following:
- Open the hood.
- Remove the air filter housing.
Note: After this there will be enough space to carry out further work.
VAZ 2109 cooling fan relay
- Protrude the impeller. Any convenient tool will do for this.
Note: the impeller itself is very fragile, so work with it should be carried out carefully.
- Using a 13mm socket, unscrew the nut that secures the impeller.
- Under no circumstances should you lose the key that is inserted into the motor shaft. Otherwise, you will have to make something similar to it yourself, and this is not so easy.
- Replace impeller blades.
VAZ 2109 cooling fan diagram
- Insert it into place (if necessary, you can use a new impeller). The nut needs to be tightened as tightly as possible, because if the impeller dangles, it will soon break again.
VAZ 2109 cooling fan switching diagram
- Before you put the fan in place, you need to install two rubber washers. This will ensure that the vibration coming from the fan will be less noticeable on the body of the vases.
- To easily put the mount back on the stud, you can make a small slot in the lower mount of the frame.
VAZ 21093 cooling fan
- Insert the fan. Tighten all the nuts that secure it.
Double fan
Cooling fan impeller for VAZ 2109
In the summer, the “nines” especially overheat. Therefore, in order to ensure maximum engine cooling, you can replace one fan with two. To do this:
- First of all, you need to make another mount for the fan.
- In addition, you also need to make a small hole in the fan itself so that it can be easily installed in place.
- Disassemble the motor and remove the magnets (it is better to use a screwdriver to prevent them from breaking).
Note: it is important not to confuse the order in which the magnets were placed, so they need to be marked.
- Use a grinder to cut off the previous cylinder fasteners and weld new ones in their place.
- Reassemble the motor in reverse order.
- Screw the frame to the motor.
- Install the blades.
- Connect two fans to the blades.
Note: one fan will already be connected (since it is standard). The other can be turned on as needed by making a special button in the cabin.
Add a commentAdd a commentWe recommend reading
Scheme for switching on a VAZ 2109 fan using a relay
But when driving for a long time in the starting mode and instantly stopping, the antifreeze in the cooling system simply boils. Today we will look at the reasons why the VAZ 2109 fan does not turn on in automatic mode, replace the temperature sensor, and also draw up a small diagram for forcing the fan to start. The latter turns out to be useful, since the quality of thermal switches leaves much to be desired.
Where is the fan relay located?
4 – electric fan relay; 5 – electric fuel pump relay; 6 – main relay (ignition relay).
Attention: the order of the relays and fuses can be arbitrary, we are guided by the color of the wires. Therefore, we find a relay from which comes a thin pink with a black stripe wire coming from the main relay (pin 85*) (not to be confused with the thin, red with a black stripe wire coming from the controller) and a thick power white with a black stripe wire (pin 87) (white and pink wires we need), this is the fan relay.
Control circuit modernization
This problem can be solved in two ways: adjust the switch-on temperature in the “brains” or make a button. We'll focus on the second one. Turning on the fan from the button is very convenient: if you get into a traffic jam, turn it on, drive out, turn it off, and no overheating occurs.
A button for selecting the fan operating mode was installed in the cabin (always off, constantly on, automatically turned on via a sensor) - this “tuning” is not mandatory, but will be a very useful addition.
There will be a large current at relay contacts 87, 30, on the wire from the battery to the fuse and the fan ground, and therefore we must use wires there with a cross-section of at least 2 mm, otherwise the thinner wire will not withstand it and will burn out.
VAZ 2114 heater fan does not work reasons
Hello. If you start the car in severe frost or on a hot summer day, and the heater fan on the VAZ 2114 stops working and does not blow, do not be upset, as this problem can be quickly solved by reading this article. In order to understand the reasons why the stove fan may not work, let's first look at the electrical diagram for connecting the stove motor.
Heater fan diagram VAZ 2114, 2115, 2113
And so, here is a list of all components of the scheme:
- Mounting block (aka fuse block).
- Egnition lock.
- Ignition switch relief relay.
- Heater fan speed switch.
- Additional resistors.
- Stove motor.
- Rear window heating switch with warning lamp.
- Rear window heating element.
The scheme works as follows. When you turn the key in the ignition switch (2), its unloading relay (3) is turned on. The unloading relay supplies power to fuse f7 in the mounting block (1).
After the fuse, power goes to the rear window heating switch (7) and the fan speed switch (4), which distributes which of the resistors (5) the power will go to next.
Output 1 from the switch (4) corresponds to the slowest blowing speed, and output 3 goes directly to the heater motor (6), i.e. highest blowing speed.
Reasons why the VAZ 2114, 2115, 2113 heater motor does not work
The reasons why a fresh flow of cold air in summer or a hot stream in winter does not come from the air ducts of your VAZ 2113, 2114, 2115 can be of two types:
- mechanical
- electric
Let's look at them in more detail.
Mechanical reasons why the VAZ 2114, 2115, 2113 heater fan does not work
First of all, mechanical reasons include clogging of the air duct.
As you can see in the photo, leaves, branches and other debris get under the casing and clog the air duct of the heater motor. Debris can get into the section with the blades itself and jam the stove fan. Usually before this, a whistle or grinding noise is heard from under the soot space.
Mechanical reasons for the inoperability of the stove motor include jamming of the blades due to improper installation of the stove fan housing. When removing the stove motor, the latches securing the two parts of the housing are often damaged. And if these parts are not firmly fixed to each other, then there will be a gap between them and the air flow that should go into the cabin will fall into this gap. Also, parts of the housing may generally jam the motor blades, then it will not spin at all.
Electrical heater fan problems
In this section, we will consider the circuit to the VAZ heater fan by components.
Fuse
Let's follow the scheme given at the beginning of the post. If your heater fan does not work together with the heated rear window, then the problem is 100% in the fuse.
Check fuse f7 in the mounting block, if it is ok, then use a multimeter to see if the plus is coming to it from the ignition switch unloading relay.
To do this, with the ignition on, place one multimeter probe on the fuse and the other on the car body. If everything is in order, look at the circuit from the fuse to the speed switch and the heating switch.
Heater fan speed switch
We figured out the fuse - let's move on. And then we have the stove motor speed switch. To check it, remove the connector from it. The connector has three inputs nearby and one is located, as if separately from them. We connect any of these three inputs with a wire to the one that stands separately. If the motor starts working, then the speed switch is to blame; if not, we move on.
Additional resistors
If the fan works, but only at the third (fastest) speed, then the additional resistors are to blame. In the third mode, power is supplied directly to the fan, bypassing additional resistors, so it does not work in other modes.
Heater motor VAZ 2114, 2115, 2113
If checking all the components listed above shows they are working, the reason is in the stove motor itself. Most likely it is burned out or has a bad mass. To check, we remove it (read how to do this here) and connect it directly to the battery (the black wire screwed to the body is a minus). If it works, it's a bad mass. If it doesn't work, we change the motor.
Comparison of heater fans (heater motors) VAZ 2108
We continue to educate consumers about the features of products from various manufacturers. In this publication we provide a comparison of heater fans 2108-8101080 manufactured by LUZAR and (according to the Advertising Law, we do not name the manufacturer).
Parameter 1. Appearance (Photo 1).
Photo 1
Conclusion: the appearance of both manufacturers is quite acceptable.
No external defects are detected. Parameter 2. Energy consumption (without photos, data obtained from test results).
LUZAR fan – 8A during operation, 15A at startup.
Fan “X” – 12.5A during operation, 22A at startup. Conclusion: fan “X” has a significantly shorter lifespan.
Parameter 3. Bearing assembly (photo 2).
LUZAR fan (pictured below) – ball roller bearings (
patent!
) Fan “X” (pictured above) – bushings (sliding bearings)
Conclusion: fan “X” has a significantly shorter service life. Photo 2
Parameter 4. Collector (photo 2).
Fan LUZAR (pictured below) – the collector is much larger than the analogue (
patent!
) Fan “X” (pictured above) – the collector is small
Conclusion: the collector of the fan “X” under certain modes will not be able to pass a sufficient amount of current.
Parameter 5. Spark extinguishing system (photo 3).
Fan LUZAR (pictured on the left) – spark suppression chokes are much larger than the analogue (patent!) Fan “X” (pictured on the right) – spark suppression chokes are small
Conclusion: fan “X” will experience excessive sparking. Photo 3
Parameter 6. Electric motor (photo 2).
Fan LUZAR (pictured below) – the winding of the electric motor is larger than the analogue and is made with a thicker wire Fan “X” (pictured above) – the winding is made of thinner wire
Conclusion: the electric motor of the fan “X” has significantly less power.
Parameter 7. Brush assembly (photo 4).
LUZAR fan (pictured on the left) – brushes have a cross-section of 8×8 mm Fan “X” (pictured on the right) – brushes have a cross-section of 6×6 mm
Conclusion: fan “X” has a significantly shorter service life. Photo 4
Parameter 8. Stability of the sliding contact (photo 4).
Fan LUZAR (pictured on the left, shown with a red arrow) – pressing of the brushes to the commutator is ensured by powerful coiled springs Fan “X” (pictured on the right) – an ordinary weak spring is used
Conclusion: fan “X” will have unstable contact of the brushes with the commutator.
Parameter 9. Ease of installation in the heater housing (photo 5).
LUZAR fan (pictured) – uses a convenient patented fastening to the casing using a special cover and 2 screws.
For this purpose, special eyes are provided on the electric fan housing (they may not be used, they do not interfere with standard mounting) (patent!) Fan “X” (no photo) - standard mounting system Conclusion: fan “X” will force the consumer to experience many difficulties during installation. Photo 5
Parameter 10. Warranty obligations.
Fan LUZAR – product passport is included in the packaging, the warranty is 2 years Fan “X” – there is no product passport, the warranty is 1 year
Conclusion: the short warranty period of the fan “X” is justified by the low quality.
So, as part of this small comparative analysis, we were able to completely criticize the fan in 10 rounds. You may ask how all of the above threatens the buyer. The answer will be:
- When using fan "X", the rotation speed will be lower than that of the LUZAR fan. The windows will fog up, the interior will be cold in winter, and hot in summer.
- When operating for a long time, fan “X” (1-2 hours), due to overheating of the brush springs, will “fail” in operation, until the engine stops completely.
- In cold weather, a similar situation may occur - “the brushes will freeze” and the fan “X” will stop working.
- Any voltage surge or sharp increase in resistance in the on-board network can damage fan “X”.
- After six months or a year of using the “X” fan, all your trips will be accompanied by an inevitable nasty whistle (since bushings are installed, not bearings).
- Without a product passport, when attempting to return fan “X”, the consumer may be refused.
Description of DTOZH and DVV
Where is the coolant temperature and fan activation sensor located in 2109 with an injector or carburetor engine, what should I do if the device does not work? First, let's look at the basic questions regarding the purpose, device and principle of operation.
Purpose and functions
The main purpose of the DVV is to activate and deactivate the ventilation device on the engine radiator in order to cool the power unit. The device turns the fan on and off based on the temperature of the liquid in the cooling system. On injection machines, this is DTOZH; turning the fan on and off is controlled by the brain according to the readings of this sensor.
As for the TOZh controller in the VAZ 21093, this device is intended to display readings about the antifreeze temperature on the car’s dashboard in the cabin. With its help, the driver can find out about possible overheating of the power unit.
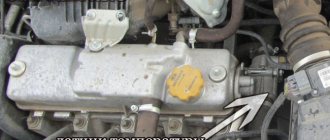
Location
As for the location, in models 2108, 2109 and 21099 the DTOZH is located between the engine cylinder head and the thermostat, in particular, on the intake hose. The DVV is installed in the threaded hole of the expansion tank with coolant. If you look in the direction of travel of the car, the refrigerant container is installed on the right.
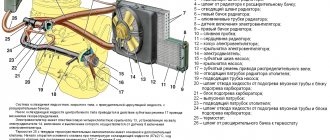
Cooling system VAZ 2109
The liquid cooling system of the engine of the VAZ 2109 injector is a closed-type system with forced circulation of coolant (coolant). The system consists of the following units:
- water pump with impeller, driven by a timing belt;
- a thermostat that directs coolant in a small or large circle depending on the degree of engine warm-up;
- a radiator consisting of two plastic containers for coolant flow and aluminum tubes for heat dissipation, located in the front part of the engine compartment to facilitate air access;
- an expansion tank equipped with inlet and outlet valves to maintain standard pressure in the system;
- radiator cooling fan located directly in front of the radiator for efficient heat dissipation.
The operation of the fan is critical in the hot season when traffic is slow. Under these conditions, overheating of the motor is especially likely and, accordingly, high-quality operation of the fan is necessary. The cooling air flow must be properly supplied to the radiator. If the VAZ 2109 injector cooling fan does not work, then the cooling system may “boil.”
Causes of fan malfunction
There are times when the radiator cooling fan runs continuously. This is also wrong. What to do in this case? What is the cause of the malfunction?
There may be a broken circuit in the temperature sensor. This will be indicated by a constantly lit sensor light. In this case, you simply need to replace the temperature sensor or the injection system unit. The relay may need to be replaced. Also, the contacts on the radiator thermal switch that triggers the relay may not open. To fix the problem, you will need to replace the thermal switch.
To find out the cause of the fan malfunction, you will need to remove it.
- Disconnect the fan block and harness by disconnecting the wires.
- Disconnect the motor wire by unscrewing the left nut. If necessary, use suitable keys.
- Under the hood, unscrew the two screws that secure the fan.
- Take out the casing.
- Remove the two fan mounting bolts.
- Remove five more bolts and the air intake grille.
- Lift the fan support and pull it towards you.
- Rotate the fan itself 90 degrees and remove it.
Fan motor connection diagram
If there is any breakdown in the car, regardless of whether the fan has stopped working or something else, you should contact a specialized workshop. Experienced technicians will always find the cause of the problem, select suitable parts, sensors and carry out repairs. Of course, many car owners want to repair their vehicles themselves; this gives them a lot of pleasure and requires minimal costs. But in this case there is a risk of making a mistake with the selection of parts and the correct diagnosis. A car enthusiast can spend a lot of time and effort and end up not getting the desired result. To prevent this from happening, it is better to contact a specialist.
Revision instructions
Remove the air intake box (popularly called “boot”):
- In the interior, unscrew 4 nuts using a 10mm wrench;
- In the engine compartment, an assistant holds the bolts with the same key;
- Remove the air intake.
Remake the “boot” and install a fan in it:
- Cut off part of the plastic a little from the side so that the fan housing does not interfere with the hood lock;
- We cut off all the protruding parts of the fan mount and place it inside the “boot”;
- Secure the fan, securing its housing with sealant.
- We close the space around the fan nozzle with suitable material to prevent air outflow;
- We install the casing with the fan in place, laying the wires;
- We check that the hood closes without problems.
The damper can be left in place, but if it is removed, there will be no additional obstruction to the air flow into the cabin.
Why doesn't the electric fan work?
There are not many reasons:
- The motor winding burned out.
- The thermal switch has failed.
- Destruction of electrical wiring.
So, what to do if the fan suddenly stops turning on? First of all, open the heater tap, this will increase the circulation of coolant. Don't forget to turn on the heater radiator fan to help it cool faster.
When the temperature begins to drop slightly, turn off the engine. You open the hood and you see a not very pleasant picture - the antifreeze is gone, half of the compartment is wet. It is necessary to add fluid to the expansion tank. If this happens in the summer, then you can add water (the main thing is to change it to antifreeze before winter).
Check the operation of the electric motor - disconnect the connection block and directly supply power from the battery to it. Is the propeller spinning? This means that everything is fine with the winding, put the block in place. On later modifications, only the sensor switch is responsible for turning on the VAZ 2109 fan.
To check it, you need to remove two wires from it and connect them. If the rotor begins to rotate, then the fault lies in the sensor. The way out of this situation is to continue moving by connecting these two wires. There is no need to isolate them, since the activation of the VAZ 2109 fan is controlled by ground (if a bare wire gets caught on a part of the body, then it’s okay).
And the third reason is broken wires. There are two wires to the VAZ 2109 fan sensor: directly from the fan and ground (body). If no problems have arisen before, then try to make a reliable ground, since by default in nines the negative wire from the fan sensor goes towards the fuse box and is lost there.
Find a place near the radiator where you can connect the negative power cable. These are all the malfunctions that may await you. Now it’s worth talking about the useful button for forced airflow.
https://youtu.be/https://youtu.be/wdpTUvxVWFU
_