Print this article Font size 16
Many inexperienced drivers begin to panic and talk about a breakdown of the gearbox, although in fact the culprit of the problem is the rocker.
Practice shows that replacement and repair are rare and not very common measures. Much more often, the current situation forces you to simply adjust the scenes.
But today we will talk not only about adjustment, but also talk about the features of modification, repair and replacement of this element.
Element location
Making a short-stroke slide with your own hands
The diagram shows in detail where you need to cut with a grinder, and where you need to cook. So, let's begin the modernization process:
- We raise the place of attachment of the piece of iron that goes from the gearbox to the lever inside the VAZ 2110 interior.
- You can do without dismantling the rocker, the main thing is to disassemble the ball joint.
- Now we need to ensure that the plastic paws release the ball. To do this, you need to unclench the metal ring. We disconnect the rod and carefully drag it inside through the cover, which is responsible for protecting it from dirt. It will be much more convenient to work if the clamp near the gearbox is loosened.
Adjustment is made using this lever.
- Guided by the diagram, we cut off the parts using a grinder. It is necessary to weld a piece of metal pipe with a wall thickness of about 3 millimeters into the rod. To avoid skew, it is necessary to use identical pieces. The pull can be lengthened by 2-4 centimeters.
- All that remains is to raise the hinge with the hook, which serves to prevent an erroneous shift to reverse gear 2110.
Replacement is carried out according to the same scheme. Only instead of welding, a freelance short-stroke rocker from another car is installed. Replacement is a more expensive solution, so doing it yourself is problematic. If you have experience working with gearboxes, then replacing and purchasing a new part will cost about 1,000 rubles.
Comparison of short and long stroke
Car enthusiasts describe the difference in options as fantastic. The renovation dramatically improves ergonomics. The amplitude of movements of the gear shift knob decreases by two to three times, but the force on its tip increases. The increase is quite acceptable, since gear shifting occurs in an unloaded state with the clutch depressed and does not require any serious effort.
Some experts believe that an increase in the shoulder leads to an increase in forces on the gearbox rods and to additional wear on the gearbox. There is no statistical confirmation of this point of view yet. Unfortunately, it is not possible to order a short-stroke configuration from the factory. You must install it yourself at your own risk. AvtoVAZ does not approve of such changes in the design of the Nine.
Independent modernization of the design associated with welding the levers lengthens them, and the height of the gearshift knob above the tunnel increases by about 5 cm. Such alteration requires welding work and the involvement of an experienced specialist, for whom cutting the levers using a grinder, installing a pipe and a strip of the appropriate section , and also welding the levers is not difficult.
The adjustment changes the ergonomics, but due to the reduction in the strokes of the shift knob, it is not perceived as a deterioration.
Reasons for replacement
There are several situations when the owner of a VAZ 2109 has or wants to get into the design of the gearbox and specifically work with the rocker:
- Oil is leaking due to a damaged rocker seal. It must be replaced;
- The old drawstring was out of order;
- I would like to exchange the long-stroke for a short-stroke in view of its advantages.
Now to the question of when replacing or repairing the backstage is a necessary measure.
- The backlash of the gearbox selector has increased significantly.
- Gears change with difficulty, and when changing speed, extraneous sounds appear.
- It is possible to change gears, but with a lot of effort.
- Speeds change incorrectly. Instead of one, a completely different one turns on.
- It is impossible to turn on all or part of the gears at all.
Even if the resulting play is still insignificant, it is advisable to immediately begin repairs or completely change the drawstring.
Replacing the oil seal
If you find that the oil in the gearbox is gradually disappearing, you can suspect the rocker seal. There is nothing else left to do but change the element.
- First, buy a new shift rod seal. It costs about 70-100 rubles.
- Drain the oil from the box, having prepared a clean container in advance. This is in case you refill the same oil. Although this is an excellent reason for you to change the transmission lubricant at the same time.
- To make sure the oil flows out better, first unscrew the filler plug or remove the speedometer gear. After draining the oil, screw the cap back on.
- We climb under the car and disconnect the fasteners of the gearbox lever driveshaft.
- Pull the boot off the cardan, unscrew the bolts securing it to the gearshift rod. Problematic fasteners that you will have to tinker with.
- After removing the cardan shaft, remove the rod boot.
- We remove the damaged oil seal using an awl or suitable available tools. The main thing here is the stock itself.
- We install a new one in place of the old oil seal and press it with a tube of the appropriate diameter.
- Put the boot back in place and rotate the driveshaft.
- Please note that the bolt securing the cardan to the rod is an adjustment bolt. Therefore, screw it in exactly the same way as before dismantling. Otherwise, some speeds may not turn on.
Stuffing box
After the work done, do not forget to check the result.
Replacing the cardan
Practice shows that if problems arise with the slide, it is not at all necessary to completely change it.
Kardanchik
The instructions for replacing the cardan are as follows.
- Using two 13mm spanners, unscrew the clamp that relates to the speed switch drive rod.
- Pull the boot off with a screwdriver, moving towards the box. If you want, remove it completely. So it definitely won’t interfere with the repair process.
- Using a 10mm wrench, unscrew the fixing bolt on the cardan.
- Apply several gentle, not strong blows with a hammer to knock the cardholder off the shaft. Remove the boot to the side if you have not done so before.
- We replace the old cardan with a part from Kalina. It is more reliable, efficient and durable.
- For reassembly you will need the help of a friend. Do not rush to tighten the clamp immediately at the end.
- The assistant will set the position of the gearshift lever at the optimal points from inside the cabin. First you need to catch the center, then move the lever a little to the right while you tighten the clamps from below.
- Check if the gears engage well. If yes, then we continue assembling the unit and check the updated gearbox under real road conditions.
https://youtube.com/watch?v=wNKKJvY6J4Y
The experience of VAZ 2109 owners shows that when there are problems with the rocker, the essence often lies in an unsuccessful factory cardan. By replacing it with an analogue from Kalina, you will be able to get rid of discomfort and continue to confidently operate your car. By replacing the cardan shaft, the design of the gearbox will improve significantly.
Adjustment
After changing the link or cardan, you should definitely adjust the operation of the unit.
- Engage reverse gear, loosen the clamp tension.
- Set the gearbox selector to the position in which it should ideally be located when engaging reverse.
- Tighten the clamp back.
- A similar operation is performed with other speeds.
There are situations among VAZ 2109 owners when difficulties arise when engaging reverse gear. This is where adjustment can help.
- Set the gear lever to first gear;
- Loosen the rocker clamp;
- Turn the rocker drive counterclockwise;
- Turn the drive until the selector is pressed against the plastic stopper for the reverse gear. You will feel this without any problems;
- Resting against the stopper, tighten the clamp under the bottom. That's it, the adjustment is done.
Adjustment process
Repair
Regardless of what exactly you do with the rocker - repair, adjust or change, you will still need to disassemble this unit.
Disassembly is performed as follows.
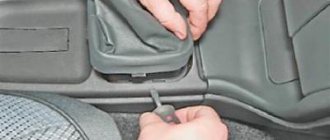
- Remove the cover from your gear shift knob.
- Place the car on a pit, or raise the front end with a jack.
- Remove the front console. It is held in place by mounting bolts.
- Now remove the curtain itself. To fix it, AvtoVAZ used 6 bolts in the case of the VAZ 2110 model.
- When carrying out dismantling work, be sure to examine the condition of all elements.
- By bending the boot, you will gain access to the support, oil seal and cardan shaft.
Now regarding the repairs. There may be several recommendations in this regard, depending on the current state of the node and its components.
- At best, repairs will require the use of a repair kit for the backstage. It doesn't cost much.
- If the bushing is deformed, it will need to be replaced with a new one.
- Check the lever shaft bore for wear.
- Make sure there is no play in the driveshaft. Otherwise, a regular repair kit will no longer be enough, that is, a complete replacement of the entire backstage will be required.
- Often the culprit of extraneous noise and rattling when shifting gears in gearboxes is the rocker pad. Changing it is quite simple, and even a beginner can perform the operation.
Replacing the oil seal
Quite often, VAZ 2110 owners are faced with a situation where, after parking under the car, they find traces of oil. There are two options here - the oil filter has worn out or there are problems with the oil seal.
As you replace the oil seal, you will be able to simultaneously inspect and change such elements as the cushion, cardan shaft, and boot.
But let's talk about everything in order. First of all, check whether it is really an oil seal and not a filter. If everything is fine with the filter, then we drive the car into a pit or find another way to end up under the bottom of your VAZ 2110. Beforehand, it would be a good idea to watch video materials regarding your current situation.
- Carefully inspect the boot. If oil leaks from the gearbox through the oil seal on your car, traces of it will definitely remain on the boot.
- Bend back the boot. This way you can get to the cardan, disconnect it and gain access to the cuff.
- You first need to dismantle the cardan from the lever, and only then from the rocker itself. Not the other way around.
- The cardan has been removed, so we move to the oil seal.
- The cuff is removed from the gearbox using a hook and an awl. Therefore, make sure you have these tools at hand in advance.
- Now a new one is installed in place of the old oil seal. Craftsmen have adapted to using ordinary plastic bottle caps. If you get used to it, it turns out to be very easy to change the oil seal.
- After replacing the element, return all dismantled components to their places. If some of them need replacing or signs of wear are already visible, it is better to replace them immediately. It is unlikely that you will want to repeat the same operation in a couple of weeks and lie under your own car.
Repair will not give the desired result if the adjustment was carried out with errors. To do everything carefully and competently, use the help of a partner. One will work under the car, the second will help from inside.
The gearbox is one of the most complex components of a vehicle. However, this does not mean that its repair cannot be done at home on your own. Now we will tell you what the VAZ 2110 rocker is, what may be the reasons for its malfunction and how to repair the mechanism.
Adjusting the scenes of the VAZ 2110
It is preferable to carry out the adjustment together. The master with the tools is under the car, the assistant is in the cabin and performs the necessary actions behind the wheel.
- Try to install and hold the lever in first gear.
- Loosen the clamp on the control drive rod (stage).
- Move the lever to the far left position. Avoid switching to front and rear positions.
- Tighten the clamp.
- Assess the condition of the hinge switch cover. If damage is found, replace it.
- Carefully pull the boot towards the box. Inspect the cardan. Deviations from the norm are noticed - schedule a shift. Pull the protection back.
Diagnostics
In any car, the gearbox is used to prevent the car from changing gears on its own. This part needs to be monitored and looked after; in addition, over time it becomes loose and requires adjustment. If the adjustment has not been made for a long time or it was performed poorly, then the driver will feel uncomfortable when driving the car.
It is because of this that prevention should be carried out, as well as due attention should be paid to the scenes. If the car begins to behave somehow incorrectly, then it is necessary not to delay the repair.
Gearbox slide
To understand that the rocker requires adjustment or replacement, you just need to monitor the operation of the gearbox.
As a rule, when a failure occurs, the following symptoms appear:
- Difficulty when engaging 1st gear. As a rule, it is difficult to engage the gear; the driver has to practically drive the lever in to engage 1st speed.
- Possibly difficult shifting from 1st to 2nd speed.
- Due to a loose lever, it is not 1st speed that is engaged, but reverse. This is very dangerous, especially at a traffic light, at the start. It is necessary to urgently repair the rocker, otherwise the problem will only get worse.
- Difficulty engaging 5th gear, while other speeds can be engaged smoothly.
- There is play in the shift knob. As a rule, the rocker only requires replacement and adjustment is not necessary.
- Extraneous sounds appeared coming from under the car, or rather from the gearbox. As a rule, the sound becomes ringing. This problem is a disease of the entire VAZ 2110-2112 family. As a rule, such a ringing can appear after repairing the car’s suspension.
- When driving, the speed may jump. In other words, the car, gaining acceleration, independently disables the engaged gear and switches to neutral speed. For further driving, you will need to keep the lever at the desired speed constantly so that it does not jump out.
- Strong vibration that occurs on the shift knob. This is due to the failure of the scenes. It will need to be repaired to solve the problem.
If the symptoms described above appear, then you will need to begin repair work. You should completely replace the linkage or simply adjust it and gear shifting will become comfortable again. Therefore, it should be adjusted before replacing.
Adjusting the work of the scenes
Backstage adjustment
Adjustment is made only in cases where:
- The gearbox was removed and installed back;
- Previously, repairs were carried out to replace the cardan;
- In the case when the hinges on the slide have turned.
Of course, adjustments can be made at other points as described earlier. Do not forget that even minimal gaps can disrupt the correct operation of the entire transmission.
Naturally, before starting repair work and adjustments, you will need to prepare the right size wrenches. With their help, the clamps will be loosened. You should also place bricks, stones or special anti-roll devices under the wheels.
When everything is ready, you can begin the work process itself. To do this you need:
It is recommended to use an overpass or pit for repairs; if these are not available, then use reliable jacks. Next, you should go to the garage. When the car is ready for repair, it is necessary for safety to put on the handbrake and throw bricks or specialized devices under the wheels that will prevent the car from rolling away. Next, you need to crawl under the car and find a special clamp. It connects the hinge and the rocker itself. Then you will need to loosen it using a wrench. Loosen the clamp
Next you need to get out from under the car and get behind the wheel.
Now engage reverse gear, it is only important not to confuse it with 1st gear. Therefore, you should look at the position of the lever, it should be maximally in the upper left corner
It is recommended to do this procedure with someone. This person will need to hold the lever in a locked position. Next, you need to climb under the car again and tighten the clamp, applying great force.
That's the whole process of adjusting the scenes. Nothing complicated, the main thing is to follow safety precautions.
Frequent breakdowns of the scenes
A breakdown of the rocker in a VAZ-2110 is accompanied by the following main symptoms:
- A faulty gear lever play means that the part cannot be repaired, only replaced.
- If you hear a ringing in the wings, then perhaps the VAZ-2110 has a built-in part with a manufacturing defect. Sometimes the ringing appears after repair work has been carried out; you cannot leave the car in this condition; the mistakes made will have to be sorted out and corrected.
- If the driver notices that the speed is turned on poorly, use one of the following solutions to the problem - try to repair the rocker, or maybe it’s better to replace it right away.
- When reverse gear turns on instead of first speed, the problem is absolutely not in the rocker; the real cause of the breakdown will still have to be determined.
- Does the gearbox lever vibrate very much while the car is moving? This means that there is significant play inside the gearbox knob hinges.
What to do if the gearshift lever on a VAZ 2109 and 2110 is loose? We can fix everything
- Designer error. The metal bushing clings to the rod when moving. The result is a rattling sound. There is no way to fix the problem;
- Bushing failure;
- Lever from Lada Kalina;
- Malfunction of the backstage cardan;
- Wear of the box or its fastenings.
AutoFlit.ru
How to repair a car
Many car owners of VAZ-2110, VAZ-2111, VAZ-2112 cars are faced with unpleasant vibration on the gear shift knob, which is caused by increased play in the connection. The appearance of play occurs as a result of wear of the gear shift pad. Symptoms of a broken rocker pad include rattling and loss of gear shift clarity. These symptoms include another malfunction - a broken gear selection rod hinge. If you're having problems with it, here's how to replace your selector rod pivot.
If you replaced the gear selector rod joint, and the problem did not go away, the rattling and vibration of the rocker remained, then you need to pay attention to the rocker pad
Video instruction
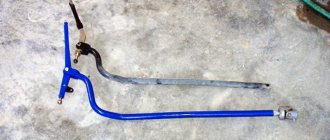
Hi all! This time I will tell you about another experiment. This time we will do another stupid thing, we will replace the tuning gearbox driveshaft with a Kalina driveshaft driveshaft.
I have long had a hard, backlash-free gearbox drive unit installed; such driveshafts are made from the steering shaft and are popularly called tuning drives. In principle, he suited me with everything, but there is no limit to perfection.
Let me remind you that I previously conducted an experiment with installing a stock cardan, and then the result did not particularly impress me.
Replacing the gearshift pad on VAZ-2110, VAZ-2111, VAZ-2112 cars
On VAZ-2110, VAZ-2111, VAZ-2112 cars, when unpleasant rattling, vibration and increased play in the gearshift knob appear, the happy owners of these vehicles should pay attention to the condition of the ball joint race of the gear shift link or as it is also called in common parlance gear shift pad. There is another option - butterfly wings
But, I personally like the second option))). Due to the fault of this very pillow (ball joint cage) being completely broken, the clarity of gear shifting may also disappear. Yes, I know that all the listed symptoms also include a broken cardan (joint) of the gear selection rod. What kind of cardan is this and how to replace it you can find out from this article. But we’re not talking about him now and let’s assume that everything is ok with him. Or, as another option, the cardan was replaced, but the rattling and play of the rocker did not disappear. This also happens; not everyone immediately pays attention to the backstage cushion. But, it exists and it periodically fails (breakage of rubber “ears”, ejection of metal bushings, breakage of a plastic bushing or spring). The destruction of the rubber part of the cushion (ball joint race) of the rocker is not difficult to replace (see photos 1 and 15). And if you find them, then it’s time for you to get ready for work. Let me reassure you right away, it’s not complicated. But for everything to go smoothly, you need to be thoroughly prepared. That is, buy the necessary spare parts, decide on the location of the work, assemble the necessary tools and, of course, familiarize yourself with and remember in what sequence you should replace the cushion (ball joint race) of the gear shift lever on VAZ-2110, VAZ-2111, VAZ- 2112. And I will try to help you with this, and I invite you to further read this material.
Spare parts. Here the choice is obvious. I recommend choosing the ball joint clip for the gearshift mechanism of VAZ 2110-2112 cars - BRT (Balakovo). As they say, time-tested quality. Photo 2.
List of tools that you will need to replace the cushion (ball joint race) of the gearshift gates of VAZ-2110, VAZ-2111, VAZ-2112 cars: a 13-socket and socket wrench, a 10-size combination wrench, pliers, a flat-head screwdriver and a small ratchet with with a cross attachment (photos 3 and 4). The need for a ratchet with an attachment will be shown a little later. And you should immediately decide on the location of the work. It is advisable to replace the cushion in an inspection pit, overpass or lift. Why is it desirable? Because this work can be done “from the ground”, but believe me, it will take more time and effort. And it will still be a pleasure.
And so, into battle! Let's proceed to independently replacing the cushion (ball joint cage) of the gearshift slides of VAZ-2110, VAZ-2111, VAZ-2112 cars:
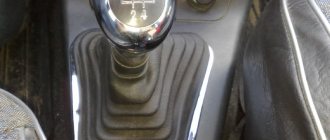
Let's start working inside the car. Use a screwdriver to pry up the frame of the decorative cover of the gearshift slide (photo 5). Pull the lever handle up and remove it along with the cover.
Using a 10 mm spanner, unscrew the two fastening nuts and the bolt of the reverse locking bracket lining and remove it (photos 6 and 7).
Using a 13mm wrench, unscrew the lever axle nut (photo 8). After this, use a wrench with an attachment (in my case it’s a ratchet) to unscrew the axle locking screw (photo 9). Without such a key, this screw will be difficult to unscrew. We take out the axle (photo 10). We remove the set of bushings from the lever, otherwise we risk losing them (photo 11). All. Now the work inside the car is finished, let's climb under the car.
Using a 13 mm socket wrench, unscrew the two nuts of the rocker pad bracket (photo 12). And remove the bracket.
Next, you should disconnect the reaction rod from the cushion (ball joint cage) of the rocker. We use a spanner wrench (hold the nut on top with it) and a 13mm socket wrench (photo 13).
We pull down the pillow along with the lever (photos 14 and 15). Remove the retaining ring (photo 16) and remove the lever along with the plastic bushing (photos 17 and 18).
All. We clean the lever hinge from dirt, lubricate it, and put on a plastic bushing. We place this whole thing in the pillow body and secure it with a locking ring (photos 19 and 20). We return this entire structure to its place (photo 21). Don't forget to put a cover on the pillow (photo 22).
Ready. We carry out the rest of the assembly in reverse order. The work on replacing the butterfly cushion (ball joint cage) of the gearshift gates of VAZ-2110, VAZ-2111, VAZ-2112 cars has been completed. I hope it's successful)))
If you find an error, please select a piece of text and press Ctrl+Enter.
Do-it-yourself repairs and preparatory work
Replacing the VAZ 2110 gearbox cushion
The knocking starts when the gear is switched from 1 to 2 or from 3 to 4. The knocking also occurs when driving on country roads at one speed. One thought immediately arises: the checkpoint is buzzing. What to do? Contact a car service center or look for the cause yourself. A car enthusiast, not a specialist, needs to know a simple truth. At service stations, minor repairs are taken on reluctantly or even refused due to workload. They may, of course, offer to repair the gearbox. Since such repairs will bring financial profit. But the result is the same. The knock under the bottom will remain. Therefore, there is no need to despair. You need to visit a car store and buy the necessary spare parts:
- 2 assembled pillows (choose from the Volzhsky Rubber Plant or Balakovo);
- 2 bolts M12x75; 4 washers dia. 12 mm;
- 2 nuts - 12 mm with nylon insert;
- 2 bolts M10x25; 6 wide washers - 10 mm;
- 2 engraving washers - 10 mm;
- 1 VAZ-2108 timing case bushing.
Followed by:
- Drive the car into the garage into the inspection pit:
- Connect the lamp with the lantern closed;
- Visually inspect the attachment points of the box cushions. The knock can be produced by the rocker (see Replacing the rocker on a VAZ 2110 on your own), hitting the transverse rod. All due to the fact that the gearbox sagged. The gap from the link to the rod should be more than 5 mm.
When there is enough time, it is necessary to replace the gearbox mounting pads. It is advisable not to delay this. If the box is sagging, you need to find the cause and eliminate it. First, try tightening the left mount nut on the gearbox. Due to its spontaneous unscrewing, the engine and the gearbox sag. If this operation does not help, then you need to change it.
Replacing rubber supports
Replacing a pillow on a VAZ 2110 gearbox
Let's get started:
- Raise the car with a jack and place it on secure stands.
- Place a beam or a section of channel across the hole under the box.
- Place the jack on it, place a 50x100 mm wooden board with a cross-section about 20 cm long on the top of the jack.
- Raise the box with a jack to remove the weight from the cushion (install the jack closer to the cushion support).
- Inspect the supports to determine their condition. If the rubber has hardened, cracked, or separated from the metal, then they need to be replaced. Before starting work, you need to prepare the tools and accessories:
- sealant;
- two containers for bolts and washers;
- a pry bar or large screwdriver;
- jack;
- open-end wrenches, heads.
VAZ 2110 gearbox pillow
Removing the left support:
- unscrew the three nuts securing the pillow to the box,
- unscrew the through bolt fastening to the body frame;
- remove the left cushion.
Second fastenings:
- unscrew the two through bolts on the box;
- also two blind bolts fastening to the body, remove together with the clamp.
- Remove the old rubber mounts from the gear assembly (you can use a large screwdriver to make the job easier).
- Install them in reverse order.
Additional support for gearbox and engine
https://youtube.com/watch?v=nGWofDjqTg8
During work, the following should be observed:
- When installing new cushions, the box should rise in height by about 5 mm.
- You can also install an additional engine mount, this will move the engine forward, which will reduce the load on the gearbox, or install an additional mount on the box.
- Carefully inspect the bottom of the body in the area of the box fastenings. There, the manufacturer left holes for attaching this support.
Mounting the gearbox cushion VAZ 2110
This additional solution secures it more rigidly, which will eliminate the knocking of the wings on the rod
The most important part of the gearbox mounting is the supports. If the rubber mounts are damaged or worn out, the vibration that occurs when accelerating damages the machine's transmission. To carry out independent replacement of gearbox supports, you must read the relevant literature
You also need to watch videos on repairs. In addition, it will be useful to carefully study the photo in order to carry out the work in order, and slowly study the step-by-step instructions. As a rule, the price of box supports in auto stores is within the range of 450 rubles, and the cost of an additional suspension is 1000 rubles. Therefore, you need to be careful about your car. He will serve his caring owner with faith and truth.
Parts and tools required for replacement
Before you start replacing the crosspiece, you need to purchase the necessary parts and arm yourself with tools. So, when buying an outboard bearing, you first need to check the smoothness and elasticity of the rubber. If suddenly the bearing rotates with a kind of snag, then it is better not to buy one. And in general, there are many secrets. You need to understand the details and spare parts in order to avoid mistakes. Likewise with rubber, if it is too hard, then after installing the cardan and crosspiece, the car will vibrate while driving, since insufficiently elastic rubber will transmit oscillatory movements. As for the crosspiece, it is better to take a new one from VAZ, and do not forget to purchase retaining rings at the same time, because it will no longer be possible to install the old ones, since they will either quickly fail or are no longer suitable for use.
Now let's look at what tools you need to prepare. To replace the suspension bearing and crosspieces on a VAZ, you will need to arm yourself with the following tools:
- wrenches and spanners 12, 13, 27;
- copper or aluminum insert;
- hammer;
- compression pliers for working with retaining rings;
- tension puller;
- flexible coupling flange.
Replacing the cross
We begin work, as always, by lifting the car onto the inspection hole. You can also use the overpass. It is worth considering that when working in a pit, you will have to use a jack when you need to unscrew the cardan mounting nuts from the rear side.
Removing the cardan
So let's begin:
- remove the parking brake cable spring;
- using a center punch we apply marks where the cardan is connected to the gearbox;
- take a 13mm wrench and unscrew the bolts securing the suspension bearing to the transverse support;
- unscrew the nuts that secure the cardan to the rear axle;
- when unscrewing bolts and nuts, it is recommended to hold the cardan with a screwdriver to avoid twisting;
- First, remove one end of the cardan;
- using a center punch we mark the position of the centering flange of the EF and the cardan to each other;
- bend the locking tabs on the seal ring in the place where the ESP is located;
- we move the cage towards the cardan together with the seal;
- take the 13mm head and use it to unscrew the nuts securing the safety bar;
- remove it;
- move on to the outboard bearing plate;
- take a 13mm wrench and unscrew the nuts securing the part;
- remove the cardan from the EF splines;
- we extract it.
At this stage, the removal of the propeller shaft is completed. This video will help you do everything right
Cardan disassembly
Before disassembling the driveshaft, it is necessary to mark the relative positions of the parts with a center punch or chisel. You can also use paint for these purposes. A mark is made so that the initial balancing is not changed. So:
- we mark the placement of the forks and shaft relative to each other;
- remove the retaining rings using pliers;
- take a puller and install it on the crosspiece fork;
- press out the bearing, which should fall into the puller cup.
It is worth remembering that a bearing of this type extends out of the fork only a third of its height.
- the opposite bearing should be pressed out accordingly;
- take a hammer and a screwdriver and knock out the pressed bearings completely from the fork body (the screwdriver needs to be rested against the edge of the bearing);
- remove the fork from the cross;
- press out the other pair of bearings in the same way.
That's all. We finish disassembling the cardan. All retaining rings must be removed, all lugs must be cleaned of rust and dirt, as well as the grooves for the retaining rings.
Installing a new cross
Installing the crosspieces will not be difficult. You will need to remove two cups from the opposite side of the crosses and insert new ones into the springs. Begin:
- take plastic plugs and install them together with seals;
- bearings should be lubricated with Fiol;
- using a removable device, press the bearings into place;
- install the retaining ring;
- press in the second bearing on the other side of the fork so that the first rests against the retaining ring;
- after that we install the second retaining ring;
- take a hammer and a bit (a screwdriver will do);
- With light blows you need to drive the locking rings all the way;
- take a special feeler gauge and measure the gap.
Attention: It is worth noting that a gap of 0.04 mm between the retaining ring and the bearing is considered normal. As you know, retaining rings come in different sizes. Their difference is not only in diameter, but also in thickness. Each type and size of locking rings has its own color, which helps the consumer when choosing. Thus, completely unpainted rings are the thinnest in thickness, and yellow ones are the thickest.
Removal and repair of outboard bearing
Typically, the suspension bearing (pictured above) comes in two types: removable and non-removable. It is clear that in the first case no problems should arise, but in the second it will be necessary to change the driveshaft assembly, which will not be very cheap. The malfunction of the removable outboard bearing can be determined with your own hands, based on the following steps:
- when driving, you can hear a kind of hum that comes from nowhere;
- the car is lifted onto an inspection pit or overpass, where a specialist or driver makes sure that the noise is coming from the part of the car where the suspension bearing is located (it must be taken into account that the noise is often accompanied by vibration);
- the universal joint fastening bolt is unscrewed and lowered to the ground (in this case, you need to do everything carefully, as required by the instructions, so that all the oil does not leak out in vain);
- We check the bearing for play, which is the main criterion for evaluating performance.
Replacing the outboard bearing is not that difficult. It is done after the driveshaft is removed (how to remove it is discussed above). It would be a good idea to arm yourself with vinegar or a special liquid that will help decarbonize the bolts and nuts that may be rusty. So, let's start:
- remove the rear driveshaft and, of course, the crosspiece;
- take the 27mm socket and use it to unscrew the nut securing the front cardan fork;
- take a puller that is placed on the fork;
- press the fork off the spitz;
- take a 13mm wrench and unscrew the bolts securing the outboard bearing, which secure it to the plate;
- knock out the bearing from the shaft, resting it on the corners;
- the cardan is assembled in the reverse order;
- The slots must be lubricated with Fiol-1 grease and the previously marked marks must be aligned;
- the seal ring is assembled after installing the splined part of the cardan;
- the locking tendrils are bent after the clip moves forward.
The step-by-step instructions presented to the reader above will help all motorists repair their car. As you know, the price of repair services today is not cheap and it would be simply inappropriate not to use the advice given above. All the tips and recommendations given above were put into practice not only by specialists, but also by ordinary novice motorists.
Airbag malfunctions
Understand that pillows
They have become unusable based on the amount of engine vibration. If it operates in normal mode, and the body begins to rattle, transmitting vibration to the steering rack, pedal block, and instrument panel, you can be sure that the reason for this is the wear of the pillows.
The greatest vibration is usually observed when the engine starts, as well as when it is turned off. When the rubber cushions are completely worn out, a knocking noise may appear caused by the contact of the engine elements and its supports.
Read:
To be more convincing, start the engine, open the hood and visually inspect the engine mounts and the cushions themselves. Replacing the VAZ 2110 clutch without removing the box and draining the oil. Place your palm on the motor and feel how much it vibrates.
The causes of failure of engine mounts can be:
- deformation due to spent life, mechanical or temperature effects;
- loss of elasticity due to “aging” of rubber and temperature changes;
- delamination or cracking caused by exposure to chemically active liquids.
Adjusting the scenes of the VAZ 2110
It is preferable to carry out the adjustment together. The master with the tools is under the car, the assistant is in the cabin and performs the necessary actions behind the wheel.
- Try to install and hold the lever in first gear.
- Loosen the clamp on the control drive rod (stage).
- Move the lever to the far left position. Avoid switching to front and rear positions.
- Tighten the clamp.
- Assess the condition of the hinge switch cover. If damage is found, replace it.
- Carefully pull the boot towards the box. Inspect the cardan. Deviations from the norm are noticed - schedule a shift. Pull the protection back.
Adjustment
The backstage adjustment should be made in several cases:
- after dismantling the gearbox;
- when the cardan has been replaced or the fixing clamps have become loose;
- if the linkage rotates on the hinge.
Of course, this will also be advisable if you have recorded signs of a malfunction of the element, which are described in the previous paragraph.
What to cook?
Before you begin repairs, prepare in advance:
- wrench to loosen the clamp;
- wheel chocks or bricks.
Universal wrench
You will need wheel chocks...
...or the most ordinary bricks
Step by step instructions
To perform repairs, that is, adjustments, you need to perform the following steps:
- First, drive your VAZ 2110 into a garage with a pit or onto an overpass.
- Place bricks or special wheel chocks under the car. Apply the handbrake.
- Climb under the bottom of the car and find the clamp that secures the linkage and hinge.
- Use a wrench to loosen the clamp.
- Then sit in the driver's seat and put the car into reverse. Remember that the lever must be in the extreme left position. Therefore, set it the way you think it should ideally be when engaging reverse gear. It is advisable to do this work with an assistant so that he holds the gearbox lever in the position you set it.
- Now again climb under the bottom of the car and firmly fix the clamp in this position.
Reach under the bottom and loosen the clamp, then set the gearbox lever to the reverse gear position
This completes the adjustment of the device. Take a test drive and check the operation of the unit. If necessary, repeat all steps again.
Backstage adjustment:
Note! Before you go to the auto store and buy a new rocker, be sure to try to adjust the old one first so as not to waste money, maybe everything is fine with the old rocker!
1) At the very beginning of the operation, we will tell you why the adjustment of the rocker may go wrong, namely, after removing the box, after replacing the cardan shaft, or after unscrewing the nuts and bolts that secure the tension clamps of the rods that come from the rocker, and in other cases.
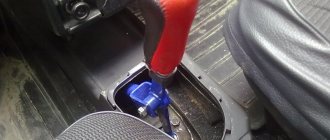
2) Now let’s move on to the actual adjustments, firstly, you will need to first drive the car into a pit or lift it using a lift, then climb under the bottom of the car and there you will find the boot under which the driveshaft itself is located (the boot is indicated by a red arrow), next to with this cardan and the boot that covers it, the end of the rod coming from the rocker itself will be attached, and this end will be attached using a tie clamp, so take two screwdrivers in your hands and with their help loosen the bolt nut a little (the nut is indicated by a blue arrow, and the bolt green), while when you loosen, hold the bolt itself with one wrench so that it does not turn, and with the other at this time loosen the nut, after the nut is slightly loosened, take a screwdriver in your hands and insert it into two holes, namely in the hole between the tie clamp (Indicated by a yellow arrow) and into the hole of the rod itself (Indicated by a white arrow), thereby widening both holes (In fact, these are not holes but a groove, so in the future we will use this word) so that the link rod can easily move relative to gear selector rod.
Note! Before you crawl under the car, put the car into first gear!
3) After you loosen the tension clamp, get out from under the car and return to the car interior. In the cabin, move the gear shift lever all the way to the left, but forward or backward and do not even try to pull it.
4) And to complete the operation, again climb under the car and tighten the nut of the same bolt that secured the tie rod of the rocker link.
Note! When all the operations are completed, test the gearshift lever for functionality, namely, check whether all gears engage clearly, start the car, drive it a little and if the shifter is working, then everything will be fine and you won’t even need to change anything!
By the way, another way (almost the same method) of adjusting the rocker, see the video clip below, in this video an example is shown on a VAZ 2109 car, but don’t pay attention to this, since the entire gear shift mechanism is on front-wheel drive cars VAZ, including the top ten, is practically no different from each other!
Installation of a short-stroke rocker
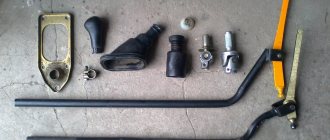
If you don’t bother with alterations and find where the short-throw VAZ 2112 gearbox assembly is sold. Then let's do the replacement:
- To gain access to the bolts securing the gearbox lever, we need to remove the protective decorative cover from it along with the knob
- The knob itself is not screwed to the lever, so it will be enough to pull it hard to remove it
- Now you need to disconnect the gearbox lever rod from the cardan; to do this, you first need to loosen the clamp using a key at “13”
- Pulling the shaft off the cardan
We loosen the clamp with the key “13” and pull the gearbox rod off the cardan
- Let's go to the salon
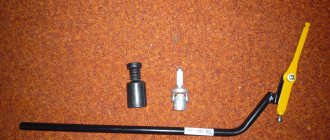
- And remove the locking ring, then remove the lever with the ball and spring from the plastic case
Remove the locking ring, and then the lever with the ball and spring will come out
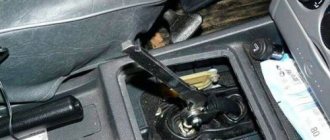
- Then we pull the lever with the rod into the cabin, to make it more convenient, you can disconnect the rod from it, although it can be pulled out without disconnecting, it’s already been checked
- We go down the car to disconnect the traction drive
- First of all, we pull off the rubber boot from it, then, using the “10” key, unscrew the bolt that is attached to the left side of the cardan shaft
- The VAZ 21124 short-stroke gearbox requires replacing the Priorovsky cardan with a Kalinovsky one
Differences between the traction drives of Kalina and Priora
- As you can see, the cardan rods differ greatly in length
- This problem can be solved by simply shortening the Kalinovsky rod
- This must be done, taking into account the type of short-stroke link
- There are situations when the rod may not fully enter
- As a result, the gearbox lever moves towards the parking brake.
- This can be corrected by shortening, if necessary, know that you need to cut off no more than 1-2 centimeters
- We install the “Kalinovsky” cardan, first lubricate it from the inside with “Litol” lubricant
- The fastening bolt screws in easily because it has a cone-shaped shape; you should not tighten it, however.
- Installing traction through the cabin
- It is more convenient to perform the installation with an assistant: so that one holds it in the cabin by the elastic band, and the second carefully stretches the rod
Now assembly
And so we have in our hands the short-throw shift link of the VAZ 2112 gearbox, the removal of the old one is completed, all that remains is to screw on the new link:
- We put a rod on the cardan shaft
- Then we assemble the mechanism that blocks accidental engagement of reverse gear, lubricate the spring ball
- Adjusting the gearbox lever
- Then we clamp the clamp on the rod with the “13” key
- Note: If you assemble the mechanism that blocks accidental engagement of reverse gear first, then due to the long rod it may not be possible to put the cardan rod on the rod. Shortening the driveshaft may solve the problem. And don’t forget to put the boot on the driveshaft.
- Now let’s adjust the mechanism that blocks accidental engagement of reverse gear, since after adjusting the rocker it may not fall on the blocking plate to which it usually clings
- A similar problem is solved as follows: remove the plate and adjust the hook
- In the bracket itself that secures the plate, there is a cutout for which the engagement occurs
- Our task is to adjust or modernize this plastic hook using sandpaper or a file
A short-throw gearbox is installed on the VAZ 21124, enjoy the short shifts. If there are unclear points, it is better to clarify them before performing the work using a video.