Window regulators in any car must be in good condition, even if they are used very rarely. From the factory, the VAZ-2107 is equipped with cable lifts that are manually activated. If an electric drive is installed on the car, this already indicates that modifications have been made by the car owner. In this article we will consider the question of how to replace the window regulator on the “seven” yourself.
What types of window lifters are there?
From the very beginning of production of the VAZ-2107 until the very end of production of the model in the 21st century, exclusively manual window lifters were installed on it. Automatic (electric) ones were installed only starting with the VAZ-2110 model and newer ones.
At the same time, there were several types of manual window lifters:
- Rack and pinion.
Their peculiarity is that their gears are made of plastic, as a result of which the mechanism wears out extremely quickly, and in addition, its device requires more space, lubrication and maintenance. The undoubted advantage of such lifts is that glass distortion is eliminated, and in addition, these mechanisms produce significantly less noise than other models. Used mainly on trucks.
- Cable.
The “bearing” element in such window lifters is the cable, and the entire load is transferred to the torque mechanism blocks. The advantage of the design is its simplicity and maintainability. It is not difficult to carry out any replacement or partial repair of parts in this type of window regulator. However, such a system is highly unreliable.
The device of window lifters VAZ 2107
A diagram of a window regulator for a VAZ 2107 car for the driver's door will help you figure out what the device is. Mechanism functionality:
- opening/closing windows;
- creating a comfortable microclimate in the cabin;
- raising or lowering the glass to the required level.
These devices come in manual and electric types. In Zhiguli “standard” configurations, a mechanism is installed that opens using a special handle. The electric version allows you to perform this action by pressing a single key. A dashboard with buttons can be installed on the driver's door or personal switches can be placed for all locations where window regulators are installed.
The design of the product is simple, as is its installation. The main thing is to have an idea of how wiring is connected and to follow safety rules during this process.
Window lifter malfunctions and ways to eliminate them
The designs of manual window lifters for VAZ cars suffer from a number of “childhood” diseases, the cause of which is design flaws and the lack of the required intermediate tests on benches. Moreover, the most negative thing is the fact that manual window regulators are actually not suitable for manual repair. Even if it seems that fixing the problem is very simple (using a regular screwdriver and wrench), it turns out that in order to restore the system to working order, workshop conditions are needed. The following “popular” faults can be identified:
Window lift creaking
It is very easy to confuse this “symptom” with the normal operating mode of the window regulator (because all more or less complex components in VAZ cars necessarily make sounds during operation). But it is wiser to take it as a rule: if at least some noise appears in the operation of the window regulator, this means that it is necessary to lubricate them. Because if this is not done, then the next event will be, directly, a breakdown of the mechanism.
It is also recommended to replace the rubber seals on the windows. Firstly, they can be the ones that make the creaking noise, and secondly, they actually wear out quite quickly.
Window lifter jammed
It happens that it is impossible to close or open the window regulator. Mechanism wedge is a very common situation. In this case, there may be the following reasons for this:
- or the welded joint that secures the cable to the glass strip has broken. (Then you need to unfasten the cable and re-weld the detached bracket);
- or the correct winding of the cable on the block has gone wrong. (Then you should try to carefully unwind it, however, in case of failure you need to be prepared that you will have to replace the entire mechanism);
- Wedging of the lift mechanism can occur due to simple wear and breakage of gear teeth. (In this case, the only solution is to replace the defective parts).
Read, it may come in handy: Repair of front seats (the backrest falls)
Glass falls
A window lift malfunction typical only for VAZ cars is... glass falling. Down, but not all the way. The reason for this is the weakening of the tension cable, resulting in sagging of the glass. It is possible that you just need to tighten the cable, or it is possible that its end flew out of the fastening. In the latter case, the window regulator will have to be disassembled in order to restore the integrity of the cable and rewind it.
Cable pulling diagram for 2104, 05, 07
Types of mechanism, design of window lifters
Some internal mechanisms are different. There are rack and cable drive types. Each device differs in technical characteristics and has its own advantages and disadvantages:
- The rack and pinion device is more reliable. The risk of glass distortion is minimized even after long-term use. The movement of the device is carried out thanks to gears that run along a belt rack. However, the carriage requires regular lubrication, which is why you have to disassemble the door card at least once a year.
- The cable device breaks more often. It often jumps off the rotating mechanism. Slow movement and resistance of the rubber seals can cause the cable to come off. This happens if you turn the handle sharply. The main advantage of the mechanism: good maintainability without serious financial costs.
The devices have the same location. The window regulator of the front right door of the VAZ 2107 car is located identical to the mount in the driver's side panel. The design includes:
- handle;
- cladding with a lock;
- socket, roller bracket;
- screws;
- mechanism with gears;
- pressure plate;
- glass;
- cable;
- roller: upper, tension;
- fasteners.
The listed components are present in a mechanical device. The electric version is distinguished by the presence of connecting wires that lead to the start button.
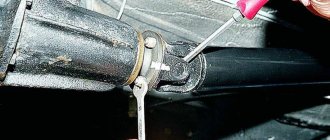
Replacing the cable
A broken cable is a very common failure of the window lift mechanism. In this case, there is only one answer - replacement:
- After removing the lining of the inside of the door, the torn cable is removed from the guides.
- The new cable must be generously lubricated before installation.
- You need to start pulling the cable from the top roller - the lower branch of the cable is fed there. The top one is fed downwards.
- In the design of the "seven" window lifter, there is also a hidden roller at the top. Throwing a cable over it is extremely difficult, so you should proceed as follows:
- at the top of the cable you need to twist a loop and lead it to the hidden roller;
- then, having inserted the loop into the housing of the hidden roller mounting bracket, we begin to move the cable back and forth until the loop catches on the roller.
- After the cable is thrown through all the blocks, we check the functionality of the updated window regulator.
Briefly about the change procedure
A simplified process for replacing a defective window regulator in the front door of a VAZ 2107 looks like this:
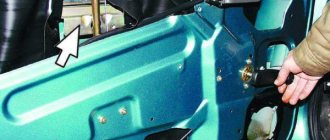
- remove the door trim;
- disconnect the cable from the clips securing the glass;
- loosen and remove the cable from the rollers;
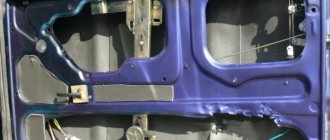
- dismantle the guide chute and the window lift mechanism;
- install the housing of the new glass lifting mechanism;
- thread the cable along the contour;
- fix the glass brackets relative to the cable;
- pull the cable;
- install door trim.
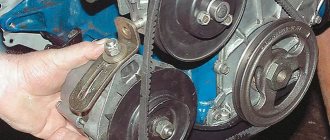
Replacing rollers
To begin with, let's look at the functionality of these mechanism parts. In total, the design of the “seven” window lifter includes 4 rollers:
- 1 roller – tension roller, its functionality is to maintain the cable in a taut state (taking into account the fact that it stretches over time);
- 2, 3 rollers – mounted on glass; their main task is to transfer the lifting moment from the movement of the cable to it;
- 4 roller – stationary, mounted on the door (it is relative to it that the movement of the upper pair of rollers occurs and it is on it that all the lifting force falls).
Removing the rollers is very simple: just remove the inner door lining and unscrew the nuts that secure them. After installing new parts, the entire structure should be put back together.
Installing a new window regulator
The new mechanism must necessarily have a bracket that secures two branches of cables. It cannot be removed until a full installation has been completed.
In general, the installation process looks like this:
- Installing and fixing the case in its “own” place.
- Installing cables around the rollers.
- Fastening the glass clips with a cable. It is fixed with screws using 2 brackets.
- Installation of the guide groove.
- Cable tension.
- Now the bracket that secures the branches of the cable is removed.
- Installation of door trim and handles.
The cable can be routed around the rollers in two ways through the rolling support (upper or lower). If the line goes through the lower roller, then the cable is routed as follows:
- Left guide roller (lower).
- Left guide support (top).
- Central tension reel (bottom).
- The guide element is at the top right.
If the front window regulator is being replaced, then you can loop it through the upper coil in the reverse order.
Stretching process:
- Lower the glass to the down position.
- Turn the handle all the way in the direction of lowering the window.
- Adjust the cable tension by moving the required roller.
- The bolt clamp that secures the roller.
Please note that the tension should be sensitive. The cable should not be overtightened, but it should not be allowed to dangle either.
conclusions
Installing electric windows on a VAZ-2107 is a completely feasible task for car enthusiasts who have worked with electricity at least once. If you can’t cope with it, you can contact a car service, where high-quality installation will be carried out for the appropriate fee.
Sources
- https://legionerov.ru/avtomobili/samostojatelno-ustanavlivaem-jelektricheskie/
- https://bumper.guru/klassicheskie-modeli-vaz/stekla/steklopodemniki-na-vaz-2107.html
- https://vazweb.ru/desyatka/elektrooborudovanie/samostoyatelno-ustanavlivaem-elektricheskie-steklopodyomniki-na-vaz-2107.html
- https://motorsguide.ru/system/elektrosteklopodyomnik-na-vaz-2107
- https://www.autoposobie.ru/ustanavlivaem-elektrosteklopodyomniki-na-vaz-2107-svoimi-rukami/
- https://avtozam.com/vaz/2107/montazh-i-ustanovka-jelektrosteklopodemnikov/
[collapse]
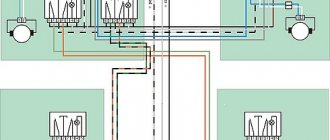
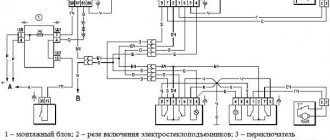
Connecting electrical wires
The third part of installing an ESP involves working with electrical wiring. All manipulations should be carried out according to the instructions:
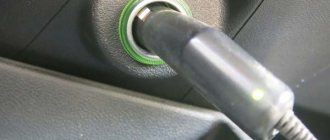
- Using a corrugated tube, you should stretch the wires to the car console. To avoid overloading the cigarette lighter, it is better to use a separate electrical cord with a fuse.
- You need to bring them out through the holes for the control keys located on the instrument panel, connect them and place them in a special place.
- Wires running inside the cabin must be insulated with plastic tubes and placed under the trim.
It should be remembered that connecting the power circuit of electric lifts to the on-board electrical network is impossible without using fuses. The circuit according to which the electrical wiring will be connected must ensure the operation of electric drives only in cases where the power unit is turned on.
The final part of installing an ESP on a VAZ-2107 involves the final adjustment of the mechanism. The setting will be completed correctly if, when the glass is raised to its maximum level, there are no gaps left between it and the seal. All that remains is to fasten the door trim back, and close the place where the handle of the mechanical lift was with a plug.