It came to the door) Although the original meat grinders served for 13 years without any complaints, it’s not convenient no matter how you look at it. Original Forward window lifters were purchased at a local Nivsky store. There were also Chinese ESP forwards available, structurally and in a “1 in 1” box, they cost a ruble less, the difference is in the quality of the metal and the speed of operation. Perhaps the only thing I didn’t like about them was the installation instructions, in which nothing was clear!
I tried to look for reports about their installation, but every now and then I came across reports with “Two holes because I didn’t get it the first time” and of course no one drew a diagram after that. I decided to change this situation:
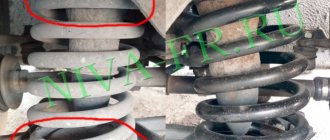
Everything fell smoothly and began to work the first time on both doors, the only special attention is on the adapter plates, if they are mixed up or turned upside down, it will seem that the installation is jammed)
We are also not too lazy to remove the rollers from the meat grinders, they usually make noise!
_______________________________________________ Did you like the post? Let's like and share with friends) Thank you for your attention!
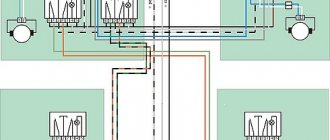
In the Chevrolet Niva, electric windows are installed on the front doors. The control buttons are located on the top of the doors. The driver can operate the windows of both doors, and the passenger can only operate the right one.
Electric window device (ESP) and connection diagram
The standard circuit consists of a control unit, drive and trigger mechanisms. The drive mechanism, or gearmotor, rotates the cable drum, directly raising or lowering the glass. The gearmotor is a solid block of an electric motor with a worm gear, which provides rotation in only one direction, from the worm to the wheel. This prevents the window from accidentally closing. The built-in thermobimetallic fuse protects against overloads.
Let's look at what the components in the electric lifting mechanism circuit are responsible for:
1. There is a mounting block located under the instrument panel on the driver's side. Devices are powered from it.
2. The power window relay reduces the current in the control circuit.
3. Buttons with LED backlight, on the right and left doors, activate the glass lifting mechanism.
4. Gear motors for the passenger and driver's doors create a force that raises and lowers the window.
5. The ignition switch supplies power to the relay.
How does the scheme work?
Turning the ignition key supplies power to the unit and the lift relay. The LED backlighting of the control buttons turns on. The glass movement mechanism starts only when you press any key.
The movement of current in the circuit: battery - fuse - relay - button - motor.
Controller for power windows or sunroof in a car
This device is an automatic controller for power windows, which are designed for a car that already had electrically operated windows, but they only worked when a button was pressed. Once released they stopped immediately. For ease of management, our own version was created. Here, automatic closing / opening of the glass occurs after holding the button for 1 second, and now you can easily open the window with a short press, as in more advanced cars. For example, you can use it to control a purchased window drive on a VAZ and similar cars. The device controls only one glass; to control two, it is necessary to create two such circuits. This of course requires more work and increases the cost slightly, but this solution has many advantages:
- Can be applied to electric sunroof.
- Easier to install and connect.
- The use of buttons is independent for the passenger and driver.
Attention! Be careful when assembling, testing and operating the circuit! Edition 2 of Schemy.ru is not responsible for material or moral damage caused by the presented scheme. You use all this at your own peril and risk!
Front door window regulator malfunctions
During the operation of the car, breakdowns of the window lifting mechanism occur. Most often, the causes of malfunctions are related to the electrical circuit of the lifts. Let's look at the main causes of malfunctions:
1.Both window regulators do not work: 1.1. The fuse has blown. 1.2. Unreliable connection of wires to ground 1.3. The connector is disconnected or there is a break in the electrical network. 1.4. The main power window switch is faulty.
2. Doesn't work right: 2.1. Damage to the gearmotor or reverse current relay. 2.2. Electrical network interruption. 2.3. The power window switch is broken.
3. The glass goes down, but does not go up. The reason is that the button is stuck in the down position.
4. Slowing down or raising the glass. The reason for this is contamination of the drainage holes at the bottom of the door.
5. The cable in the drum may be worn out or broken.
6. Mechanical damage also occurs. They are identified by characteristic noises and knocks. Troubleshooting begins with checking the fuse; it supplies power to both window regulators. If the cause of the breakdown is not found, you will have to disassemble the door.
Electric drives
Drives with electric motors are much more advanced. But they were installed on “classic” VAZ cars exclusively by car owners - this option was not provided at the factory. The main thing (according to those who have been producing these cars for almost 30 years) is wheels on an iron body and some kind of motor, as long as it drives this entire structure.
If you take a closer look, you will see that the designers did not bother themselves with comfort; they only thought about how to save on production. And in the car circuit there was no provision for connecting power windows. Therefore, you have to install all the wiring yourself.
But many car owners took on the responsibility of the factory and began installing power windows themselves. Most often, the choice falls on hinged lever mechanisms, which have several advantages:
- Quite low cost of the kit.
- Electric windows are easy to install.
- There is no need to look for components - everything needed for installation is already available, including wires and buttons.
- The devices are highly reliable, work quickly and do not make noise (the latter advantage is more relevant for modern Vesta than for the “seven”).
Car fuses and relay box
The vehicle's power supply and consumption system ensures the correct functioning of components and assemblies and comfortable driving. The car's current source is the battery. The consumers are connected in parallel and combined into separate blocks with fuses.
On the Chevrolet Niva, the fuse box is mounted in a unit and is located in the passenger compartment. Fuses protect almost all electrical power circuits. They do not have such protection for the generator circuit, engine starting and battery charging.
The Niva fuse box is located on the driver's side under the dashboard. Access to the mounting block is closed with a lid.
To remove it, unscrew two screws.
We remove the cover from engagement with the instrument panel. Lift it up, remove the pins from the rubber bushings and remove.
In the photo you can see where the relay and fuse box is located.
In Niva Chevrolet cars, fuse F5 protects the power supply circuit for the front door window lifter. The power window relay is located in a block with remote relays. This block is located below the mounting one.
Location of the Niva Chevrolet immobilizer and instructions for disabling
page » Immobilizer » Location of the Niva Chevrolet immobilizer and instructions for disabling
Blocker APS-6 APS-4
Chevrolet Nivas produced before 2004 were equipped with APS-4 immobilizers. Modern cars began to use APS-6 devices. In later versions of the car, it began to be installed on the steering column, and not in the tunnel.
Read news about the new Niva
- What to do if the right or left power window does not work in a Chevrolet Niva
- Expedition rack for Niva 2121 drawings
- How to make an expeditionary trunk for a field
- Niva Chevrolet alarm connection points
- ELECTRICAL DIAGRAM VAZ 21213 - ELECTRICAL DIAGRAM
- Do-it-yourself expedition trunk for a Chevrolet Niva
- How to connect fog lights via a relay and a button: diagram
- Chevrolet Niva fuse box with description (up to 2009 release)
Troubleshooting ESP
To prevent the front door window lift mechanism from breaking, it is enough to lubricate all its parts once a year. In case of breakdowns, remove the ESP and carry out repairs:
1. The fuse is checked in the standard way. Using the diagram or visually we find the required fuse. We inspect it for broken wires and burnt marks. You can check with a tester (multimeter) by resistance or voltage.
2. Check the relay for serviceability. To do this, either connect a new one, or close contacts 30 and 87 with each other. The relay cannot be repaired; it must be replaced.
3. Window lifter buttons are easier to remove and replace. The reason for their malfunction is oxidation of the contacts. You can quickly restore the operation of the buttons by treating them with WD-40 penetrating liquid.
4. The faulty motor must be replaced. Its repair is possible only if the contacts are oxidized. They need to be cleaned. If there is no voltage in the walk-behind tractor wires, you need to find the break and repair the damage.
All moving parts of the removed ESP mechanism are inspected for mechanical damage, dust, and dirt. Sometimes it is enough to clean the parts from rust and lubricate them for the lift to work properly.
Electrical work
Remember that using a power window fuse can protect all important components from short circuits.
The electrical setup procedure looks something like this:
- The electric motor must be supplied with voltage directly from the battery. In this case, the rotor should rotate and the entire mechanism should rise up. And you need to wait for the moment when the holes in the fasteners of the mechanism are aligned with those located on the glass carriages. Only after this can the glass be fixed.
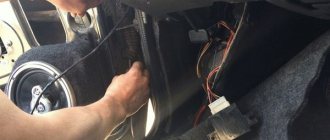
- If there is no wiring (the installation of ESP is not provided for by the manufacturer), then it must be laid through the technological holes that are located in the door and body. You need to run wires to the instrument panel.
- You can place the control buttons in any convenient place, but it is best to place them in the door handle. But on domestic cars they are more often installed in the cigarette lighter area or near the handbrake.
- All moving parts of the electric drive must be lubricated - a CV joint type compound is suitable.
- Apply voltage to the entire system through the power window fuse and check operation.
- If there are no faults, you can install the casing and recheck.
The article shows a wiring diagram for the power window button. It is recommended to switch all power circuits using relays to maintain the integrity of the buttons.
Replacement of front SP
Remove the ESP mechanism from the front door to repair parts or completely replace it. The electric window lifter is also removed during other repair work, when the mechanism interferes with their implementation. A standard set of tools is required.
Sequence of work:
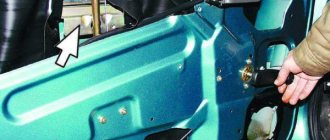
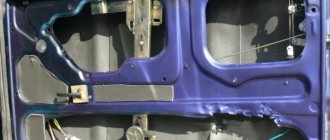
- Remove the plastic door trim. Using a thin screwdriver, carefully pull out the plastic plugs. We unscrew the cross-shaped screws on the frame near the opening handle, and the three at the bottom of the door on the bottom pocket and remove the parts. Remove the two large screws under the plug. We remove the main casing.
- Disconnect the wires from the buttons by pressing the latches. We remove the switches from the plastic case.
- We remove the speaker.
- We remove the front door glass. To do this, unscrew the bolts securing the glass plate to the bar and the bolt securing the door guide. We remove the guide, remove the glass seal, and remove the glass.
- We detach the ESP drive gearmotor from the block with the power wires.
- We unscrew the nuts securing the mechanism to the base of the door, the central and lower nuts.
- We take the mechanism out of the door hole. We inspect the mechanism for damage and replace parts. Next, we install the repaired power window in reverse order, or replace it with a new one.
Photo report on the installation of GRANAT electric windows on a VAZ-21213 Niva
Our buyer, Mikhail Aleksandrovich Golovnin (Kirov, Kirov region), as part of his participation in the promotion, told us how to install GRANAT electric windows on a VAZ-21213 Niva.
Before installing power windows, it is necessary to dismantle the door trims and manual windows. To remove the trim, you need to unscrew the three screws securing the armrest, remove the speaker (if installed), and the trim of the internal door opening handle:
To remove the window lifter handle, insert a screwdriver between the latch and the ring, pull the latch in the direction opposite to the handle:
Along the perimeter of the upholstery (left, right and bottom), you need to pry up and snap off 8 holders, remove the upper edge from the door strip:
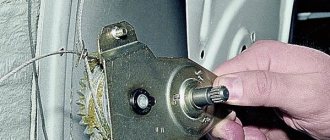
To remove the manual window regulator: 1. Loosen and remove the lower (tension) roller of the cable.2. Unscrew the fastening plates of the two glass brackets.3. Unscrew the three nuts securing the window regulator housing.4. Remove the cable from the non-removable lower and upper rollers (since access to these rollers is difficult for dismantling, it is necessary to fix them, for example, with auto plasticine, to avoid rattling).
To make it easier to drill holes for wiring in the door and pillar, you need to knock out the lock:
It is recommended to use a conical drill and a tube with a ring (to protect against chafing, the plastic ring is taken from the power source housing):
After installing the tube with the ring, hammer the retainer into place:
The control buttons can be installed on the floor tunnel, all the necessary connections can be made to the cigarette lighter (with this option for placing the buttons, the length of the supplied wires for pulling into the door is not enough, they need to be extended):
To install the GRANAT electric window lifter in the door, according to the attached instructions for VAZ-21213:1. Drill out the rivet, drill a hole with a 7 mm drill for the upper mounting point.2. Straighten the flange on the door.3. For the lower mounting point, use the hole in the upholstery holder.4. Drill a 7mm hole for the middle mounting point.5. Without fully tightening the fastening screws, bring the ESP plate in (using power supply to the motor) and secure the lowered window brackets with standard screws.
Depending on the door design, eliminate distortions by moving the ESP mechanism left and right, and if necessary, place washers under the fastening points. Assemble the door trim (remove one lower holder, since its hole is used for the lower attachment point). Install the plug in place of the manual window lift handle.
The installation for the left door is similar.
We thank Mikhail Alexandrovich for preparing this report. We transfer the promised prize to his mobile phone account.
Source
Connecting ESP without ignition
By default, the front door power windows on the Chevrolet Niva only work when the ignition is on. There are several ways to connect an ESP bypassing the central locking.
We will need a simple tool: a Phillips screwdriver, a thin screwdriver, wire cutters, and insulating tape. To replace the relay, we purchase a simple jumper, or we make it ourselves. Process: 1. We bridge the power legs of the relay, which supply power to the window regulator. To do this, remove the protective plastic cover. There are three to five relays under the fuse block.
Electric drive installation
Each set of electric windows comes with instructions that indicate the installation diagram of all drive elements, as well as a circuit diagram. It allows you to see how to connect electric windows to the vehicle's on-board network. The same instructions, which describe installing the drive on the “seven”, indicate how the holes in which the rack is attached are located relative to each other. Measure the distance using a ruler and caliper, mark the location of the holes using a marker.
Make a hole with a 5.5 mm drill inserted into a screwdriver or drill. The power window mechanism is installed through the right hole in the door. Next, align the holes in the rail with those you made in the door. All that remains is to secure the rail with 10mm bolts, which should be included in the installation kit.
Rear SMEs Niva Chevrolet
The rear doors of the Niva Chevrolet are equipped with mechanical windows. They are not as convenient as electric ones, but are more reliable.
The main element of the window lifter mechanism is the drive device. The drive consists of a simple set of elements: a pair of spur gears and a handle. The handle regulates the degree of opening of the window.
If the window regulator is broken, the window will not open when the handle is turned. There may be several reasons:
1. The handle slots are worn down. This is due to the soft plastic of the handle itself, at the junction with the gearbox shaft. The handle is replaced by choosing the option with a metal insert.
2. The gear teeth of the gearbox have ground down . The gearbox is a block of two gears in a housing, with space for a cable. The body is connected with rivets. To replace a worn-out gear, you need to drill out these fasteners and replace them with bolts after repair. It's easier to change the gearbox assembly.
3. The cable has broken . If this is the case, the handle rotates too easily. The cable is sold only assembled. You can find a suitable option, but it’s easier to change the entire window regulator.
4. The fastening of the cable to the base of the glass has become loose. This is the simplest failure. The cable slips into the mount and does not move the glass. It is necessary to remove the door trim and, by tightening the fastening bolts, adjust the position of the glass and the cable to each other.
Let's look at how to change the rear power windows:
- Remove the upholstery from the door.
- Unfasten the rods of the inner handle of the lock.
- Raise the glass all the way and fix it.
- We unscrew the center nuts securing the glass and window regulator.
- We unscrew the fastening nuts from the bottom and top and remove the window regulator assembly through the technological hole.
We looked at the main causes of power window failures on the front and rear doors and how to repair them. Use our tips for DIY repairs and save your family budget.
Video instructions for installing FORWARD electric windows in the rear doors of LADA Largus
You watched
Once again Tatyana will please your eyes.
Today in our new instructions, she will demonstrate the installation of FORWARD electric windows in the rear doors of LADA Largus
Brief content of the video:
First, we disassemble the door and dismantle the mechanical window regulator: - remove the handle of the mechanical window regulator; — using a Torx 20 key, unscrew the screw securing the internal handle of the door lock drive and remove it; — in the armrest, unscrew the screw securing the door trim; — remove the speaker trim, unscrew and remove it; — remove the door trim, tearing it off the clips; — fix the glass in the upper position to prevent unwanted falls; — using a Torx 20 key or a socket wrench 8, unscrew the two self-tapping screws securing the glass to the window lifter carriage; — using a 10mm wrench, unscrew the 4 nuts securing the mechanical window regulator and remove it from the door through the mounting opening.
We begin the installation of the FORWARD electric window regulator: - insert the window regulator into the door through the installation opening; — fasten it into the standard holes with two nuts; — fasten the window lifter carriage to the glass with two self-tapping screws.
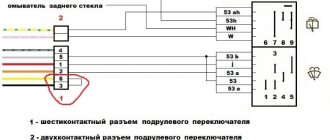
To connect window regulators, we use an electrical installation kit of our own production. It consists of: — two separate electrical wiring harnesses; — two switches for installation in door trims.
We route the electrical wiring from the door into the car interior through the protective corrugation and route it to the connection point. Black wire is ground. Connects to the car body. White wire - power supply, +12 V. Yellow-green - switch illumination, connected to the side lights circuit.
The power was taken from the front power window switches: - yellow wire on the 3rd contact - “+”; — blue wire on pin 4 — button illumination; — the ground is connected to the car body.
We install decorative plugs into the holes from the handles of mechanical window regulators. We assemble the door in the reverse order.
source
Let's sum it up
As you can see, installing and connecting power windows, as well as power window buttons, is not the easiest procedure to install, but it is quite possible to do all the work yourself in an ordinary garage.
The main thing is to choose the right window regulator (and, if necessary, a window closer), and the diagram of the window regulators should be studied in advance in order to avoid errors when connecting.
Finally, we note that there are a large number of different window lift mechanisms, blocks, buttons, etc. on the market. In practice, it is recommended to buy complete and ready-made kits from trusted manufacturers rather than assemble a window regulator from individual elements.
Of course, high-quality components are also sold separately. However, this option is more suitable for repairing window regulators. If you assemble the entire kit, it may turn out to be significantly more expensive than purchasing a ready-made solution right away.
Preparatory work
Before connecting the power windows on the VAZ-2107, you need to put all the components in place and lay all the wiring. But first, make preparations - open the hood and completely disconnect the battery to eliminate the possibility of a short circuit. You start all work from the front door (driver's). First, remove the handle from the standard window regulator; you need to remove the lock washer from under it.
Using a flat screwdriver, carefully push the edges of the lock washer apart and pull the handle toward you. Then you need to use the same flat screwdriver to pry off the plastic plugs around the entire perimeter. They need to be removed to provide full access to the bolts that hold the casing in place. They need to be unscrewed with a key to “8”. After this, the casing is completely removed.
Specifications
- Operating voltage range: 10.8 – 15 V
- Nominal force on drive plate: 12 kgf
- Allowable force on the drive plate: 20 kgf
- Time to move the plate from one extreme position to another at a supply voltage of 13.5 V and rated force: 4 s
- Current consumption at supply voltage 13.5 V and rated voltage, no more than: 8 A
Completeness
- Power window R162.16 front right 1
- Power window R162.16-01 front left 1
- Screw M5 4
- Screw M6 4
- M6 bolt with locking skirt 4
- Lock washer 8
- Adapter plate right 1
- Adapter plate left 1
- Decorative plug 2
- Plug retainer 2
- Self-tapping screw for fastening plug 2
- Pack 1
- Passport 1
Overall dimensions in packaging: 53.5*17.5*7 cm.