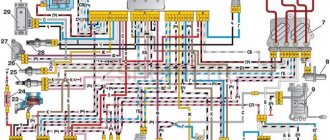
Wiring diagram for power windows of the front doors: 1 — mounting fuse block in the passenger compartment; 2 — mounting block of relays and fuses in the engine compartment; 3 — power window relay; 4 — power window switch on the left front door; 5 — right front door power window switch; 6 — electric motor for window lift of the left front door; 7 - right front door window lift motor
Connection diagram for electric windows of the front and rear doors: 1 - mounting fuse block in the passenger compartment; 2 — mounting block of relays and fuses in the engine compartment; 3 — power window relay; 4 — power window switch on the left front door; 5 — right front door power window switch; 6 — left rear door power window switch; 7 — right rear door power window switch; 8 — electric motor for window lift of the left front door; 9 — electric motor for window lift of the right front door; 10 — electric motor for window lift of the left rear door; 11 - right rear door window lift motor
Schematic electrical diagrams, connecting devices and pinouts of connectors
Electric windows (ESP) are convenient devices for controlling the side windows of a car, which are controlled by a special button and make it possible to lower or raise the side windows without rotating the previously used handles. This option is provided only in some modifications of the VAZ car, but nothing prevents you from purchasing a ready-made unit and installing it yourself.
The most preferred are rack type ESPs , so as an example we will describe the process of their installation.
The connection diagram for the window regulator on a VAZ-2110 car is as follows:
- remove the negative terminal from the car battery to stop the supply of voltage to the on-board power supply network;
- we take the wires that come standard with rack-and-pinion window lifts and make a kind of harness out of them that makes connection easy;
- remove the car mounting block, which will require unscrewing the self-tapping screw that secures the special latch;
- turn the block over and carefully install block Ш1 of the pre-prepared wiring harness into the corresponding connector;
- dismantle the door trim;
- we pull the wires to the electric window drive. To do this, you will need to carefully pass them through the holes in the door itself and the body pillar on the desired side.
After this, buttons or keys are installed that will be used to control the power windows. Depending on your desire, they can be attached either to the door trim of a VAZ-2110 car, or to an existing control panel. In the first case, you will need to use an additional wire, which will allow you to equip the key backlight.
Diagram of window regulators on a VAZ-2107
On the automotive goods market for old mechanical VAZ models there are sets of electric windows from different manufacturers, the most popular of which are “GRANAT” and “FORWARD” rack-and-pinion type. The window lifter rack is a housing in which the glass movement device is located - a toothed chain drive. A stationary electric motor is already attached to the rack, driving the entire mechanism to work.
To connect power windows, you need to determine the place where you will get the power from. In the VAZ-2107, this is most conveniently done from the cigarette lighter. If this option is not suitable, then the electrical wiring will have to be done from the battery.
Electric drives
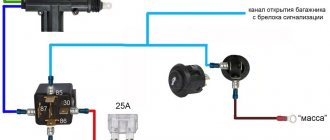
Panther alarm, useful information, how to install. Panther car alarm connection diagram Pantera alarm diagram
Drives with electric motors are much more advanced. But they were installed on “classic” VAZ cars exclusively by car owners - this option was not provided at the factory. The main thing (according to those who have been producing these cars for almost 30 years) is wheels on an iron body and some kind of motor, as long as it drives this entire structure.
If you take a closer look, you will see that the designers did not bother themselves with comfort; they only thought about how to save on production. And in the car circuit there was no provision for connecting power windows. Therefore, you have to install all the wiring yourself.
But many car owners took on the responsibility of the factory and began installing power windows themselves. Most often, the choice falls on hinged lever mechanisms, which have several advantages:
- Quite low cost of the kit.
- Electric windows are easy to install.
- There is no need to look for components - everything needed for installation is already available, including wires and buttons.
- The devices are highly reliable, work quickly and do not make noise (the latter advantage is more relevant for modern Vesta than for the “seven”).
Connecting power windows VAZ-2109
Owners of a VAZ 2109 car can replace power windows with electric windows. On 2109 cars, electric windows can be connected via standard wiring, which already has everything provided for connecting an ESP.
This circuit is used to connect ESP on more “rich” configurations of the nine and it is advisable to use it when connecting independently. Below are diagrams for connecting an ESP with fuse blocks of new and old models.
Wiring diagram for power windows on a VAZ 2109 with an old-style mounting block (17.3722):
- 1 - Mounting block
- 2 - Ignition relay
- 3 — Ignition switch
- 4 — Right door electric window motor
- 5 — Left door electric window motor
- 6 - Right door power window switch
- 7 - Left door power window switch
- K7 - Power window power relay
- A - To terminal “30” of the generator
- B - To the wiring harness block connected to the heater lever illumination display
- B - to the heater lever illumination display
- G - conventional numbering of plugs in the gear motor block
Getting ready for installation: necessary tools
In order for the installation of power windows to go smoothly, you will need certain tools and materials. Here is a sample list:
- Electric drive kit for a specific vehicle. Please note that kits vary for all vehicles.
- Flathead screwdriver.
- Ruler.
- Calipers.
- A set of open-end and spanner wrenches.
- Marker.
- Set of socket wrenches or sockets.
- Electric screwdriver and metal drills.
- Silicone and CV joint lubricants.
Having prepared all these tools, you can begin installing the drives on the car.
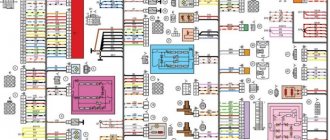
ESP diagram VAZ 2110, 2111, 2112
- 1 – mounting block
- 2 – ignition switch
- 3 – right front door power window switch
- 4 – right rear door power window switch
- 5 – electric window motor reducer of the right front door
- 6 – electric window motor reducer of the right rear door
- 7 – electric window motor reducer of the left rear door
- 8 – electric window motor reducer of the left front door
- 9 – left rear door power window switch
- 10 – left front door power window switch
- 11 – relay for turning on electric windows
- A – to power supplies
- B – to the instrument lighting switch
- C – conventional numbering of plugs in power window blocks
The power window relay for this car is located in the mounting block. On the left under the panel in the fuse box on the additional connector.
Window lifter diagram for VAZ-2115, VAZ-2115
Power windows for front doors for VAZ-2115, VAZ-2114 cars (usually power windows are installed only on front doors).
1 – mounting block; 2 – power window switch for the right front door; 3 – gear motor for the electric window of the right front door; 4 – motor reducer for the electric window lifter of the left front door; 5 – power window switch for the left front door; 6 – ignition switch; K5 – relay for turning on electric windows; A - to power supplies; B - to the external lighting switch.
How to connect a button?
The driver and passenger door buttons are connected to each other, as well as to the ESP motor and power cable. Correct pinout of the power window button:
- Pin 1 on the driver's door is connected to pin 6 on the passenger side. Contact 1 on the passenger door is connected to the negative terminal of the ESP motor.
- Pin 2 on both buttons is connected to power.
- Pin 3 is the ground on the driver's side and the positive wire on the passenger's side.
- Contact 4 in both cases goes to the headlight switch.
- Contact 5 is ground in all cases.
- The positive wire of the ESP motor corresponds to pin 7 of the passenger door button.
Serial connection - diagram
We connect the output of additional button 1 in the driver's door to input 6, and output 7 to input 3 of the main button on the passenger door. We cut the wires in the block connecting contacts 5-6 and 6-3. The minus of contact 5 now goes only to the backlight, and contacts 6 and 3 now take output from additional buttons 1 and 7 of the driver's door. Installation in parallel will result in short-circuiting during lifting and lowering. Power wires are highlighted in bold.
When using trigger buttons, connect all ESP motors only through a relay. When using a conventional door closer, relays are also needed, since they are not in the long-press closer block and all the current flows through the buttons and wires from them.
How does a power window work?
The basis of the window regulator is an electric motor, which through various mechanisms raises and lowers the glass. The window regulator has only two operating modes - raising and lowering the glass, which depend on the position of the control button. Some control units support a closer function, where a single press of the button will lead to full automatic opening or closing of the corresponding window. This function is provided by a time relay installed in the control unit. When the glass is completely closed or open, the limit switch is activated, cutting off the power to the electric motor. Therefore, the control unit, when you press the button, supplies voltage from the battery to the corresponding window regulator contacts.
Parallel connection - diagram
Wires from the main button next to the driver's ESP motor go directly to pin 88 of the relay and from pin 30 directly to the engine, and long wires from the backup button go to pin 85 of the relay winding, and the relay feeds a powerful plus to the passenger's ESP motor. A parallel connection for power buttons is preferable, since there is no need for a relay on the main (passenger) button, thereby eliminating unnecessary relay clicking when the main button on the passenger door is operating.
Window lifter options
According to their design, electric windows (ESP) are divided into three main types:
- rack and pinion window lifters. The devices are not very powerful, plus they require systematic lubrication. If this is not done, their service life is significantly reduced;
- Cable window lifters. Their main advantage is their low price. In addition, changing the motor on such a window lifter will not be difficult (since it is easy to find on sale). They are inferior in power to rack and pinion lifts, which is especially noticeable when the glass freezes to the door in winter;
- finally, the windows are lever operated. Among car enthusiasts they are considered the best option: powerful, fast and almost silent during operation. These are the ones that will be discussed below.
The most popular among lever ESPs are the “Granat” lifts. Their popularity is due to two factors: a fairly affordable price and good equipment. Along with the ESP, the driver receives wiring, fasteners, cuffs and plugs.
Lever window lifters "Granat"
Scheme for any number of buttons and doors
Here you can place any number of buttons in parallel and simultaneously press them in different directions - a short circuit is impossible from the circuit design. In a situation where we press the up button on the main button, and the down button on the backup button, it will simply stop, since both power lines will have the same potential. The advantage of the circuit is that the power switching is in one place, there are no losses in the harnesses and on the buttons, there is a minimum of “pulling” of wires - 2 in total per channel + ground.
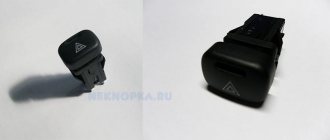
Connecting the power window button
Diagram of the rear window heating button
Look at your button, it should have 5 contacts:
- + 12V
- 1st power window wire
- + 12V
- There is no 4th contact
- 2nd wire from power window
- Weight
From personal experience, I advise you to connect + from the audio system to the first contact of the power window button. The thing is that rarely does anyone use this wire, but it receives +12V when the car’s ignition is turned on.
Next, you can treat the door seals with silicone grease. After all the above steps have been completed, you can check the operation of the power windows. Let's also add that on some cars there may be minor discrepancies in the connection diagram, and the advice here is this - look where which contacts are located on the power window connection button.
We hope our instructions will help you correctly connect the power windows on your car. We also suggest that you read another article on the general topic of Car Structure.
Well, even more information about cars is contained in our Auto section.
Glass closer Pandora DWM
Connection diagram for the passenger door button in series through a duplicate button on the driver's door. Contacts 1-6 and 7-3 are always normally closed. When you press the up button, contacts 1-6 open and 1-2 close (window rises). When you press the down button, contacts 7-3 open and 7-2 closes (window down). The 30th contact of a 5-pin relay, without supplying voltage to the winding contacts, is constantly shorted to contact 88, which gives us the necessary negative contact (works like a switch). If voltage is applied to the winding, then contact 30 is disconnected from contact 88 and connected to contact 87. Contact 86 of the winding is connected to ground.
What to pay attention to
On domestic VAZ cars, the installation of rear window lifters is approximately the same as the front ones. One difference is the location of the control knob. Therefore, you will have to drill holes in the door with a slight offset. And one more thing - one set of ESP, which can be found on sale, is designed for installation in two doors. Therefore, if you want to install equipment in all doors, you need to buy four sets. And connect the power windows according to the diagram given in the article. It includes a window closing system when arming - this doubles the ease of use of the car.
It is also recommended to completely assemble the kit in advance and then place it in the door. And the entire mechanism must be placed in the lowest position. If this is not done, then it will not be possible to install the drive through the technological hole.
Pay attention to the wiring diagram for the power window button; check it several times to avoid mistakes. When checking the mechanism, you need to look at how the glass moves and whether there are any extraneous sounds or creaks.
Wiring diagram for power windows. Installation of electric windows at News4Auto.ru.
Our life consists of everyday little things that in one way or another affect our well-being, mood and productivity. I didn’t get enough sleep - my head hurts; I drank coffee to improve the situation and cheer myself up - I became irritable. I really want to foresee everything, but I just can’t. Moreover, everyone around, as usual, gives advice: gluten in bread - don’t go near it, it will kill you; A chocolate bar in your pocket is a direct path to tooth loss. We collect the most popular questions about health, nutrition, diseases and give answers to them that will allow you to better understand what is good for your health.
Installation of electric windows on a VAZ
The procedure is performed in the following sequence:
- temporarily remove the glass seal located on the inside of the door;
- remove the glass, and then dismantle the window regulator fastening mechanism;
- we install devices that will operate from an electric drive;
- connect the negative terminal to the battery and check the operation of the new window regulator;
- We install the glass in place and trim the door.
Unlike conventional mechanical devices, power windows are not equipped with traditional gear reducers, but with a special drum. The shaft of a DC electric motor is inserted into its hole located in the center. In this case, the motor is only a component of the gearmotor, on which, as we found out earlier, the speed and quality of raising and lowering the windows depends.
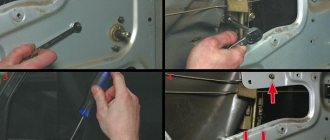
Installation of the lifting device is quite simple. It starts with disconnecting the battery. After this, use a curved screwdriver to unscrew 3 screws, unfasten the door trim latches and remove the door pocket. Using a thin screwdriver, pry off the handle (latch) of the window lifter - the tip of the tool is inserted into the recess between the latch and the socket.
The handle itself is removed. At the next stage, the car door opening handle is dismantled. To do this, use a screwdriver to pry the handle cover and remove it. Now use a screwdriver to remove the 2 fastening screws that were hidden by the cover plate. After this, the handle can be removed without much difficulty. Using a screwdriver, you can also remove the power window button, which serves to lock the door.
After removing 6 pistons, the trim covering the car mirror adjustment mechanism is also removed. As a result, it remains easy to dismantle the door trim. Armed with a 10mm wrench, unscrew the 2 bolts that hold the auto glass clips. Next, 2 nuts securing the lifting mechanism, nuts of the upper and lower fastenings, and 3 nuts securing the lifting mechanism are unscrewed in sequence.
Upon completion of the described stage, it is time to remove the lower guide pin of the lifting device from the door panel. To facilitate and simplify such an operation, the upper pin of the guide must be bent using a screwdriver. Now the entire lifting mechanism can be safely removed through the resulting opening in the door frame.
Many older models of the domestic automobile industry do not have a power window button. Technological progress is moving forward, and car enthusiasts are trying to improve their car. The article is devoted to the window lifting mechanism key: malfunctions and repairs.
Removing old window regulators
- Disconnect the negative connection to the battery or use the ground disconnect button.
- Next, carefully remove the door trim. It is fastened with plastic pistons, so there shouldn’t be any problems: just pry up the edge near the piston and pull. As a last resort, then replace the broken fasteners with new ones (they cost pennies).
- Before removing the window lifting mechanism, install the glass in a position in which there is free access to the mounting bolts through the technical hole of the door, and secure it with regular tape.
- Unscrew the bolts that secure the glass.
- At the bottom of the door, unscrew the guide nut.
- Near the window lifter handle, unscrew 3 more nuts. After this, you can remove the mechanism from the door cavity through the largest opening (pull it up).
Typical faults
Keys are used to control the power windows. Over time, it may fail. You need to know what malfunctions can occur and how you can fix them yourself.
Causes
The reasons why the power window key may not respond to pressing may be different:
- glass froze during severe frost;
- glass lift failure.
It is almost impossible to detect a breakdown without disassembling the window lifting mechanism. Therefore, you need to remove the casing and disassemble the mechanism.
Removing door trim
When removing each part, you should check it for integrity.
The main causes of breakdowns can be divided into two groups:
- Problems with the key's power supply.
- There may be situations where everything is fine electrically, but the power window switch still does not work.
Remedies
If problems arise due to the power supply, then first of all you should check the fuses. If they are in good condition, the next step is to carefully inspect the motor of the beet lifting mechanism and check what voltage is supplied to its terminals. The test can be done using a multimeter or a regular 12 V light bulb. If there is no voltage, you need to check the relay, wiring and control unit.
Removing the Switches from the Door
If the button works periodically (it works, then it gets stuck), the problem is most likely in the button itself. It is necessary to disassemble the window regulator, remove the button and clean the contacts if they are oxidized.
How does the power window control unit work?
The control unit is a set of switches (switches) installed in a convenient housing that provide centralized control of the window lifters. Some models have backlighting for one or more buttons. It supplies power to the window motors depending on the position of the control buttons. There are also power window control units that automatically open or close the window to a certain level. Most of these blocks use the principle of pulse width modulation. Despite the complex electronic circuit, the operating principle of this unit is similar to simpler devices - pressing the button supplies power to the window lift motor.
It consists of:
- connector;
- printed circuit board;
- button mechanism;
- backlight LEDs.
DIY repair
If after checking it turns out that the entire mechanism is working, then repair of the window lifter button is necessary (the author of the video is Nik86 auto-construction).
You need to know how to remove the power window button to repair it.
To disassemble you need to perform the following sequence of actions:
- First, the door panel is dismantled.
- Next, you need to disconnect the connector and unscrew the fastener that holds the key board.
- There are four contacts on the board. If they have oxidized, they should be carefully cleaned.
- When a key is pressed, it presses on a plastic pad, which in turn presses on its rubber shell. As a result of these actions, the contacts on the board are closed. It is also advisable to check the springs and each part for serviceability.
- Next, you should apply conductive glue to the surface of the rubber key shell in the place where the contacts and the printed part of the board come into contact.
- After waiting for the glue to dry, you need to reassemble in reverse order.
During repairs, it is important not to mix up the contacts when connecting switches.
Connection instructions
To connect the button of the mechanism that raises the glass, you will need a whole set of tools and materials. If the installation is carried out on several doors, then you will need the same number of kits as there are doors.
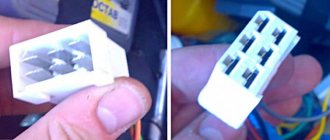
- female-male block having two contacts;
- connection connector;
- 2 male terminals;
- 2 large female terminals and 7 small terminals;
- beet lifting mechanism key;
- glass and key connector;
- 4 meters of wire with a cross section of 0.75;
- 7 pistons for the door.
Electrical connection diagram
If the key for raising the glass is installed directly in the door, then its installation will consist of the following steps:
- Before work, you should turn off the power to the car by removing the negative terminal from the battery.
- To access the glass lifting mechanism, the trim must be removed.
- The power window button is installed on the driver's door; you need to run wiring from it to those doors where the same keys will be installed.
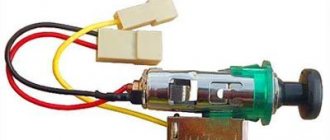
- There is a black and white 12 V wire on the power window relay. Connect 2 red 12 V wires to it.
- On the car door there are blue and gray wires connected to the window lift motor. The prepared wires need to be connected to the block connector: black and white to the blue wire, and black to the gray.
- There should be 5 wires connected to the button. The black wire is responsible for ground; red receives 12 V; black and white goes to blue; white — illumination of power window buttons; The black one is connected to the gray one from the block.
Switch connection pinout
It is necessary to connect wires with terminals using the following diagram:
- red 12-volt connects to hole #2;
- black and white (from blue) – hole No. 3;
- white (backlight) – hole No. 4;
- black (“ground”) - hole No. 5;
- black (from gray) - hole No. 6.
It is important to correctly connect all wires to the appropriate sockets of the connector, otherwise the control buttons will not work.
Then you need to take black and black-and-white wires of the appropriate length and insert the black one into socket No. 1, and the second into socket No. 2. The loose ends should be crimped using large female terminals and connected to the new connector. In this case, you need to make sure that the connected black and white wire is directed to blue, and the black wire is directed to black.
At this stage, the connection is considered complete. All that remains is to install the glass and the window lifter button, securing them with sealant in a specially made connector in the door trim.
Thus, you can connect the switches for raising the glass yourself, if you use the connection diagram and have experience in electrical work. This will give you the opportunity to improve your car without resorting to the help of a car service.
Sorry, there are no surveys available at this time.
Power rack-and-pinion windows
Connection diagram and pinout of VAZ power window button
Rack and pinion window lifters are considered one of the most “long-lasting” compared to others. Rack-type ESPs operate on the principle of transmitting rotational motion from an electric motor to gears, with its subsequent transformation into linear movement of racks that perform lifting. In addition to reliability, window lifts of this type lift windows much faster and quieter than cable counterparts.
But, like everything in this world, rack and pinion windows are not perfect and have their drawbacks. The main disadvantage is that the gears need lubrication; without it, they very soon begin to wear out, and the power windows themselves cease to function normally. The second drawback especially concerns those devices whose manufacturers decided to “save” on metal parts and gave preference to plastic. The fact is that this material is fragile and is noticeably inferior in strength to aluminum, as a result of which the service life of such ESPs is reduced. Among other things, the rack and pinion mechanism is more bulky, so they are installed mainly in “large” car doors.
Cable-type electric windows
The main advantage of cable window lifters is their high maintainability. In the event of a malfunction, you can easily repair the mechanism, and spare parts can be found in almost any auto store
This advantage, at first glance, is insignificant, but as practice shows, most motorists choose this type of ESP without paying attention to the disadvantages of the cable mechanism. The fact is that the cable wears out or stretches over time; in addition, due to the low strength of the plastic guides, they often fail, and the electric motor is very prone to overheating
Lever type electric windows
Lever-type ESP successfully combines compact dimensions and a high degree of reliability. In such power windows, the motor turns a gear, which transmits rotation to one or more levers. In turn, the levers move the plate on which the glass is mounted. The main disadvantage of this mechanism is the uneven speed of glass movement; the higher it is, the slower the lifting will occur.
As for glass, regardless of the type of mechanism, it moves along guide channels or special rails.
Impulse and non-impulse windows?
In addition to the type of lifting mechanism, ESPs are divided into pulsed and non-pulse. The former are capable of operating in pulsed as well as normal mode. By “normal” we mean that the power window operates only when you directly press and hold your finger on the control key. The term “pulse” means a short touch, after which the glass itself will completely lower or rise.
Pulse power windows are most often equipped with five-position control keys; the lever is set in neutral mode, from which there are two speeds of lifting up and down. By moving the slider up one position, the window lifter will operate in “normal” mode, and the glass will rise exactly as long as you hold your hand on the key. The second position will allow you to fully raise or completely lower the window.
Apr 14, 2015