The comfort of the driver and passengers of a passenger car in the cold season directly depends on the quality of the heater, and the VAZ 2107 is no exception. If the heating fails, you can forget about the normal temperature in the cabin; in addition, fogging and frosting of the windows threatens traffic safety. One of the main reasons for the failure of the heating system is the stove radiator, which does not provide normal heat exchange and does not warm up the incoming cold air.
Reasons for replacing the stove on a VAZ 2107
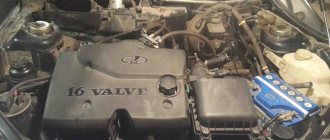
Many car problems occur with the arrival of cold weather, and this especially applies to cars from the domestic auto industry. One of the main problems is the inefficient operation of the heating system, as a result of which the windshield and side windows are poorly heated. VAZ 2107 owners quite often encounter a situation where in winter the car’s interior simply does not warm up. In this case, there is no need to talk about any comfort for passengers and the driver. To understand the reasons and eliminate a possible malfunction, you first need to understand the design of the “seven” heater.
The main elements of the VAZ 2107 stove are:
- radiator;
- tap;
- fan;
- control cables;
- air ducts
Parts of the heater and body ventilation of the VAZ 2107: 1 — lever of the air distribution cover;
2 — bracket for control levers; 3 — handles of heater control levers; 4 — air duct for heating the side window; 5 - flexible rods; 6 - heating air duct As the vehicle is used, certain malfunctions may occur with the stove, which reduce the efficiency of the unit or make its operation completely impossible. There are not many signs of major problems and they boil down to the following:
- heater leak;
- lack of heat or weak air heating.
As for the service life of the stove, it is inappropriate to give any figures. It all depends on the quality of the parts, the coolant used, as well as the frequency of operation of the car.
Radiator leak
If the heat exchanger is leaking, it won’t be difficult to detect. Coolant in the form of a puddle will be under the feet of the driver or passengers. However, you should not rush to conclusions and buy a new radiator to replace it. The leak may be associated not only with it, but also with leaky pipes or faucets. To do this, you need to get close to these elements and carefully examine them with good lighting. Having made sure that the problem is not in them, only the radiator remains. By the way, sometimes when a leak appears while the heater fan is running, the windshield fogs up and a characteristic smell of antifreeze appears. Having found out that the reason lies in the heat exchanger, it will need to be removed and then repaired or replaced with a new one.
If a radiator leaks, the part needs to be repaired or replaced.
The stove doesn't heat
If the engine is warm, the heater valve is open, but cold air is coming from the heating system, then most likely the radiator is clogged or there is a low level of antifreeze in the cooling system. To check the coolant level, just look at the level in the expansion tank or unscrew the main radiator cap with the engine off. If there are no problems with the level, then you need to deal with the heat exchanger, you may have to flush it or the entire cooling system. To avoid possible clogging of the heater radiator, you should not add various additives that eliminate small leaks. Such products can easily clog the stove tubes.
Cold air flow from the heating system can also be caused by air in the system. In this case, you will need to remove the air plug and add coolant.
Airing is the appearance of an air lock in the cooling system during repair work or when replacing the coolant.
The heater faucet may eventually fail as a result of scale formation.
In addition, the problem is possible with the faucet itself, which over time may become clogged or scale may form if water is used instead of antifreeze. If there is a problem with the tap, the part is disassembled and cleaned or simply replaced. Another, although rare, but possible cause of a cold stove, may be pump failure. In this case, the engine warms up, but the pipes going to the heater radiator remain cold. In this case, the water pump must be repaired immediately. Warm air may also not enter the cabin due to problems with the heater fan. The problem may be with the motor itself or its power circuit, for example, if a fuse blows.
In what cases is it necessary to replace the heater radiator?
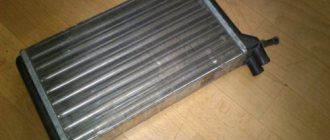
The radiator itself is a simple device from a technical point of view. It consists of a system of tubes through which the coolant moves, equipped with thin lamellas. It would seem that there is nothing to break here. However, radiators fail very often. There are only two reasons here:
- leakage due to drying out, corrosion or mechanical damage;
- obstruction resulting from sedimentation of oxidation products on the tubes or “clogging” with various debris or the same products of oxidative processes.
If you can try to combat the latter reason by flushing the radiator with chemical reagents, which does not always help, and not for long, then if a leak occurs, the only correct solution is to replace the radiator with a new one.
You can, of course, try to correct the situation by soldering the leak, but this option is only suitable for copper-brass radiator models. And no one will give you a guarantee that symptoms will not appear in the near future.
Do you need to bother with repairing the heater radiator if it is not that expensive, and you don’t have to go to a service station to replace it?
How to change the stove in a VAZ 2107
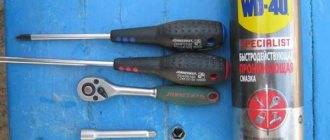
Having found out that the heater needs repair, it will require complete or partial dismantling. If there is a problem with the motor, then it is enough to remove the lower part of the assembly. If there is a problem with the radiator, you must first drain the coolant from the engine cooling system. To carry out repair work you will need the following tools:
- Phillips and flathead screwdrivers;
- set of open-end and socket wrenches.
To replace the stove you will need a set of keys and screwdrivers
Heater removal
After the coolant has drained and the necessary tools have been prepared, you can begin disassembly. It is carried out in the following order:
- Remove the negative terminal from the battery.
- In the engine compartment, loosen the two clamps that secure the hoses to the heater pipes. When the hoses are pulled together, a small amount of antifreeze will leak out.
Unscrew the clamps and pull the hoses off the radiator tubes - Unscrew the screws and remove the rubber seal.
Unscrew the screws and remove the rubber seal - We move into the cabin, unscrew the fastening of the shelf under the glove compartment and remove it.
To remove the shelf located under the glove compartment, unscrew the fasteners in the form of screws - Remove the panel with the clock and cigarette lighter by unscrewing the screws on the right, left and bottom.
To remove the panel with the clock and cigarette lighter, you will need to unscrew the corresponding screws - Disconnect the wires from the cigarette lighter and the clock, and then move the panel to the side.
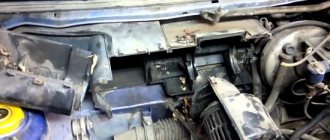
Disconnect the wires from the cigarette lighter and clock - We dismantle the internal cavity of the glove compartment in order to move the right air duct aside and provide access to the heater valve. The left air duct is also dismantled (when the stove is completely removed).
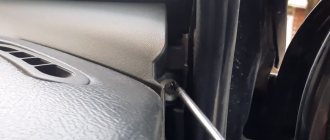
It is necessary to disconnect the right and left air ducts from the heater - Using a 7 key, unscrew the bolt that secures the crane control cable.
Using a 7 key, unscrew the cable fastener - To partially disassemble the stove, you will need to dismantle the lower part of the housing. To do this, use a screwdriver to pry up the metal latches (2 on the right and 2 on the left).
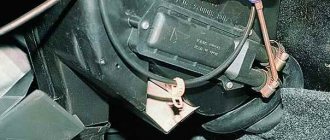
To remove the lower part of the heater you will need to pry off 4 latches with a screwdriver - After removing the latches, pull the lower part towards you and gain access to the motor. If repair or replacement work is required for this unit, we will carry it out.
After dismantling the lower part, access to the heater fan opens - To dismantle the radiator, we take it out of the housing along with the tap.
To remove the radiator, simply pull it towards you. - To completely dismantle the stove, remove the upper part of the body, which is secured with four 10mm wrench bolts.
To completely remove the stove, you need to unscrew 4 10mm wrench bolts. - We unscrew the 2 bolts securing the heater control bracket and loosen the screws that hold the rod mounting brackets.
- We remove the remaining part of the stove.
When the fasteners are unscrewed, remove the upper part of the stove body
Selecting a new heater radiator
Buying a stove radiator today is not at all a problem. Automotive markets and spare parts stores are overflowing with such products, but making the right choice is not always easy. It's all about the manufacturer and price.
The cheapest radiator from an unknown manufacturer, also made from an unknown alloy, will cost you a maximum of 500 rubles. Naturally, no one will give a guarantee for several years of its productive operation. At the same time, you can buy a high-quality heat exchanger made of copper-brass alloy with a guarantee, at a price of about 3,000 rubles.
There are also compromise options that involve fairly high-quality products from well-known manufacturers at reasonable prices. Below is a table indicating the models of VAZ 2107 heater radiators from trusted manufacturers.
| Manufacturer | Catalog number | Factory number | Material of manufacture |
| DAAZ | 21050-8101060-00 | Aluminum | |
| AVTOVAZ | 21050810106000 | 21050810106000 | Aluminum |
| Hola | RH372 | LRh-0106 | Copper |
| LUZAR | 2105-8101050 | Aluminum | |
| AURORA | 2105-8101050 | HR-LA2105 | Aluminum |
| AT | 2105-8101050 | AT 1050-005RA | Aluminum |
| Extra (Hungary) | 2105-8101050 | 2105-8101050 | Aluminum |
| Alaska | 2105-8101050 | 2105-81001050 | Aluminum |
| AMZ | 2105-8101050 | PAC-OT2105 | Aluminum |
| BAKER | 2105-8101060 | Aluminum | |
| SHAAZ | 2101-8101060-02 (three-row) | Copper | |
| SB OR | 2101-8101060 | Copper | |
| Bautler | BTL-0006H | Aluminum | |
| Master-Sport | 2105-8101050-PCS-MS | Aluminum | |
| OAT | 21050-8101060-00 | Aluminum | |
| Finord (Finland) | FN2215 | Aluminum | |
| Oberkraft (Germany) | 2105-8101060 | Aluminum | |
| Fenox (Belarus) | RO0003O7 | Aluminum |
Let's sum it up
Even a novice driver can handle replacing the stove on a 7 on his own, the main thing is the desire to work for a positive result. Carry out regular preventive diagnostics of your car's heating system at least once a year, before the onset of cold weather. This will provide you with comfort in the car at any time of the year.
Sources
- https://avto-idea.ru/sovety/pechka-vaz-2107-ustroystvo-rabota-osnovnye-neispravnosti/
- https://avtocity365.ru/ustrojstvo-i-ekspluatatsiya-avtomobilya/remont-radiatora-vaz-2107/
- https://7road.ru/drugoe/radiator-pechki-2107-razmery.html
- https://avto-idea.ru/remont/vaz-2107-remont-pechki-svoimi-rukami-zamena-pechki-vaz-2107/
- https://ladaautos.ru/vaz-2107/kak-pravilno-razobrat-pechku-na-vaz-2107.html
- https://bumper.guru/klassicheskie-modeli-vaz/sistema-ohdazhdeniya/pechka-vaz-2107.html
- https://7-vaz.ru/remont/kak-zamenit-radiator-pechki-na-vaz-2107.html
- https://akki-carsh.ru/dvigatel/otopitel-vaz-2107.html
- https://remam.ru/vozdsys/zamena-pechki-vaz-2107.html
Principle of operation
The heating system works simply - to ensure air heating, the driver uses the upper slider to open the antifreeze supply valve to the heater radiator. If the air supply damper is open (the middle slider is in the extreme right position), then the air flow through the box that separates the moisture and the damper enters the stove body. Passing through the radiator, the air heats up, and then moves depending on the location of the remaining dampers.
If the lower slider is moved to the right, then the heated air will go to the windshield area, and if it is positioned to the left, it will go to the center of the cabin and to the side windows. To supply heated air to the feet, the driver needs to lower the lower damper lever down.
When driving at high speeds, the air flow through the air intakes moves intensively, so it is not necessary to turn on the fan. But if the movement speed is not enough, the fan creates forced circulation.
Using dampers and a fan, the driver controls the stove - sets the speed of air movement, the degree of its heating and the area of distribution.
Preparing the car
Before starting the radiator replacement procedure, it is necessary to drain the coolant from the system. To do this, you need to warm up the engine (so the liquid drains faster) and install the car in any convenient way so that you can get to the drain plug (on an inspection hole, overpass, etc.). After this, open the caps of the cooling radiator and expansion tank.
Climbing under the car, we find the coolant drain plug on the cylinder block. Do not confuse it with the oil drain plug located on the oil pan! Having substituted a previously prepared container, unscrew the cap with a key set to “17” and wait until all the liquid has drained. This may take from 2 to 5 minutes. After this, the plug can be wrapped.
Now you can begin the procedure for replacing the stove radiator.
What will you need?
You will need quite standard tools for this work. Be sure to prepare screwdrivers (phillips and slotted). You will also need several keys. It is advisable to stock up on rags and containers for collecting coolant. If you are sure that the radiator is damaged, then you should buy it in advance. On sale you can find 2 types of heater radiators for classics. One of them is copper, which is now quite difficult to find. But such radiators have better heat transfer, which has a positive effect on interior comfort. Such heaters fail relatively quickly.
Aluminum radiators are more reliable. But, they cope somewhat worse with heat transfer. If the problem is related to a lack of warm air supply, then most likely there is a problem with the faucet. It often becomes clogged with deposits, and accordingly ceases to cope with its responsibilities. In such a case, it is easiest to replace it.
Fault signal
Before thinking about how to change a radiator with your own hands, a motorist should be aware of the signs that indicate an existing malfunction.
First of all, you need to pay attention to the presence of obvious fluid leaks. You can notice this by the puddle of antifreeze that will regularly appear under the driver’s feet.
The second sign may be cold air blowing from the heater, which is especially noticeable during the cold season.
Most often, the first problem entails an inevitable replacement of the radiator, if the second can only be corrected by replacing the faucet.