Unscrew a few bolts
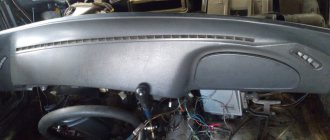
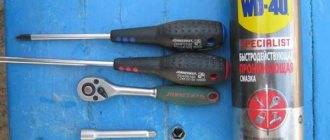
We unscrew the bolts on the passenger side, the first two bolts must be unscrewed with a screwdriver (they hold the dashboard itself directly), and the third bolt with an “8″ wrench or a socket head (this will be much more convenient. And the fourth is located on the driver’s side in the same place, as well as the third bolt. They hold, so to speak, BRAINS))).
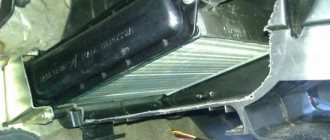
After the bolts are unscrewed, the dashboard will have free play, which will allow you to move the dashboard and get to the radiator itself.
Drain the ANTIFREEZE / ANTIFREEZE
We unscrew the bolt, but before doing this, do not forget to place a container underneath into which the liquid will be drained. It is worth unscrewing a little at a time, gradually draining the liquid, and when the bulk is drained, you can unscrew the cap of the expansion tank. But you shouldn’t do this right away, as the pressure will be strong and the liquid will spill with a 99% chance.
Unscrew the pipes
After draining the liquid from the system, you need to unscrew the pipes leading to the radiator. Be careful, there may be liquid left in the radiator.
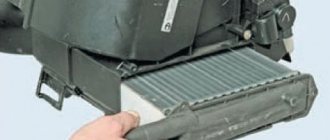
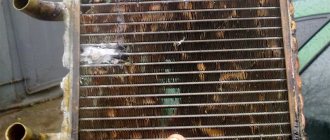
Then we unscrew the three screws that hold the radiator itself and pull it out.
Don't forget to clean the inside of the stove from leaves and other debris. Then we install a new radiator and reassemble in the reverse order.
This method helped me save a lot of time and did not require complete disassembly of the dashboard, which is good news.
Useful tips
I would also like to give some useful tips on how to extend the life of your heater radiator.
- Don't skimp on coolant. Cheap coolant is the main cause of problems with the heater core.
- Check the coolant level regularly. This will not only help identify its leak, but will also protect the engine from overheating.
- In the summer, open the heater tap at least once a month to allow coolant to flow into the radiator. This solution will prevent the faucet shut-off mechanism from souring, and will also allow the radiator not to “dry out”.
- When replacing coolant, be sure to flush the system with a special fluid. This will slow down the scale deposition process.
- Having identified problems with the system, do not delay repairs.
Inconvenient design solutions
VAZ-2114 and 2115 cars are quite modern and quite popular cars in the economy segment.
But these cars, like most new models, have a not very pleasant feature.
By increasing the comfort of the interior and the layout of the front panel, designers significantly complicate the maintenance of the heating system.
The heater radiator in these cars is hidden deep under the panel and is not so easy to get to.
But the heating radiator is a rather vulnerable element of the cooling system. And if the interior heating has deteriorated, in more than half of the cases the problems are related to the heat exchanger.
And all this despite the fact that the element itself is practically not repaired and is often simply replaced.
Diagnostics of the operation of the VAZ 2114 stove cables
In order to inspect the valve cable of the VAZ 2114 stove, you need to dismantle the side panel trim on the driver's side (to the right of the gas pedal). Further details:
- Start and warm up the car engine thoroughly.
- Unscrew the three side trim mounting bolts.
- Turn your gaze towards the heater valve.
- Check to see if the cable has come loose from the faucet.
- Move the heater lever on the instrument panel to maximum heating mode.
- Pull the cable towards you and hold it in this position
- Check if hot air is coming from the deflectors.
Now that the source of the problem has been identified. It is required to fix, give constant tension and thereby ensure good operation and correct throughput.
One of the options for increasing the tension is a method in which a part (0.5-1 centimeter) of the cable is bent at the point of direct connection to the heater lever. To do this you will need:
- Remove the second trim, only from the passenger seat side.
- Take pliers and pull the cable towards you (at this moment, the temperature switch should be at maximum heating mode).
- Bend the additional amount of cable formed (its amount is selected experimentally, and in each specific case it differs and, as a rule, amounts to 0.5 centimeters).
- We hook it up to the temperature switch of the stove.
Attention! To avoid damage, perform all tension-related actions carefully and do not use excessive force. If you overdo it with tension, you can damage the system and the functionality of the heating system.
Main reasons for replacement
There are not many reasons why it may be necessary to replace the radiator of an internal heating system. One of them is the aspect of loss.
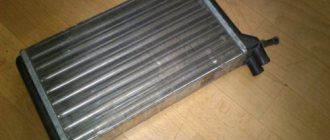
Heat exchangers are made of non-ferrous metals: copper or aluminum.
Gradually, these metals oxidize under the influence of the liquid, which leads to the appearance of cracks through which the coolant escapes.
The second reason for replacing a stove radiator is that the pipes are clogged with contaminants. The coolant, circulating through the cooling system, washes away corrosion products, small particles, etc.
In addition, the liquid cannot contain them on its own, and these contaminants are deposited on surfaces, including the furnace radiator.
As a result, first the heating system loses its efficiency, and later (in case of severe contamination) it simply stops working.
In some cases, radiator blocks can be removed by washing them with chemicals.
But if the pipe blockage is severe, then the dirt plugs can only be removed mechanically. And this can only be done with the radiator removed.
Before you start disassembling, you should first make sure that the problems are with the radiator.
Therefore, the loss of this element is manifested by the appearance of traces of antifreeze on the interior floor.
But the same result can be caused by damage to the radiator pipes or loss of tightness at their connection to the heat exchanger.
A drop in heating efficiency can occur not only due to clogged radiator pipes, but also due to severe clogging of its honeycombs.
Dust, fluff, leaves, and insect remains get clogged between the cooling fins, so the transfer of heat to the air is difficult.
But in this case, identifying the problem is very simple - turn on the stove fan at full power and check the air flow from the deflectors.
If it is not strong, the radiator must be cleaned, which also cannot be done effectively without removing the element.
Also, the stove may stop heating due to radiator ventilation, which often happens when the coolant is changed. Often the cause is also a malfunction of the cooling system elements, especially the thermostat.
In general, before removing the heater radiator, you need to make sure that the cause of poor interior heating is hidden. And for this you will have to almost completely check the cooling system.
VESKO-TRANS.RU
AutoNews / Reviews / Tests
Replacing the Radiator of the VAZ 2115 Heater Video
Replacing a VAZ-2115 stove radiator without removing the panel
With the onset of the first cold weather, every decent motorist should pay enough attention to the heating system of his car. Especially when it comes to Russian-made cars. Daewoo Nexia. a very popular model for replacing the Niva radiator plate. There is no desire to say anything unpleasant about our automobile industry, but it often happens that our cars begin to act up before winter.
Methods for replacing a radiator
There are two ways to remove the heater radiator on a VAZ-2113, 2114, 2115. The first involves completely removing the front panel, which is necessary to access the heat exchanger.
Please note that complete disassembly is a relative concept, since the panel itself is not removed from the car, but is only separated from the body, which allows it to be moved and thus brought closer to the radiator.
You will also need to move the torpedo itself.
The second method is without removing the panel. But it is not suitable for everyone, since to provide access it is necessary to make cuts in some places so that the lower part of the panel in the area where the heat exchanger is located can be bent.
The disadvantage of the first method is the laboriousness of the work, since you will have to unscrew many fasteners and disconnect the wiring, which is quite suitable for the panel.
As for the second method, the panel itself will essentially be damaged, although it will be cut in places hidden from view.
Additionally, once the replacement is complete, you will need to think about how to reattach and secure the cut pieces.
But since the stove radiator can leak at any time, ease of access is very important, so the second method is preferable.
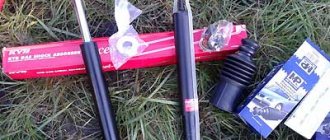
Selecting a replacement radiator
But before you begin the removal and replacement operation, you must first select a new heat exchanger.
You can purchase a factory heater radiator, catalog number 2108-8101060. But similar products DAAZ, Luzar, Fenox, Weber, Termal are quite suitable.”
As for the material, it is recommended to use copper heat exchangers, but they are much more expensive than aluminum ones. Although it is not for everyone, many people use aluminum products and are quite satisfied.
In general, the main thing is that the radiator is designed specifically for these cars.
On the VAZ-2113, 2114 and 2115 models, the designers used the same front panel design, so the procedure for replacing them is the same.
Next, we will look at how to remove the radiator of the internal heating system using the example of a VAZ-2114 and how this is done in different ways.
CABIN FILTER
One of the reasons why the heater in the interior of a VAZ 2114 stops heating the air normally is that the heating system is clogged with various debris and dirt. To prevent the entry of dirt and dust, a cabin filter is used; it is located between the engine compartment and the upper part of the heater housing. To replace it, you need to open the hood and find the filter protective housing; it is located just below the windshield, approximately in the center of the wiper panel. Changing an element is easy - just remove the old one with your own hands and install a new one. A cabin filter adapter has been developed especially for VAZ models (2108-2115); this design allows the installation of a modern type filter element. Replacing the element every 10 thousand kilometers will keep the heating system parts clean.
Replace without removing the panel
But no matter what method is used, the coolant must first be drained from the system. Therefore, you will need to stock up on antifreeze in the required quantity in advance.
First, let's look at a replacement method without removing the panel. As already mentioned, for this you will have to make cuts here and there.
To complete the work you will need:
- Set of screwdrivers of different lengths;
- Rags.
- Metal cloth;
- Flat container for draining remaining coolant from the radiator;
Having prepared everything and drained the coolant from the cooling system, you can start working:
- Remove the glove box (glove compartment) from the panel, for which you need to unscrew the 6 screws that secure it;
- Remove the side trims on the center console;
- Using a metal cloth, we make the necessary cuts: the first vertical cut is made on the inner wall of the panel near the center console (behind the metal strip of the glove compartment). And here you need to make two cuts.
The second cut is horizontal, running at the top of the rear wall of the opening under the glove box.
The third is also vertical, but not through. Performed on the right on the back wall of the lower shelf of the panel;
- After all the cuts, part of the panel along with the wall can be folded back to gain access to the radiator. We fold this part and fix it;
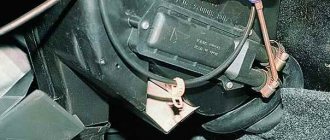
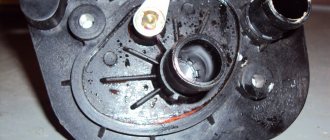
- We unscrew the nearest bracket for fastening the heating system hatch control cable and move the cable to the side;
- We loosen the clamps of the coolant supply pipes to the radiator. In this case, it is necessary to replace the prepared container under the connection points, since liquid leaks from the heat exchanger. We remove the pipes;
- We unscrew the three screws securing the radiator, remove it and immediately inspect it.
Then we replace the heat exchanger, fix it in the socket, connect the pipes to it and fix it with clamps. To make the tubes easy to insert, lubricate them with soap.
At this stage of operation, the cooling system must be filled with liquid and expelled to remove air pockets.
After this, it remains to make sure that the joints of the pipes with the radiator do not leak, and that the damper and tap are connected without errors.
After this, all that remains is to return the cut out part of the panel to its place and secure it. For this you can use screws and plates.
The main thing is to secure it in several places so that the cut part does not move when moved. Use sealant or silicone.
This method is convenient because when you replace the radiator again (which is quite possible), it will be very easy to do all the work - just remove the storage box and unscrew a few screws.
In addition, all the cuts are made in such places that after assembling the panel and installing the glove compartment, they will not be noticeable.
How to replace the thresholds of a VAZ 2109 with your own hands
If a significant part of the thresholds is damaged by corrosion, then there are no options other than completely replacing these body elements. To carry out repair work you will need the following list of tools and materials:
- semi-automatic welding machine;
- new thresholds;
- Bulgarian;
- drill;
- sandpaper;
- putty and primer;
- anti-corrosion compound (mastic).
Features of replacement and preparation for it
When planning body repairs, you need to understand that the design of the VAZ 2109 thresholds consists of the following elements:
- outer box;
- inner box;
- amplifier
The outer and inner boxes are the outer walls of the threshold. The outer element goes outside and is located under the door, and the inner one is located in the cabin. The amplifier is an element located between two boxes inside. Most often, the outer frame is subject to corrosion, and when replacing thresholds, this particular body part is in mind.
Even though new parts are used when replacing thresholds, they still require preparation. From the factory they are covered with shipping primer, which must be cleaned before installation, i.e. the metal must shine. This is done using sandpaper or grinder attachments. After cleaning, the elements are degreased and coated with epoxy primer.
The final preparation of the thresholds comes down to drilling holes with a diameter of 5–7 mm for welding in the places where the parts adhere to the body.
Preparatory procedures also include the dismantling of doors, aluminum sill trims and interior elements (seats, floor covering, etc.). Before the immediate start of work on removing the old thresholds, a metal corner is welded to the racks from inside the cabin. It will provide rigidity to the body and prevent it from deforming after cutting off the thresholds.
Step-by-step replacement instructions
Having prepared everything you need, you can begin the repair. The procedure consists of the following steps:
- Place the new threshold on top of the old one and outline it with a marker.