Replacing the heater radiator on a Priora without and with air conditioning. This is AvtoVAZ
Replacing the heater radiator on a Priora without and with air conditioning
Can be done by drivers who know how to handle the tool and are not afraid to perform such operations. The interior heating system of this car has a number of its own features that need to be taken into account when carrying out such repairs. To carry out such repairs when it is very cold outside, therefore you should pay more attention to the timely maintenance of this system in order to avoid such troubles.
A car of this brand is equipped with a liquid-based stove, which is combined with the cooling system of the power unit. It includes:
- The heat exchange device is represented by a radiator, through which the external air entering the cabin is heated;
Damper that regulates the flow of incoming cold air;
- Dampers that regulate and distribute the flow of incoming warm air into the cabin.
Replacing the heater radiator on a Lada Priora
If the stove on your Lada Priora starts blowing cold air instead of hot air, you should pay attention to the heater radiator. There are already discussions on our website about why the stove on a Priora does not work, but we still decided to publish additional material on replacing the heater radiator with our own hands.
Features of the design of the stove on the Lada Priora
Main elements of the heater:
– heater heat exchanger (radiator), designed to heat the air entering the passenger compartment with the heat of the engine cooling liquid; – an electrically driven fan (supercharger), providing a controlled supply of outside air to the heater dampers; – a damper for the air temperature regulator coming from the heater into the passenger compartment, the position of which determines the amount of air passing through the heat exchanger of the heater, and the amount of outside air passing bypassing the heat exchanger; – air heating distributor dampers 4, which distribute the air entering the cabin from the heater through air ducts 2, 6, 8 and 9 or for blowing the windshield.
If antifreeze or antifreeze is leaking from the stove, then the radiator is leaking and requires replacement.
Let us recall that in the previous article we looked at how to replace a Priora heater fan with your own hands.
Replacing the stove (heater) radiator on a Priora
– drain the antifreeze. – remove the heater. - Prepare a Phillips screwdriver.
Video. How to remove the stove on a Lada Priora
Replacing the heater on a Priora with your own hands:
1. First of all, you need to unscrew the 3 screws that hold the heater radiator.
2. Then remove the radiator from the stove body.
Installing the stove radiator will be done in the reverse order; this requires a little sleight of hand. I spent about 50 minutes on this operation.
Problems with the damper gear motor or fan motor
A common malfunction on a Lada Priora car is that the heater does not work. No air blowing at all.
First, you should make sure that the heater motor is working - at least cold air should be blowing from the deflectors. If not, then you need to check the integrity of fuse F9.
If it is intact, it means the stove fan is not working. "Priora" is equipped with a "ten" fan. Therefore, removing it exactly repeats the procedure on the “ten”. In some cases, the fan does not spin because leaves or other foreign objects have gotten between the impeller and its housing, which can block rotation. In this case, you can hear a characteristic hum.
How to replace the radiator of a Priora stove without air conditioning
In winter, as you know, car enthusiasts turn on the stove to avoid freezing.
Its normal operation ensures a comfortable temperature inside the car, and this, in turn, is the key to safe driving. However, there are times when this unit stops supplying warm air. The reasons can be very different, for example, problems with the radiator. Many people, including owners of Lada Priora, both equipped with air conditioning and without it, encounter malfunctions of this kind. In some cases, it will only take a minute to fix the problem because you just need to replace the blown fuse. But there are situations when more serious repair work, such as replacing a radiator, cannot be avoided. However, there is nothing particularly complicated here. Everything can be done with your own hands - you just need the appropriate desire and a little time.
How to replace a Lada Priora radiator heater without air conditioning
First of all, let's look at the main elements of the VAZ-2170 heating system. They are, in particular:
The scheme is, in principle, traditional, and there are no particularly complex technical delights here. If you notice that warm air is not flowing into the cabin while the heater is on, you should inspect the entire system. If a radiator leak is detected, the latter will have to be removed either in order to be soldered, or to be replaced with a new one. Let's look at how this procedure can be done with your own hands on a Priora without air conditioning.
The first thing that is recommended to do before starting the main work is to remove the negative terminal from the battery.
Do not neglect this advice, because it is, firstly, about your safety, and secondly, it is additional insurance against a number of different unpleasant surprises with wiring and electrical equipment.
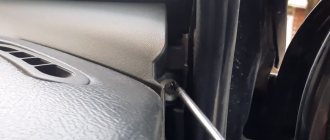
After the car is de-energized, you can remove the windshield trim. It will also be necessary to dismantle the wiper arms, since they will create additional inconvenience during operation. Together with them, we also disconnect the plastic tubes through which liquid from the windshield washer reservoir is supplied to the nozzles. Now you can proceed to removing the decorative trim of the windshield. This is not difficult to do - it is attached using 7 self-tapping screws, respectively, they should be unscrewed.
First you will need to remove the hood seal. Please note that in the middle of the pad there is a screw with which the halves are pulled together. After this, use a screwdriver or knife to carefully pry up the plugs covering the screws and unscrew them. That's it - the cover can be removed.
If everything went well, then you can move on. At this stage, you should remove the sound insulation from the engine compartment. To do this, unscrew the screws with which it is actually attached, and then remove the lining, left and right (the order does not matter). After this, you can move on to the pipes leading directly to the radiator. In order to remove them, you will first need to loosen the retaining clamps. Place a container to drain the coolant first.
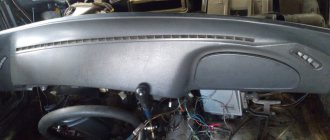
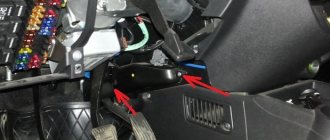
Now you can remove all the wires that lead to the heater from the connectors. Having disconnected them, take two keys - 10 and 8 - and unscrew the 4 nuts. The wiring harness should be moved to the side so that it does not interfere, after first removing the holder. After this, we move into the car interior and take a socket wrench size 13. With its help, remove the bracket from the brake pedal, and
move it to the side. That's all - you have free access to the heater radiator. In order to remove it, you need to unscrew 3 screws using a Phillips screwdriver, after which the unit can be easily removed. All work on installing the radiator is carried out in reverse order.
We eliminate other problems
This problem has been sorted out, but it is not the only reason why the heat from the stove does not reach the feet. When the valve is in the "legs only" position, not the entire channel is blocked. There remains a space through which heat moves towards the windshield. To correct this situation, you can build a curtain from PCB that will be placed above the damper. Here the work is also completed, all that remains is to deal with the air ducts.
Passengers who will be seated in the rear seat should also experience a comfortable ride. And cold feet have nothing to do with comfortable conditions. To correct the situation with heat supply to the rear of the cabin, the best option would be to install a separate air duct. This will require corrugated sleeves.
Heating the feet of people sitting in front will be more effective if decorative grilles are cut out. This decision will not have the best effect on the aesthetics of the interior, but the issue with heating the legs will be resolved in a better way. Don’t forget about the cabin filter, which, when clogged, impairs the efficiency of the heating system.
Replacing the radiator of a heating device in a Lada Priora car
Almost every motorist who owns a domestic vehicle discovers a malfunction of the car’s heating unit in the winter. After all, only with the onset of severe cold does a person begin to think about how to avoid freezing while driving a car. Naturally, everyone uses a stove for this. However, what should those for whom this very device has ceased to function properly do? After all, only the heater can ensure that the cabin maintains a normal temperature, allowing for comfortable movement. In this article we will look at only one reason why the heating device stops working, we will learn about the principles of repairing and replacing the heater radiator installed in a Lada Priora car.
If the motorist is sure that it is necessary to replace the heater core, it may take a lot of time to eliminate the faulty object, since most likely, in the process it will be necessary to replace not just a blown fuse, but to carry out more serious repair work. True, you should not immediately despair because of your ignorance; the material contains detailed instructions to help everyone understand how to replace the stove radiator in a Priora with and without air conditioning.
Replacing the radiator of a heating unit in a Priora that is not equipped with air conditioning
Replacing the heater radiator on a Priora without air conditioning may make sense if warm air has stopped flowing into the cabin, while the heater itself is working. If, in addition to the above problem, there is also a water leak from under the Priora stove, the motorist will have to remove the poorly functioning unit in order to solder the latter. Sometimes repairs are impractical and you have to replace the old device with a new one.
So, first of all, you need to start by removing the negative terminal from the battery. The fact is that the issue here is not only about the safety of the master himself, but also about additional insurance, which allows him to avoid several unpleasant surprises that, if handled carelessly, can arise not only with wiring, but also with electrical equipment.
If you are replacing the heater radiator on a Priora without air conditioning, after de-energizing the system, you can begin to dismantle the windshield trim. At the same time, the wiper levers, which can cause future discomfort during operation, should also be removed. After this, you should rid the unit of all plastic tubes through which the liquid located in the windshield washer reservoir goes directly to the nozzles. Only after all the above steps have been completed will it be possible to remove the decorative trim located along the edges of the windshield. In fact, it’s easy to carry out such a manipulation - just get rid of seven self-tapping screws.
Replacing the heater radiator on a Priora can only be done after removing the hood seal. Before dismantling, it should be noted that in the middle of the lining there is a screw that tightens both halves of the structure. Using a screwdriver or any knife, you can gently lift the plugs (this element serves as the “cover” of the screw) and unscrew them.
After this, you can begin to remove the sound insulation, which is located in the power unit compartment. To do everything correctly, you will have to unscrew the screws and remove the pads (there is no clear rule about which of them to remove first: left or right). Then you should get rid of the pipes that go directly to the radiator. A person who wants to understand how to get to the heater radiator on a Priora must loosen the clamps holding the structure itself.
After this, you can remove all the wires going directly to the stove from the connectors. You can remove them using two keys, in particular, one “10” and the other “8”. After unscrewing all four nuts, move the wiring harness to the side, which is held by the holder. The “13” key will help to dismantle the bracket located on the brake pedal. Only after this can you begin to remove the heater radiator on a Priora that does not have air conditioning. A regular Phillips screwdriver will help you dismantle the device, allowing you to remove 3 screws. All the rest of the work consists of installing a new unit and reassembling the system in the reverse order of the described actions.
In fact, there is another way to replace the system element of interest. To open free access to this element, dismantling not the stove body, but the vacuum brake booster will help. It is worth noting that this procedure will only be successful if the brake pedal is removed along with it. Such actions help to get closer directly to the left side of the stove and the desired device.
Priora heater
Lada Priora is a product of the domestic automobile industry. This car has earned people's love for its low cost, good quality, and the availability of parts when repairs are needed.
Despite good reviews from owners, the car is not without a number of shortcomings. For example, it happens that the Priora stove only works at speed 4. You can go to a service station to find out why the Priora stove switch is not working.
But you can wait for your turn for several days, and the problem needs to be solved as quickly as possible. If you are familiar with the device of the tenth model, then you can easily figure out the heating system on the Priora.
There may be several reasons why the temperature of the Priora stove is not regulated. Let's look at what these reasons are:. Before you begin troubleshooting the heating of the furnace, it is necessary to eliminate the impact of breakdowns of the cooling system and engine. Only then can you begin to figure out why the stove mode switch on the Priora does not work.
To do this, we check the antifreeze level and engine operation. First step: look into the expansion tank and determine the coolant level. Then turn on the engine and warm it up for a while. This will allow you to determine whether the thermostat is functioning correctly. If you find that the top pipe is hot, this indicates that the device is functioning normally. A cold pipe is a sign that the thermostat is not working properly and you will need to replace it.
This part is inexpensive, so replacement will be easy. A loose expansion tank cap is another reason why the engine remains cold. Because of this, the Priora stove switch may not work. The cooling system of Lada Priora is slightly different from the tenth model; it practically does not create an air lock. It can be caused by incomplete system insulation or antifreeze poured into an empty expansion tank.
Solving the problem is not difficult. Remove the reservoir cap, stand on a hill with your front wheels and accelerate. Often the heater regulator on a Priora does not work due to the fact that a large amount of dust or other small dirt particles has entered the heat exchanger. Over time, contaminants get inside heating devices.
This cannot but affect the performance of the entire system. Air masses do not warm up well. You may note that the oven only works in position 4. In case of contamination, you can simply replace the entire radiator. You need to remove the device from the power unit side. Do not forget to first drain the antifreeze from the cooling system, disconnect the windshield wipers and wires, dismantle the fan completely and remove the entire radiator by removing the pipes leading to it.
There is not only the problem that the Priora stove operates only at maximum, but also the complete absence of air jets from the heating system. The first step is to make sure that the radiator is working in principle. Place your hand and note whether any streams of air are blown out. Even cold air masses indicate that the system is operating. If the fuse stops, it means the furnace fan is broken.
One possible reason for the fan not spinning could be small leaves or other small objects that have gotten into the fan. This will be confirmed by a hum. If necessary, you can remove the fan on the Lada Priora using the same procedure as on the tenth model.
Replacing the fan will solve the problem. A breakdown of the gearmotor on a Lada Priora can lead to the damper not operating, which will prevent hot air jets from entering the cabin.
You can get to the gearmotor through the hood. If the problem is not with the damper, then most likely the stove is not working due to the contacts being oxidized. Simply clean them with sandpaper. Often, replacing the filter can help solve the problem of weak air mass flows - when dirty, it becomes an obstacle to the passage of warm air. And then, even at high speed, the air flow can be too weak.
You can also repair the rheostat of a Priora stove with air conditioning yourself. It is enough to replace the thermal fuse. This is precisely what a clogged filter affects. The thermal fuse overheats and fails; it only works at the maximum position. If the Priora stove only works in position 4, then this may indicate that the rheostat has burned out. The same problem can lead to the heating system operating exclusively in the first position.
Additional resistance causes the stove to work worse and slower. You will note that the Priora stove switch does not work. Many passenger cars of the domestic automobile industry have a similar resistor block to the Lada Priora.
Installation of a new radiator in a Lada Priora with air conditioning
Replacing the heater radiator in a Priora car with air conditioning is a fairly simple process. The latter unit appeared only in newer cars, in particular, Priors began to be equipped with a HALLA or Panasonic climate control system. Thanks to the new component, you can replace any part of a non-working stove only by dismantling the frill, getting rid of the windshield wipers, the stove itself or the vacuum brake booster.
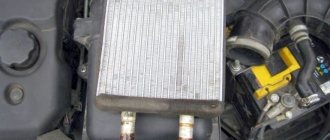
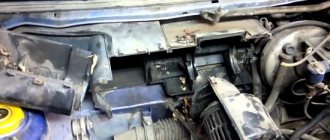
If a motorist wants to understand how to remove the heater radiator on a Priora with air conditioning, he must start by removing the sound insulation located in the engine panel. After this, you should dismantle the power unit air filter hose and remove the seal, which is located near the radiator hoses. Then you should drain the coolant and lift the radiator up towards the mechanic.
Replacing the Lada Priora heater valve (VAZ Priora)
Antifreeze or antifreeze - make the right choice. The heater heater valve on VAZ, VAZ, VAZ, VAZ, VAZ cars should be changed for two reasons. And accordingly, the ability to open or close the tap disappeared. But this breakdown is not critical and does not require urgent repairs. But the second reason is a leaking stove tap, which can bring many more problems. And it requires urgent elimination. If this is not done or is not done immediately after detecting a breakdown, then you cannot avoid a major leak of coolant into the cabin. And this will entail both an unpleasant smell and a wet carpet, which is very difficult to wash and dry after antifreeze. So, if you notice that liquid is disappearing somewhere from the expansion tank, then look for the cause of the leak not only in the engine compartment, but also in the passenger compartment. To do this, you don’t have to take a flashlight and try to get to the tap itself; it will be enough to just lift the rubber mat and run your hand over the carpet.
Replacing the radiator of a heating unit in a Priora that is not equipped with air conditioning
Replacing the heater radiator on a Priora without air conditioning may make sense if warm air has stopped flowing into the cabin, while the heater itself is working. If, in addition to the above problem, there is also a water leak from under the Priora stove, the motorist will have to remove the poorly functioning unit in order to solder the latter. Sometimes repairs are impractical and you have to replace the old device with a new one.
So, first of all, you need to start by removing the negative terminal from the battery. The fact is that the issue here is not only about the safety of the master himself, but also about additional insurance, which allows him to avoid several unpleasant surprises that, if handled carelessly, can arise not only with wiring, but also with electrical equipment.
If you are replacing the heater radiator on a Priora without air conditioning, after de-energizing the system, you can begin to dismantle the windshield trim. At the same time, the wiper levers, which can cause future discomfort during operation, should also be removed. After this, you should rid the unit of all plastic tubes through which the liquid located in the windshield washer reservoir goes directly to the nozzles. Only after all the above steps have been completed will it be possible to remove the decorative trim located along the edges of the windshield. In fact, it’s easy to carry out such a manipulation - just get rid of seven self-tapping screws.
Replacing the heater radiator on a Priora can only be done after removing the hood seal. Before dismantling, it should be noted that in the middle of the lining there is a screw that tightens both halves of the structure. Using a screwdriver or any knife, you can gently lift the plugs (this element serves as the “cover” of the screw) and unscrew them.
After this, you can begin to remove the sound insulation, which is located in the power unit compartment. To do everything correctly, you will have to unscrew the screws and remove the pads (there is no clear rule about which of them to remove first: left or right). Then you should get rid of the pipes that go directly to the radiator. A person who wants to understand how to get to the heater radiator on a Priora must loosen the clamps holding the structure itself.
After this, you can remove all the wires going directly to the stove from the connectors. You can remove them using two keys, in particular, one “10” and the other “8”. After unscrewing all four nuts, move the wiring harness to the side, which is held by the holder. The “13” key will help to dismantle the bracket located on the brake pedal. Only after this can you begin to remove the heater radiator on a Priora that does not have air conditioning. A regular Phillips screwdriver will help you dismantle the device, allowing you to remove 3 screws. All the rest of the work consists of installing a new unit and reassembling the system in the reverse order of the described actions.
In fact, there is another way to replace the system element of interest. To open free access to this element, dismantling not the stove body, but the vacuum brake booster will help. It is worth noting that this procedure will only be successful if the brake pedal is removed along with it. Such actions help to get closer directly to the left side of the stove and the desired device.
Preparatory stage
Troubleshooting the heater should begin provided that the power unit and engine cooling system are in order to eliminate their influence. To do this, you need to make sure that the antifreeze is poured in the proper amount, the engine is in good condition and is functioning normally. And after that, find out why the stove on the Priora does not work. First, check the coolant level in the expansion tank. Next, you need to start the engine and warm it up to operating temperature. After this, you need to check the serviceability of the thermostat - feel the thick hoses that go from it to the car radiator.
The top one should gradually become hot. If the rubber hose is still cold, the thermostat is faulty. In this case, you can continue working only after replacing this element. Fortunately, its cost is low.
Another reason why the engine may not warm up to operating temperature is a leaky expansion tank cap. It should keep excess pressure in the system. Often, simply replacing this cover can completely eliminate the problem.
On the Priora, unlike the Tens, the cooling system is organized differently. And the formation of an air lock there is practically excluded. It can occur when the system is leaking or when antifreeze is poured into a completely empty expansion tank. This can be fixed quite simply. You need to drive your front wheels up some hill in a warm car and vigorously apply the gas in place. The expansion tank cap should be removed.
Installation of a new radiator in a Lada Priora with air conditioning
Replacing the heater radiator in a Priora car with air conditioning is a fairly simple process. The latter unit appeared only in newer cars, in particular, Priors began to be equipped with a HALLA or Panasonic climate control system. Thanks to the new component, you can replace any part of a non-working stove only by dismantling the frill, getting rid of the windshield wipers, the stove itself or the vacuum brake booster.
If a motorist wants to understand how to remove the heater radiator on a Priora with air conditioning, he must start by removing the sound insulation located in the engine panel. After this, you should dismantle the power unit air filter hose and remove the seal, which is located near the radiator hoses. Then you should drain the coolant and lift the radiator up towards the mechanic.
What does damage cause?
The most common cause is engine overheating. failure will occur in a very short period of time. As a result of overheating, the cylinder block becomes deformed, cracks may appear and the piston may become deformed.
But it is much worse when the piston is completely deformed and makes a hole in the cylinder block. Such a breakdown usually leads to a complete replacement of the damaged engine with a new unit.
Cooling system design
The car's cooling system consists of:
- radiator;
- water pump;
- expansion tank;
- pipes and hoses;
- thermostat.
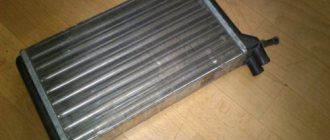
A radiator is a grille of pipes and plates made of light metal: aluminum, brass or copper. Numerous tubes reduce the cooling volume, and plates increase the heat exchanger area.
The heat exchanger for a car cooling system is made of aluminum, copper or brass
All components are connected to each other by pipes and hoses. The water pump (pump) drives coolant through one of the circuits. The thermostat is responsible for circulating the refrigerant in a long or small circle. From a physics textbook we know that a liquid increases in volume when heated. The expansion tank helps compensate for this physical property of antifreeze.
Causes and solutions to leaks
It is important to monitor the refrigerant level in the system. There are special marks in the expansion tank for this purpose. If the level constantly drops and you have to add fluid, then the system is leaking. We need to look for the cause and eliminate it quickly. Let's look at the main reasons for leakage and ways to solve the problem:
- If the radiator has a neck, then you need to check the cap. The coolant is heated to 120 degrees Celsius and circulates through the system under high pressure. If the cap is not able to hold pressure, then the antifreeze evaporates from the heat exchanger and the level drops. This problem is solved by replacing the cover with a new one.
One of the reasons for antifreeze leakage is a poor seal of the radiator cap.
A large hole in the radiator is noticeable; thick steam flows through it and antifreeze sprays
Finding a large hole will not be difficult - hot steam will pour out of it . It is difficult to eliminate such a defect on the road. Get to the nearest service station quickly and have the heat exchanger repaired or replaced. In any case, the old radiator will have to be dismantled and inspected. Some craftsmen know how to weld holes. If the radiator is made of copper or brass, then it can be soldered. Aluminum is repaired using argon welding.
A heat exchanger made of copper or brass can be soldered using a powerful soldering iron. An aluminum radiator is welded using argon welding
Experience shows that such repairs can rarely be carried out efficiently, and after just a few months the car owner is forced to replace the radiator with a new one.
It is more difficult to detect a small leak, but the antifreeze itself will help in the search. Its chemical composition contains a dye that is illuminated under ultraviolet light. Just shine a special lamp on the radiator and you will see where the coolant is leaking.
A defect discovered in a garage is eliminated using cold welding. This is a two-component epoxy resin. The prepared composition is similar to plasticine and is applied to the detected defect. Pre-clean the surface: remove dirt, oil and dust. After 15-30 minutes, the weld hardens and the leak is eliminated.
Two-part epoxy resin helps repair radiator leaks in garage environments
There is an opinion that you can eliminate a small leak using folk methods, for example, using dry mustard. This product is added to the radiator; under the influence of temperature, the particles increase in size, spread throughout the system and, where there is a leak, close the hole. Remember that once the defect is eliminated, foreign substances clog the entire system: engine channels, radiator honeycombs. Do not use traditional methods. Find another option to get to a service station or use radiator sealant.
Diagnostics using a video example
The process of replacing the pipe
The first thing to do before replacing the pipe is to completely drain the coolant from the system. If the liquid is clean and drained into a clean container, it can be reused. Now it’s time to remove the clamps on the missing pipe. It happens that they rust, so you should prepare all the necessary tools and WD40 in advance to facilitate the removal process.
It is worth remembering that all procedures must be carried out on a cooled engine, especially draining the coolant, otherwise you may be injured.
A similar, new pipe must already be prepared in advance. The old pipe should be removed slowly and without much effort, since the radiator necks are not strong enough and break easily. If it cannot be removed, it is recommended to twist it from side to side, but not bend it in any way.
As a last resort, you can cut it to length, this way you can remove the old pipe. Taking it off is often not a problem, but putting on a new one is much more interesting. If the new pipe does not lend itself to the procedure, then its inside should be lubricated with a solution of soapy water. But in order to soften it, you need to lower the desired part into hot water.
Under no circumstances should you use oil or related materials, as the pipe may corrode over time, and oil may also get into the cooling system.
The last step is to put the clamps on the pipe, and only then put it on the radiator neck and water jacket. Make sure that the pipe is correctly positioned and not twisted. Now we tighten the clamps on the necks and begin to fill in the coolant.
After filling, make sure once again that there are no leaks in the places of replacement and repair. It is worth remembering that when draining, there may be some coolant in the heater radiator. Now we start the engine and check the serviceability of the system. After filling in the new one, you need to turn on the stove, then add liquid to the expansion tank.
If you manage to break one of the necks, you should immediately solder it using argon welding.
Test of modern sealants
To increase the tightness of the cooling system and eliminate leaks in the radiator, special sealants are offered to car owners. They are also called “Stop-flow”.
The attitude towards sealants is ambivalent. Same as for engine oil additives and fuel tank tablets. The opinion of car manufacturers is negative. In car maintenance books, in the section devoted to the engine cooling system, there is not a word about “Stop-leak” additives. Their answer to a leak is to replace the radiator with a new one.
But what to do if the antifreeze level drops sharply on the road and the destination is still quite far away? There is an exit. Stores and gas stations sell additives that can help fix leaks. This is an emergency method that allows you to get to the nearest service station without any problems. Sealants cannot permanently cure a radiator from leaking. The main problem with additives is the formation of excess deposits in the car’s cooling system.
Stop-leak additives are an emergency method for eliminating radiator leaks. The sealant helps you get to the nearest service center and repair the heat exchanger
To make the choice easier, a summary table with two characteristics will help: the time of clogging of holes of different diameters and the level of deposits. To evaluate the last parameter, we used the mass of the thermostat before and after applying the additive. Such testing of sealants was carried out at the Department of Internal Combustion Engines of St. Petersburg Polytechnic University.
Fines for crossing the stop line and speeding will no longer bother you!
Sealant
BBF SuperLiqui MolyK-SealHi-GearGunkFillinTime of plugging of calibration holes, s0.3 mm203075351541260.5 mm8562115962246120.7 mm124883153452452921.0 mm146118380630218—Change in thermostat mass, gDifference+1,454+1,324+0,965+1,970+2,798+1,735The table shows that sealants cope with microcracks successfully, even large holes are blocked within 2-10 minutes.