Don’t panic. No need to think that the climate control unit has burned out (at a cost
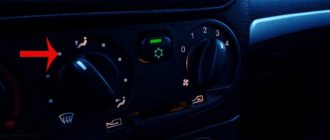
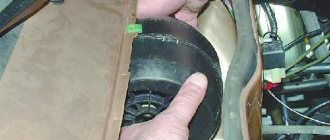
6,000 rubles). In general, do not rush to spend money on expensive repairs. My Priora glass model 2009, luxury+ equipment, Halla Conder The heater did not turn on at any speed... Due to jamming of the electric heater fan due to icing or when some foreign particles got into the impeller, under the hood, approximately in the center frill, under the wiper (see photo) a cheap thermal fuse burns out: 250v, 10A, 142 °C, which is installed in a very expensive speed controller (if I’m not mistaken
The Lada Priora is in many ways similar to its progenitor, the VAZ of the tenth family, including the design of the heater. The manufacturer decided to leave the operating principle of the stove, replacing only some elements with new ones. At the same time, Lada Priora also inherited familiar problems, for example, when the stove does not heat and blows cold air.
Heating system elements (stoves)
The fact that the Priora stove is 95% similar to the “ten” can be seen by the catalog numbers:
- Heater assembly (2170-8101012 or 2111-8101012-10).
- Air flow distribution gearmotor (2170-8127100). Distributes air flow to the feet/face/windshield. Located inside the dashboard.
- Interior air temperature sensor (11186-8128050). Located on the ceiling.
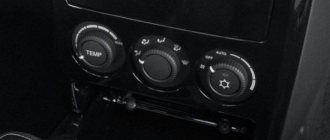
- Heater control controller (HCU) or stove control unit (21703-8128020). The block on which the driver sets the operating parameters of the stove. Located on the panel.
- Additional resistor or additional resistor (2123-8118022). Determines the rotation speed of the stove fan. Secured in the engine compartment.
- Electric heater fan (2111-8118020). Located under the hood.
- Heater damper motor reducer (2110-8127200). Distributes air flows into the cabin (outside/heater radiator). Inside the heater assembly.
- Air filter (2110-8122020).
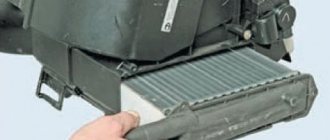
- Heater radiator (2110-8101060). Located inside the heater.
A malfunction of one of these elements causes problems in the operation of the stove.
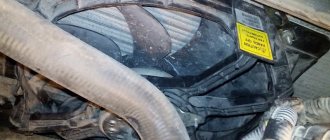
Where is the coolant temperature sensor installed on the Priora?
Many car owners do not know where the element in question is located on Priora until they are faced with the need to diagnose or replace it. In order not to make a mistake and correctly find the coolant temperature sensor on the Priora, below is a photo of its location. It is located between the cylinder head and the thermostat.
Access to it is almost free, but for ease of diagnosis or removal, it is necessary to dismantle the air filter housing. It is important not to confuse this element with the device responsible for displaying temperature readings on the instrument panel. In the design of the Priora cooling system, two temperature sensors are installed: one on the arrow (it is located below), and the second on turning on the fans and transmitting readings to the computer.
Operating principle of the stove
To independently determine a heater malfunction, you should understand the principle of its operation.
The heater control controller receives a signal from the temperature sensor in the cabin and compares it with the temperature set by the driver. If there is a difference, then the KUO sends a signal to the heater gear motor (located under the hood) so that it closes or opens the heater dampers by a certain amount for a greater supply of cold or hot air.
After setting the required heater fan speed, the heater control controller sends a signal to an additional resistor (in the engine compartment), which, due to the built-in resistance, sends an adjusted signal to the fan. At maximum speed, the resistor is not used and the electric fan rotates at maximum speed.
Lada Priora fuses: where are they located, replacement - AutoExpert
These include air conditioning, heated and controlled side mirrors, front airbags, a primitive ABS system, and if we compare the old “ten” modifications, then also electric power steering. Each of these electrical circuits is controlled by a relay and protected by appropriate fuses. All of them are distributed and located in separate blocks.
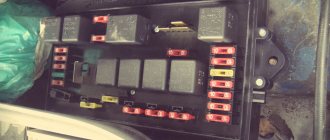
Relay and fuse blocks
The VAZ-2170 has three relay and fuse blocks:
- main block;
- mounting block;
- additional mounting block.
Luxury "Priors" with air conditioning have another additional block in which relays and fuses are located that are responsible for the operation of climate control equipment.
Main power fuse block
The main unit is located in the engine compartment of the car next to the battery and expansion tank. It is protected from above by a removable plastic casing. The main unit contains only six fuses that are responsible for the operation of the main (power) electrical circuits of the car.
| Fuse designation | Rated current, A | Case color | Electrical circuit |
| F-1 | 30 | Green | Electronic motor controller |
| F-2 | 60 | Blue | Ignition switch relay, power window control module, rear window defroster, radiator fan |
| F-3 | 60 | Blue | Signal, ignition switch, cigarette lighter, hazard warning lights, brake light unit, radiator fan circuit, interior lighting |
| F-4 | 60 | Blue | Electric generator |
| F-5 | 50 | Red | Electric power steering (EPS) |
| F-6 | 60 | Blue | Electric generator circuit |
To replace the fuses in the main unit, you need to disconnect the ground on the battery, remove the cover and replace the faulty part. VAZ-2170 mounting block
Relays and fuses in the cabin
The mounting block is located in the car interior under the dashboard on its left side. It is protected by a removable plastic panel attached to the “torpedo” using three latches. To remove the panel you need to turn each of these latches 900 degrees. After this, the panel will be completely removed.
The location, number, and markings of relays and fuses in the Priora mounting blocks may differ depending on the type of vehicle equipment.
| Relay designation | Purpose |
| In the “Norma” package | |
| K-1 | Radiator fan |
| K-2 | Rear window defroster |
| K-3 | Starter |
| K-4 | Additional relay |
| K-5 | Socket for backup relay |
| K-6 | Windshield wiper and washer motors |
| K-7 | High beam lamps |
| K-8 | Signal |
| K-9 | Alarm |
| K-10, K-11, K-12 | Sockets for backup relays |
| Available in “Lux” and “Lux Plus” configurations | |
| K-1 | Headlight and low beam lamps |
| K-2 | Rear window defroster |
| K-3 | Starter |
| K-4 | Additional relay |
| K-5 | Reserve socket |
| K-6 | Wiper mode switching module |
| K-7 | High beam lamps |
| K-8 | Signal |
| K-9 | Anti-theft alarm (sound signal) |
| K-10 | Fog lamps |
| K-11 | Seat heaters |
| K-12 | Relay for wiper operation mode |
Mounting block fuses
| Fuse designation | Rated current, A | Electrical circuit |
| In the “Norma” package | ||
| F-1 | 25 | Radiator fan |
| F-2 | 25 | Rear window defroster |
| F-3 | 10 | High beam lamp (right) |
| F-4 | 10 | High beam lamp (left) |
| F-5 | 10 | Signal |
| F-6 | 7,5 | Low beam headlight bulb (left) |
| F-7 | 7,5 | Low beam lamp (right) |
| F-8 | 10 | Signal |
| F-9 | 25 | Electric stove fan motor |
| F-10 | 7,5 | Interior lighting, instrument panel lighting, brake light lamps |
| F-11 | 20 | "Windshield wipers" (control) |
| F-12 | 10 | Connector “15” of the instrument panel |
| F-13 | 15 | Cigarette lighter |
| F-14 | 5 | Side lamp (left headlight) |
| F-15 | 5 | Side lamp (right headlight) |
| F-16 | 10 | Connector "15" ABS |
| F-17 | 10 | Left fog lamp |
| F-18 | 10 | Right fog lamp |
| F-19 | 15 | Front seat heater |
| F-20 | 5 | Immobilizer control module |
| F-21 | 7,5 | Fog lights (rear) |
| F-22–F30 | Reserve sockets | |
| F-31 | 30 | Electric package control module |
| F-32 | Reserve socket | |
| Available in “Lux” and “Lux Plus” configurations | ||
| F-1 | Reserve socket | |
| F-2 | 25 | Rear window heater, electrical package module, relay and connector “10” for connecting the rear window heater |
| F-3 | 10 | High beam lamp (right), instrument panel, high beam warning lamp |
| F-4 | 10 | High beam lamp (left) |
| F-5 | 10 | Protection of the mounting block, signal and its relay |
| F-6 | 7,5 | Low beam (left headlight) |
| F-7 | 7,5 | Low beam (right headlight) |
| F-8 | 10 | Anti-theft alarm relay, anti-theft alarm horn |
| F-9 | Reserve socket | |
| F-10 | 10 | Brake light switch, brake light lamps, connector "20", interior lighting |
| F-11 | 20 | Windshield wiper mode switching module relay, wiper mode switch, connector “53A”, rear window heater relay, rear window wiper motor (for VAZ-2171, 2172), connector “25” of the front airbag control module |
| F-12 | 10 | Connector “21” of the instrument cluster, connector “9” of block X2 of the dashboard, connector “1” of block X2 of the electric power steering control module, reversing headlight lamps, parking sensor control module |
| F-13 | 15 | Cigarette lighter |
| F-14 | 5 | Left side light, trunk light, warning light for license plate light, connector “12” of block X2 of the glass unit control module |
| F-15 | 5 | Right side light, glove box light |
| F-16 | 10 | Hydraulic unit of the ABS system |
| F-17 | 10 | Fog lamp (left headlight) |
| F-18 | 10 | Fog lamp (right headlight) |
| F-19 | 15 | Heated front seats relay |
| F-20 | 10 | Side and low beam relay, heater fan relay, lighting control relay, windshield wiper control module, climate system control module |
| F-21 | 5 | Connector “30” of the light alarm switch, connector “16” of the diagnostic block, clock, connector “14” of the automatic climate control unit |
| F-22 | 20 | Wiper motor, wiper motor relay, wiper control module relay |
| F-23 | 7,5 | Connector “20” of the wiper control module |
| F-24 - F-30 | Backup fuse sockets | |
| F-31 | 30 | Connector “2” of block X1 of the electrical package module, threshold illumination lamps |
| F-32 | Reserve fuse socket |
To remove the mounting block from its seat, you only need a screwdriver with a Phillips bit. She needs to unscrew the screw securing the block, then, pulling it towards you, disengage it from the fastening hooks.
Before replacing relays and fuses, you must disconnect the negative terminal from the battery. To remove the main unit, you will need to disconnect all terminals with wires connected to it, having previously marked their location.
Additional mounting block
The additional VAZ-2170 mounting block is located behind the panel of the right tunnel trim on the left leg side of the front passenger. To get to it, you need to unscrew the screws securing the cladding and remove it.
The additional mounting block contains three fuses and two relays.
| Designation | Rated current, A | Purpose of protection |
| K-1 | Ignition relay (main relay) | |
| K-2 | Fuel pump relay | |
| F-1 | 15 | Starter and main relay interlock circuits |
| F-2 | 7,5 | Motor controller circuit |
| F-3 | 15 | Fuel pump |
To replace fuses and relays in the additional unit, there is no need to remove it from its mounting location. To remove the relay, use an “8” key to unscrew the corresponding nut securing it.
Before carrying out work to replace relays, fuses or the entire unit, it is strongly recommended to disconnect the ground wire from the battery, and also disconnect the electronic engine controller wiring harness block from the additional mounting block connector.
If the stove blows cold air (does not heat)
There may be several reasons why the Priora’s stove does not heat well (the percentage of breakdowns based on the results of a survey among owners of this car is indicated in parentheses):
- There is a malfunction in the engine cooling system (the heater radiator is cold and cannot give off heat). Touch both heater core hoses; they should both be hot. Sometimes the reason lies in the radiator itself (defect, insufficiently productive) (8%).
- Dirty cabin filter. Try removing the filter for a while and checking the operation of the stove (2%).
- The heater damper does not work, it is simply jammed (17%).
- The heater gear motor is faulty (16%).
- The heater control unit is faulty (13%).
- The interior air temperature sensor is faulty. Try turning it off for a while and check the operation of the heater (6%).
Points 3-6 may also be the reason when only hot air is constantly blowing from the stove.
No heating at idle
It is not for nothing that this issue has been submitted for separate consideration, since it worries many motorists and solving the problem can be much more difficult than one might expect. So, you have a Priora, the heater does not heat up at idle, although when the car is moving, the interior is heated in normal mode. Here you can also identify several possible reasons:
- Insufficient coolant level.
- Leaks that lead to a decrease in antifreeze levels.
- There is an air lock in the system.
If the first two problems can be easily diagnosed and eliminated, then with an air lock the situation is much more complicated. If you have ruled out the first two reasons and the Priora’s stove still does not heat up at idle, you need to eliminate the air lock. You must proceed as follows:
- We remove the screen from the engine.
- We lower the clamp, after which it is necessary to remove the heating tube for the throttle assembly. We choose any of the two.
- Unscrew the cap on the expansion tank. We place a clean rag on the neck and begin to blow into the expansion tank. The air supply should be carried out until coolant begins to pour out of the tube, which was previously removed.
- Immediately place the tube on the fitting and carefully tighten the clamp.
- Installing the screen.
If the option of blowing out the tank does not suit you, then you can go another way. We warm up the engine so that the pressure in the heating system increases. After some time, we turn off the car and remove the hose from the heating of the throttle assembly. In this case, there is no need to remove the cap from the tank. As a result of high pressure, coolant will be forced through the tube. All that remains is to place the tube on the fitting and tighten the clamp.
Now the Priora stove should not cause any difficulties; you know how to fix faults, as well as carry out diagnostics and identify the source of the problems. Let the heater in your car always turn on, work properly and provide comfort regardless of the weather outside.
Operating principle of the stove
The heater is controlled by a controller, from which a signal is received to turn on the stove. The driver sets the temperature in the cabin. If the temperature sensor detects that the temperature has dropped below the set level, the controller sends a signal to change the opening width of the stove damper. In some cases, an electronic failure occurs; instead of hot air, cold air is supplied.
The controller also regulates the number of fan revolutions. It sends a signal to an additional resistor, which, in turn, adjusts the operation of the fan using the built-in resistance. The resistor may not be used at all - then the fan runs at maximum speed. Thus, it acts as a “brake” for this node. If the resistor breaks, the fan may not start at all.
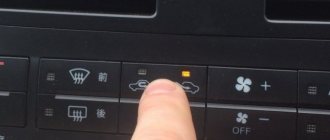
The driver can control which direction the air flow will be directed. To do this, he needs to set the value on the dashboard. The control regulators bark a command to move the dampers.
Features of the heater in a Priora with air conditioning
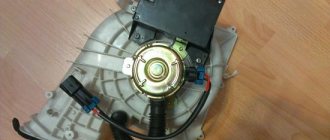
A common reason why the stove (Priora with air conditioning) does not work is the failure of the speed control unit (RFV), which is located on the heater housing under the hood. It regulates the intensity of the fan motor. If it fails, the stove stops functioning altogether or operates only at fourth speed.
The cause of the malfunction is often prolonged operation of the heater in recirculation mode (with the air damper closed) and, as a consequence, its overheating. Therefore, its performance should also be checked.
vote
Article rating
Why can a fan fail?
There are several types of malfunctions of the Priora heater fan. The most common are:
- The heater stopped working completely. In most cases, this is caused by the failure of a 25 A or F 9 fuse. Power is not supplied and the unit does not operate. The second reason may be a malfunction of the heater control unit.
- Noise during fan operation is most often caused by a foreign object getting into it. Most often, dry leaves get stuck between the blades (especially in autumn), this leads to the appearance of extraneous sounds.
- Only mode 4 of the stove works; in all others it does not turn on. This failure can be caused by a faulty resistor or control unit.
Not every car enthusiast can check and repair a complex stove system. If you are not well versed in auto electrics, then you should turn to professionals. Otherwise, you can use the instructions below.
Replacement
Replacement is quite simple if you have a car without air conditioning. In this case, you just need to unscrew a few bolts securing the fan to the radiator and remove it.
If the Priora is equipped with air conditioning, then you will have to work hard when replacing it, since there is quite a bit of space and you will need to unscrew the radiator itself, move it to the side and only then remove the fan itself.
Sources
- https://avtonomnaya-gazifikaciya.ru/priora/ne-rabotaet-ventilyator-ohlazhdeniya.html
- https://delis-avto.ru/pro-dvigatel/ne-vklyuchaetsya-ventilyator-na-priore-2.html
- https://favorit69.ru/ne-rabotaet-ventilyator-ohlazhdeniya-priora-s-konditsionerom/
- https://enginehack.ru/vse-o-ventilyatore-ohlazhdeniya-lady-priory/
- https://gil-service.ru/dvigatel/kak-proverit-ventilyator-na-priore.html
- https://o-ladagranta.ru/ne-vkljuchaetsja-ventiljator-ohlazhdenija-priora-s/
- https://ilifia-club.ru/dvigatel/ne-vklyuchaetsya-ventilyator-na-priore.html
Carrying out diagnostics and repairs: where to start
Let's deal with the most difficult case when the stove does not start. First, you need to check the engine cooling system, because malfunctions may be associated with it. Check the amount of fluid in the expansion tank. Its level should be between the minimum and maximum marks. If you constantly add fluid to the reservoir, it is necessary to eliminate the leak in the cooling system. Check the pipes and tighten the clamps. In winter, you can only fill in a minimum amount of liquid, so it will heat up faster and warm air will flow into the cabin.
Design flaws
The Lada Priora stove has a number of design flaws that appear already during operation.
Let's highlight the main points:
- Air is supplied to the side deflectors in any of the shock absorber positions. For this reason, there may not be enough air in the legs.
- The presence of additional holes and insufficient quality of gaskets when connecting pipelines will lead to a deterioration in flow rate.
- Poor duct alignment results in excessive duct noise.
Otherwise, the design of the Priora stove is well thought out and rarely causes complaints from users. The exception is those cases when the device ceases to perform its intended functions.
For example, a common problem is when cold air is constantly blowing from the stove. In this case, the cause of the malfunction is the damper or radiator.