The coolant temperature sensor (CTS) is essentially a thermistor or thermal resistance. Depending on the temperature of the environment in which it is immersed, the resistance in the circuit changes up or down. The process of checking the coolant temperature sensor is quite simple; this can be done in several ways. However, you should understand the main aspects of its operation, and to identify a defect, know the common causes and signs of breakdowns. Most often, a multimeter is used for checking. Below we present the most popular options for diagnosing the sensor.
Operating principle of the sensor
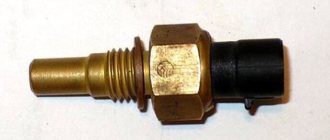
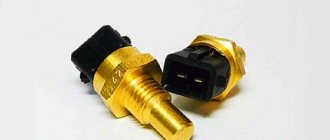
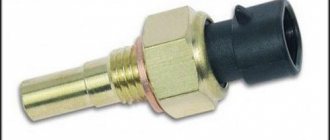
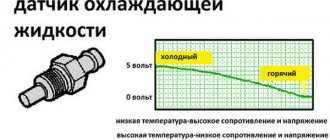
Let's briefly look at how a thermistor sensor works, this will help to correctly diagnose it. The sensor consists of two output contacts and a measuring head in which the thermistor is located. The contacts are connected via wires to the electronic control unit (ECU). The head is immersed in the liquid being measured. Since DTOZh has a negative temperature coefficient, as the coolant temperature increases, the resistance value on the thermistor decreases, and as the temperature decreases, the resistance increases. The control unit reads the information and, based on it, gives a specific command, and the thermostat opens or closes the flow of antifreeze through the radiator.
Based on the readings of the antifreeze temperature sensor, the ECU, when starting the engine, sets the required number of idle air control (IAC) steps, ignition timing and injector injection time, thereby adjusting the fuel supply. The sensor is supplied with a constant voltage of 5 V from the ECU through a resistor having a constant resistance value, which is located in the control controller. That is, the control unit responds to changes in voltage at the sensor.
Speedometers
Speedometer 81.3802010
Diameter 140mm, runs on 24 volt on-board network. It is mainly used on Kamaz or Maz trucks. There is a total and daily mileage counter and a speed limit alarm.
Diameter 140mm, runs on 12 volt on-board network. Suitable for GAZ, KAZ and PAZ.
Speedometer 85.3802010
Diameter 100mm, runs on 12 volt on-board network. Suitable for GAZ, UAZ and ZIL. Daily and total mileage counter. Very compact with a depth of only 7 centimeters.
You can buy these components from almost any supplier or at Avtopribor” in Vladimir.
tell me which sensor is suitable for the tachograph siemens vdo car maz 1999.
Main signs and characteristics of DTOZh malfunctions
The failure of the coolant temperature sensor can be judged by several signs. However, it is worth understanding that the typical manifestations listed below may also be the cause of other car engine defects. Therefore, to be sure, you need to conduct an additional check.
The main signs indicating a sensor malfunction:
- The Check Engine light came on on the dashboard. If you see this icon, scan the error code; it may indicate other problems.
- Fuel consumption has increased. Due to the fact that the electronic unit receives incorrect data from the sensor, it cannot correctly read it and determine the required command. Namely, how much fuel is needed to form a fuel mixture and maintain the optimal engine temperature.
- Unstable engine operation. This includes failures at idle, difficulties when starting the engine (more often in winter) or a complete stop at low speeds.
- The car stalls when the engine is warm. As soon as the antifreeze temperature reaches a certain point, the engine stops spontaneously. Regardless of what liquid was used in the system (good antifreeze or plain water).
- Unstable fan operation. There are several manifestations - sometimes it does not work at all, and in other cases it does not switch to emergency mode. Here it is important to additionally check the thermistor for serviceability.
- The car does not start easily when the engine is cold.
More often, such sensors are made with a non-separable housing, so if they are defective, they are replaced with new ones. This applies to cars of any manufacturer, both domestic and foreign.
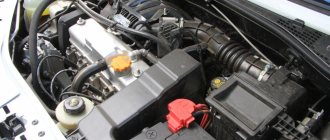
Where to find the sensor on the car
To check the sensor you need to know where it is located. Naturally, its location will differ in different brands and models of cars. However, there are several signs by which you can determine where it is installed.
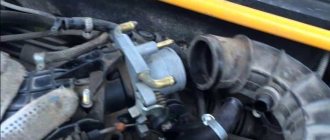
Most often, the coolant temperature sensor is located on the outlet pipe of the cylinder head. Its design includes a thread with which it is mounted in the appropriate place. An important requirement is direct contact of the sensor head directly with the coolant. This provides the most accurate sensor readings.
It should also be taken into account that some car models have two coolant temperature sensors at once. In such cases, the first one takes and transmits readings of the antifreeze temperature at the engine outlet, and the second one at the radiator outlet. This provides more accurate information about the condition of the engines and cooling systems.
All information about the number and location of sensors can be found in the car’s registration certificate.
Causes of malfunction of the coolant temperature sensor
The design of the sensor is extremely simple, and accordingly, its breakdowns occur very rarely. The most common causes are wear and tear or mechanical damage. For example, the appearance of corrosion may be caused by the fact that ordinary water was used in the cooling system instead of antifreeze.
The most common causes of DTO failure:
- Damaged hull. It is expressed in different ways, but more often it is a noticeable leakage of coolant from the thread of the sensor or its housing. It is also possible that the thermistor itself or its contacts may be damaged, which will cause it to produce an incorrect signal.
- Oxidized contacts. When exposed to high humidity or simply because the sensor is old, oxidation can appear on its contacts, which prevents the passage of electrical current through them (or significantly increases the resistance of the circuit).
- Damaged group of contacts (chips). More often caused by mechanical damage to the wires at the base of the connector.
- Broken contact inside the coolant temperature sensor. May be caused by aging, strong impact or vibration. Leads to broken contacts. In such cases, repair is impossible, since the sensors are manufactured with a sealed housing and therefore must be replaced.
- The wire insulation is damaged. Refers to the power conductors going from the ECU to the sensor. Occurs from mechanical stress, old age, due to the use of low-quality insulating materials, etc. It is especially important for vehicles operated in high humidity environments.
In many cases, to restore normal operation of a temperature sensor, it is enough to remove unwanted deposits, traces of corrosion and possible oxidation from its body, threads and contacts. If this does not help, it is easier to replace it with a new one.
The cost of the sensor is low, and installation will not be difficult for even a novice car enthusiast.
Gazelle (engines ZMZ 406, 405, 409)
Installation location - on the power unit in the area of the thermostat or on the body of the latter.
To remove it, it is necessary to partially drain the coolant from the engine, disconnect the spring clamp of the harness block and discard the block from the sensor.
Next, using a key set to “19” you need to loosen the broach and unscrew the device.
When choosing a device, you need to focus on the engine and ECU.
406 engine and ECU Mikas 7.1, 5.4, SOATE, VS5.6
In such cases, a DTOZH is used, operating at a voltage of 5 to 12 Volts through a resistance of 9.1 kOhm.
Several types of devices are suitable for replacement: Kaluga 19.3828, Luzar LS 0306, Rikor 40.5226 or Autotrade 42.3828.
POPULAR WITH READERS: MPI engine - modifications, pros and cons
When checking, you will also need water with a boiler and variable temperature, as well as a multimeter.
To work, you need to assemble a circuit and apply 1 to 1.5 mA to it. In this case, it is necessary to measure not resistance, but voltage.
When checking, the following parameters must be present:
- -60 C - 2.13 V;
- -40 C - 2.33 V;
- -20 C - 2.53 V;
- 0 C - 2.73 V;
- +40 C - 3.13 V;
- +80 C - 3.53 V;
- 105 C - 3.83 V;
- 125 C - 3.98 V.
When the engine is running, the voltage will be 5 V.
Engine 405, 409, UMZ 4216E3, 4213 control unit Mikas 11 / 10.3, VS8, SOATE
DTOZH with catalog numbers 234.3828, 40.5215 or 421.3828 are used here.
Unlike the method discussed above, here it is necessary to measure resistance.
In this case, the dependence should be as follows:
- 128 C - 80.8 Ohm;
- 100 C - 177 Ohm;
- 80 C - 332 Ohm;
- 60 C - 667 Ohm;
- 40 C - 1459 Ohm;
- 20 C - 3520 Ohm;
- 0 C - 9420 Ohm;
- -20 C - 28680 Ohm;
- -40 C - 100707 Ohm.
In case of significant deviations from these parameters, the device must be replaced.
Checking the serviceability of the DTOZH
The antifreeze temperature sensor is checked in two main ways: without removing it from the car or by removing it from its seat. The second method is also divided into two diagnostic options: with and without a thermometer.
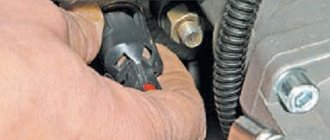
If the sensor is not stuck to the thread, then it is quite easy to remove it with an open-end wrench of a suitable size. It is important to disconnect the contact connector before unscrewing. The next step is to check whether power is coming from the ECU to the sensor.
It’s quite easy to do this with a universal tester (multimeter):
- disconnect the connector from the sensor;
- switch the multimeter measurement mode to “20 V constant voltage”;
- attach the probes to the terminal contacts coming from the ECU.
Under normal conditions, the voltage should be 5 V. If this condition is met, then you can proceed to further testing of the sensor.
If you don’t have a multimeter on hand, the serviceability of the ECU and the wiring to it can be checked by simply removing the connector from the coolant temperature sensor while the engine is running, the radiator fan will automatically turn on. This will happen because the control unit will see an open circuit and go into emergency mode. If this does not happen, then either the ECU or the cooling fan is faulty.
Check without removing from the car
The most convenient way, because there is no need to dismantle and then install. The check is performed using a tester, by measuring readings on the sensor contacts.
To provide access to the contacts, you will need to disconnect the terminal block from the sensor. When performing work on a hot engine, be careful, because you can not only burn yourself, but also melt the case or probes of the multimeter.
The tester is then moved to the resistance measurement position and connected to the sensor output contacts. It is worth noting that for a cold engine the reading will be high, and for a hot engine it will be significantly lower.
For a general understanding of what values the sensor produces at different temperatures, as an example, below is the data for the VAZ-2110. The readings of other passenger cars will not be much different.
Sensor readings depending on temperature changes
| Liquid temperature, °C | Conductor resistance, Ohm | Liquid temperature, °C | Conductor resistance, Ohm |
| 5 | 7 280 | 45 | 1 188 |
| 10 | 5 670 | 50 | 973 |
| 15 | 4 450 | 60 | 667 |
| 20 | 3 520 | 70 | 467 |
| 25 | 2 796 | 80 | 332 |
| 30 | 2 238 | 90 | 241 |
| 40 | 1 459 | 100 | 177 |
It is worth noting that the sensor rarely breaks down; situations occur when it produces incorrect information. Therefore, you should compare the temperature readings on the dashboard with the data received from the coolant temperature sensor in accordance with the table. If the data differs, then it makes sense to remove the sensor and carry out further diagnostics.
Checking DTOZH with a thermometer
For such diagnostics, it is necessary to remove the sensor from its seat. As mentioned above, this can be done using a suitable wrench. At the same time, you can clean the sensor itself, remove plaque from the threads on the pipe and lubricate it, inspect the contacts for oxidation and, if necessary, remove them.
Then put water into an electric kettle or another container, but in this case you will have to use a boiler. In addition, to measure you need to take a multimeter and move its switch to the position for measuring conductor resistance.
The sensor head is lowered into the water, and the tester probes are connected to its contacts. A thermometer is also placed in the container with the sensor; for ease of measurement, an electronic one is preferable, but a mercury one is also possible.
Then, gradually increasing the temperature of the liquid, compare the readings of the sensor and the electronic thermometer in accordance with the table. For greater accuracy, it is better to record readings every 5 degrees. As a result, you will receive data that can be entered into a table. They can subsequently be compared with the information provided in the technical documentation for a specific car model. As a last resort, you can compare it with the table above.
During testing, small deviations from the values are allowed. Small errors may depend on various conditions and on the sensor itself. Often, even coolant temperature sensors of the same model have slight differences in readings under the same measurement conditions.
Checking without a thermometer
This method is not very different from the previous one, only here a thermometer is not used and readings are taken only once.
To check the sensor, immerse it in a container of water and bring it to a boil. Then connect the multimeter probes to the output contacts and see what it shows.
If the DTOZH is fully operational, then its resistance should be 177 Ohms. However, errors should be taken into account. In addition, the multimeter probes also have their own resistance, and the water temperature may be slightly below 100 degrees, and accordingly the resistance will be slightly higher.
Replacing diesel fuel assemblies
Removal of diesel fuel assemblies in VAZ 2110
The VAZ 2110 interior temperature sensor is used to monitor temperature parameters in the car. This controller is also a transmitter connected to the ECM. In cold weather, the VAZ air controller transmits information to the ECU, which promotes optimal air flow throughout the car interior. As in the previous case, the malfunction of the device may be due to problems in the operation of the electrical circuit, so it would be a good idea to check the wiring if the controller does not turn on.
To replace the interior air temperature sensor, you need to perform the following steps:
- The car must be set to the parking brake. Disconnect the battery.
- Using a flat-tip screwdriver, you need to move the device body away from the installation site.
- First, the upper part of the diesel fuel assembly is removed, this will allow for more convenient dismantling of the controller. When the device is removed from the latches, proceed carefully, since you will still need to disconnect it from the wiring (two connectors). First, the wiring is disconnected, then the combustion engine itself is removed.
- As for installation, the procedure looks similar, but is done in reverse order. After installation, it is necessary to diagnose the functionality of the device.
How to check the DTOZH using the example of a VAZ 2110
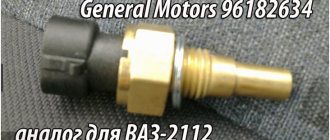
In general, the coolant temperature sensor on different VAZs is checked using the same methods and in the same sequence as described in the previous sections. Most often, sensors with article numbers 23.3828 and 405213, or its analogues – 423.3828, are installed on Ladas 2110, 2112, Priora, Kalina and others.
To carry out the test, you need to know what its resistance is at different temperatures:
- 15 °C - from 4,033 to 4,838 Ohms;
- 128 °C - from 76.7 to 85.1 Ohm;
— output voltage at 15 °C – from 92.1 to 93.3% of that supplied from the ECU;
— output voltage at 128 °C – from 18.1 to 19.7%.
Before dismantling the DTOZh for subsequent inspection or replacement with a new one from the cooling system, it is necessary to drain the antifreeze a little. This is done on a cooled engine to avoid injury and damage to engine parts or tools.
The sensor is unscrewed with a 19 mm wrench. To do this, unscrew it and remove it together with the sealing ring.
Measurements are carried out in steps of 10 °C from the boiling point to room temperature. The resistance values are recorded and finally checked against the table.
Instructions for replacing the controller
Replacing the regulator looks like this:
- First, the battery terminals are disconnected. All coolant should be drained from the radiator unit.
- Next, you need to disconnect the wiring from the device; to do this, you just need to disconnect the plug. For greater ease of removal, you can remove the air filter.
- After this, the controller is dismantled; to do this, it must be unscrewed. The unscrewing procedure is performed using a wrench. The failed device is removed from the outlet hose hole.
- As for installation, in this case the procedure will look similar, only in reverse order. When installing a new device, do not forget to change the O-ring. When installing the controller, tighten it as much as possible and connect the wiring to it. Now all you have to do is refill the antifreeze and connect the battery, after which you can check the performance of the DTOZH.