The generator in any car is an integral part, since it charges the battery and powers consumers while the engine is running. If any breakdown occurs with the generator, charging problems immediately appear, which requires an immediate search for the cause and elimination of the malfunction.
- Checking the brushes
Video: checking the brushes of the VAZ 2107 generator
- Simple option
- Using control
- Generator repair
Dismantling the generator
Video: dismantling the generator on a “classic”
- Table: dimensions and analogues of generator bearings
- Which one can I put?
- Video: dismantling the brushes of the “seven” generator
- Video: tensioning the alternator belt on a “classic”
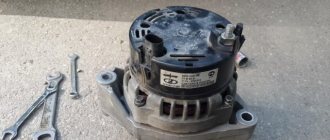
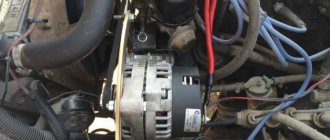
Removing the VAZ 2107 generator
First of all, you should disconnect the battery terminals. To make work easier and improve access to the generator, it is better to remove the battery from the car. The further order of work is as follows:
- disconnect the generator connector;
- remove the insulating cover from the terminal, unscrew the fastening nut using a 10mm wrench;
- disconnect the terminal;
- loosen the generator by unscrewing the nut and remove the belt;
- remove the adjusting bar by unscrewing the fastening nut;
- unscrew the lower fastening nut and remove the bushing with the bolt;
- get the generator.
Possible malfunctions: signs and causes
Why does the generator not charge and does not charge the battery, what voltage should the unit produce, how to excite and how to ring the device, how is the unit disassembled, assembled and modified?
First, let's look at the main causes of the malfunction why the carburetor or injector device in the VAZ 2107 does not work:
- Wear of the voltage regulator brushes (tablets), this problem is one of the most common and frequently encountered in domestic sevens. These devices are classified as consumables, so sooner or later they will wear out in any case. Since the voltage regulator is responsible for equalizing this parameter, if it breaks down, an overcharge may occur in the electrical network. With more charging, all devices will work unstably, but this is not always possible to determine. For example, if you turn on the optics, you will see that the headlights become dimmer and then brighter.
- Burnout of the windings inside the device. Repair in this case will consist of replacing failed components, but it is not always possible to rewind the windings.
- Damage to the unit body has occurred, in particular, this means mechanical damage. This may allow moisture to enter the device and destroy the components installed inside.
- Wear of bearing elements. When the bearings wear out, the operation of the unit will be accompanied by increased noise or creaking. In some cases, the problem can be solved by adding lubricant to the bearing devices, but this does not always help.
- The diode bridge is broken.
- Mechanical damage or wear of the pulley. It is not possible to restore the operation of the pulley by dismantling and repairing it; the device must be replaced.
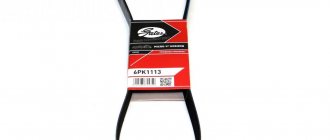
- The reason may also be a broken drive belt. Over time, the strap tends to wear out, as a result of which its intensive use can lead to breakage.
Disassembling the VAZ 2107 generator
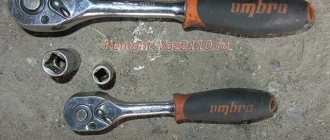
For a comprehensive repair, you need a puller to remove the bearing from the shaft, a mandrel for pressing and knocking out the bearing in the generator cover.
Sequence of work:
- unscrew the nut securing the pulley and impeller using a socket wrench, holding the rotor with a screwdriver so that it does not turn;
- dismantle the pulley and impeller, remove the key, remove the washers from the shaft;
- unscrew the screws securing the voltage regulator relay and remove it, having first disconnected the wire block;
- remove the regulator relay along with the brush assembly;
- unscrew the nuts and remove the bolts securing the generator cover;
- knock down the front cover by hitting the shaft with a rubber hammer (the cover must be rested against a wooden block);
- remove the spacer sleeve from the shaft;
- check the condition of the bearing in the front cover;
Tip: To check the bearing, you need to rock the inner race of the bearing while holding the cap. If there is play, the bearing must be replaced.
- if necessary, unscrew the bearing mounting nuts;
Attention: if the nuts do not unscrew, you should cut off the ends of the fastening bolts. During assembly, it is necessary to install new bolts and, after tightening the nuts, rivet their ends with a core.
- knock the bearing out of the cover using a drift (mandrel);
- rest the back cover against a pair of wooden blocks and knock out the rotor using a soft metal drift and a hammer;
- check the condition of the rear bearing (similar to the front);
- if necessary, replace the bearing by pulling it from the rotor with a puller;
- unscrew the nuts holding the VAZ 2107 diode bridge and the winding terminals;
- remove the bolts;
- remove the stator winding;
- visually check the condition of the winding;
- if the winding has breaks or has turned black from overheating, replace it;
- remove the generator output nut and insulating washer;
- dismantle the diode bridge;
- remove the capacitor by unscrewing the fastening screw;
- remove the bolt securing the rectifier unit;
- check the rotor and stator windings with a test lamp;
- check the diode bridge of the VAZ 2107 generator for broken diodes.
What should you pay attention to?
To carry out repairs, you need to have a general understanding of electricity and its properties. If with mechanical breakdowns everything is much simpler and often a visual inspection is enough to detect a part that needs replacement, then with electrical faults there is no such clear visualization. Moreover, the initial cause of generator breakdowns may be a malfunction of another component of the VAZ 21074, for example, the same battery. And vice versa. Very often a chain reaction is detected, with damage to several nodes.
In such cases, it is important to discover the cause before taking action. Otherwise, there is no guarantee that after replacing one or another element everything will not happen again.
As mentioned earlier, you cannot check the operation of the generator on the VAZ 21074 using the old method of tilting the terminals. Don't forget about the injector and ECU.
It is better not to buy a used generator, but to buy a new one. But even in this case, you need to check the voltmeter readings and battery charging more often than usual. Alas, even new factory products are sometimes defective. Therefore, it is better to play it safe, thereby protecting all electronics, injector, battery and other devices from overvoltage. This is really important.
If you don’t have confidence in your abilities, then it’s better to immediately contact a workshop. And one more important detail. If any element installed in the generator fails, service centers first of all offer its complete replacement rather than partial replacement. Of course, this approach has its advantages, but when the warranty period has expired, it is very expensive.
The housing of the voltage regulator unit becomes very hot during operation. You need to keep the wires away from it.
To regularly monitor fluctuations in voltage and battery charge level, you can purchase an on-board computer that includes a similar function. In addition, this will be useful for many other components of the VAZ 21074. Such a device is indispensable on cars where an injector is installed.
Assembling a VAZ 2107 generator
Before assembling the generator, it is necessary to clean the parts from contamination. It is better to wash metal parts with gasoline, and wash windings and other complex parts with air from a compressor.
The new bearing is pressed onto the rotor using a mandrel. You can use a head or tube with a diameter that matches the size of the inner ring of the bearing.
Before installing the rear and front covers, it is necessary to check the condition of the bearing seats. They must not be damaged or scratched.
If there are cracks in the cover, they must be replaced with new ones. Bolts and nuts of poor quality must also be replaced.
The sequence of assembling the generator corresponds to the procedure for disassembling it.
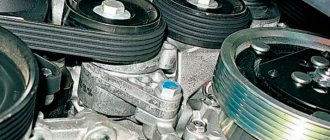
After installing and connecting the generator, it is necessary to tighten the belt with the necessary force. If it is overtightened, the bearings will fail; if it is loose, the generator will slip under load and will not produce the required charging current.
Types of breakdowns
What problems occur if the generator is not working properly?
- Extraneous noise appears.
- Complete lack of battery charging while the engine is running.
- Overheating and failure of the same battery.
- Damage to any or all energy consumers, including the injector.
- Increased or decreased voltage in the electrical system. The standard voltage is 13.6-14.5 V.
- Mechanical or electrical damage to the elements of the generator itself.
Obviously, this node requires special attention.
Node diagnostics
The functionality of the generator unit is checked using a tester - a multimeter.
How to check the unit yourself:
- First, the tester must be configured in the diagnostic mode for measuring DC voltage. After setting, you need to check the operating parameters of the car battery. In accordance with technical regulations, the voltage level at the terminals should vary around 11.9-12.6 volts. A slight deviation from these limits downwards is allowed, but only in this case if the car uses more energy consumers.
- The verification operation must be performed with an assistant. When the assistant starts the engine, you also need to check the voltage. If the diagnostics show a decrease in this parameter, then this indicates that the unit has either failed or is not functioning correctly. This means that one of its components must be replaced.
- If the voltage value exceeds 14.5 volts, and the parameter does not decrease, this can lead to boiling of the electrolyte solution in the battery (video published by the Auto Electrician HF channel).
About installing an additional diode
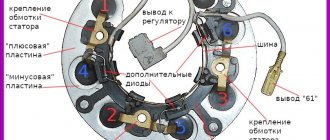
Installing an additional diode is quite rare. Why is this being done? In order to slightly increase the voltage of the on-board network. The need for this increase arose due to new laws. As you know, in 2015, changes were made to the traffic rules, forcing drivers to constantly drive with their running lights on. And owners of classic VAZ models are forced to constantly drive with their low beams on. In such a situation, both battery charging and on-board voltage drop significantly. To somehow solve this problem, craftsmen install additional diodes, which are located between the voltage regulator terminals and the common output wires for the additional diode, as shown in the figure below.
An additional diode is placed between the terminals of the voltage regulator (number 1) and the common wire for additional diodes (number 2)
For installation, KD202D diodes are usually used, which can be found in any radio parts store.
The KD202D diode is very popular among owners of “Sevens”
If the above diode is not available, you can choose any other one. The main thing is that the direct forward current is at least 5 amperes, and the maximum permissible reverse voltage is not lower than 20 volts.
So, in order to change the diode bridge on a VAZ 2107, you do not need to go to the nearest service center and pay a mechanic 800 rubles. Everything can be done on your own, and in a fairly short time. To remove and disassemble the generator, 20 minutes is enough for an experienced car enthusiast. It will take a beginner more time, but in the end he will cope with the task. All you need to do is follow the recommendations given above exactly.
About replacing the diode bridge (rectifier unit)
Since after removing the winding, the diode bridge is practically free, there is almost nothing to say about replacing it. The only thing you need to do is push the bolts from the inside so that they pop out from the outside:
And the diode bridge has been completely removed and you can replace it:
After carrying out the required repairs to your generator, we reassemble it in the reverse order and do not forget to connect all the winding wires correctly.
Source
BEARINGS
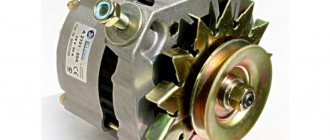
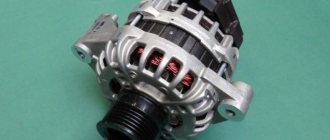
The generator on a VAZ 2114 car consists of the following main parts:
- A housing consisting of two aluminum covers (front and back);
- Stator (winding located inside the housing);
- A rotor rotating inside the stator;
- Diode bridge;
- Voltage regulator.
The armature (rotor) rotates in two bearings, which are installed: one in the front cover and one pressed onto the rotor. Both bearings are press-fit and therefore are not that easy to replace.
There are usually two main problems with a generator:
- Charging disappears;
- Noise occurs: whistling, grinding or humming.
If there is a whistling noise under the hood, a worn alternator bearing is often to blame. Due to such a malfunction, charging is not lost, but you still shouldn’t drive with noise, since as a result the generator will jam because the rotor will stop rotating.
Before changing or starting repairs, you need to buy the necessary spare parts. And before purchasing, you need to find out what bearings are on the VAZ 2114 generator. A bearing of brand 180202 (a foreign analogue of 6202-2RS) is installed on the rear of the rotor, and 180302 (an analogue of 6302-2RS) is installed on the front cover. The cost of Russian parts is low - in the range of 50-80 rubles per piece, imported spare parts are noticeably more expensive - from 200-250 rubles. Bearings are often sold as a set, that is, in pairs. Imported analogues are of much higher quality, so when choosing parts it is better to buy brand 6202-2RS and 6302-2RS.
Bearing 6302-2RS