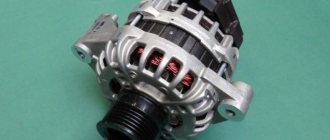
In VAZ 2107 cars, the generator unit is the main element of the electrical system, since it is this device that supplies current to all consumers and equipment. Malfunctions in the functioning of the generator device can cause serious inconvenience to the car owner. This material will allow you to learn how to diagnose and how to remove the VAZ 2107 generator to replace it in case of a malfunction.
Possible malfunctions: signs and causes
Why does the generator not charge and does not charge the battery, what voltage should the unit produce, how to excite and how to ring the device, how is the unit disassembled, assembled and modified?
First, let's look at the main causes of the malfunction why the carburetor or injector device in the VAZ 2107 does not work:
- Wear of the voltage regulator brushes (tablets), this problem is one of the most common and frequently encountered in domestic sevens. These devices are classified as consumables, so sooner or later they will wear out in any case. Since the voltage regulator is responsible for equalizing this parameter, if it breaks down, an overcharge may occur in the electrical network. With more charging, all devices will work unstably, but this is not always possible to determine. For example, if you turn on the optics, you will see that the headlights become dimmer and then brighter.
- Burnout of the windings inside the device. Repair in this case will consist of replacing failed components, but it is not always possible to rewind the windings.
- Damage to the unit body has occurred, in particular, this means mechanical damage. This may allow moisture to enter the device and destroy the components installed inside.
- Wear of bearing elements. When the bearings wear out, the operation of the unit will be accompanied by increased noise or creaking. In some cases, the problem can be solved by adding lubricant to the bearing devices, but this does not always help.
- The diode bridge is broken.
- Mechanical damage or wear of the pulley. It is not possible to restore the operation of the pulley by dismantling and repairing it; the device must be replaced.
- The reason may also be a broken drive belt. Over time, the strap tends to wear out, as a result of which its intensive use can lead to breakage.
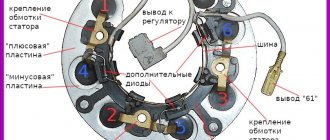
Electrical diagram of the VAZ-2107 generator set (carburetor and injection)
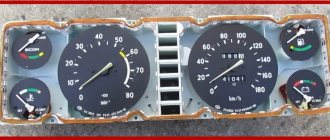
When repairing a VAZ 2107 car generator, you will need this generator set diagram and a detailed current path in the field winding circuit.
1. Battery. 2, 5. Basic rectifier semiconductor diodes. 6. Generator stator winding coils. 7. Semiconductor integrated voltage regulator (charging relay). 8. Excitation winding (rotor) of the generator. 9. Noise filtering capacitor. 10. Mounting block (relays and fuses). 11. “Battery charging” indicator lamp. 12. Voltmeter (on-board voltage indicator). 13. Ignition relay (ignition switch relay). 14. Ignition switch.
Current path of the excitation winding with the ignition on and the engine not running: Terminal “+” of the battery – pink wire – terminal “30” of the generator – pink wire – contact “1” of connector “Ш10” of the mounting block – internal current-carrying tracks of the mounting block – contact “4” » connector “w1” of the mounting block – brown wire – pin “30” of the ignition relay (installed under the dashboard) – closed contacts of the ignition relay – pin “87” of the ignition relay – black and blue wire – pin “6” of connector “w1” of the mounting block – fuse “pr 10” of the mounting block – contact “1” of connector “w 4” of the mounting block – orange wire – contact “4” of the instrument panel connector (black) – conductors and conductive tracks of the instrument panel – contacts of the “battery charging” warning lamp holder – filament of the “battery charging” lamp – socket contacts – instrument panel conductive tracks – contact “2” of the instrument panel connector (white) – white-brown wire – contact “3” of the mounting block connector “w5” – internal conductive tracks of the mounting block – contact “7” connector “Ш10” of the mounting block – white-brown wire – terminal “61” of the generator – connecting bus for additional rectifier diodes – short conductor – charging relay terminal – internal semiconductor junctions of the charging relay – first brush – first contact ring of the rotor – generator excitation winding – the second contact ring of the rotor – the second brush – the “minus” contact – car body parts – the “-” terminal of the battery.
After starting the engine, a positive potential appears at the point “connecting bus of additional rectifier diodes”, current flows from it further to the brushes. The control lamp is shunted (shorted) by open additional diodes and goes out.
Source
Node diagnostics
The functionality of the generator unit is checked using a tester - a multimeter.
How to check the unit yourself:
- First, the tester must be configured in the diagnostic mode for measuring DC voltage. After setting, you need to check the operating parameters of the car battery. In accordance with technical regulations, the voltage level at the terminals should vary around 11.9-12.6 volts. A slight deviation from these limits downwards is allowed, but only in this case if the car uses more energy consumers.
- The verification operation must be performed with an assistant. When the assistant starts the engine, you also need to check the voltage. If the diagnostics show a decrease in this parameter, then this indicates that the unit has either failed or is not functioning correctly. This means that one of its components must be replaced.
- If the voltage value exceeds 14.5 volts, and the parameter does not decrease, this can lead to boiling of the electrolyte solution in the battery (video published by the Auto Electrician HF channel).
Video “Everything you need to know about home renovations”
Find out how to properly repair a generator from the video (the author of the video is Vyacheslav Lyakhov).
Sorry, there are no surveys available at this time.
Author: ides · Published 07/12/2016 · Updated 07/12/2016
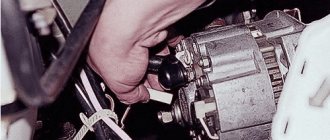
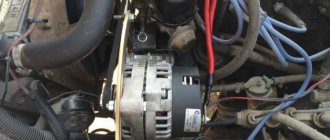
Before removing the VAZ 2107 generator , it is necessary to clearly understand that this work is classified as more complex. Sometimes removal is quite problematic, so before you begin, think carefully about how you will do it and with what tools. Bolts and fasteners most often stick tightly to the fasteners, so you most likely cannot do without WD-40 fluid. In order to remove the VAZ 2107 generator, you will have to work through the wheel arch of the right wheel, which is quite inconvenient, so it is best to carry out the work of dismantling the generator on an inspection hole or a lift.
How to remove the unit with your own hands?
If malfunctions are detected in the operation of the generator device, it is necessary to remove the unit for further repair or replacement. If the generator cannot be repaired, which is extremely rare, then it will be useful for you to learn how to dismantle the unit to change it.
So, how to change the unit yourself:
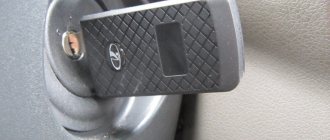
- First you need to open the hood and disconnect the battery terminals, and then disconnect the connector with the connected wire from the unit.
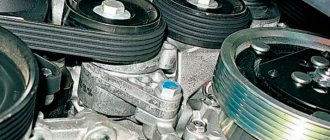
- Then you need to remove the insulating cover from the battery and slightly loosen the device. By loosening the tensioner pulley nut, you can remove the drive belt.
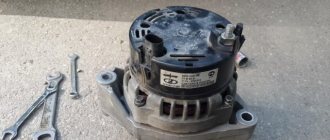
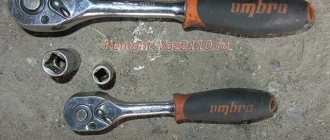
- After this, you will need a 17mm wrench, with its help you will need to unscrew the adjusting bar and remove it.
- Now you should unscrew the fastening nut from the bottom side, and then remove the bolt with sleeve from the seat. After completing these steps, you will be able to dismantle the generator unit (the author of the video is Roman Romanov).
VESKO-TRANS.RU
AutoNews / Reviews / Tests
- Home
- Auto garage
- How to Remove a VAZ 2107 Generator Without a Pit
How to Remove a VAZ 2107 Generator Without a Pit
How to change the generator on a VAZ 2107
Replacing a VAZ 2107 generator yourself is a rather difficult procedure. From time to time, when removing an old generator, severe tasks arise due to the fact that bolted connections and fasteners tightly “stick” to each other. Therefore, before work, you need to thoroughly prepare and stock up not only with tools, but also with the popular WD-40 liquid, which allows you to “free” rusted nuts.
How to troubleshoot the generator of the seventh VAZ model?
Troubleshooting the device involves removing and disassembling the unit to identify failed components.
How to disassemble and repair the unit:
- First you need to unscrew the nut that secures the pulley. When unscrewing, it is necessary to support the rotor mechanism, otherwise it may turn.
- When the nut is unscrewed, the pulley is moved to the side, then the impeller is removed along with the key and washers. When the pulley is removed, you must also disconnect the control device relay. To perform these actions, you need to unscrew the fastening screws and disconnect the block with wires. Then the voltage regulator itself can be removed with the brush mechanism.
- When the regulator is removed, it is necessary to unscrew the nuts that secure the unit cover. After this, the cover itself can be removed, then you need to remove the sleeve.
- At the next stage, it will be necessary to diagnose the performance of the bearing device. Try twisting the bearing without removing it. If you notice that a gap is formed during scrolling, the mechanism will need to be replaced; to remove it, unscrew the device with an 8-mm wrench.
- After this, you will need to remove the rotor mechanism from the installation site. In practice, this is not so easy to do, especially if there are no auxiliary tools at hand. So you will need to take two small pieces of wood and secure them to the edge of the back cover. Using a drift, which must be made of soft metal, the rotor mechanism is knocked out of its installation location. If you accidentally damaged the lid while knocking it out, you can try using a grindstone to restore it.
- Then the rear bearing is checked; it needs to be twisted in the same way as the front one. If there are gaps, the bearing must be replaced. Also, the bearing must be changed if its condition is generally unsatisfactory. To dismantle the device, it is advisable to use a puller.
- Next, you will need to remove the diode bridge; to dismantle this device, you will need to unscrew the nuts that secure its block and leads to the winding. Having done this, you can remove the bolts that secure the stator mechanism, then the diode bridge can be removed. Now you can check the integrity of the winding - if the diagnostics showed damage to it, for example, a broken wire, then you can try to rewind the winding. But, as a rule, rewinding does not help, so the winding will most likely have to be changed.
- Now you will need to unscrew one more nut, and then the bridge can be dismantled without any problems. If the diodes are burned out, then the bridge must be replaced with a new one.
- At the final stage, the screw that secures the capacitor is unscrewed, the device itself is then removed and, if necessary, replaced.
Photo gallery “Do-it-yourself repairs”
1. Slide the pulley and other components.
2. Unscrew the nuts and remove the bearing.
3. Knock the rotor mechanism out of its seat.
4. Remove the diode bridge and replace.
Instructions.
- Remove the entire crankcase protection: the mudguard, as well as the so-called “ski”, after first blowing out all the fastening bolts and nuts with a WD tool.
- Unscrew the nut of the lower mounting of the generator. If you have problems with this, again spray it with WD, wait a little and try again.
- Move from under the bottom of the car to its engine compartment, remove the battery and, using a 17mm wrench and socket, loosen the alternator belt tensioner nut.
- Go under the car again and slide the generator towards the engine.
- Remove the belt from the generator pulley and inspect it for integrity.
- Unscrew and remove all terminals, “chips”, etc. wires connected to the generator.
- Spray the alternator mounting bolt with WD-40 type lubricant. To avoid damaging the thread, screw a nut onto it and tap it with a hammer to knock the bolt out of its seat. Then unscrew the nut and, using any convenient tool at hand (a pry bar, wrench, iron screwdriver, etc.) into its head and a hammer, knock it out completely. It is recommended to hold the generator with your other hand so that it does not accidentally fall out.
- Once the bolt is removed, use a gentle rocking and turning motion to remove the generator.
For reference: before removing the generator on a VAZ 2107 , the car should be driven into a pit or overpass. This will make dismantling work much more convenient.
Ideas for improving the generator and their implementation
One option for modifying the unit is to install a three-level voltage regulator.
How to complete this task:
- Disconnect the terminal from the battery. You need to unscrew the M6 nut on the unit, to do this you will have to use the S10 key, and also move the wires to the side.
- Then the “female” block will need to be pulled off, after which, by prying up the three latches, it is necessary to dismantle the plastic casing of the device.
- Unscrew the two bolts that secure the assembly itself, dismantle the connector and remove it. At the same stage, you will need to unscrew another M6 nut and slightly modify the ends of the spacer sleeve using a file. This will ensure better contact of the device with the diode bridge.
- After this, install the brush holder in place of the adjusting mechanism. To do this, you need to slightly seal the hole through which the wiring enters; use sealant for this.
- Once the plastic casing is finished, it can be put back in place.
- Route the new cable along the existing wiring to the location where the new regulator will be located. Secure it with clamps. In order for the contact of the three-level regulator with the ground, that is, the car body, to be of the highest quality, you can make a shunt by connecting the body of the unit with the new regulator.
- Now all you have to do is screw the remaining wires into place and start the engine to check the operation of the regulator with the voltage consumers turned on. When checking, it is necessary to activate all equipment - radio, optics, heater, glass heating, etc. (video author - Pavel Dorokhov).
Capacitor check
The capacitor serves to protect the vehicle's electronic equipment from voltage surges in the ignition system, as well as to reduce interference with radio reception. Damage to the capacitor or loosening of its fastening on the generator (deterioration of contact with the housing) is detected by an increase in interference to radio reception when the engine is running.
Approximately the serviceability of the capacitor can be checked with a megger or tester (on a scale of 1-10 MOhm). If there is no break in the capacitor, then at the moment the probes of the device are connected to the terminals of the capacitor, the arrow should deviate in the direction of decreasing resistance, and then gradually return back. Capacitor capacity 2.2 µF±20%.
Replacing the generator: description of the process with comments
Sometimes it happens that a car generator completely fails and cannot be repaired. This happens in two cases, after a serious accident, when the generator housing is broken or when the housing falls apart due to age. In such cases, repairing the generator is impractical and it is easier to replace it with a new one. It also happens that after installing a powerful sound system on a car, the owner begins to notice that the standard generator does not have time to charge the battery. In this case, the generator is replaced with a more powerful one.
Often, old cars have simple and reliable generators that work for decades without replacement. When removing such units, it is often necessary to cut off the fastening elements, as they literally “stick.”