Preparing for installation
Before you go to a car store, you should find out what exactly you need to purchase, taking into account the characteristics of your car.
And for this we visually define:
- What type of dashboard is installed in the cabin;
- Are there any seats (stampings) in the front bumper for installing PTF?
Note! Ready-made foglight kits have a lot of differences in the mounting method. In particular, the button for turning on the fog lights of the VAZ 2110 for cars with an old dashboard has a different shape than with a Euro-dashboard.
The kit for connecting fog lights of the VAZ 2110 has a double button for the Euro panel
Legal requirements
In auto parts stores you will find a huge selection of fog lights of different shapes and sizes.
But everything depends on the existing GOST 8769-75, according to the requirements of which:
- Fog lights are only allowed to be installed in pairs;
- Each headlight must be at least 400 mm away from the plane of the side marker (measured along the outer edge of the lens);
- The distance from the road to the lower edge of the lens should not be less than 250 mm;
- PTFs should not be installed higher than the head light.
Despite the “menacing appearance”, the connection diagram for fog lights on the VAZ 2110 has been followed
Note! It is allowed to install PTF on the roof of only those cars that are used on rally tracks or in Off-Road competitions.
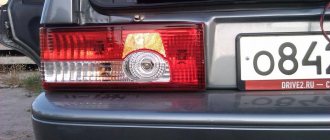
Why are taillights bad?
The real fly in the ointment for the VAZ 2112 model was the work of the rear lights.
The reason for frequent refusals is trivial:
- the conductive tape in the flashlight body has poor contact;
- unstable contact and increased frequency of operation leads to lamp burnout;
- Despite the fact that their price is low, replacement will only help for a short time.
Warning! Unfortunately, replacing the conductive tape from the same manufacturer will also not solve the problem.
Conductive tape - a cheap part with a short life term
Ready-made PTF kits
Today you can find 2 types of foglights on sale, in which the light spot is formed:
- Due to scratches on the glass (classic headlight with reflector);
- Due to the lens (so-called lensed).
Complete set of lensed headlights - wiring, relay and PTF with adjustment system and plugs
Tip: Making stickers for your headlights will protect your lenses from damage.
Which ones to choose depends not only on your desire, but also on the configuration of the set.
In particular, to install PTF you will need:
- Full compliance of the kit with your car model (in this case, VAZ 2110);
- The adjustment system is easy to use (meaning, without removing the bumper or partially disassembling the headlight itself);
- Visual instructions on how to connect fog lights on a VAZ 2110.
Each “correct” kit contains a wiring diagram for VAZ 2110 fog lights
Note! Only fog lights specially designed for the VAZ 2110 can be installed on a car without any body work. Manufacturers whose products are as easy to install as possible include the German Bosch and the domestic Avtosvet Plant, the price of whose products is significantly cheaper.
The famous “Kirzhachi” are produced at the Avtosvet Plant.
So, we found out that cars of the 2110 family may differ in the way they install PTF due to the technical features of the instrument panel and front bumper.
Everything else (installation of headlights and their integration into the electrical circuit) will not create problems, because:
- The automaker has prepared the vehicle as much as possible for the installation of PTF;
- Independent work will take only 1.5-2 hours of pure time.
What's better
One of the questions that 2110 owners ask is which headlights are best to choose for this vehicle. For the VAZ 2110, only Bosch and Kirzhach headlights are standard. If we consider the secondary market, what headlights are suitable for a foreign car?
This car configuration uses the following types of products:
- in the form of a monoblock;
- using lenses;
- modular;
- black;
- chrome plated;
- tinted.
In order not to be confused about which base is in the VAZ headlights, you can refer to the manufacturer’s documentation. Cars have a standard H1 base. When choosing new blocks, you need to focus on this feature.
Self-installation
Electrical connection
Having purchased a ready-made PTF kit, you can begin to integrate it into the standard VAZ electrical wiring system:
- Disconnect the battery (remove “+”);
- Open the fuse box and use a screwdriver to unscrew 1 screw and remove the block into the passenger compartment;
The VAZ 2110 fog light switching circuit is protected by fuses
- We unfold the block and find the terminals of two fuses F4 and F14. The first is responsible for protecting the right headlight, the second – the left;
- The block also contains fuse F20, which is responsible for the operation of the rear PTFs;
Note! The connection diagram for the rear fog lights of the VAZ 2110 is initially present on all models, and consists of two-filament lamps in the side light unit.
- We insert the copper wire connectors from the kit according to the attached diagram;
- Separately, we bring out the wire for the button into the instrument panel and install it;
- We lay the wires through the partition into the engine compartment;
- Putting the fuse block back together.
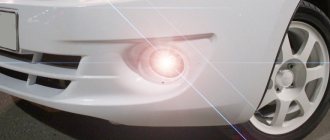
Bumper installation
- Remove the plastic plug and insert the wiring with the connector into the hole;
- We connect it to the base and install the fog lamp for the VAZ 2110 in the bumper;
- Take a Phillips screwdriver and screw the headlight with 2 self-tapping screws;
- We pre-adjust its position;
- We secure the wiring in the engine compartment, leaving some slack for replacement (for example, a burnt-out lamp);
- We connect the battery and check the quality of the work performed.
The photo shows the process of fixing the PTF in the front bumper.
All that remains is to adjust the correct direction of the light flux. You will find information about this procedure in other articles on our website dedicated to AvtoVAZ models.
Features of the VAZ 2110
The VAZ 2110 car is not very different from its younger brothers of the following modifications, but there are still some differences:
- This model does not have front fog lights. Moreover, the car bumper may not even have seats for PTF.
- For some reason, the car has rear fog lights, which seems strange: there are rear ones, but no front ones.
- The VAZ 2110 can be equipped with different types of panels: standard (also called old) and europanel. In the first case, there is no space for installing the PTF power button, but there are several slots for installing additional switches. In the case of the Europanel, the PTF button can be installed in a place previously provided for this, and the fuse panel has sockets for connecting fog lights.
Before you go to the store to buy an anti-fog kit (more about it below), carefully examine your car and find out what panel is installed in it, whether there are seats for fog lamps, what shape they are, etc. Otherwise, you may buy the wrong kit or the wrong fog lights.
Other manufacturers and types of lamps
Of course, many are trying to install other types of light sources and other types of lamps. All headlights discussed above have a halogen lamp. That is, it is actually the same incandescent lamp, but its filament operates in a gas environment (bromine or iodine halogens).
There are also alternative fog lights.
Xenon PTF
Difficult to install and expensive lighting devices.
Standard PTFs converted to xenon fog lights.
The old xenon PTFs worked on lamps D1 and D2, the new ones received lamps D3 and D4 without the use of mercury vapor. Theoretically, the efficiency of such fog lights and the luminous intensity are higher than those of halogen lights. However, do not forget about the specificity of PTF - not to cause reflection of the beam from the water suspension. And all inexpensive xenon headlights require very precise adjustment of the light beam and are not able to provide a low horizontal stripe to combat fog.
In addition, the maximum color temperature for the effectiveness of fog lights is 3000-4500 K , otherwise they will be of no use and blinding light will be provided for oncoming drivers. The prices of such foglights are not lower than 5-7 thousand ( Hella Micro DE , for example). Anything cheaper is useless and even dangerous.
LED PTF
Intelligent LED PTFs are very expensive, and it makes no sense to buy cheap ones.
The main disadvantage of effective LED fog lights is their huge price and low efficiency..
The low efficiency is explained by the fact that a conventional LED produces light that is bright and pleasant to the human eye with a temperature of about 6000 K. This is not bad for head optics, but not for PTF. However, there are exceptions. For example, Osram LEDriving FOG 101 . A high-tech device with LEDs of a proprietary proprietary design with a color temperature of about 3000 K, which is just suitable for PTF.
Price - no less than 16,000 rubles.
Requirements for installing PTF
How legal is it to independently install fog lights and will it not cause problems when meeting with traffic police officers? Let's consider excerpts from the standards by which PTF is established by the manufacturer (GOST 8769–75 and GOST 41.48–2004):
- Number of lanterns – 2 pcs.
- Installation height – not lower than 25 cm from the road surface, but lower than the low beam lights.
- Installation in width - no further than 40 cm from the side lights.
- The vertical coverage angle is 5-10 degrees.
- The lighting angle of the road surface (horizontal) is 45-55 degrees.
- PTFs are turned on only together with the side lights.
If PTFs are installed according to these rules, then no problems will arise with police officers.
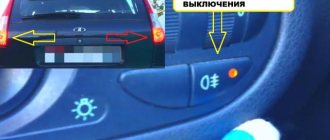
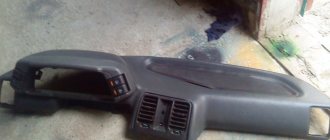
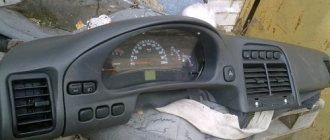
Types of instrument panels and location of fog lamp buttons
As I noted above, depending on the modification, VAZ 2110 cars are equipped with two types of panels: the so-called old panel and the European panel. If you have a Europanel installed, then the place to install the button for turning on the fog lights is located to the left of the steering wheel, and this button is located in close proximity to the button for turning on the side lights.
On some modifications of the Europanel, the buttons for sidelights and fog lights may be located one above the other:
On a regular, old panel there is no special place for installing a PTF switch, but there are places for installing additional buttons for any purpose, including for connecting PTF. They are closed with plugs and are located on the switch panel between the driver and passenger.
On cars with an older panel, the space for additional buttons is located to the right of the driver
The indicated installation locations for the fog light switch on a VAZ are recommended, but not required. You can install the PTF button in any place convenient for you.
Common Mistakes
If a car enthusiast does not have experience in electrical installation work, it is easy to make a mistake when installing a PTF. In order to properly connect the headlights, it is recommended to learn in advance about the typical mistakes of beginners.
Disadvantages and problems:
- The problem arises when connecting the PTF to the dimensions. This system is not designed to handle the current that it must carry due to the additional load introduced. As a result, overheating and melting of the wires is observed. If the PTF lights up along with the dimensions, the equipment will quickly fail.
- If the PTF installation parameters do not meet traffic regulations, traffic police officers may file claims against the driver. If they find a violation of established standards, the driver will be fined.
- It happens that a car enthusiast chooses the wrong place for a button. If it is located too far away, it is difficult for the driver to reach it. This can cause an accident.
If you often drive in poor visibility conditions, you should install PTF. Thanks to them, you will be able to better control your car in difficult conditions, which will provide you with a higher level of safety when driving.
Source
Selection of fog lights for the VAZ 2110
The range of PTFs for the VAZ 2110 today is quite wide: large and small, round and square, yellow and white. Which ones to choose? Everything here will depend on your taste and financial capabilities, but I still dare to give some advice.
- Yellow light is less absorbed by water (and fog and rain are water). This means that yellow PTFs will produce a higher quality light spot than white ones of the same power, and at the same time they will not dazzle oncoming drivers.
- The shape of the headlights does not matter, the main thing is that they should fit the seats of your bumper as best as possible.
- You should not buy very expensive headlights from famous brands. Most often, such companies charge a lot of money just for the fact that they are famous (the so-called surcharge for the brand).
- Before purchasing, take the headlight in your hands and carefully examine the quality of the body and glass. Even by its weight and appearance, you can feel whether it is a worthwhile thing or junk that will fall apart after 100 km of run.
Below I will give some common and affordable PTF models for the VAZ 2110 that really deserve attention.
| Set (2 lights) | Manufacturer | Brand | Peculiarities | Estimated cost at the end of 2022, rub. |
| PL-519DLВ W VAZ | China | DLAA | LED, white glass, smooth | 1 200 |
| PTF VAZ 2110 | Italy | Magneti Marelli Automotive Lighting | Incandescent, white fluted glass | 930 |
| Bosch VAZ | Russia | Ryazan | Incandescent, white fluted glass | 890 |
| Fog lamp VAZ 2110 | Russia | Lada | Incandescent, yellow corrugated glass | 520 |
| Fog lights for VAZ 2110-11-12 | Russia | Stavr | LED, smooth white glass, chrome-plated body | 800 |
| Fog lamp “Osvar” for VAZ car | Russia | Auto Start | Incandescent, white glass, corrugated | 850 |
| HY-174-2LED VAZ | Russia | Auto Key | LED, white glass, lenses | 900 |
| Hella FF 75 VAZ | Germany | Hella | Incandescent, external, white glass, smooth + installation kit (relay, button, etc.) | 5 000 |
| LD-088 | China | DLAA | LED, white glass, lenses | 1 100 |
Installation process
Before installing fog lights on a VAZ 2110, you should carefully consider purchasing them.
But don’t rush to the store, but first figure out what kind of front bumper your car is equipped with. If the bumper has seats for PTF (they are usually closed with plugs), then everything is in order. Measure your seats and go to the store.
If the installation of fog lights on your bumper is not provided, then you will either have to buy a new bumper or do it yourself. Here everything will depend on your desires and capabilities, since there are always PTFs on sale with decorative overlays that can be installed on almost any bumper.
In some modifications of bumpers there are no holes for fog lights, but the places for their installation are stamped. In this case, first select the headlights that will fit your bumper, and only then cut the mounting holes for them.
This can be done using a conventional drill by drilling a series of holes around the perimeter of the future seats.
After the hole is cut or the plugs are removed, install the PTFs in their places, following the instructions and using the fasteners included with the headlights. Typically, headlights are attached through a decorative trim using two screws.
How to upgrade them
- The good news is that we will no longer need conductive tape - neither new nor old. In any case, AvtoVAZ itself abandoned this “karmically” unsuccessful detail in the design of the rear lights of the VAZ 2114 or VAZ 2115 models.
- The bad news is that your car with such tape in the headlamp unit may present an unexpected and unpleasant surprise at the most inopportune time.
But there is a way out - to modernize it yourself, and in fact simplify the design of the rear lights.
Penny purchases
As you know, the best improvement is the one that:
- costs less than the original. And the proposed method will allow you to keep it within 250 rubles;
- simplifies the design. That’s how it will be, because it’s not for nothing that this method is used everywhere.
The proposed method will not lead to the disassembly of half the car. So, go to the nearest auto store and purchase:
- a set of single sockets for direction indicators;
- double sockets for brake lights and parking lights;
- male-female copper connectors;
- high-quality wire 2-3 meters.
Independent steps
Having removed the rear lights from the car, we begin to modernize them. To do this, you will need instructions that will show you how to remove the lighting fixture.
Don't forget that modern cars are full of plastic parts that can easily be broken due to carelessness.
When dismantling, try to do everything carefully
Note! You will need a wiring diagram for the VAZ 2112 injector, and the good news is that it is posted at the beginning of the article.
Locksmith stage
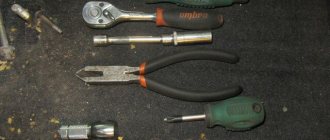
We arm ourselves with cutting tools and begin the alteration:
- in the plastic panel of the headlight housing we mark places for cartridges;
- then we cut holes for them;
- We fix them with self-tapping screws.
This is what the first stage of the remodel looks like
Electric stage
An equally important process for connecting electrical components is as follows:
- We cut off a piece of wire and use it to make a common “ground”. To do this, we connect the “-” terminal of all cartridges in series, having previously secured the male-female connector to the wire;
- Cut the wire again and connect it to the “+” turn terminal;
- Using the next piece of wire we connect the “+” terminal of the side and stop lights in series;
- Referring to the diagram, we connect the connector block with the free ends of the wiring.
This is what the inside of the headlight will look like after your modifications
Tip: be sure to test the assembled circuit to identify a short circuit.
Connection to electrical circuit
So, the VAZ fog lights are installed in their regular places, all that remains is to connect them to the VAZ hog network. According to the current rules (see above), PTF can only be turned on together with the side lights. If you turn on the PTF, but forget to turn on the “dimensions”, then this will already be a violation.
The fact is that the fog lights are installed quite close to each other, and in the dark the oncoming driver will not be able to correctly assess the width of your car. That is why the side lights must be on when the PTF is operating.
To prevent this from happening, the connection diagram for fog lights in a VAZ is assembled in such a way that they cannot be turned on with the lights turned off. Despite its apparent complexity, the circuit is quite simple, and anyone with basic knowledge of electrical engineering can understand it.
Typical electrical connection diagram for PTF VAZ 2110
When the headlights are turned on, voltage from them is supplied to the fog light switch, allowing it to start working. When you press it, voltage is supplied to the electromagnetic relay, which connects the VAZ fog lights to the +12 V bus. The second wire supplying the headlights is connected to the car body, which, as you know, is the negative wire for all VAZ electrical equipment.
At the same time, the supply voltage is supplied to the indicator lamp, indicating that the PTFs are turned on. So that in the dark the fog light switch can be easily found on the panel, it is illuminated by a miniature pilot lamp. It can be connected in parallel to any panel backlight lamp.
If you are not very experienced in electrical engineering, then you may have a question: why a relay if voltage can be supplied to the headlights directly from the switch? The fact is that fog lights consume quite a lot of current, which neither the PTF switch nor the headlight switch wiring simply can withstand.
In the best case, when turning on the PTF without a relay, the fuse for the dimensions will burn out, in the worst case, the wiring of the dimensions and the equipment that powers them will burn out.
Theoretically, the scheme is clear, but how to implement it in practice? As I said above, there are several modifications of the VAZ 2110, 2111, 2112 that are not equipped with fog lights. Some have old-type panels, others have so-called Europanels. Let's consider the installation procedure for both cases.
Connecting PTF in a car with an old panel
Based on the above diagram, in order to organize fog lighting on this VAZ model, in addition to the fog lights, you will have to buy an installation kit consisting of the following elements:
- PTF power button;
- PTF turn-on relay;
- set of installation wires;
- fuse(s);
- accessories (ties, terminals, brackets, adapters, etc.);
- connection instructions.
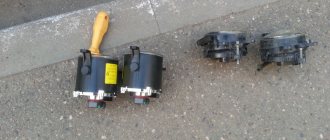
Kit for connecting fog lights for VAZ 2110 with an old panel
When buying a kit, choose the one that is designed specifically for the standard VAZ 2110 panel. The standard and Euro panels differ in the shape and size of the PTF button seats.
If the kit is in hand and the illuminators are installed, all that remains is to assemble a circuit that will look like this:
PTF connection diagram for the old panel (pin 86 is connected to the car body)
The only problem that will have to be solved is to find a place for the relay, since the car’s design does not imply a standard mounting. You can place it anywhere: even under the panel, even in the engine compartment away from the heating parts of the engine.
If the kit does not come with a coil of wire, but with ready-made wires with connectors, then when installing the relay, be guided by the length of these wires.
Option for relay location for fog lights in the engine compartment
All that remains is to lay the wires and, if necessary, press the knife pads that come with the kit onto them (ordinary pliers will do), and then assemble the circuit. When laying wires, try to run them close to the standard harnesses - this is the safest place for them. They will not fray or fall on the hot parts of the engine. At the same time, take the length of the wires with a small margin and often grab them to the body or the standard wiring harness with the clamps included in the kit.
Be sure to install the fuse included in the kit! In the event of an accident in the wiring of the fog lights, it will save the car from fire.
Connecting PTF in a car with a Europanel
If your car has a Europanel installed, then the connection diagram for the fog lights changes somewhat, since the manufacturer has provided for their installation. In addition, the kit for connecting fog lights for VAZ, as I noted above, should have a button of a slightly different shape than for cars with a regular panel.
Kit for connecting fog lights for VAZ 2110 with Europanel (the difference is in the shape of a button)
After the wires from the lights are brought into the cabin, open the wiring box, which is located on the left under the steering wheel:
The VAZ 2110 mounting box with Europanel is secured with two self-tapping screws
Find the locations of fuses F4 and F14. If they already have 10 A fuses, then everything is in order. If not, then install the ones included with the kit. They will be responsible for the safe operation of the right and left headlights, respectively.
Marking of fuses VAZ 2110 with Europanel
All that remains is to assemble the circuit by connecting the relays, illuminators and button according to the diagram above and connect it all to blocks Ш1 and Ш3.
PTF connection diagram for VAZ 2110 europanel
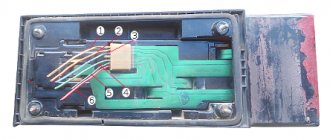
Where can I find these pads? They are located on the side opposite the fuses in the same mounting block, and they are numbered as follows:
Numbering of mounting pads for VAZ 2110 with Europanel
After installing and connecting the fog lights, do not forget to adjust them correctly and make sure that they shine in the right direction. Otherwise, they will not so much help in bad weather as hinder you and oncoming drivers.
So we figured out how to install non-standard fog lights on a VAZ 2110 with our own hands. It turns out that this is not difficult to do yourself, and installing them is completely legal and even desirable. After all, good lighting on the road is additional safety for all road users.
Direction indicators
The direction indicators (left or right) are activated by the steering column switch. The hazard warning mode (all direction indicators flash) is activated by pressing the corresponding button. The blinking of the lamps in this mode is ensured by a short-circuit breaker relay type 493.3747 in the mounting block. If one of the turn signal lamps burns out, the blinking frequency of the remaining lamps and the warning lamp doubles. In normal mode, the blinking frequency should be 90±30 cycles per minute at an ambient temperature of -40 to +65°C and a voltage of 10.8 to 15 V.
Why is this necessary?
Modern fog lights provide significantly more “penetrating” light through fog and rain and better illuminate the road surface. Firstly, PTFs produce a flatter luminous flux, spreading above the ground and spreading more in width than in height.
This was not done in vain. The fact is that due to the discrepancy in the temperature of the air and the ground (the ground is warmer), the fog rarely reaches the road itself, which means that with such headlights on the VAZ 2110 you will see the road you are driving on at least ten meters further ahead low beam headlights.
Secondly, due to the beam width of the fog lights, you will see the roadside and markings. This will prevent you from “flying off” the road, which is not uncommon in fog.
Thirdly, you will not blind oncoming cars, but you yourself will be visible to other road users, if, of course, the adjustment is made correctly. This means that the probability that another car will not crash into your VAZ 2110 increases.
The principle of operation of the fog lamp
Before grabbing the tools and adjusting the position of the PTF on the car with your own hands, every car owner must understand the features of their operation.
And for this you need to remember that fog:
- These are the smallest particles of moisture that are in the air;
- The emanating heat from the ground (road surface) does not allow them to sink, causing them to literally hang, which leads to the formation of a milky veil;
- The stream of light, reflected from them like a mirror, returns back and blinds the driver.
Narrow work space
All drivers know that turning on regular headlights in fog leads to poor visibility. This happens because droplets of moisture are located exactly at the level of the headlight of a modern car. After all, their location was determined for better illumination of the road situation - as close as possible to the driver’s organs of vision.
But PTF has another task - to make movement in fog possible. That’s why they are installed on cars as low as possible to the road surface, so that they, as they say, “shine under the fog.”
Correctly adjusted PTF shines “under the fog”
The fact is that moist air close to the ground is drier and, accordingly, does not have glare properties.
Technical feature of the luminous flux
The second point that should be emphasized is that:
- The beam of the fog lights along the top edge has a clear boundary:
- This is done so that when it hits drops of moisture, it does not refract upward and blind drivers.
The peculiarity of PTF operation is the crossed upper limit
Roadside lighting
There is another feature of fog lights that is often forgotten.
After all, it is the same lighting device as the head light, i.e. must:
- Create sufficient visibility of the road situation for movement;
- And illuminate the side of the road to the right of the car in the direction of travel.
Both regular and fog lights should illuminate not only the road ahead, but also the right side of the road
Color meaning
Some people, in the old fashioned way, believe that it is better when the fog glass is yellow. But this is not true. Most leading manufacturers today produce transparent white fog lights, and they are not only as good as yellow ones, but often superior to them.
On the VAZ 2110 you can install corrugated or transparent glass. The latter are for some reason more fashionable, although less useful, since they shine in spots, while the corrugated ones give a more directed beam, which really increases visibility in bad weather.
Basic operating principle of electrical equipment
Note. It should be noted that the general principle of operation of electrical equipment on all VAZ families is identical.
- absolutely all electronic devices of the car are connected according to the principle of a single-wire circuit;
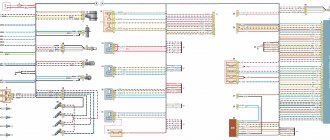
VAZ 2110 wiring diagram
- the car body acts as a negative wire;
- all consumer terminals, together with power sources, have a direct connection to the car body.
Note. All electrical wiring wires have a strictly defined color, which is indicated in the diagram by the first letter of the name of the corresponding word.
The power wire is always marked in red in all diagrams and is designated by the letter “P”, since it supplies power to the positive terminal of the battery.
Buying what you need
You can, in principle, buy a ready-made set along with wires, but many believe that if you buy everything separately, the number of installation options increases, and it will all cost less. So, we buy:
- Set of headlights (2 pieces);
- Plastic pads;
- Headlight frames;
- A key and a yellow indicator for it;
- Relay;
- Wires. It is better to purchase ones from an electrical equipment store, so that there are two copper conductors with double insulation (ShVVP-2 is suitable). A cross section of 0.5 mm will also be normal, but if you want to install lamps of higher power, take 0.75 mm;
- Terminal for installation to ground;
- Wide as well as narrow terminals, called mother/father. When purchasing them, it is advisable not to take them complete with wires. Installation will be more convenient if these terminals are crimped with pliers already on the connections of the installed wires.
Kit for connecting fog lights on VAZ 2110
Note: if your VAZ has an old-style dashboard, then it is better to buy a PTF 2110 kit, but for a new, so-called EURO, it is more convenient to connect PTF 2115.
You can, of course, vary it, but we are talking specifically about the convenience of the location of the buttons. Regarding the power of the lamps, 55 W is enough, no more is needed. Also keep in mind that very cheap fog lights will not last long.
Why don't the brake lights light up?
Almost any problem with electronics in a car can be solved in the same way. You need to look for the problem either in the device itself, which is faulty, or in the power supply system to it. The situation is similar with the main reasons for the breakdown of brake lights. If they do not light up, it may be due to one (or several) of the following reasons:
- Problem with the brake light fuse: its oxidation or failure;
- Malfunction of the lamp(s) installed in the brake light;
- Problem with the brake light activation mechanism when pressing the brake pedal;
- Oxidized contacts in the socket for installing the brake light lamp;
- Damage to electrical wiring.
As you can see, among the problems listed above, only one can cause serious problems for the driver if he wants to repair the brake lights himself, and we are talking about wear and tear on the electrical wiring. Modern cars are equipped with dozens of electronic devices, and a worn, torn or improperly clamped wiring harness can cause your brake lights to turn off. If none of the troubleshooting steps below resolve the problem, it is most likely a wiring issue. In such a situation, you will need to find a detailed plan for the car's electrical wiring and check with a tester for the presence of voltage in the sections, and after finding the problem, solder or replace the wires.
But don’t rush to get a tester, most often the brake lights don’t light up due to much more mundane faults, the elimination of which will be discussed below.