Cooling system pipes for VAZ 1118 Kalina and 2170 Priora...
Greetings to all readers of the autoblog RtiIvaz.ru. In the auto repair kit section, I published a story from a car enthusiast, where he asks a question to all car enthusiasts - why do the cooling system pipes of VAZs break?
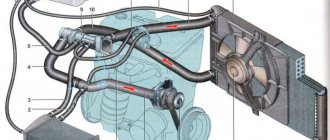
Today I want to continue talking about the radiator pipes of the cooling system. The radiator pipes of VAZ, Kalina-1118, Priora-2170, Grant-2190 cars supplying “upper” and also discharging “lower” coolant through themselves are designed for an elastic connection between the engine and the radiator.
Replacing pipes for a Priora stove without air conditioning
Heater (stove) and air conditioner - design, service, malfunctions, removal and installation of the heater (stove) and radiator on a VAZ 2170 2171 2172 Priora (Priora)
What is a heater radiator for the cooling system of Priora, many people guess, but everyone knows for sure. Popularly, this heater has its own name: stove radiator. This means that it is first used in cool periods, when the air passing through the heater radiator is heated and supplied to the cabin. And if so, then they remember about this same heater radiator at the worst possible moment, when it’s already winter and cold outside, and then repair work and research begins on how to change it, and where to look and fix it. In fact, “how” and “what” are also an important factor, because without certain knowledge you cannot get into the Priora system, it will be of no use except for wasted time. So, in order to make it clearer to you what and why, and to make it easier to repair your stove on the Lada Priora, we have prepared this article. Kommersant
By the way, it’s not only about the stove, but also about the air conditioning system and air conditioning, so we’ll also talk about that.
Design features of the stove-heater Lada Priora VAZ 2170 2171 2172 (Lada Priora)
The Priora car is equipped with a stove - a heater (Fig. 1) of a liquid type, combined with the system
Main elements of the heater:
– heat exchanger of the heater (radiator), designed to heat the air entering the cabin with the heat of the water cooling the engine;
– an electronically driven fan (supercharger), providing a controlled supply of external air to the heater dampers;
– a damper for the air temperature regulator coming from the heater into the passenger compartment, the position of which determines the amount of air passing through the heat exchanger of the heater, and the amount of external air passing bypassing the heat exchanger;
– air heating distributor dampers 4, which distribute the air entering the cabin from the heater through air ducts 2, 6, 8 and 9 or for blowing the windshield.
Rice. 1. Priora interior ventilation and heating system: 1 – left side ventilation nozzle; 2 – left ventilation air duct; 3 – side window heating nozzle; 4 – air heating distributor; 5 – heater; 6 – right ventilation air duct; 7 – right side ventilation nozzle; 8 – air duct for heating legs; 9 – interior heating air duct; 10 – central ventilation nozzle.
In turn, the exposed components of the Pyrora stove can be divided into components. Let's start with the dispersal block
Now let’s take a look at what the stove heater consists of, which, like in the tenth family, is installed on the engine side, in other words, it is installed and removed from the engine side.
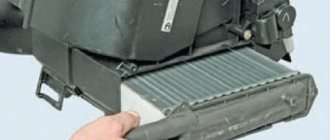
1, 3 — housing parts of the Priora heater, 2 — air filter, 4 — gear motor, 5 — heater radiator, 6 — sensor, 7 — heater (heater) fan.
Sketch 2 The main elements of ventilation of the central part in the Lada Priora car
Replacing the heater radiator of a VAZ 21072 Priora, in an hour
Replacing the stove radiator
VAZ
Priora without
removing the brake vacuum. This is the most important point where many became.
Replacing the radiator of the fan heater or damper of a VAZ Priora without removing the brake vacuum.
Quite a quick and less easy method to get to the stove
Lada Priora car
without air conditioning
. Saved.
Replacing the heater radiator on a Lada Priora
If the stove on your Lada Priora starts blowing cold air instead of hot air, you should pay attention to the heater radiator. There are already discussions on our website about why the stove on a Priora does not work, but we still decided to publish additional material on replacing the heater radiator with our own hands.
Features of the design of the stove on the Lada Priora
Main elements of the heater:
– heater heat exchanger (radiator), designed to heat the air entering the passenger compartment with the heat of the engine cooling liquid; – an electrically driven fan (supercharger), providing a controlled supply of outside air to the heater dampers; – a damper for the air temperature regulator coming from the heater into the passenger compartment, the position of which determines the amount of air passing through the heat exchanger of the heater, and the amount of outside air passing bypassing the heat exchanger; – air heating distributor dampers 4, which distribute the air entering the cabin from the heater through air ducts 2, 6, 8 and 9 or for blowing the windshield.
PayAnyWay payment:
1. Payment/transfer to Sberbank VISA card № ( 4276 1633 1094 5170 )
Payment transfer methods:
A. The simplest and most proven method, transfer from any bank card to a VISA illva.ru store through the online service of Alfa Bank, Commission is only 1.95%.
b. Through payment terminals: QIWI Instructions or Cyberplat Instructions
d. Many other methods are described on the VISA portal.
2. After payment is received in the bank account, the order is delivered to the client. When sending goods through a transport company, they are delivered to the transport company and sent for further transportation to the client’s city. The Client is provided with a bill of lading number via SMS notification or to the specified e-mail, to track the cargo on the transport company’s website;
Payment in cash upon receipt.
Payment in cash upon receipt.
QIWI (transfer to wallet +79221511117)
Payment system via QIWI wallet
Internet banks WebMoney, AliPay and others El.Money Yandex.Money to No. 410011443465084
Payment method through the electronic payment service Yandex Money.
Payment upon delivery by MAIL, activated after payment
Source
How to replace the radiator of a Priora stove without air conditioning
In winter, as you know, car enthusiasts turn on the stove to avoid freezing.
Its normal operation ensures a comfortable temperature inside the car, and this, in turn, is the key to safe driving. However, there are times when this unit stops supplying warm air. The reasons can be very different, for example, problems with the radiator. Many people, including owners of Lada Priora, both equipped with air conditioning and without it, encounter malfunctions of this kind. In some cases, it will only take a minute to fix the problem because you just need to replace the blown fuse. But there are situations when more serious repair work, such as replacing a radiator, cannot be avoided. However, there is nothing particularly complicated here. Everything can be done with your own hands - you just need the appropriate desire and a little time.
Article number and cost of antifreeze for Priora
According to factory standards, coolant of different brands cannot be mixed in Lada Priora. The Lada-A40 brand is suitable for Priora, its catalog number is: 88888100005082. The cost of the liquid is approximately 550 RUR. rub. for 5kg. There is also a list of acceptable liquids:
- Antifreeze G-48;
- Macra Cool Stream liquid Standard/Premium;
- 2 types OZh-40 Tosol-TS/OZh-65 Tosol-TS.
OZH-K Tosol-TS;
What types of car malfunctions can occur due to antifreeze?
When the coolant begins to drain, the owner of the Lada Priora should think about why this is happening. Antifreeze leaks often occur due to mechanical damage to the cooling system. In the worst case scenario, the engine overheats and the cylinder head gasket burns out.
The car owner noticed that antifreeze was constantly flowing, reasons:
- Leak between block and cylinder head. In this case, you can tighten the bolts better.
- When the radiator is damaged. You can try to replace it, but there are times when only repairs are required.
- The water pump has become unusable. The situation can be corrected by replacing the pump.
- The pipes are damaged. Initially, you need to tighten the clamps; if the problem does not go away, you can replace the hoses and pipes with new ones.
- The expansion tank of the automobile cooling system is damaged. There is only one option - replace the tank.
- Malfunctions can also be short-term in nature:
- There is scale on the cooling jacket; it can also be seen on the pipes and on the walls of the radiator. Flushing the system will help. Next, fill in new high-quality coolant.
- The existing antifreeze circulates poorly through the system. In certain cases, the pump, and in some cases the entire water pump, needs to be replaced.
- When the car owner first notices a low coolant level, he needs to top it up to the level. If the leak becomes regular, the system needs to be checked for leaks.
How to replace a Lada Priora radiator heater without air conditioning
First of all, let's look at the main elements of the VAZ-2170 heating system. They are, in particular:
- heater radiator (heat exchanger) – this is where the coolant is heated;
- fan - with its help warm air is supplied to the car interior;
- regulators – heating intensity and heat distribution zones.
The scheme is, in principle, traditional, and there are no particularly complex technical delights here. If you notice that warm air is not flowing into the cabin while the heater is on, you should inspect the entire system. If a radiator leak is detected, the latter will have to be removed either in order to be soldered, or to be replaced with a new one. Let's look at how this procedure can be done with your own hands on a Priora without air conditioning.
The first thing that is recommended to do before starting the main work is to remove the negative terminal from the battery.
Do not neglect this advice, because it is, firstly, about your safety, and secondly, it is additional insurance against a number of different unpleasant surprises with wiring and electrical equipment.
First you will need to remove the hood seal. Please note that in the middle of the pad there is a screw with which the halves are pulled together. After this, use a screwdriver or knife to carefully pry up the plugs covering the screws and unscrew them. That's it - the cover can be removed.
If everything went well, then you can move on. At this stage, you should remove the sound insulation from the engine compartment. To do this, unscrew the screws with which it is actually attached, and then remove the lining, left and right (the order does not matter). After this, you can move on to the pipes leading directly to the radiator. In order to remove them, you will first need to loosen the retaining clamps. Place a container to drain the coolant first.
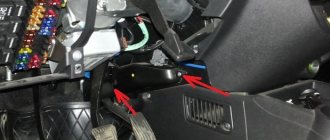
Now you can remove all the wires that lead to the heater from the connectors. Having disconnected them, take two keys - 10 and 8 - and unscrew the 4 nuts. The wiring harness should be moved to the side so that it does not interfere, after first removing the holder. After this, we move into the car interior and take a socket wrench size 13. With its help, remove the bracket from the brake pedal, and
move it to the side. That's all - you have free access to the heater radiator. In order to remove it, you need to unscrew 3 screws using a Phillips screwdriver, after which the unit can be easily removed. All work on installing the radiator is carried out in reverse order.
As you can see, there is really nothing particularly difficult here. In order to remove the heater radiator on a Priora without air conditioning yourself, you will need some time (it all depends on your skills) and a minimum set of tools. On the other hand, you save money because you do all the work yourself, rather than turning to specialists at a car service center. Even if you have never encountered this before, figuring out how to remove the Priora radiator will not be difficult. The eyes, as you know, are afraid, while the hands do. It’s probably worth listening to folk wisdom.
Step-by-step instructions for replacing antifreeze in Priora yourself
Replacing the coolant yourself requires some tools and items, check out the list before you get started:
- 13th key;
- Phillips screwdriver;
- Capacity 10 l.;
- Coolant – 8l.
Before the antifreeze is replaced on the LADA Priora, it is, of course, necessary to drain the old antifreeze. First you need to wait until the “engine” and the coolant itself cool down, this is required in order to avoid getting burns.
A procedure such as replacing the coolant is carried out in the following sequence:
- We drive the car into the pit and stop it accordingly.
- Remove the negative terminal from the battery.
- We remove the crankcase protection of the power unit.
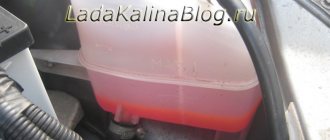
- Remove the cap of the expansion tank of the cooling system.
- We substitute the previously prepared container under the “engine”.
- We unscrew the drain plug, a key will help with this.
- The plug should be tightened when all the antifreeze has completely drained out.
- We transfer the container with the drained antifreeze under the radiator and unscrew the cap on it, from here it is also necessary to drain the antifreeze.
- Close the plug after the coolant has drained.
- Disconnect the throttle body heating hose.
- Fill in new antifreeze within the MIN/MAX marks.
- We install the throttle body heating hose in place. Tighten the pipe properly.
- Check the steam outlet pipe for leaks.
Replacing the radiator of a heating device in a Lada Priora car
Almost every motorist who owns a domestic vehicle discovers a malfunction of the car’s heating unit in the winter. After all, only with the onset of severe cold does a person begin to think about how to avoid freezing while driving a car. Naturally, everyone uses a stove for this. However, what should those for whom this very device has ceased to function properly do? After all, only the heater can ensure that the cabin maintains a normal temperature, allowing for comfortable movement. In this article we will look at only one reason why the heating device stops working, we will learn about the principles of repairing and replacing the heater radiator installed in a Lada Priora car.
If the motorist is sure that it is necessary to replace the heater core, it may take a lot of time to eliminate the faulty object, since most likely, in the process it will be necessary to replace not just a blown fuse, but to carry out more serious repair work. True, you should not immediately despair because of your ignorance; the material contains detailed instructions to help everyone understand how to replace the stove radiator in a Priora with and without air conditioning.
Choosing coolant for Lada Priora. What does AvtoVAZ recommend?
AvtoVAZ recommends filling the Priora with factory fluid and not mixing it with antifreeze and antifreeze of other brands.
Approved coolant types include:
- OZH-K Tosol-TS
- OZh-40 Tosol-TS
- OZh-65 Tosol-TS
- Antifreeze G-48
- Felix Carbox G12
- Cool Stream Standard
- Cool Stream Premium
- G-Energy Antefreeze
- Antifreeze Sintec, etc.
A complete list of recommended coolants can be found in the operating instructions for the Lada Priora car.
Replacing the radiator of a heating unit in a Priora that is not equipped with air conditioning
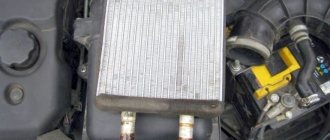
Replacing the heater radiator on a Priora without air conditioning may make sense if warm air has stopped flowing into the cabin, while the heater itself is working. If, in addition to the above problem, there is also a water leak from under the Priora stove, the motorist will have to remove the poorly functioning unit in order to solder the latter. Sometimes repairs are impractical and you have to replace the old device with a new one.
So, first of all, you need to start by removing the negative terminal from the battery. The fact is that the issue here is not only about the safety of the master himself, but also about additional insurance, which allows him to avoid several unpleasant surprises that, if handled carelessly, can arise not only with wiring, but also with electrical equipment.
If you are replacing the heater radiator on a Priora without air conditioning, after de-energizing the system, you can begin to dismantle the windshield trim. At the same time, the wiper levers, which can cause future discomfort during operation, should also be removed. After this, you should rid the unit of all plastic tubes through which the liquid located in the windshield washer reservoir goes directly to the nozzles. Only after all the above steps have been completed will it be possible to remove the decorative trim located along the edges of the windshield. In fact, it’s easy to carry out such a manipulation - just get rid of seven self-tapping screws.
Replacing the heater radiator on a Priora can only be done after removing the hood seal. Before dismantling, it should be noted that in the middle of the lining there is a screw that tightens both halves of the structure. Using a screwdriver or any knife, you can gently lift the plugs (this element serves as the “cover” of the screw) and unscrew them.
How to change it correctly?
Next, we will look at how to correctly replace the working fluid of the cooling system in a Lada Priora car with an electronic pedal or with air conditioning. You can change the refrigerant at a service station, but this task is quite simple and anyone can handle it on their own. For the best effect it is necessary, we will talk about this below.
Preparation
Before you begin the process, prepare the following:
- fresh refrigerant in the required volume;
- seal for the drain cover if the old one is worn out;
- set of wrenches;
- clean rags;
- container for collecting used antifreeze.
The Lada Priora Repair and Maintenance channel provided a video that demonstrated the procedure for draining the working fluid from the cooling system.
How to replace antifreeze on a Priora:
- Drive the car into a garage with a pit; you will need a flat surface to perform the work. Wait until the engine cools down; the entire process is carried out cold.
- There should not be high pressure in the cooling system. To reset it, open the hood and unscrew the expansion tank cap. If the engine is hot, coolant may spray out of the hole, so use a rag when opening it.
- Dismantle the plastic protection of the power unit. To remove it you need to unscrew two fasteners on the sides. It is not necessary to dismantle the clamps, but removing them will make the task more convenient.
- If your car is equipped with a transmission with control cables, then it is necessary to dismantle the starter device. To do this, disconnect the negative terminal from the car battery. Press the fastening of the connector with the wiring and disconnect the plug from the output of the traction relay. Remove the protective cap from the nut securing the tip of the wire connected to the positive terminal of the battery. Using a 13mm wrench, unscrew the nut and remove the cable tip from the contact screw on the traction relay. Then use the same tool to unscrew the screws and dismantle the starter device. If the car's transmission is controlled by traction, then there is no need to dismantle the starter.
- Find the drain plug; it is located directly on the cylinder block. You need to place an old bucket or basin under it, into which the used refrigerant will be drained. Unscrew the cap and wait until the liquid comes out of the system. Also unscrew the protective valve under the radiator device; some of the substance will also flow out of it. When the draining is complete, you need to tighten both plugs. Don't forget to check the condition of the seal on the drain cap. If it is worn out or there are traces of defects, the ring must be replaced.
- Assess the condition of the refrigerant drained from the refrigeration system. If there are traces of deposits, wear products, or the liquid as a whole is very cloudy and viscous, it is recommended to flush all components. To do this, pour about 7.8 liters of distilled water into the system through the expansion tank. You can add vinegar or citric acid to it to remove dirt. The use of special cleaning agents is allowed. After filling, the engine starts, you can perform a test drive. Then the procedure for draining the refrigerant from the power unit is repeated. If the liquid is still dirty, then the washing is repeated until it comes out clear.
- Assess the condition of all pipes and lines of the cooling system. If there is damage or signs of leaks, the hoses must be replaced.
- The next step is to pour new refrigerant into the system. To prevent an air lock from appearing in the lines and eliminate air entering the system, it is recommended to slightly loosen the clamp of the pipe connected to the throttle assembly. The hose is then disconnected.
- The cooling system is filled with fresh antifreeze through the filler neck in the expansion tank. New refrigerant is poured in until it comes out of the pipe disconnected from the throttle. When this happens, the line is connected into place and the clamp is securely tightened. Then the refrigerant is added to the system to the required level.
- All previously dismantled components are reassembled in reverse order.
- The engine starts and the journey is carried out. Now you need to once again make sure that the fluid level is correct. Make sure there is no leakage from the drain hole.
Remove the cover on the expansion tank Unscrew the drain valve on the radiator cooling device of the engine Remove the starter from the car by disconnecting all fasteners
Next, we will look at how to correctly replace the working fluid of the cooling system in a Lada Priora car with an electronic pedal or with air conditioning. You can change the refrigerant at a service station, but this task is quite simple and anyone can handle it on their own. For the best effect, it is necessary to flush the cooling system, we will discuss this below.
Installation of a new radiator in a Lada Priora with air conditioning
Replacing the heater radiator in a Priora car with air conditioning is a fairly simple process. The latter unit appeared only in newer cars, in particular, Priors began to be equipped with a HALLA or Panasonic climate control system. Thanks to the new component, you can replace any part of a non-working stove only by dismantling the frill, getting rid of the windshield wipers, the stove itself or the vacuum brake booster.
If a motorist wants to understand how to remove the heater radiator on a Priora with air conditioning, he must start by removing the sound insulation located in the engine panel. After this, you should dismantle the power unit air filter hose and remove the seal, which is located near the radiator hoses. Then you should drain the coolant and lift the radiator up towards the mechanic.
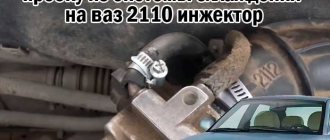
Replacing the supply pipe on a VAZ 2110
The pipe, gaskets and hose for the radiator must be purchased from a trusted dealer. Cheap counterfeits cannot withstand the high temperature and pressure of the coolant.
Removing the pump guard
To carry out the replacement procedure, you must:
- Drain the antifreeze from the engine block (work on a “hot” engine is prohibited) into a previously prepared container.
- Unscrew 2 bolts securing the pump and 2 from the engine block.
- Remove the pipe from the engine compartment.
Before installing a new supply pipe, apply a thin layer of automotive sealant to the gaskets. Reassemble in reverse order. Fill with coolant and check for leaks. If you suspect the integrity of the rubber hose of the expansion tank, replace it.
Cooling system pipe
What is a pipe? There are often several of them in a cooling system; they connect individual parts into one sleeve and are the basis for cooling.
Pipes can be divided into two types:
From the names it becomes clear that the outlet pipe is designed to drain coolant, and the inlet pipe is designed to supply it. To cool the engine, antifreeze or antifreeze is most often used, since at very low temperatures they tend not to freeze.
It is worth recalling that two pipes of different types should not be confused or swapped, since their operating temperature conditions are different.
Most often, the supply pipe fails, since the load on it is maximum, which leads to the rubber drying out, as a result it can leak or even burst.
Mixing liquids
The type of coolant is indicated on the packaging. The letter G with a two-digit number and pluses indicates the type of antifreeze, the letters TL indicate antifreeze.
Under no circumstances should you mix antifreeze and antifreeze.
Antifreezes G11 and G12 have different additives: in G11 they create a protective film, and in G12 they eliminate rust. It is unknown how additives will behave when interacting, so mixing liquids of these categories is not recommended.
G11 and G13 contain different base alcohols (ethylene glycol and polypropylene glycol, respectively), so they cannot be mixed categorically.
Antifreezes of classes G12, G12+ and G12++ are made on the basis of ethylene glycol, they contain both organic and inorganic additives of the same nature, so mixing them is permissible.
Coolant compatibility is shown in the table below.
Signs of a broken cooling system pipe
The first and most common sign of a cooling system failure under the hood or under the car is wet and slightly greasy spots of coolant. These are the first signs that a pipe has burst somewhere. Also in the cabin on the instrument panel, there is a special indicator that will show the low fluid level in the expansion tank.
If the sensor fails, the engine temperature will rise rapidly, which may result in the engine boiling. It also happens that you can smell antifreeze in the cabin; this is an indicator that the pipe may burst not under the hood, but under the front panel or in the area of the interior partition and engine.
Many experienced car enthusiasts advise, from time to time, to simply check the level of antifreeze in the expansion tank. Inspect the pipes for greasy, oily stains and do not delay repairs if this is detected.
How to find a coolant leak in the system. First of all, it is worth inspecting the expansion tank for leaks. Next we move on to the radiator, since it is most often damaged. When inspecting, special attention should be paid to the joints of pipes (nozzles) and honeycombs, which are easily damaged.
Next, we inspect the pipes and hoses themselves along their entire length, since it is through them that the coolant circulates. Do not forget about the clamps at the connection points; due to engine vibration, the clamps may become loose, which means the pipe may come off the mounting point and leak.
The last and most unpleasant failure of the cooling system is liquid getting into the oil jacket. As a result, checking the oil level with a dipstick or opening the filler cap to fill the oil, you can see how it foams. This is the first sign that coolant has gotten into the oil.
How to remove an air lock on a Priora
On a car, malfunctions occur in the cooling system, and an air lock may form. To remove air from the system, you need to use its hoses. This is done in one of two ways. In each case, you need to wait until the power plant has completely cooled down, and only then begin to troubleshoot the problem.
It is best to wear thick gloves before work to avoid burns. Warm up the engine a little and be sure to turn off the car. Remove the tube and clamp from the heating when antifreeze flows. Put everything back in its rightful place and tighten the clamp again. Air will escape under the resulting pressure.
A device such as the throttle assembly clamp needs to be loosened, then the tube must be removed from the heating. Next, open the lid of the special expansion tank of the cooling system located in the engine compartment, cover the neck with a clean rag and blow through it properly. You will see air coming out. You need to tighten the cap when the coolant appears directly.
If, after you have replaced the coolant, you notice that the engine cooling system is not functioning correctly, then it is quite possible that the problem is an air lock.
First way:
- Loosen the clamp and disconnect the pipe from the heating of the throttle assembly.
- We unscrew the lid of the cooling tank, cover it with a clean rag and blow into the neck until antifreeze starts flowing from the removed pipe.
- As quickly as possible, put the pipe in place and tighten the clamp.
Second way:
- We warm up the engine a little so that the pressure in the cooling system increases slightly, and then turn it off.
- Without removing the coolant tank cap, disconnect the pipe from the throttle body heating.
- After antifreeze or antifreeze starts coming out of the tube under pressure, immediately put the coupler in its place and tighten it with a clamp.
Attention! Be careful as the coolant being drained may be very hot at this point.
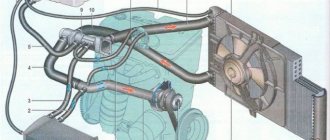
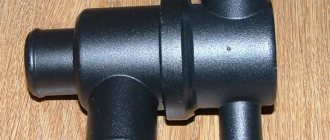
Direction of coolant flow in the thermostat housing and cover
: 1 — supply from the cylinder head cooling jacket; 2 - to the heater radiator; 3 - to the throttle assembly heating block; 4 - from the expansion tank; 5 - to the supply pipe of the coolant pump; 6 — from the radiator of the cooling system; 7 - to the radiator of the cooling system
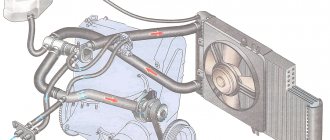
From the pump, liquid under pressure is supplied to the engine cooling jacket, and from there to the thermostat housing. Two thermostat valves - main and bypass - redistribute fluid flows in the cooling system. On a cold engine, the main valve closes the channel in the thermostat cover connecting the lower (outlet) radiator hose with the pump supply pipe. The bypass valve of the thermostat is open, and the flow of liquid from the engine cooling jacket enters through the thermostat housing into the supply pipe of the coolant pump, bypassing the radiator of the cooling system - a small circulation circle. As the engine warms up, at a fluid temperature of 85±2 °C, the thermostat valves begin to move, closing the bypass channel and opening the main channel, passing the fluid flow through the radiator of the cooling system. At a liquid temperature of about 102 °C, the bypass valve closes completely, and the main valve opens to its full stroke - 8 mm, and the liquid enters the radiator of the cooling system, where it gives off heat to the surrounding air. The movement of fluid through the engine cooling jacket, thermostat housing and radiator of the cooling system forms a large circulation circle.
: 1 - plate; 2 — bypass valve spring; 3 - spring; 4—cylinder with heat-sensitive filler; 5 - main valve; 6 — rod; 7 - bypass valve
Fluid circulates constantly through the heater radiator and the throttle body heating unit and does not depend on the position of the thermostat valves.
Location of the coolant temperature indicator sensor
(for clarity, the radiator hoses and ECM wiring harness blocks are disconnected): 1 - cylinder head; 2 — coolant temperature indicator sensor; 3 — engine control system coolant temperature sensor; 4 — thermostat housing; 5 - thermostat cover
: 1 — rubber cushion of the lower fastening; 2 - outlet pipe; 3 — hole for the side fastening of the fan casing; 4 — left tank; 5 — supply pipe; 6 — steam outlet hose pipe; 7 — bushing of the upper fastening; 8 — pin for the upper fastening of the fan casing; 9 — right tank; 10 — radiator drain plug; 11 — stud of the lower fastening of the fan casing
The radiator consists of two vertical plastic tanks (the left one with a baffle) and two horizontal rows of round aluminum tubes passing through the cooling plates. The bases of the tubes are connected to the tanks through rubber gaskets. The liquid is supplied through the upper pipe and discharged through the lower. Above the inlet pipe there is a thin pipe for the steam removal hose. There is a drain plug at the bottom of the right tank. A plastic casing with an electric fan is attached to the radiator.
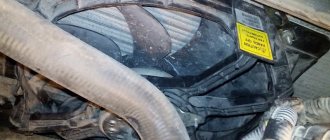
Fan with casing assembly
: 1 — electric motor wiring harness; 2 - casing; 3 - impeller; 4 - electric motor
The fan maintains the thermal operating mode of the engine and is switched on via a relay based on a signal from the engine control system controller.
Coolant temperature gauge sensor
To monitor the coolant temperature, a temperature gauge sensor is screwed into the engine cylinder head in the instrument cluster. content .. 170 171 172 173 174 175 176 177 178 179 ..
What does damage cause?
The most common cause is engine overheating. failure will occur in a very short period of time. As a result of overheating, the cylinder block becomes deformed, cracks may appear and the piston may become deformed.
But it is much worse when the piston is completely deformed and makes a hole in the cylinder block. Such a breakdown usually leads to a complete replacement of the damaged engine with a new unit.
The process of replacing the pipe
The first thing to do before replacing the pipe is to completely drain the coolant from the system. If the liquid is clean and drained into a clean container, it can be reused. Now it’s time to remove the clamps on the missing pipe. It happens that they rust, so you should prepare all the necessary tools and WD40 in advance to facilitate the removal process.
It is worth remembering that all procedures must be carried out on a cooled engine, especially draining the coolant, otherwise you may be injured.
A similar, new pipe must already be prepared in advance. The old pipe should be removed slowly and without much effort, since the radiator necks are not strong enough and break easily. If it cannot be removed, it is recommended to twist it from side to side, but not bend it in any way.
As a last resort, you can cut it to length, this way you can remove the old pipe. Taking it off is often not a problem, but putting on a new one is much more interesting. If the new pipe does not lend itself to the procedure, then its inside should be lubricated with a solution of soapy water. But in order to soften it, you need to lower the desired part into hot water.
Under no circumstances should you use oil or related materials, as the pipe may corrode over time, and oil may also get into the cooling system.
The last step is to put the clamps on the pipe, and only then put it on the radiator neck and water jacket. Make sure that the pipe is correctly positioned and not twisted. Now we tighten the clamps on the necks and begin to fill in the coolant.
After filling, make sure once again that there are no leaks in the places of replacement and repair. It is worth remembering that when draining, there may be some coolant in the heater radiator. Now we start the engine and check the serviceability of the system. After filling in the new one, you need to turn on the stove, then add liquid to the expansion tank.
If you manage to break one of the necks, you should immediately solder it using argon welding.
Timing for coolant replacement
In VAZ Priora cars with a 16-valve engine manufactured in 2011 and other years of production, the frequency of antifreeze changes is 75 thousand kilometers. Then the working fluid begins to lose its properties. In addition, the refrigerant that is poured during production is changed every five years, if during this time the car has not traveled 75 thousand km.
The need to change the working fluid can be determined by the following “symptoms”:
- the antifreeze has become dirtier, black, and traces of deposits have appeared in it;
- a refrigerant leak has occurred, as a result of which more liquid will need to be added to the system, and if you do not know what kind of antifreeze was added, then it will have to be changed;
- the presence of deposits and dirt in the expansion tank, this indicates that the substance has lost its properties;
- foam formation in the reservoir under the hood;
- the stove began to work worse in the winter season;
- the engine began to boil.