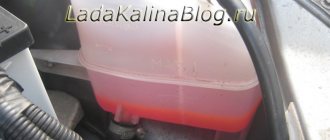
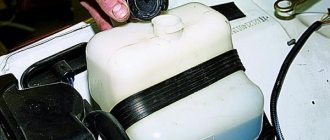
Today I went out to the car in the morning, started it up and sat there warming up. As usual, out of habit, I got out of the car, opened the hood and saw that the level of antifreeze in the tank had dropped sharply. Usually he always stayed at the maximum level, but here I see that he has dropped almost to the very bottom:
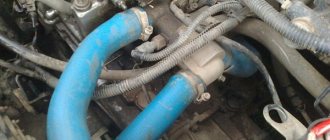
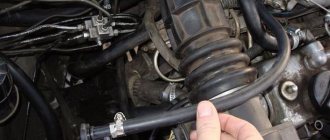
I looked carefully under the hood and at first did not see any traces of coolant anywhere. But then I looked at the radiator on the left side and saw a rather unpleasant picture, which, by the way, I also captured:
As you can see in the photo, the leak was from the upper pipe, since everything is in antifreeze from top to bottom. Apparently, the severe frosts made themselves felt, and they “fried” them to the fullest for two weeks!
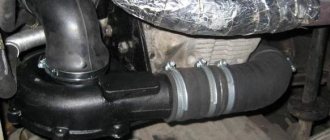
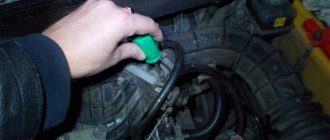
Since it is impossible to just crawl up to the pipe to tighten the clamp, it was necessary to remove the air filter housing completely. After this, at least somehow you have access to the clamp, but you still won’t be able to use a long screwdriver there. I had to tighten it with a short screwdriver, but there wasn’t much room for it to turn around either.
In general, after a minute of effort, we managed to tighten the clamp a little, the bolt turned about one turn.
It looks like the pipe is intact, but it’s hard to say for sure; it will become clear over time. After tightening, I poured antifreeze into the expander to the MAX level. So far there seem to be no traces of a leak, but it is better to look on a cold engine in good frost, since at low temperatures the coolant becomes more fluid.
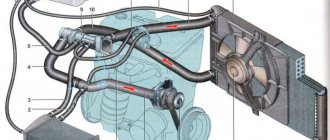
Procedure for checking the Lada cooling system
1. Check the coolant level in the expansion tank; it should be between the “MIN” and “MAX” marks. If antifreeze has to be added periodically, then the system is not sealed (we check the integrity of: hoses, radiator drain holes, cylinder block, sensor installation locations, expansion tank housing, pump and its connections, engine and heater radiators).
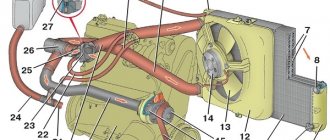
2. Check the thermostat. We warm up the engine to 85-92C and check the lower radiator hose leading from the radiator (in diagram No. 10), if it is cold, it means the coolant is circulating only in a small circle, the thermostat is faulty and should be replaced.
3. Check the circulation of antifreeze in the cooling system. Open the cap of the expansion tank and monitor the flow of antifreeze into the tank. Attention, the cooling system is under pressure, and the antifreeze in the system may be hot; open the expansion tank cap very carefully. Poor circulation of antifreeze indicates a malfunction of the water pump (pump), or the cooling system is clogged (needs to be cleaned).
Replacing control rods for interior ventilation and heating
Remove the instrument panel trim.
Using a slotted screwdriver, press out the spring holder of the air temperature regulator rod shell and remove the holder
Remove the rod from the air temperature regulator lever.
Using a slotted screwdriver, press the spring holder of the air temperature regulator rod sheath from the heater body and remove the holder.
Remove the air temperature regulator rod from the lever on the heater body.
We install the new air temperature regulator rod in reverse order.
The sequence of operations for replacing the switch rods with the operating mode of the fan and air flow distribution regulator is similar.
Lada-Kalina is equipped with either a heating and ventilation unit (top picture) or a climate control unit (bottom picture).
The heating and ventilation unit is used to create a comfortable air temperature in the car interior, the value of which is regulated by the control unit for the ventilation and heating system, but at the same time cannot provide a temperature in the cabin lower than the outside air temperature.
The air intake box contains an air filter that cleans the air entering the car interior from dust, pollen, soot, and small insects. The filter must be replaced every 15,000 km (or earlier if operating conditions are severe).
- switch 1
—controls the fan operating mode (0—fan off, 4—maximum rotation speed); - switch 2
- controls the operating mode of the stove and air conditioner (in a variant); - handle 3
- controls the air recirculation damper (the leftmost position is the supply of outside air to the cabin, the rightmost position is the recirculation mode of air inside the car - this mode is not recommended to be used for a long time); - switch 4
- controls the distribution of air supply in the car interior:
vertical position up
- air flows to the windshield and the windshield blower nozzles of the front doors; - vertical position down
- air flows to the lower part of the cabin, to the driver’s and passengers’ foot areas; - horizontal position to the right
- air flows through the side and central nozzles into the upper part of the car interior to blow air over the driver and passengers; - horizontal position to the left
- air flows to the lower part of the cabin, to the driver’s and passengers’ foot areas, to the windshield and the windshield blower nozzles of the front doors.
Levers 9 and 5 of the damper drive regulate the intensity of air supply through the side (8) and central (4) nozzles by changing the position of the dampers (up to their complete closure). Levers 1 and 3 of the guide vanes of the side and central nozzles change the direction of the air flow.
Ventilation (unheated air supply) of the interior
:
- set switch 2 to the extreme left position (blue dot on the control unit) - the heating stove faucet is completely closed;
- set switch 4 to the horizontal right position;
- open nozzles 4 and 8, turn lever 5 on the central nozzle down, and lever 9 to the right on the left side nozzle and to the left on the right side nozzle;
- Set heater fan operating mode switch 1 to the desired mode;
- If the windshield fogs up, set switch 4 to the vertical upward position.
Preventing glass fogging
:
- set switch 4 to the vertical position up;
- Set switch 1 of the heater fan operating modes to position “2”.
Quick heating of the interior
:
- set switch 2 to the extreme right position (red dot) - the heating stove faucet is completely open;
- set switch 4 to the horizontal position to the right;
- Set switch 1 of the heater fan operating modes to position “3”;
- open the side and central nozzles.
Ensuring a comfortable temperature in the cabin
:
- set switch 2 to the required position (desired temperature);
- set switch 4 to the horizontal position to the left;
- Use switch 1 of the operating mode of the interior heater fan to select the required intensity of warm air supply to the interior.
When the heating system is operating at maximum mode, it is not recommended to open the car interior windows.
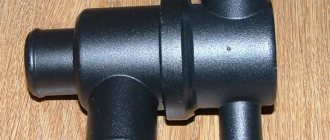
Replacing the thermostat on Kalina 8 valves
The thermostat on Kalina consists of 2 parts - the so-called thermostat cover and housing. The cover is the part in which the thermocouple is located, and the housing is the part that is attached to the engine. Housings are not sold separately, unlike covers, at least I haven’t seen them. Therefore, you can either replace the cover or buy a completely assembled thermostat.
It is attached to the engine with 2 nuts along with the ground wire from the battery. We unscrew them and remove the thermostat. In most cases, the remaining gasket will stick to the engine. They will need to be removed with a knife or blade.
The coolant temperature sensor is screwed into the thermostat housing. You need to unscrew it from the old one and screw it into the new thermostat, or just buy a new one. It is attached under a copper gasket, which seems to need to be replaced with a new one, but practice shows that a used one also holds up normally. The thread of the sensor itself, closer to the gasket, can be lightly coated with sealant.
To be sure, I additionally applied a thin layer of sealant to the new thermostat gasket and installed it in the prepared place. According to reviews on the Internet, it is best to buy an original thermostat from AvtoVAZ. He will last the longest. In second place, this is exactly what I bought, since I simply couldn’t find the original one. Some samples may open not at 85 degrees, but at 90-95º. Not sure if this is normal. It should also be noted that the PRAMO thermostat cover will not fit into the AvtoVAZ body; the side will interfere, which the craftsmen successfully saw off with a grinder.
Common faults
The stove itself on Kalina is well conceived, but due to the poor quality of the elements and parts, various troubles constantly happen to it. Even the latest models with climate control have various “diseases”. The list of the most common faults looks like this:
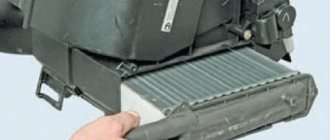
- The heater core is leaking;
- the heater damper is jammed or does not open completely;
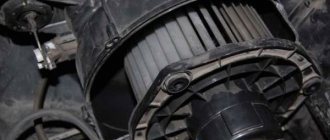
- failure of the fan or control unit;
- gear motor failure;
- the temperature sensor or heater resistor has become unusable;
- The cabin filter is clogged.
To find out where this or that element of the heating system is located, you should look at the operating instructions; there will definitely be a corresponding diagram there.
The design of the Kalina stove without climate control is such that the air sucked in by the fan passes through the air filter and enters the heater radiator. There it is heated and supplied to different areas of the cabin through adjustable grilles and openings. The dampers are controlled and the fan speeds are switched manually. This heating system is more reliable because it does not contain any electronics.
On a Lada Kalina with climate control, the rotation of the dampers is controlled by a gearmotor at the command of the electronic unit. The latter receives signals from a temperature sensor located inside the car and reacts accordingly to changes in the microclimate. The controller interacts with both the heater and air conditioner.