Print this article Font size 16
Many owners of the domestic "ten" complain that their VAZ 2110 cooling fan does not work. The problem is quite common, but to fix it it is not at all necessary to resort to the help of specialists, or to pay a lot of money to car service technicians for finding and eliminating the cause of the problem.
All this can be done with your own hands. Today we will tell you exactly how this is done.
Minor improvements
In winter, motorists often have to drive with the heater on. Otherwise, it will be quite cold in the cabin, and the windows tend to fog up. At the same time, many car enthusiasts may be annoyed by the rattling sound when the stove is running, which is especially audible at the maximum operating mode of the stove. The problem here is in the lower panel of the heater housing. It is attached on peculiar hooks. On the one hand, this simplifies dismantling if necessary; on the other hand, these fasteners can be easily unfastened. After this, the panel begins to vibrate, causing unpleasant sounds.
To fix it, simply fasten the hooks in place. Sometimes they just break off. In this case, the only option is to replace the stove assembly.
If the stove does not heat well, then it makes sense to check how the radiator is warming up. It is necessary to remove the deflector; this is done using a slotted screwdriver. After that, start the engine and let it warm up. During this time, the radiator should heat up quite well. If this does not happen, then check the functionality of the heater valve. The reason may also be a clog in the radiator itself. It must be removed and washed. For this, it’s a good idea to use a strong solution of citric acid.
If you have a car produced before 2006, then it makes sense to install a pre-heater on it. This will allow you to quickly warm up the interior in winter. There will be no problems with installation, you will just need to purchase a heater designed for the injection “ten”.
Conclusion
. The heater fan in domestic cars is not very reliable. This is why you can so often hear the question of how to replace the stove fan on a VAZ 2110 and 2112. In fact, the work is not difficult, but due to the large number of small parts that need to be removed, the replacement can take several hours. At the same time, you should be quite careful due to the abundance of plastic parts.
Fan replacement
If the problem still lies in the fan itself, then it would be best to replace it with a new one. The stove fan can, of course, be repaired, but this may involve, for example, replacing the brushes. It simply doesn’t make sense to carry out more comprehensive repairs, since you can’t hope for long-term service for such a part. Replacing a VAZ-2110 stove fan requires selecting a new part. There are two options here: find an old-style part or buy a new spare part. The second option is more acceptable and accessible.
VAZ stove fan
The replacement process is not as complicated as it might seem. It is enough to be able to work with standard tools, have free time and have the desire to tinker with your own machine. To replace a faulty fan, you must follow the following work plan:
- Open the hood and remove the battery negative terminal.
- We remove the windshield wipers by prying and dismantling the rubber caps. Using a 10mm wrench, unscrew the nuts and remove the brushes.
- Using a slotted screwdriver, pry up the decorative plugs, unscrew the screws on the frill and the nuts on the edges. Now we can remove the frill.
- Under the rubber seal you can find screws that hold the shield from the engine compartment. We also unscrew them.
- We dismantle the hose through which washer fluid is supplied to the injectors.
The process of replacing a fan is not as complicated as it seems
- On the right side of the engine compartment, there are two nuts on the bottom side that fit a 10mm socket wrench. They are difficult to get to, but you don’t have to unscrew them all the way, because with a few turns the shield can be easily removed.
- It is necessary to remove the clamps from the hose that connects to the vacuum booster of the brake system in advance.
- There are four self-tapping screws on the cabin filter cover; after unscrewing them, you can easily remove it.
- Already at this stage the outlines of the stove motor are visible. But you will also need to disconnect the block on the heating system motor and on the resistor.
- After the work has been done, it becomes possible to dismantle the left side of the stove along with the motor.
- A new part is installed in place of the damaged element, and assembly is carried out in the reverse order.
If you have never had to remove a heating system fan before, this process may take several hours. But in the future, any problem with the heating system can be fixed much faster. Even if something doesn’t work out for you during your work, you don’t need to stop trying to achieve a positive result. Over time, everything will definitely work out.
Stove fan
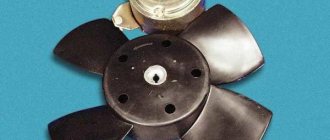
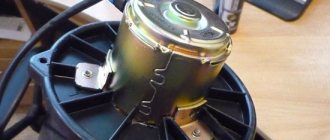
Structurally, the fan consists of a DC electric motor with a commutator-brush assembly and an impeller mounted on the electric rotor. motor. The electric motor is powered from the vehicle’s on-board network. There are several modes of fan operation, the difference between which comes down only to the rotor rotation speed, and this is realized by inserting a resistor into the power supply circuit of the electric motor.
The fan operating mode is set using a handle located in the heater control unit on the center console. Initially, on the VAZ-2110, this handle was part of the design of the SAUO controller, but functioned separately from the controller itself. Later, the ACS added an automatic fan control function (position “A” on the handle), using which the controller regulates the rotation speed of the electric motor in order to maintain the set temperature.
We recommend: 5 signs that it's time to change the fuel filter
The electric motor used in the design of the VAZ-2110 fan is simple, but it has “weak points” - the commutator-brush assembly and bearings. Wear of these elements causes incorrect operation and complete inoperability of the fan. Short circuits and winding breaks in the stove drive are rare, but don’t forget about these breakdowns either.
Symptoms of failure. Heater components that affect fan operation
Signs of a malfunctioning stove fan are quite obvious and impossible not to notice. Common symptoms of failure:
- Increased noise, grinding noise during operation.
- Significant reduction in air injection efficiency.
- The fan does not turn on.
- Spontaneous change in the rotation speed of the electric motor.
- It can be determined by ear that the electric motor is operating under heavy load.
In some cases, such consequences result from malfunctions in the power supply and fan control circuits, so you should check them first. This applies to:
- fuse (blowout is the cause of complete failure of the electric motor);
- resistor (if it is faulty, some speed modes of the electric motor stop working);
- controller (the knob for switching fan modes is part of its design, so malfunctions of the automatic control system affect the functioning of the electric motor);
- wiring terminals of the power and control circuits (oxidation, damage to wires is one of the reasons for a malfunctioning electric fan).
If diagnostics of these elements shows that they are in good working order, it is necessary to dismantle and repair the fan itself. But it can be diagnosed first.
Fan check
A check is done by directly powering the electric motor from the battery (we lay wires from the battery terminals and connect them to the power terminals of the motor) - operation under load, difficulty in gaining rotation speed, squeals and squeaks indicate wear of the drive components and the need to replace them. But if, even with direct voltage supply, the electric motor does not start, it is most likely that it has burned out or the windings have broken. Such faults are difficult to fix and it is easier to replace the entire unit.
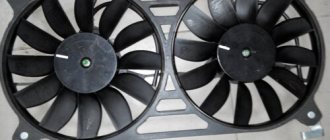
Design features of the stove of the old and new models
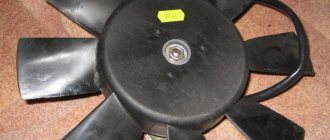
The design of the electric motor of the stove on the VAZ-2110 is identical, but the fans and their location are different. On models of the first years of production, the electric fan is installed in the stove housing in front of the radiator and it is located horizontally (old-style stoves). Afterwards, the design was revised - the fan was already placed in the cabin filter housing and installed vertically (new model heaters).
Despite the design features, dismantling the fan is a simple operation and does not require complete disassembly of the stove.
On a VAZ-2110 with an old-style heater, to remove the electric fan you need to:
- Dismantle the frill.
- Remove the front wall of the niche in which the heater is located.
- Remove the back cover of the fan housing by first unscrewing the screws and removing the clamps.
- Disconnect the wiring from the fan and remove it.
We recommend: How to make splices with your own hands?
As for models with a new type of stove, the technology for removing the electric stove fan on such cars is different:
- dismantle the “jabot” and the front wall;
- remove the air filter;
- unscrew the fastening of the filter housing to the stove body and separate them;
- disconnect the wiring;
- remove the filter housing together with the fan;
- dismantle the electric fan.
After removing the electric motor with the impeller, we disassemble it, perform troubleshooting, replace worn elements and put it back together.
Stories from our readers
“Fucking basin. "
Hi all! My name is Mikhail, now I’ll tell you a story about how I managed to exchange my two-wheeler for a 2010 Camry. It all started with the fact that I began to be wildly irritated by the breakdowns of the two-wheeler, it seemed like nothing serious was broken, but damn it, there were so many little things that really started to irritate me. This is where the idea arose that it was time to change the car to a foreign car. The choice fell on the melting Camry of the tenth years.
Yes, I had matured morally, but financially I just couldn’t handle it. I’ll say right away that I am against loans and taking a car, especially not a new one, on credit is unreasonable. My salary is 24k a month, so collecting 600-700 thousand is almost impossible for me. I started looking for different ways to make money on the Internet. You can’t imagine how many scams there are, what I haven’t tried: sports betting, network marketing, and even the volcano casino, where I successfully lost about 10 thousand ((The only direction in which it seemed to me that I could make money was currency trading on the stock exchange, they call it Forex. But when I started delving into it, I realized that it was very difficult for me. I continued to dig further and came across binary options. The essence is the same as in Forex, but it’s much easier to understand. I started reading forums, studying trading strategies. I tried it on a demo account, then opened a real account. To be honest, I didn’t manage to start earning money right away, until I understood all the mechanics of options, I lost about 3,000 rubles, but as it turned out, it was a precious experience. Now I earn 5-7 thousand rubles a day. I managed to get the car buy after half a year, but in my opinion this is a good result, and it’s not about the car, my life has changed, I naturally quit my job, I have more free time for myself and my family. You’ll laugh, but I work directly on the phone)) If If you want to change your life like me, then here’s what I advise you to do right now: 1. Register on the site 2. Practice on a Demo account (it’s free). 3. As soon as you get something on the Demo account, top up your REAL ACCOUNT and go to REAL MONEY! I also advise you to download the application to your phone, it’s much more convenient to work from your phone. Download here.
Let's look at these reasons in order, starting with the simplest:
- The bolt that attaches the plastic fan itself to the motor pulley was simply unscrewed.
- The radiator is simply not inserted into its socket and the radiator lies on the suspension cross member.
- Part of the fan impeller blade broke off and as a result there was an imbalance. (replacing the fan impeller)
- Dirt on the impeller and, as a result, imbalance. (needs to be cleaned, washed)
- The cushions are compressed and do not hold the engine properly and there is vibration. (Change pillows, make rubber gaskets)
- The fan is making a loud noise and there is no lubrication. (lubricate the electric motor)
- Broken bearing. Usually due to an imbalance in the impeller, which has been vibrating for quite a long time. (replace bearing)
How to balance a fan impeller? Option 1: We wind the wire around the valve blades and see where the imbalance is stronger and gradually level it to conditional silence. Option 2: You need to insert an axis (for example, a drill) that exactly matches the diameter into the hole, place the impeller with its axis on 2 horizontal supports (the impeller between the supports), for example on 2 identical tables with space between them. If there is an imbalance and the impeller constantly strives to occupy a certain position in space, this can be eliminated by turning the blades or gluing a weight inside the cylindrical base of the impeller.
Work to replace the fan in the cabin
Replacing the heater motor of a VAZ 2110
The subsequent change of the heater motor will be done directly from inside the car:
Under the dashboard you need to find the block that goes to the electric motor. She disconnects. After this, you will need to unfasten the ground wiring of the electric motor. As a rule, it is pressed to the body by the front mounting nut of the heater. The trim and lining of the windshield frame are dismantled, and you cannot do without unscrewing the mounting screws. The right upholstery is removed from the interior heater, and the fastening nuts and screws should also be unscrewed. Heating hoses are disconnected
At this stage of work, extreme caution must be taken, since antifreeze residues may leak from these hoses and the heater radiator. To prevent the smell of coolant in the car interior, you need to lay a material that absorbs moisture well. The wiring from the electric motor, from the micro-reducer, and also from the pneumatic valve is disconnected
After these steps, remove the front housing with the stove casing
The wiring is disconnected from the electric motor, from the micro-reducer, and also from the pneumatic valve. After these steps, remove the front housing with the stove casing
These elements are fixed with brackets and screws. It is worth noting that the engine and motor are located on the casing. The latches are removed, and the engine and motor are removed
Recommendations for replacing the motor
Replacing the heater motor of a VAZ 2110
You can disassemble the electric motor yourself only to evaluate the collector and clean it. If the cause of the breakdown lies in another situation, then it is not advisable for a non-specialist in working with such parts to disassemble it. It is better to buy a new electric motor.
Note! It is also not recommended to dismantle the engine impeller on your own, since when it is installed in its place, the balancing, which plays an important role, will be disrupted. Naturally, the electric motor will function, but not smoothly, which can lead to breakage of the bearings and noise when the stove is turned on.
Since the stove is in a disassembled state, it becomes possible to calmly view the other components of the cabin heater. So:
- In order for more heat to come from the radiator, you need to dismantle it and wash it. It is fixed on the rear casing of the heater, which is removed by unscrewing the mounting screws. After this, the radiator can be easily removed and washed under the pressure of water flowing from a hose that is connected to the radiator inlet or outlet tube. The same pressure washes away dirt from the surfaces of the removed radiator.
- To disassemble the air ducts and heater control mechanisms, you will need to remove the instrument panel on which the main air ducts are located.
Note! Usually the panel with the main air ducts is made as one piece, so it must be handled with the utmost care so that it does not have to be replaced later. After this, you need to remove the interior air ducts, which are secured with special screws, and the decorative lining of the floor tunnel
After this, you need to remove the interior air ducts, which are secured with special screws, and the decorative lining of the floor tunnel
After this, you need to remove the interior air ducts, which are secured with special screws, and the decorative lining of the floor tunnel.
Note! Under this trim there are air ducts for heating the feet, which are attached to the body with screws and latches.
- The air distributor is removed from the dashboard by unscrewing the mounting screws and disconnecting the damper control rod.
- Reassembly must be done in the reverse order of disassembly. If necessary, fix the damper seals with glue. You can also seal the attachment points of the hoses with the radiator with sealant.
- When all the parts are assembled and installed in their places, the functioning of all components is checked and antifreeze or antifreeze is added. It all depends on personal preference.
- At the final stage, they check the tightness of the attachment of the hoses to the radiator and the actual operation of the assembled stove.
For those who perceive information visually, it is recommended to watch a video with a detailed description of the actions and several photos that will help you do everything correctly.
Repair work can be carried out with your own hands, but subject to clear instructions. This will help you save a lot of money, because the price for services of this kind in car services is not cheap.
Replacement of micromotor gearbox
To replace an element, you will need to perform several not particularly complex activities. Therefore, it is not at all necessary to go to a service station and pay a lot of money for their services.
- First of all, remove the frill.
- Next, the vacuum brake booster is dismantled.
- After this, you still need to remove the pedal assembly.
- Now we begin to dismantle the old micro-gearbox along with the plastic component.
- A new micromotor gearbox should be installed in place of the damper sector. There you will see a similar square.
Article on the topic: Stabilizer struts for VAZ 2114
Device location
Practice shows that replacing a micro-gearbox does not require special skills, a lot of time or excessive effort. However, never forget to be careful.
But in order to install the damper of your micro-geared motor, you will need to invite an assistant.
- First, the contacts are connected to the new micro-gearbox, that is, the motor.
- By turning the damper counterclockwise, you turn on the cold air supply.
- Turn on the ignition and turn the heater control system (SAUO) sensor to the position directly opposite the blue dot of the regulator.
- Or you can do the opposite, that is, check the micro-gear motor by installing the sensor opposite the red dot, and turn the damper all the way clockwise.
- The micro-gearbox rotates slightly more than required, so for proper installation it is recommended to use a special lubricant for the square.
- Install the motor so that the holes for the screws match.
- Now you need the help of your friend, since his task will be to turn the temperature regulator and at the same time press the motor inward.
- If the squares match, the replacement of the micromotor reducer can be considered successful. Now the air should flow to the desired temperature inside the cabin.
- Don't worry if the square doesn't go the full length of the flap you're using. This is normal when the gear motor goes about a third of the way. This installation will not affect the performance of the system in any way.
- Now all that remains is to return the screws to their place and twist the micro-gearbox several times - from the blue mark to the red one, and in the reverse order.
- These manipulations will allow the stove to remember what operating range the new gearbox has. Therefore, there will be no problems with its performance in the future.
If everything is done carefully and in accordance with the instructions, when you turn the damper, the micromotor reducer of your stove will not move to the required position. By turning on the device in mode with the “A” icon, control and adjustment will be carried out automatically - with an error of no more than 2 degrees.
Article on the topic: Connecting a tachometer to a VAZ 2109 (carburetor)
Installation
To install the gearmotor, you will need a certain set of tools, which include:
- Open-end wrench 10 millimeters;
- Crosshead screwdriver;
- Spanners.
Don't worry if you're new to doing car repairs yourself. There is nothing complicated about replacing a gearmotor.
- Remove the windshield wipers from the fuse to gain access to the device. To do this, you need to dismantle the contact nut and then release the frill.
- You will have access to the screws.
- Two nuts are unscrewed on the sides of the frill, and then the rubber seal is removed from the electric motor compartment of the gearbox.
- Disconnect the damper jabot pipeline by disconnecting it.
- Remove the screws that hold the gearbox thermal radiators.
- The motor is located on the left in the damper gear box, right next to the brake booster.
- Next, you need to unscrew the lower mounting screw and remove the electric motor.
- The damper assembly should be carried out strictly in the reverse order. Moreover, do this only after the gearmotor has been installed.
Heater fan not working
It is quite simple to understand that the car's heater fan is faulty. To do this, just start the car and switch the heater operating mode. If during the switching process no additional sounds appear in the vehicle interior, this means that the heating system fan is not working. At the same time, if the fan does not spin only at certain speeds, then the problem is not in the fan itself, but either in the resistor or in the heating intensity toggle switch.
The stove fan does not work - the main reasons
There are six main reasons why the stove fan may not work:
1. The fuse has blown.
This is the most banal and simple reason, but at the same time the most problematic. The thing is that replacing a fuse is a very simple procedure that anyone, even the least experienced car owner, can handle. But it’s very difficult to identify the short circuit that caused it to burn out. To do this, you will have to go through the entire electrical circuit of the car's interior heating system.
Video. The fan on the VAZ 2110 does not work
It is worth noting that the fuse marked F7, which has a current strength of 30 amperes, is responsible for the operation of the stove. Note that the same fuse is responsible for the glove compartment lighting, the cigarette lighter, the rear window heating system, as well as the electric headlight washer motor. This means that if you do not find the cause of the short circuit in the electrical circuit of the heater, you will have to go through almost the entire wiring of the vehicle.
2. Poor quality contact inside the mounting block.
Oxidation of the contacts inside the mounting block is a very common cause of stove fan malfunction. To make sure of this, you need to move the block on which the flagella are attached; if the fan starts working, then remove it and clean the contacts.
3. Flooding the relay of the vehicle ignition system.
This problem is diagnosed quite simply. If your heater starts working only after the car has “warmed up”, then the reason is in the ignition relay. The only way to fix this problem is to replace the relay. It is located under the dashboard.
4. The stove only works at third speed.
In this case, the problem is related to the additional resistor. The thing is that at speeds 1 and 2, electric current is supplied to the fan through a resistor, and at speed 3, it is supplied to it directly. There is only one solution in this case - replacing the additional resistor of the heating system of the car interior.
Let us recall that in the previous article we looked at how to replace brake fluid with your own hands. This process must be performed regularly, according to the manufacturer's recommendations.
5. The vehicle interior heating system switch is faulty.
To check this switch, you should dismantle the center console, start the car, take a 12-volt marker light bulb with soldered wires and short the negative wire from it to the body, and touch the second to contacts 1, 2 and 3 of the additional resistor. If the light bulb is on, then the switch is working, and if not, then connect the wire of the light bulb to the positive terminal of the switch. If it does not light up, then the culprit is an open circuit or a blown fuse.
6. The electric fan motor does not work.
When you have checked all the previous options, but have not identified any problems, then there are only three reasons why the stove fan does not spin: - the electric motor has burned out - the electric motor has poor contact with the ground of the car - the brushes of the electric motor have become stuck.
Removing the Nissan X-Trail air duct
1. Using a flat-head screwdriver, pry up the clips of the 3 air duct holders.
2. Remove the plug with two holders, and pull out the 3rd clip.
3. Remove the lower air duct pipe from its engagement with the lower receiver air duct, and the rear pipe from its engagement with the air filter housing.
4. Pull the air duct upwards towards you and remove it.
Causes of malfunction
As a rule, there are many reasons for such a malfunction, these include:
- clogging with slag from the stove radiator;
- stove motor failure.
If the stove motor is not functioning, or some of its speeds are not working properly, then it is first recommended to check the resistor, which in other words can be called the stove rheostat. This element is responsible for the speed of the fan. You can purchase such a part in a specialized store that sells auto parts. As for replacement, this can be done with the help of a specialist or on your own, which is not so difficult even for an inexperienced specialist.
Note! In the case of repairing or replacing the heater radiator, it is recommended to contact a car service center, since it is difficult to remove the radiator yourself. To replace the stove motor, you will need minimal knowledge and detailed instructions.
There are heater malfunctions that can be easily fixed by any car enthusiast. For example, a situation may occur when cold air blows through the side deflectors and the windshield heating duct of the heating system, while a hot air flow comes from the lower and central air ducts. Most likely, the reason will be the unsatisfactory operation of the heater damper, which is designed to cut off cold air. In some cases, it prevents the normal passage of cold air. Such faults are most easily identified during the cold season.
When bending the damper drive rod, special care must be taken so as not to damage the plastic parts. Please note that plastic becomes more fragile in winter.
Of course, a non-functioning stove causes many problems in winter.
If this is not so important in the summer, then in the winter the windows will fog up. You can figure out what the reason is by disassembling the heating system of the car.
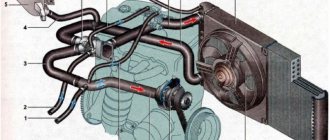
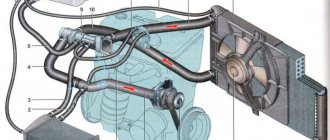
Design of the VAZ-2110 heater
The SAUO replaced manual control of the heater, but otherwise the stove remained structurally the same. As in earlier models, the interior heating system is a housing with a radiator installed inside, connected to the cooling system of the power unit - a heat source, dampers that redirect the air flow to the desired zones, and a fan driven by an electric motor, which creates the air flow. SAUO is a controller that, depending on the set parameters, monitors the temperature in the cabin and regulates the position of the dampers, maintaining the specified mode.
The efficiency of the VAZ-2110 interior heater would be low without the forced creation of air flow, and this task falls on the stove fan.
Preparation
Preparatory activities do not include many complex operations. You will need to do the following:
- Remove the negative terminal from the battery to de-energize the car and protect the car from possible short circuits;
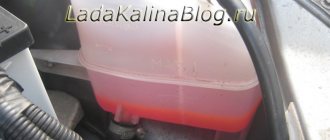
- Drain the coolant from the system. To do this, open the cap of the expansion tank to relieve excess pressure, and then unscrew the drain. The liquid must be drained into a special prepared container.
When draining the cooling liquid, one important rule must be observed - the procedure is carried out only when the engine has cooled down. If in the future you are going to use the same antifreeze or antifreeze, then choose a clean container for draining. If in the future you are going to use the same antifreeze or antifreeze, then choose a clean container for draining
If in the future you are going to use the same antifreeze or antifreeze, then choose a clean container for draining.
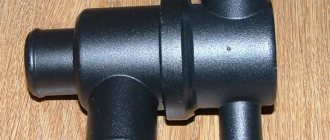
Safety valve
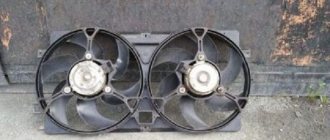
Knowing physics, you will agree that at normal atmospheric pressure, the water that is part of antifreeze boils at a temperature of 100 degrees Celsius.
Old device
If the VAZ 2110 cooling fan fuse, that is, the valve located on the expansion tank cap, turns out to be faulty, and there is atmospheric pressure inside it, the cooling liquid will boil, but the fan will not be able to start working even with a working electrical circuit. This is because the fan switching sensor on the injection VAZ 2110 has a switching temperature of more than 100 degrees Celsius.
To fix this problem, replace the expansion tank cap. The new element must maintain the pressure inside the system above atmospheric pressure, which will allow the laws of physics to work, the boiling temperature to rise to 105 degrees Celsius and thereby turn on the blades of the unit.
Why does the stove blow cold air? Causes of malfunction
In the interior of the VAZ 2110 you can quite often see that the heater simply does not respond to the temperature regulator. The answer immediately suggests itself - one of the elements of the system has simply failed. We start looking for him.
Problems with the interior temperature sensor
First of all, we check the interior temperature sensor. It is located on the ceiling, near the interior lighting. If the temperature regulator is turned to the extreme right position, and the stove reacts to this, then the sensor needs to be changed. If everything is fine, we look further.
Problems with the heater damper
The heater damper may oxidize and jam. Many experienced owners of these cars install an aluminum damper, which better distributes air and retains heat in the cabin. But you can only get to it from under the hood.
If the stove on a VAZ 2110 blows cold air, but is itself heated to a temperature of 90 degrees, then the reason is hidden in the standard air ducts. Most likely, they are either damaged or have fallen off from the stove itself. And to get to them you will have to disassemble and remove the entire panel. If you still cannot restore them, you can simply replace them with corrugated hoses purchased from building materials and install them. And seal all joints tightly and thoroughly with polyurethane foam or modelin.
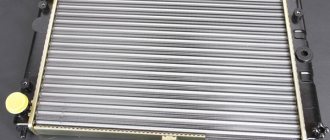
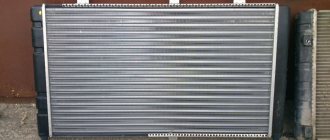
The heater radiator is clogged
If the stove on a VAZ 2110 blows cold air, then there is only one reason - the stove radiator is clogged. If the engine is cooled with water, then rust can form in the radiator, and at high temperatures, scale can also form. Small pipes in the radiator can become clogged if you (accidentally) mix antifreeze with antifreeze, this mixture will simply curdle. In addition, some short-sighted car enthusiasts add a special radiator sealant to the coolant, which also clogs the radiators from the inside. It's quite easy to check. You need to warm up the engine to a temperature of 90 degrees, turn on the heater and check the inlet and outlet pipes of the heater by touch. If the temperature on them is different, then the radiator is simply clogged and must be replaced. But the process of replacing it is quite labor-intensive.
The heater fan is broken
The stove fan may fail. Both he and his fuse are checked.
The gasket between the head and the engine block may be broken, allowing coolant to enter the cylinders. As a result, the coolant level may drop. If thick white smoke comes out of the pipe, then the gasket is definitely broken and requires immediate replacement.
If the cabin filter is clogged with dust, then there is no or almost no cold air intake to the fan of the VAZ 2110 stove. It must be immediately taken out, cleaned, and if that fails, then replaced with a new filter.
There may be a low level of antifreeze or antifreeze and there is simply not enough for the stove due to air locks in the cooling system. When the pump squeezes out and expels this plug from the system, you must add liquid.
Thermostat failure
The most common reason why the stove on a VAZ 2110 does not heat with hot air is the thermostat. It just starts to stick in the upper or lower position over time. If this happens, then you just need to replace it. But the same situation can happen to a new one. So what should we do then, change it again? There is a proven way to bring a stuck thermostat back to life.
To do this, you will need to park the car on a slight slope. In this case, the front wheels must be 25–35 cm higher than the rear wheels. The engine must be running. You need to open the hood and prepare a small wooden (precisely wooden, to avoid damaging the thermostat) stick, or the handle of a shovel. Now, once you get behind the wheel, you need to change the gas 2-3 times. Immediately go out and tap the thermostat with the butt of a stick. After this, touch all incoming and outgoing pipes near the thermostat. Such manipulations need to be carried out 3 – 5 times, after which the thermostat will work like new again.
Cracks in pipes and pipes
Another serious malfunction of the stove is coolant spilling out under your feet. There are usually two reasons. A leak in the radiator or a crack in the pipes. It is best to replace both elements, since repairs and sealing them will cost longer and more expensive.
How to check the thermostat
The function of the thermostat in an internal combustion engine is to regulate the flow of coolant, directing it in either a small or large circle. While the engine is cold, its valve blocks the flow of coolant into the cooling radiator. This allows the engine to warm up faster.
When the coolant warms up, the thermostat valve opens, directing it to the radiator for cooling. If the valve jams, the coolant constantly moves in a small circle, not reaching either the fan switch sensor or the temperature sensor. In this case, the liquid may even boil, but the sensors, being uninvolved in such a circuit, will not work.
Check the thermostat by determining the temperature of its pipes by touch. When the engine is warm, they should all be hot. If the pipe leading from the thermostat to the cooling radiator is cold, the locking device is faulty.
We identify the cause of the breakdown
First, you need to figure out the reason why the stove fan is not working. There may be several of them.
- A faulty fuse is the most common, simple and most common reason that the motor does not turn. On the one hand, replacing a fuse is not a big and difficult problem, which can be easily handled even by a beginner. But on the other hand, it will be necessary to find the reason why the fuse has become unusable. And to do this, you will need to examine the electrical circuit that ensures the normal operation of the heating system for the presence of a short circuit. Since we are talking about fuses, it would be useful to know that the operation of the stove on the VAZ-2110 depends on fuse F7 with a current strength of 30 amperes. Also, the operation of this fuse determines the illumination of the glove compartment, the functioning of the cigarette lighter, the electric motor from the headlight washer and the heated rear window. If a short circuit is not found in the electrical circuit of the heating system, then the cause will need to be looked for throughout the wiring.
- Problems with the contacts that are located inside the mounting block are a common reason for the VAZ heater motor not working. To identify this problem, you can move the block with the attached harnesses while the car is running. If the VAZ-2110 heater fan starts working, then it is necessary to remove the block and clean the contacts.
A problem with the contacts inside the mounting block is a common reason for a non-working fan.
- A flooded relay may also be one of the reasons why the heater fan does not work. Diagnosing this problem is very simple: the fan will turn on only after the car has warmed up well. In this case, you will need to replace the relay, which is hidden behind the dashboard.
- The heater electric motor can only operate when the third speed is activated. This situation is explained by the nature of the current supply to the fan: at speeds 1 and 2 this process is implemented through a resistor, and at speed 3 - directly. Consequently, if the heating does not work at the first two speeds, then the reason lies precisely in the resistor, which must be replaced.
- The malfunction of the switch can be identified as follows: after removing the center console, start the car, take a large 12-volt light bulb with soldered wires, connect the negative wire from it to the body and touch the second wire to contacts 1, 2 and 3 on the additional resistor. When the light comes on, it indicates that the switch is working properly. But if the light bulb does not light up, then you will need to connect the wire from the light bulb to the positive terminal on the switch. If there is no light on the light bulb, you can talk about an open circuit or a faulty fuse.
A broken fan motor could also be the cause.
- A faulty fan motor is the final cause that can result in a fan not working. Here we can consider three main reasons, the elimination of which may require replacing the motor, cleaning the contacts and replacing the brushes.
Expansion tank cap
The last reason why the VAZ-2110 cooling fan may be a malfunction of the expansion tank cap. The fact is that when the engine is running, a pressure above atmospheric pressure is created in the cooling system, due to which the water, which is part of the coolant, does not boil at 100 o C. The expansion tank cap valve is designed to maintain the required pressure. If it fails, the pressure in the system will be equal to atmospheric pressure. The cooling fan on the VAZ 2112 does not turn on. This will lead to the coolant starting to boil already at 100 degrees. A sensor designed to turn on at a higher temperature will naturally not work.
It is unlikely that you will be able to check the operation of the cover at home, so if during a visual inspection you have doubts about its functionality, it is better to replace it immediately.
Functional purpose of an automotive resistor
VAZ 2110 heater resistor replacement
From a practical point of view, a resistor acts as a current intermediary between the source and the final destination. The source of current in a car is the battery, but the final destination is any device that requires electricity. Main functions of car resistor:
- maintaining the functioning of an integral electric furnace in a car;
- transformation of electrical voltage from a given value to the desired value;
- protective;
- ensuring high-quality and efficient functioning of vehicle electronics;
- selectivity in the process of functioning, etc.
Let's sum it up
Malfunctions of the VAZ-2110 heater control unit can lead to both incorrect functioning of the vehicle’s heating system and complete failure of the heater. During the cold season, this will affect not only a comfortable stay in the car, but also safe driving for the driver of the vehicle.
Repairing the stove control unit can be done on your own if you have basic knowledge of electronics, a desire to work and improve your comfort.
High-quality repairs and timely regular inspections of the unit before the onset of cold weather will help you save money on stove repair services at service centers and the purchase of expensive heating system elements.
On the VAZ 10th family, which includes the VAZ 2110-2112 models, the designers used an electronically controlled interior heating system, thanks to which the temperature set by the driver is maintained automatically.
On the VAZ-2110, instead of a manual heater control mechanism with a cable drive of the main elements - the coolant shut-off valve and dampers, an automatic heater control system (AHC) controller with a temperature sensor and a gearmotor that regulates the position of the dampers are used.
In such a stove, the valve for shutting off the antifreeze supply is no longer used, and the adjustment of the heater operating mode - “heating” or “ventilation” - is carried out by a central damper, which directs the air flow through the radiator or bypassing it.
Checking at home
Sometimes the electric motor turns on too late, when the antifreeze temperature is already high. This may be caused by a malfunction of the valve in the radiator cap or abnormal parameters of the switch on sensor. You can check the device’s response temperature at home using a multimeter and thermometer.
After disconnecting the electrical connector, the sensor is unscrewed with a key. To avoid burns, remove the device only from a cold engine, after draining the antifreeze. When reinstalling, it is advisable to use a new sealing copper washer and not apply too much force when tightening.
The switching temperature is engraved on the end; it can be from 92 to 95 degrees. To check, you need to connect the multimeter in resistance measurement mode and immerse the threaded part in a container of water.