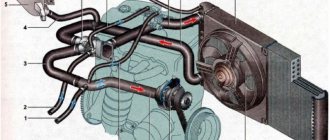
The cooling radiator is one of the most important parts of the car engine cooling system . A radiator failure can lead to engine overheating and, as a consequence, subsequent failure. The consequence of engine overheating may be a major overhaul of the engine and the entire cooling system. In this case, you can consider installing a power unit from a foreign car.
Required spare parts
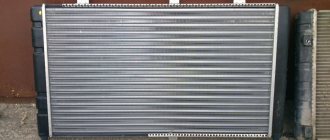
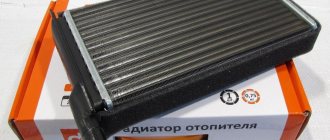
First of all, you need to select a new radiator. It is better to purchase an analogue of what is on your car. You can also make a choice by article number: 2108-1301012, 21082-1301012, RO2108-01, LRc 01082.
The average price of a new unit is 1,750 rubles. Copper models will cost more.
Attention ! It is better not to purchase painted radiators, since there is a risk of an unpleasant odor appearing in the interior, and the heat transfer of these models is lower.
Tools required for repairs
If you want to do the repairs yourself, you need to prepare the following tools:
- keys for 8 and 10;
- screwdrivers;
- heads for 8 and 10;
- pliers;
- container for draining antifreeze;
- jack;
- sealant;
- rags.
Independent work is completely justified, since as of March 24, 2019, the average price for replacing a cooling radiator for a VAZ 2114 and other models is 2.2 thousand rubles. Which will more than double costs.
On a note! It is not difficult to monitor the efficiency of the radiator and reduce the risk of engine overheating. It is necessary to regularly check the volume of coolant in the tank and the operation of the thermostat.
Step-by-step instructions for removing and installing the stove
The heat exchanger of the VAZ 2114 car is located in an extremely inconvenient place.
Therefore, when removing and installing it, you will have to do a fairly large amount of disassembly and assembly operations. The VAZ 2114 heater is equipped with air ducts, ventilation nozzles and levers for regulating the warm air flow
Tools and consumables
To work you will need the following tools:
- Phillips and slotted screwdrivers with short and long handles (screwdriver);
- set of wrenches;
- container and rubber hose for draining coolant;
- rags, a piece of oilcloth.
Procedure for replacement
In order to remove the heater radiator of a VAZ 2114 car, you should perform the following operations:
First, drain the antifreeze on a cold engine. Then unscrew the screw located behind the plastic plug.
Remove the glove compartment. First, unfasten and detach the bottom half. Then remove the cover along with the light bulb. Unscrew the screws securing the upper part and, with slight pressure and rotation, lower it down. In total, you will need to unscrew six screws.
Unscrew the two upper and two lower self-tapping screws securing the instrument panel.
Remove the lower protective cover from the steering column. To do this, remove three self-tapping screws and three screws from below.
Pull the plug out of the cigarette lighter socket.
Disconnect the connectors of the pads from the car radio and remove it from the slide.
On both sides, unscrew the screws securing the plastic console.
Pull out the flags that regulate the position of the damper and remove the heater fan mode switch.
Disconnect the console from the panel.
On the console, disconnect the terminals from the buttons for turning on the lights, heated rear window, fog lights, etc.
Be sure to mark them with a marker or notches in order of location. Disconnect the console from the panel.
Disconnect the ashtray light connector.
Unscrew the two screws from the diagnostic connector and carefully completely disconnect the console.
Carefully remove the console and set it aside.
Unscrew the two screws securing the metal base to the floor - one on the left and the other on the right side of the bracket.
Unscrew the four self-tapping screws securing the front panel (“dashboard”) - two each to the left and right of the center of the console mounting.
First remove two large screws, then two smaller screws that secure the iron structure.
Pull the electronic control unit out from under the console.
To access the heating radiator, lift the left side of the dashboard using a jack.
In case antifreeze spills, place an oilcloth under the hoses and rags on it.
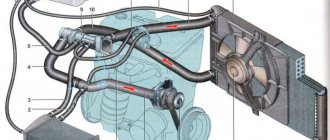
Unscrew the clamps from the hoses connecting the radiator to the engine cooling system. Remove the rubber tubes from the heat exchanger pipes. Drain the coolant from the radiator into a prepared container.
Remove the heater core from its socket. Install the new radiator by performing all operations in reverse order.
To prevent an air lock from forming in the cooling system, remove the hose from the throttle body after loosening the clamp. Pour antifreeze into the expansion tank in a thin stream.
At the same time, watch the end of the disconnected hose - as soon as liquid flows from it, put it in place and tighten the clamp.
Video: replacing the radiator of a VAZ 2114 stove
https://youtube.com/watch?v=JYC8ijuYJdg
During the operation of a car, situations arise that any car enthusiast can resolve independently. Replacing a stove radiator is precisely this type of operation. As you can see from the article, doing this yourself is quite simple. The main thing is that after removing and installing the radiator, you do not have any unnecessary parts left, and all screws and clamps are tightly tightened. Good luck on the roads!
Order of Operations
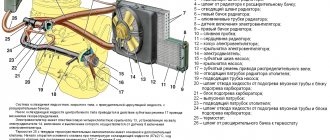
If the car has a low seating position or the coolant drain tank is large, work should begin by lifting the car with a jack. The radiator is installed on the TV along with fog and regular headlights. Work should only begin with a cold engine. If the engine is hot, be sure to wait until it cools down.
On a note! Mandatory conditions for performing operations are strict adherence to the sequence and extreme accuracy. Because the engine cooling system is one of the main ones in a vehicle. In parallel with the replacement, it is advisable to revise it and make sure that other components are in good working order and are working properly. Now you can get started:
- After removing the plug from the expansion barrel, the working fluid is drained into a container. It is necessary to drain all the antifreeze that is in the cooling system.
- Now you need to dismantle the filter.
- The radiator must be removed together with the electric fan. To do this, you need to disconnect the power supply to the cooler. Now you need to unscrew the pressure plate and remove it.
- Now you need to remove the inlet and outlet hoses from the pipes. To do this, loosen the fastener clamp.
- The radiator with fan is tilted towards the engine and removed. Attention! Before pulling out the fan, you need to disconnect the wires. They are usually located at the bottom of the device. This is necessary in order to maintain the functionality of the wiring.
- Now you need to disconnect the fan from the radiator. To do this, use a 10mm wrench to unscrew 2 nuts. The fan must be removed along with the casing.
- Installation of the radiator is carried out in the reverse order to that described above. It begins with switching the new node and the fan. Important! Before replacing, make sure that there are 2 rubber cushions. If they are missing, install new ones in the crossmember holes. If they are in place, then the installation of the new unit is carried out on them. The main causes of radiator malfunction
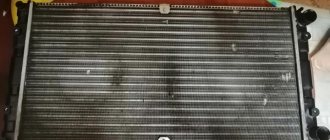
The most common reasons for radiator failure on VAZ 2113, 2114, 2115 are:
- mechanical shocks, for example, stones bouncing off the wheels of passing vehicles;
- pockets of corrosion and contamination inside the tubes;
- damage in an accident.
Also check out
- We remove the radiator outlet hose from the thermostat.
- Tilt the radiator towards the engine, and lower the clamp of the radiator steam exhaust hose. Remove it carefully so that the plastic fitting is not damaged.
- Remove the cooling radiator and fan, lowering it towards the engine. If you plan to repair the radiator, do not disconnect the fan from it. If the radiator needs to be replaced, the fan should be removed and installed on a new part.
- Using a “10” wrench, unscrew 2 mounting bolts, 1 nut and remove the electric fan.
- Using a 10mm socket wrench, unscrew the nut on the upper mount of the fan to the radiator.
- Using the “8” socket, unscrew the 2 nuts that secure the pressure plate and remove it.
- Remove the shroud and cooling fan.
Before replacing the radiator, make sure that there are 2 rubber pads at the installation site. The radiator must be installed on them, and they must be fixed in the holes of the cross member.
This completes the replacement of the VAZ 2115 radiator. You need to put everything back together and fill it with coolant.
Let's summarize
In general, repairs are quite accessible for doing it yourself, but you need to immediately prepare for a significant time investment. Work can last for 2-6 hours. When replacing the radiator, it is necessary to change the coolant. Work with 8-valve and 16-valve engines is carried out in the same way. If the car has air conditioning, you will have to remove and install it during the repair, but not on all models. It is advisable to replace the bushings at the same time. The work is completed by checking the functionality of the engine and the condition of the coolant. Namely, whether it is boiling.
For greater clarity on replacing the VAZ 2115 injector cooling radiator, you can watch this video:
Replacing the cooling radiator for a VAZ 2114
VAZ 2114 is considered one of the most striking examples of success of the domestic automobile industry. This model is a modified version of the VAZ 2109 and differs from it in the design of the front part of the body, updated headlights and hood, radiator grille design, as well as plastic moldings and spoilers. However, as it became known, the car is susceptible to radiator failures, which can lead to overheating, and as a result, to engine failure.
Replacing the cooling radiator
It is worth noting that the radiator from 2114 is also suitable for other representatives of the VAZ model range. As you know, VAZ’s developments are universal, so it is not surprising that not only cooling system parts, but also other spare parts from earlier and later models of this brand will ideally fit the 2114.
As one of the main parts of the cooling system that is in constant operation, the radiator may require replacement because it becomes clogged with debris or suffers mechanical damage. In addition, the coolant must be replaced in a timely manner, otherwise it will corrode it from the inside, which will undoubtedly lead to breakdown.
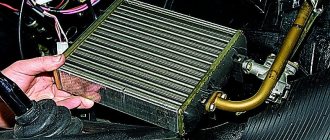
How to remove the old one?
Dismantling the cooling radiator and its pipes VAZ 2114
Before a replacement is made, regardless of the vehicle manufacturer, it is worth remembering that the process of dismantling the old and installing a new radiator must be carried out on a cold engine, and the VAZ 2114 is no exception. In addition, before replacing this spare part, you must disconnect the battery and drain the coolant by unscrewing the plug located at the bottom left.
To avoid burns, be sure to cool the engine before draining coolant.
- After draining the cooling liquid, you need to remove the air filter secured with two bolts, freeing the air duct filter by loosening the clamp.
- After the radiator is freed from the air filter, it is necessary to dismantle the protective screen provided by the VAZ developers. To do this, you need to loosen the upper fastenings, remove the iron clamp and loosen the return clamp of the expansion tank.
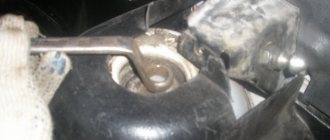
- You should also remove the pipes: the upper one can be dismantled by loosening the iron clamps using a 8-mm wrench or a screwdriver, while the lower one, in most cases, is not only screwed to the thermostat, but also sealed with a special sealant that prevents fluid from leaking from the radiator. To remove the lower pipe, you need to remove the sealant and loosen the clamp.
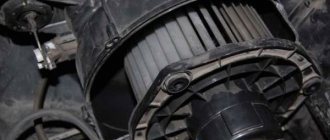
- In addition, it is necessary to disconnect the fan power cord, after which the part itself can be removed by removing the landing pads.
Removing the radiator and its fastenings - Then you need to remove the fan, screwed on with several nuts. The main work of dismantling the main part of the engine cooling system has been completed, the only thing left to do is replace it.
How to secure a new one
- Connect the fans to the new cooling system and tighten them with nuts.
- After this, carefully insert it into place, putting the landing pads on it, and connect the power plug to the fan.
- Then you need to secure the lower pipe to the thermostat, generously lubricating it with sealant to prevent leakage, and also secure the upper one and tighten the clamps.
- Next, you need to fix the expansion tank return clamp, attach the screen and secure the iron clamp.
- After this, you should install the air duct and air filter, also securing it with a clamp.
Testing modern sealants
To increase the tightness of the cooling system and eliminate leaks in the radiator, there are special sealant compositions for car owners. Different experts have mixed attitudes towards the use of sealants, by analogy with oil additives and tablets in a gasoline tank. Car manufacturers have a negative attitude towards the use of sealants. In the car maintenance manuals in the engine cooling section there is no mention of any additives. They respond to leaks by replacing the old radiator with a new one.
What to do if the antifreeze level has dropped significantly on the road, but the road to the place is still far away. There is a way out. Retail outlets and fuel filling stations sell additives that can eliminate leaks. This is an emergency method that allows you to get to a nearby service station without problems. It is not possible to prevent a radiator from leaking forever using a sealant. The main task of additives was the formation of deposits in the cooling system of cars.
You can simplify the selection using a summary table that has two characteristics: the level of deposits and the time of clogging of different holes. To assess the level of deposits, the mass of the thermostat was used before and after the use of additives. Such tests are usually carried out at institutes at the department of internal combustion engines.
From the table you can see that microcracks are easily repaired, and even large holes are clogged within 10 minutes. The use of radiator sealants is an emergency. There is no point in using them for preventive purposes. If possible, replace the faulty part and thoroughly flush the cooling system of the machine.
Refilling a new radiator
Coolant refill
Finally, “Tosol” or antifreeze should be poured into the expansion tank of the new radiator. Basically, approximately 5-8 liters of liquid are poured into the new cooling system to cool the engine. After filling with antifreeze, the car must be started and left running for a few minutes so that the thermostat opens and the antifreeze goes into the engine cooling system. Replacing the 2114 radiator, like any other VAZ model, should be carried out in a warm room or in the summer season.
Some useful tips
- To drain the coolant, you need to unscrew the plugs on the radiator, on the expansion tank and on the engine cylinder block.
- If the cooling system is not functioning well, the culprit may be a liquid cooling pump whose shaft bearings or seals have failed. It needs to be repaired or replaced with a new product.
- The cause of failure of the cooling system may be improper operation of the thermostat, which must be repaired or replaced.
- It is more convenient to remove the radiator together with the fan. The fan can be removed later if necessary.
You can check the tightness of the removed radiator as follows:
- fill the bathtub with water;
- lower the product into water and apply pressure of approximately 0.2 MPa;
- bubbles will show where leaks have appeared.
Sometimes, to bring the radiator into working condition, it is enough to rinse it with water. It's done like this. The antifreeze or antifreeze is drained and clean distilled water is poured in. The engine starts and runs at 3000 rpm. The temperature should be monitored. They turn off the car and after 7-8 minutes drain the water. If it is not completely clean, the procedure can be repeated. If the fluid has changed color, it needs to be replaced.
The coolant should be changed: antifreeze - after 2 years, antifreeze - after 5 years. The best choice for cooling fluid is antifreeze. The standard cooling system fan is quite noisy. Therefore, it makes sense to replace the original four-blade impeller with a new eight-blade one. When purchasing an impeller, you need to remember that the shaft for its attachment can have a landing thread of 8 mm and 6 mm.