Replacing pipes
And when it’s time to change the heater radiator pipes on your VAZ 2109, don’t be afraid to do the replacement yourself. First of all, it is important to know where the stove radiator and its pipes are located. So, the heater radiator is located on the right heater casing (that is, to the right of the panel of heater control levers), direct access is blocked by the dashboard console. The price of the pipes themselves is a pittance, but for replacement at a service station they will demand a tidy sum, why? Now you will see for yourself. There are two ways to replace pipes (the methods are also suitable for replacing a stove radiator):
- The first - (the so-called classic) is carried out in accordance with the instructions (manual) for the operation, maintenance and repair of the VAZ2109.
- It involves removing the dashboard and draining the fluid from the engine cooling system.
- The second is simpler (folk), does not require complex manipulations
- In our article we will consider both methods so that you can choose the most convenient one for you.
Briefly about the car
The VAZ-2114 hatchback is a fairly popular car that can still be found both on domestic roads and on the roads of the entire post-Soviet space. It was produced by AvtoVAZ OJSC from 2003 to 2013 and was one of the variants of the restyled series of the Samara-2 (VAZ-21093) family of cars.
During mass production, various engines with the same type of cooling systems were installed on it, which operate on the principle of internal heat exchange using a special cooling mixture of the “Tosol” type.
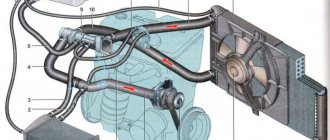
Cooling system diagram
Classic way
It is worth noting right away that it is quite labor-intensive and will take quite a lot of time. You will need a lot of patience and care (as mentioned above). The most difficult part is removing the instrument panel and installing it, as it is much more difficult to get the instrument panel into place correctly.
Tool
- Coolant drain container
- Screwdriver Set
- Head with a wrench to unscrew the steering wheel
Let's start in order:
- Removing the terminals from the battery
- With the heater tap open, drain the coolant by unscrewing the drain plugs located on the radiator and cylinder block (into a substitute container)
- Removing the decorative trim from the steering wheel
- We unscrew the nut securing the steering wheel so that its end is flush with the end of the steering column shaft.
- The steering wheel is seated very tightly on the shaft splines, so for safety reasons it is not recommended to completely unscrew the nut securing the steering wheel: with a sharp impact, it will jump off the splines and can cause injury
- Be sure to mark the location of the steering wheel in relation to the shaft
- Knock the steering wheel off the shaft splines with sharp blows of your hand.
- Now you can finally unscrew the nut and remove the steering wheel
- Unscrew the six screws securing the lower steering column casing
- Remove the lower casing from the steering column, as well as the lining of the ignition switch (lock)
- Then remove the upper casing from the steering column
- Loosen the bolt securing the base under the steering switches
- We remove the base from the shaft, disconnect the blocks with wires (there are two of them) from the contacts of the car horn
- Now we disconnect the block with wiring from the windshield wiper and washer switch lever
- It is recommended to mark the terminals with wiring before disconnecting. This will help you avoid confusion during assembly and save time.
- Disconnect the block with wiring from the headlight and turn signal switch lever
- Pull the carburetor choke control handle (aka “choke”) towards you so that the draft comes out, remove the handle from it
- Unscrew the two screws securing the dashboard console trim
- Removing the cover from the console
- Remove the cigarette lighter from the socket
- We take out the ashtray from the nest by pressing on the plate to extinguish cigarettes
- Remove the handle that switches the heater fan
- Then we remove the three knobs that control the stove and hook them with a screwdriver
- Disconnect the block with wiring from the heater fan switch, located under the heater control panel
- Disconnect two wires from the contacts of the lamp illuminating the heater control panel
- Remove the headlight direction adjustment handle, just pull it towards you
- Now remove the instrument cluster lighting switch knob
- Unscrew the nut securing the instrument lighting switch
- Unscrew the nut securing the headlight hydraulic corrector
- We push the hydraulic corrector for headlights and the instrument lighting switch inside the panel
- Remove the side nozzles located on both sides of the dashboard using a screwdriver
- Unscrew one screw securing the trim on both sides of the dashboard
- Using a screwdriver, use a screwdriver to remove the exterior lighting switch.
- Disconnect the block with wires from the switch. Push the block inside the dashboard
- We use a screwdriver and remove the socket intended for radio equipment. If you have radio equipment installed on your VAZ 2109, remove it first
- We remove radio equipment according to the manufacturer’s instructions
- Then unscrew the screw securing the trim to the dashboard
- We insert two screwdrivers so that we can bend the plastic latches
- Raising the dashboard trim
- Disconnect the wiring harness from the cigarette lighter
- Disconnect the block with wiring from the block for lighting the cigarette lighter
- Disconnect the block with wiring from the lamp illuminating the hazard warning switch
- We disconnect the block with wiring from the hazard warning switch, and finally remove the dashboard trim
- Gently press down and remove the speaker cover located on the left side of the dashboard. Be careful - latches break easily
- Disconnect the block with wiring from the heated glass switch
- Remove the block from the rear fog lamp switch
- Unscrew the two screws securing the instrument cluster
- We take out the instrument cluster from the dashboard, unscrew the nut securing the cable from the speedometer and disconnect it
Removing the instrument panel
Attention: Disconnect the connectors with wiring for additional equipment, if installed on your car.
- Disconnect the red block from the instrument cluster
- Then disconnect the block from the control system
- Disconnect the white block from the instrument cluster
- Disconnect the ignition switch block from the ignition relay
- Disconnect the ground wire of the ignition relay
- Disconnect the control lamp block for opening the air damper
- Unscrew one screw from the lower mounting of the dashboard on both sides
- Disconnect the drawer light lamp block
- Unscrew the two screws securing the heater control panel and lower it down
- Unscrew the two screws securing the air damper guide rod to the dashboard
- Unscrew two screws from the upper mounting of the dashboard on both sides
- We use a screwdriver and remove one plug at a time from both sides of the dashboard.
- Unscrew one screw from the side mounting of the dashboard on both sides
- Unscrew the screw of the central fastening of the instrument panel
- Remove the dashboard
- After replacing the pipes or the heater radiator itself, we assemble the panel in the reverse order
- After installing the panel, we check the operation of the switches and all devices to ensure they are connected correctly
Let's return to the heater radiator pipes; we have already removed the panel:
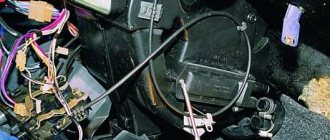
- We disconnect the plastic clamp located on the right side of the heater, which holds the damper rod that heats the windshield
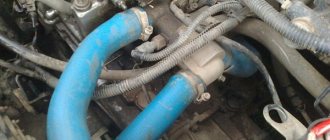
- Loosen the clamps and disconnect both pipes from the heater tap from inside the car under the dashboard
Loosen the clamps and remove the pipes
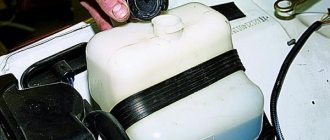
- Then loosen the clamps and disconnect both pipes from the heater valve located in the engine compartment (if you are going to remove the heater valve, otherwise skip it)
Disconnect the pipes in the engine compartment
- We replace the pipes with new ones, it’s better to replace the clamps right away, even if they are still suitable, it’s better not to risk it
- If necessary, you can unscrew the three screws securing the radiator to the stove
- And, raising the rod, pull out the heater radiator to check its condition and replace it
This is exactly how craftsmen are required to replace the VAZ 2109 stove pipes (replacement pipes) in service centers and auto repair shops. For owners who decide to do this work with their own hands, it is necessary to take into account that it will take 4-6 hours
"Folk" way
Folk craftsmen - these are brave and very desperate craftsmen - offer a much less labor-intensive method. The bottom line is that replacing the stove pipes (and the stove itself) is done without draining the coolant and without dismantling the instrument panel. The tools you will need are a set of screwdrivers, rags and a container (small) to drain the liquid from the pipes. In this case, replacing the heater radiator pipes is carried out according to the following scheme:
- Removing the terminals from the battery
- Close the heater tap
- We remove the right front seat (to make it easier to do the work)
- We unscrew the two screws securing the dashboard on the right side, and one screw located in the glove compartment, then, pulling the dashboard towards you, we place a wooden block
- Now there is a gap on the side of the passenger seat and you can get to the pipes and to the heater radiator itself
- Lay a rag on the floor of the cabin and prepare a container to collect the coolant
- Which will spill from the radiator and pipes
- We loosen the clamps of the pipes (photo above) and carefully, one by one, remove them from the radiator, replacing the container. 200 - 300 grams of coolant will drain into it
- Replace the pipes with new ones, and change the clamps, just in case.
- If necessary, unscrew the three bolts that secure the radiator to the stove and pull it down to the right
- We install the pipes and the new radiator in the reverse order.
Subtleties of filling new antifreeze
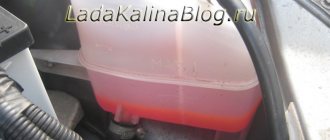
Before you start filling in new coolant, you need to drain the old one, and also thoroughly clean the entire cooling system of contaminants. To do this, it is better to use a special cleaning agent that can be purchased at a car enthusiast store. Make sure that all taps and plugs of the VAZ-2114 are open. You can determine whether the system has been flushed or not based on the color of the antifreeze flowing out.
The plugs and tap are closed only when the product becomes transparent. If the manufacturer describes in the instructions the specifics of using the cleaning mass, follow these rules for effective cleaning. As for the level of antifreeze filling, some drivers prefer to fill to the limit mark, others deliberately do not top up, and later, after a successful test, add more fluid.
After the antifreeze has been replaced, all that remains is to close the expander and start the car engine. The motor should idle until the furnace fan starts running.
Pipes and hoses VAZ 2108-21099
Engine pipes 21082 reinforced rubber red for VAZ 2108-21099, 2113-2115 injector
Heater pipes reinforced rubber blue 21082 for VAZ 2108-21099, 2113-2115 injector
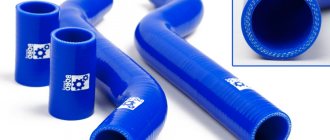
Blue silicone radiator pipes for VAZ 2108-21099, 2113-2115 injector
Blue silicone stove pipes for VAZ 2108-21099, 2113-2115 injector
Silicone blue expansion tank pipe for VAZ 2108-21099, 2113-2115 injector
Blue silicone breather pipe for VAZ 2108-21099, 2113-2115
Radiator pipes reinforced rubber red for VAZ 2108-21099, 2113-2115 injector
Crankcase ventilation hose (breather) silicone blue for VAZ 2108-21099, 2113-2115
Radiator pipes reinforced rubber red for VAZ 2108-21099 carburetor
Throttle pipe heating hose for VAZ 2108-21099, 2110-2112, 2113-2115 injector
Heater pipes reinforced blue rubber for VAZ 2108-21099 carburetor
Heater pipes reinforced red rubber for VAZ 2108 carburetor
Expansion tank hose (from tank to radiator) for 2108-2115
Thermostat pipe injector corner for VAZ 2108-21099, 2110-2112, 2113-2115, Priora
Blue silicone hose 1 meter diameter 20 mm
Heater pipes 21082 reinforced rubber red for VAZ 2108-21099, 2113-2115 injector
Silicone blue expansion tank pipe for VAZ 2108-21099, 2113-2115 carburetor
Blue silicone radiator pipes for VAZ 2108-21099 carburetor
Blue silicone hose 1 meter diameter 8 mm
Blue silicone stove pipes for VAZ 2108-21099 carburetor
Carburetor outlet hose for VAZ 2108-21099
Set of engine pipes silicone blue cs20 profi for VAZ 2108-21099, 2113-2115
Thin breather hose (pipe) for VAZ 2108-21099
Rear heater supply hose (pipe) for VAZ 2108-21099, 2113-2115
Radiator drain hose (pipe) for VAZ 2108-21099 injector
Thermostat connecting pipe (short) for VAZ 2108-21099, 2113-2115
Breather pipe Forward Auto parts for VAZ 2108-21099, 2113-2115
Upper crankcase exhaust ventilation hose Forward Auto parts for VAZ 2108-21099, 2110, 2113-2115, Lada Kalina
Set of engine pipes silicone blue cs20 profi for VAZ 2108-21099, 2113-2115 with engine 21082
Cooling system filling hose for VAZ 2108-21099, 2113-2115
Upper (small) crankcase exhaust ventilation breather hose (pipe) for VAZ 2108-21099
Radiator supply hose for VAZ 2108-21099, 2113-2115
Exhaust cooling system pipe without hole for temperature sensor on VAZ 2108-21099
Rear heater outlet hose (pipe) for VAZ 2108-21099, 2113-2115
Radiator supply hose (pipe) for VAZ 2108-21099 injector
Heater heater outlet hose (pipe) front VAZ 2108-21099, 2113-2115
Heater pipe (engine compartment, small) 2108-8101208R for VAZ 2108-21099
Heater heater supply hose (pipe) front Forward Auto spare part for VAZ 2108-21099, 2113-2115
Hose (pipe) of the lower crankcase exhaust ventilation breather on VAZ 2108-21099
Hose outlet fitting for VAZ 2108-21099, 2113-2115
Front supply hose (pipe) for the heater heater on VAZ 2108-21099, 2113-2115
Water pump outlet pipe with hole for temperature sensor on VAZ 2108, 2110-2112
Radiator outlet hose (pipe) Forward Auto spare part for VAZ 2108-21099 injector
Set of heater system pipes for VAZ 2108-21099
Set of heater system pipes for VAZ 2108-21099 (injector)
Gas tank
The gas tank hose or pipe is the connecting piece that transfers fuel to the vehicle.
| L | d1 | d2 |
| 50 | 25 | 36 |
| 50 | 20 | 31 |
| 50 | 18 | 29 |
| 60 | 38 | 51 |
| 60 | 32 | 45 |
| 60 | 32 | 43 |
| 60 | 25 | 36 |
| 60 | 20 | 31 |
| 60 | 18 | 29 |
How to check the condition of the VAZ-2109 pipes
Ideally, an inspection hole is needed to inspect the machine. In a garage this is not always possible, so craftsmen came up with another way out of the situation - they installed the VAZ-2109 on an overpass. You will also need a powerful jack; the car is placed on reliable supports.
To inspect the condition of the VAZ-2109 cooling system, stock up on the following tools:
- a lighting fixture with a protective cap that prevents injury from fragments of a broken lamp in case it falls;
- antifreeze to top up the fluid in the expansion tank to the maximum level.
Follow the step-by-step instructions and the test will be completed without any difficulties:
- Disconnect the negative terminal from the battery.
- Lay plywood or a thick sheet of cardboard on the flooring.
- First inspect the engine compartment, it is important to understand that the temperature of the cooling radiator and engine is equal to the air temperature.
- Evaluate the tightness of the connections of the pipes on the fittings that approach and extend from the radiator.
- The fit of the expansion component to the thermostat must also be carefully checked and felt by running your palm along the bottom of the connections. If the tightness leaves much to be desired, liquid is released.
- Tighten the clamps properly, but do not over-tighten, otherwise you may damage the pipe.
- Lie down on the cardboard placed under the VAZ-2109 and inspect the pipe along with the incoming pipe of the water pump. The hoses responsible for the interior heating system are also important.
- Pay attention to the pipes under the hood.
- Do not go past the rubber channels adjacent to the carburetor.
- Tighten the radiator drain plug and antifreeze temperature gauge securely.
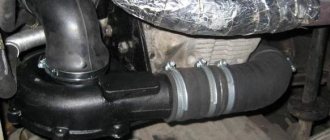
Air filter
Perhaps some drivers think that the air filter pipe is not a particularly important part in the car. Unfortunately, they are wrong. When there is a high concentration of dust in the air, it is the sleeve that is able to retain a lot of dirty air.
| L | d1 | d2 |
| 45 | 25 | 30 |
| 45 | 18 | 26 |
| 50 | 25 | 30 |
| 50 | 18 | 26 |
| 60 | 30 | 35 |
| 60 | 25 | 30 |
| 60 | 20 | 25 |
| 60 | 18 | 26 |
| 80 | 30 | 35 |
| 80 | 20 | 25 |
Dismantling the worn-out cooling system of the VAZ-2109
If the coolant hoses are not in perfect condition, you will have to replace not only one worn component, but the entire system.
To install new parts, you need to dismantle the old ones.
Do-it-yourself dismantling of the cooling system consists of the following steps:
- Remove the cap from the expansion tank.
- Unscrew the heating valve inside the VAZ-2109, rotate the lever clockwise until it hits the end point.
- Remove the crankcase protective part by carefully unscrewing the fasteners.
- The coolant is drained into a prepared container with a volume of up to 8 liters. To do this, it is convenient to use a metal canister - it is easiest to drain antifreeze from it back into the VAZ-2109. Clean the area near the radiator drain plug and cylinder block, making sure that no dirt gets into the antifreeze. Place the container under the radiator.
- When the antifreeze is drained, tighten the plugs located on the radiator and housing.
- Replacing cooling pipes in a VAZ-2109 also involves dismantling work inside the cabin. Unscrew the bolts securing the instrument panel, get rid of the passenger and driver's seats - you can move them as far back as possible.
- Disconnect the clamps connecting the transmission tubes and provided for filling new antifreeze from the heater tap. It is located between the engine compartment and the passenger compartment.
- If they are pulled out, remove the rubber pipes by turning them on different sides. The parts have to be replaced, so they need to be trimmed with a sharp knife. Do not pull with force, otherwise you may damage the metal fixation of the fittings.
- Using a flathead screwdriver, remove the valve located in the engine compartment.
- Using pliers, release the holder from the heater tap drive rod.
- Clean the faucet and blow out the inside with a pump.
- Remove the pipes gradually, you need to dismantle everything coming from the engine and radiator. Remember how they were fixed - at the stage of installing new components, this will help to install them back quickly and correctly.
Why is the cooling system malfunctioning?
The main malfunction of the cooling system occurs as a result of incorrect operation of the thermostat. In a particular case, the only solution will be to replace it.
Before you begin work on replacing the thermostat valve, it must be checked for serviceability by starting the engine while it is cool. When the engine warms up to about 90 degrees, touch the pipe at the bottom of the radiator, it should be warm, this indicates the serviceability of the valve; if the pipe is cold, the valve must be replaced.
VAZ 2114 car models have an aluminum radiator; it is equipped with two additional tanks; the left one has a partition.
The cooling system is quite simple, so you can carry out repairs yourself. The radiator is the main component of the car’s cooling system, its main function is to prevent engine overheating by removing warm air from the engine to the outside.
Instructions for self-replacement of VAZ-2109 cooling pipes
Installation of new hoses for the VAZ-2109 cooling system is divided into the following stages:
- Use a wire brush to go over the joints, and then polish the surfaces with a clean cloth. Any small speck can cause a blockage in the cooling system.
- Treat the clamps with a fine abrasive file, because when tightening the rubber pipes with clamps, they can easily be damaged by sharp corners.
- Place the treated clamps on the pipes; if the pipes do not give in, wash the edges of the fitting with a liquid soap solution.
- You should tighten the pipe carefully, try to avoid distortions. The fit must be 100%, exactly in diameter.
- Retighten all elements, connections and plugs.
- Fill the expansion tank with antifreeze and tighten the cap.
Video instructions for replacing VAZ-2109 cooling hoses can be viewed below:
Changing the coolant strictly according to the maintenance regulations
It is important to change the coolant frequently to prevent engine damage, because Over time, it loses its properties and is subject to heating.
To carry out work on changing antifreeze or antifreeze, you need to know the important components:
Of course, the best choice would be antifreeze as a coolant, because... It has a longer shelf life, unlike antifreeze, and the system wears out less. But the price indicator for antifreeze is much cheaper.
When flushing the cooling system, you must:
Main causes of malfunction
There can be several reasons for such problems, but the most common are:
- Worn or damaged pipes.
- Incorrect connection of pipes.
- Broken stove tap.
- Radiator failure.
The first of these reasons - wear of pipes - can occur for natural reasons during operation, since the chemicals contained in coolants have a corrosive effect, which is complemented by the influence of high temperature.
In addition, the hoses of the VAZ 2114 stove can be easily damaged by over-tightening the clamps on them. When such damage occurs, fluid leaks from the system.
In total, VAZ 2114 cars have 4 pipes. Two of them are located under the hood and two in the cabin.
Their damage, which led to a coolant leak, can be judged by the following indirect signs:
- there is a constant drop in the liquid level;
- a specific smell appeared in the cabin;
- A puddle of coolant forms under the car or in the passenger compartment while parked.
If at least one of these signs is observed, then urgent diagnostics of the pipes should be carried out and their replacement.
Tightening the clamps on the pipes should be done with medium force. Over-tightening may damage them.
Thermostat repair
The thermostat sensor also serves to maintain the set temperature norm. It blocks the movement of the cooling mixture into the radiator until the engine heats up to the desired temperature of approximately 90 degrees. Liquid begins to flow through the thermostat when Celsius reaches 95 degrees. Using a thermostat, the engine takes minimal time to warm up. The thermostat is located between the engine and the cooling radiator.
Common problems:
When carrying out repair work on the thermostat, it is allowed to lightly tap the housing with a screwdriver to move the valve.
If it is necessary to completely disassemble the thermostat, it is important to tightly close the pipes to avoid antifreeze leakage, only then disassemble the thermostat. At the end of the repair, it is better to replace the antifreeze.
Source
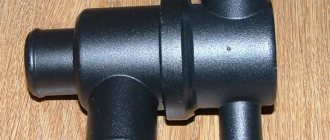
Replacing the stove tap
It often happens that a part such as a faucet breaks (it is worth noting that on the 2114 it is not very reliable). When replacing it, you should simultaneously replace the pipes, even if they are in good working order (the location of the pipes of the VAZ 2114 stove was described above).
All faucet replacements are performed in the following order:
- place the car in the pit and secure it;
- unscrew the screw plug and drain the coolant;
- using a screwdriver, loosen the clamps on the pipes located in the engine compartment, and then remove them;
- find the tap in the passenger compartment on the passenger side (located under the panel), loosen the clamps of the pipes suitable for it, and then remove them;
- Using a 10mm wrench, unscrew a pair of nuts screwed onto the studs and securing the valve body;
- from the interior side, pull out the tap and disconnect the control cable from it;
- install a new (similar) faucet in its original place;
- perform assembly in the same sequence, but in reverse order.
Before disconnecting the pipes (especially those located in the passenger compartment), you should place a cloth under them in case of coolant leakage.
Many car enthusiasts who carry out such a replacement are sometimes interested in how to properly connect the pipes to the VAZ 2114 stove? After all, by mistake or forgetfulness, you can connect them incorrectly, which will disrupt the normal circulation of coolant.
In order not to make a mistake, it is worth remembering that the connection diagram for the connection pipes of the VAZ 2114 stove is as follows: the pipes located in the engine compartment are connected: the first - from the tap (inlet) to the hole in the cylinder head, the second - from the tap (outlet) - to "saxophone". The connections in the cabin are connected: the first - from the tap to the thermostat, the second - from the tap to the pump inlet.
For even greater convenience, you can use the following general diagram of the heating system:
It is worth noting that the pipes located inside the cabin vary greatly in length, so it is extremely difficult to confuse their location.
Installing an additional pump
The main negative quality of the basic heating element of the VAZ-2109 is its low efficiency at idle speed. This problem can be solved by installing an additional pump (additional pump) in the cooling system.
Purpose
By installing an additional pump 09, you can increase the efficiency of the stove at idle speed. The base heater blows warm air at idle, and hot air only when driving. This means that fluid circulation in the engine cooling system is poor. Installing an additional pump makes the coolant move much faster, including at idle, therefore, during a stop, hot air will blow from the stove, and not warm as before.
Which additional pump is better to choose?
The most common and proven options are additional pumps from GAZelle or Bosch. These elements do not have any problems with leakage.
Installation of an additional pump from a GAZelle on a VAZ-2109
You will need:
- Pump for GAZelle
- Relay. You can take a relay with normally open contacts 2105, 2108 - starter or ignition relay and bridge contacts 30 and 86.
- Reinforced hose.
- Cooling.
- Several clamps.
Progress
- Wait for the antifreeze to cool completely and drain it.
- Unscrew the 4 top screws on the pump, where the impeller is located, and coat the rubber gasket with sealant.
- Secure the pump to the studs near the battery.
- Disconnect the coolant wire hose to the heater from the outlet pipe of the cylinder head and connect it to the horizontal pipe of the pump.
- Connect the hose of the connected S-shaped hoses (located in the cabin between the tap and the radiator) to the vertical branch pipe.
- Connect the second end to the head of the block, in the previously removed place of the base one.
- Pull all the clamps and do not forget to tighten the drain plug in the block.
- Fill the coolant to the maximum and check for leaks.
- If necessary, tighten the clamps.
- After running the engine for half an hour, bring the antifreeze level to normal.
Scheme for installing an additional pump in a car's cooling system.
Installing an additional pump from a GAZelle is very popular among VAZ owners, as it has only positive aspects. The car will be properly heated even at idle speed, and the price of the issue is about 2000 rubles. depending on the price of the purchased part.
Radiator replacement
Sometimes a clogged or damaged radiator causes the heater to not work properly. If this happens, you should replace it with a new, similar one.
It is done as follows (without dismantling the panel):
- Place the car in a pit and drain the coolant (the same as when replacing a valve).
- To quickly and more completely drain the coolant, unscrew the cap of the expansion tank.
- After draining, screw the plug-bolt into place.
- From inside, close the tap by moving its lever to the left position.
- Move the passenger seat back as far as possible.
- Remove the plug in the center of the panel and unscrew the screw underneath it.
- Unscrew the 4 screws securing the left panel cover.
- Unscrew 6 screws (3 on top and bottom) on the steering column casing, and then remove the casing.
- Disconnect the radio and cigarette lighter connectors.
- Remove the plastic covers on the stove adjustment levers.
- Unscrew a couple of screws in the upper part of the center console, and then remove the latter.
- Unscrew the diagnostic connector mounting bolts.
- Disconnect all remaining electrical connectors in the console.
- Remove the console completely.
- Unscrew the screws securing the panel base to the body.
- Remove the 4 screws securing the panel from the side.
- Unscrew the panel screws in the center.
- Remove the ECU.
- Lift and secure the panel.
- Loosen the pipe clamps and remove them.
- Drain the leaking liquid.
- Unscrew the bolts securing the radiator (4 pieces).
- Remove the old radiator.
- Install a new radiator.
Reassembly is carried out in the same sequence, but in reverse order.
What does damage cause?
The most common cause is engine overheating; failure will occur in a very short period of time. As a result of overheating, the cylinder block becomes deformed, cracks may appear and the piston may become deformed.
But it is much worse when the piston is completely deformed and makes a hole in the cylinder block. Such a breakdown usually leads to a complete replacement of the damaged engine with a new unit.
Replacing pipes
And when it’s time to change the heater radiator pipes on your VAZ 2109, don’t be afraid to do the replacement yourself. First of all, it is important to know where the stove radiator and its pipes are located. So, the heater radiator is located on the right heater casing (that is, to the right of the panel of heater control levers), direct access is blocked by the dashboard console. The price of the pipes themselves is a pittance, but for replacement at a service station they will demand a tidy sum, why? Now you will see for yourself. There are two ways to replace pipes (the methods are also suitable for replacing a stove radiator):
- The first - (the so-called classic) is carried out in accordance with the instructions (manual) for the operation, maintenance and repair of the VAZ2109.
- It involves removing the dashboard and draining the fluid from the engine cooling system.
- The second is simpler (folk), does not require complex manipulations
- In our article we will consider both methods so that you can choose the most convenient one for you.
Operating principle of a car heater
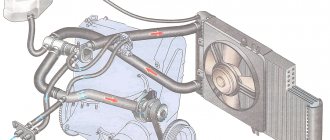
If the car heater “refuses” to blow warm air, then, of course, the interior will be uncomfortable and unpleasant, especially in inclement, cool weather. Having understood the principle of operation of the heater for the VAZ-2109 injector or carburetor, you can set up the operation of this device quite easily. A car heater stove can be considered a very ordinary heating device called a heat exchanger. The heating system is connected through a special tap to the system that is responsible for cooling the engine. When you turn on the stove, a special tap automatically opens, which allows cooling liquid to flow into the radiator located in the heating system. The liquid entering the radiator pipes is cooled, which leads to heat entering the cabin. The car heater is equipped with a fan that can operate in three modes. By choosing one mode or another, the driver can independently control the flow of warm air.
Classic way
It is worth noting right away that it is quite labor-intensive and will take quite a lot of time. You will need a lot of patience and care (as mentioned above). The most difficult part is removing the instrument panel and installing it, as it is much more difficult to get the instrument panel into place correctly.
Tool
- Coolant drain container
- Screwdriver Set
- Head with a wrench to unscrew the steering wheel
Let's start in order:
- Removing the terminals from the battery
- With the heater tap open, drain the coolant by unscrewing the drain plugs located on the radiator and cylinder block (into a substitute container)
- Removing the decorative trim from the steering wheel
- We unscrew the nut securing the steering wheel so that its end is flush with the end of the steering column shaft.
- The steering wheel is seated very tightly on the shaft splines, so for safety reasons it is not recommended to completely unscrew the nut securing the steering wheel: with a sharp impact, it will jump off the splines and can cause injury
- Be sure to mark the location of the steering wheel in relation to the shaft
- Knock the steering wheel off the shaft splines with sharp blows of your hand.
- Now you can finally unscrew the nut and remove the steering wheel
- Unscrew the six screws securing the lower steering column casing
- Remove the lower casing from the steering column, as well as the lining of the ignition switch (lock)
- Then remove the upper casing from the steering column
- Loosen the bolt securing the base under the steering switches
- We remove the base from the shaft, disconnect the blocks with wires (there are two of them) from the contacts of the car horn
- Now we disconnect the block with wiring from the windshield wiper and washer switch lever
- It is recommended to mark the terminals with wiring before disconnecting. This will help you avoid confusion during assembly and save time.
- Disconnect the block with wiring from the headlight and turn signal switch lever
- Pull the carburetor choke control handle (aka “choke”) towards you so that the draft comes out, remove the handle from it
- Unscrew the two screws securing the dashboard console trim
- Removing the cover from the console
- Remove the cigarette lighter from the socket
- We take out the ashtray from the nest by pressing on the plate to extinguish cigarettes
- Remove the handle that switches the heater fan
- Then we remove the three knobs that control the stove and hook them with a screwdriver
- Disconnect the block with wiring from the heater fan switch, located under the heater control panel
- Disconnect two wires from the contacts of the lamp illuminating the heater control panel
- Remove the headlight direction adjustment handle, just pull it towards you
- Now remove the instrument cluster lighting switch knob
- Unscrew the nut securing the instrument lighting switch
- Unscrew the nut securing the headlight hydraulic corrector
- We push the hydraulic corrector for headlights and the instrument lighting switch inside the panel
- Remove the side nozzles located on both sides of the dashboard using a screwdriver
- Unscrew one screw securing the trim on both sides of the dashboard
- Using a screwdriver, use a screwdriver to remove the exterior lighting switch.
- Disconnect the block with wires from the switch. Push the block inside the dashboard
- We use a screwdriver and remove the socket intended for radio equipment. If you have radio equipment installed on your VAZ 2109, remove it first
- We remove radio equipment according to the manufacturer’s instructions
- Then unscrew the screw securing the trim to the dashboard
- We insert two screwdrivers so that we can bend the plastic latches
- Raising the dashboard trim
- Disconnect the wiring harness from the cigarette lighter
- Disconnect the block with wiring from the block for lighting the cigarette lighter
- Disconnect the block with wiring from the lamp illuminating the hazard warning switch
- We disconnect the block with wiring from the hazard warning switch, and finally remove the dashboard trim
- Gently press down and remove the speaker cover located on the left side of the dashboard. Be careful - latches break easily
- Disconnect the block with wiring from the heated glass switch
- Remove the block from the rear fog lamp switch
- Unscrew the two screws securing the instrument cluster
- We take out the instrument cluster from the dashboard, unscrew the nut securing the cable from the speedometer and disconnect it
Removing the instrument panel
Attention: Disconnect the connectors with wiring for additional equipment, if installed on your car.
- Disconnect the red block from the instrument cluster
- Then disconnect the block from the control system
- Disconnect the white block from the instrument cluster
- Disconnect the ignition switch block from the ignition relay
- Disconnect the ground wire of the ignition relay
- Disconnect the control lamp block for opening the air damper
- Unscrew one screw from the lower mounting of the dashboard on both sides
- Disconnect the drawer light lamp block
- Unscrew the two screws securing the heater control panel and lower it down
- Unscrew the two screws securing the air damper guide rod to the dashboard
- Unscrew two screws from the upper mounting of the dashboard on both sides
- We use a screwdriver and remove one plug at a time from both sides of the dashboard.
- Unscrew one screw from the side mounting of the dashboard on both sides
- Unscrew the screw of the central fastening of the instrument panel
- Remove the dashboard
- After replacing the pipes or the heater radiator itself, we assemble the panel in the reverse order
- After installing the panel, we check the operation of the switches and all devices to ensure they are connected correctly
Let's return to the heater radiator pipes; we have already removed the panel:
- We disconnect the plastic clamp located on the right side of the heater, which holds the damper rod that heats the windshield
- Loosen the clamps and disconnect both pipes from the heater tap from inside the car under the dashboard
Loosen the clamps and remove the pipes
- Then loosen the clamps and disconnect both pipes from the heater valve located in the engine compartment (if you are going to remove the heater valve, otherwise skip it)
Disconnect the pipes in the engine compartment
- We replace the pipes with new ones, it’s better to replace the clamps right away, even if they are still suitable, it’s better not to risk it
- If necessary, you can unscrew the three screws securing the radiator to the stove
- And, raising the rod, pull out the heater radiator to check its condition and replace it
This is exactly how craftsmen are required to replace the VAZ 2109 stove pipes (replacement pipes) in service centers and auto repair shops. For owners who decide to do this work with their own hands, it is necessary to take into account that it will take 4-6 hours
"Folk" way
Folk craftsmen - these are brave and very desperate craftsmen - offer a much less labor-intensive method. The bottom line is that replacing the stove pipes (and the stove itself) is done without draining the coolant and without dismantling the instrument panel. The tools you will need are a set of screwdrivers, rags and a container (small) to drain the liquid from the pipes. In this case, replacing the heater radiator pipes is carried out according to the following scheme:
- Removing the terminals from the battery
- Close the heater tap
- We remove the right front seat (to make it easier to do the work)
- We unscrew the two screws securing the dashboard on the right side, and one screw located in the glove compartment, then, pulling the dashboard towards you, we place a wooden block
- Now there is a gap on the side of the passenger seat and you can get to the pipes and to the heater radiator itself
- Lay a rag on the floor of the cabin and prepare a container to collect the coolant
- Which will spill from the radiator and pipes
- We loosen the clamps of the pipes (photo above) and carefully, one by one, remove them from the radiator, replacing the container. 200 - 300 grams of coolant will drain into it
- Replace the pipes with new ones, and change the clamps, just in case.
- If necessary, unscrew the three bolts that secure the radiator to the stove and pull it down to the right
- We install the pipes and the new radiator in the reverse order.
Here are both methods, choose the one that suits you, and also watch a video on this topic.