Alas, the build quality of the VAZ 2114 radiator and the cooling system as a whole leaves much to be desired, which is why it can fail over time. The main disadvantage of the OS (cooling system) of the “fourteenth” model is the need for constant monitoring, regular maintenance and repair.
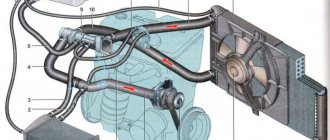
The solution to these issues is complicated by the fact that the cooling system of the injection engine on the VAZ 2114 is quite complex and includes 28 elements. The most convenient way to get to know them is on a special chart.
How the OS works
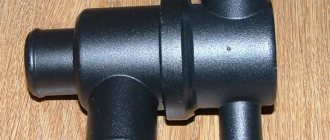
The electric fan is located on the electric motor shaft. Depending on the indicators of the sensor, it is turned on or off. One of the main elements of the OS is a thermostat valve with a storage tank , which senses changes in air temperature.
If the fluid temperature is around 87 degrees, the main valve turns on and sends fluid through the large circuit. At a temperature of 102 degrees, the valve stops at 8 mm.
Replacing the coolant
To normalize the cooling system on a VAZ 2114, sometimes it is enough to replace the coolant. To determine when this needs to be done, you should know some nuances:
- The effective life of antifreeze is 2 years, and antifreeze is 5 years;
- Typically, replacing antifreeze is required after a mileage of 20-40 thousand kilometers, depending on operating conditions;
- A changed color of the composition indicates that it needs to be replaced.
antifreeze as a liquid , since it has a long service life and does not wear out the system so intensively. in favor of antifreeze is its affordable price.
Before adding new fluid, the system should be flushed. For this:
- Drain all existing coolant from the system;
- Screw the plugs tightly;
- Fill with high-quality distilled water to the maximum;
- Start the engine and bring it to operating temperature;
- The revolutions should be about 3 thousand. Avoid overheating the engine;
- After turning off the engine, leave the car for 7 minutes, after which the water is drained. If the system is heavily contaminated, the procedure must be repeated until completely clean distillate begins to pour out.
Why does the heater on a VAZ 2109 blow cold air at idle?
The cold from the stove in winter is a good reason to stop using your car. The stove is part of the car's cooling system. The antifreeze heats up from the engine and moves into the radiator, which is blown by a fan. Cabin air is distributed thanks to deflectors. The air flow from the fan moves through the heat exchanger and bypasses it. This is the temperature control algorithm.
Possible problems with the stove:
- the fan works partially (limited in speed mode) or shows no signs of life;
- stove operation is limited in directions;
- heating system and temperature controller are in conflict (the stove only blows hot or cold air).
Regularly check the level and quality of antifreeze in your car. A dark orange color indicates that the antifreeze has expired.
Why the OS does not work
If you don’t know which cooling radiator is best to choose for the VAZ 2114, look at the existing one. Buy an analogue from the manufacturer, or purchase a device with the closest characteristics.
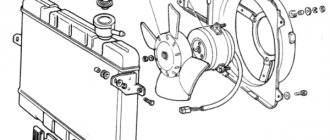
The fourteenth model is equipped with an aluminum radiator with two additional tanks. The radiator design includes:
- Radiator;
- Upper tank with pipes;
- Bottom tank with pipes.
A little theory
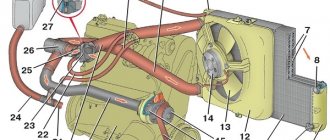
The heated liquid moves from the thermostat to the tap, and then it either enters the radiator “30” or exits directly into the outlet pipe. These are two different cases corresponding to the extreme positions of the engine (MAX/MIN). If you look at the drawing, everything will become clearer.
This is what the heater assembly looks like
Shown here: 6 – outlet hose; 8 – supply hose; 7 and 27 – clamps (4 pcs.); 26 – internal outlet hose (to the radiator); 28 – supply internal hose (from the radiator), 33 – clamp.
Radiator replacement
The replacement procedure itself is as follows.
- Unscrew the plug from the expansion tank and the cylinder and radiator plugs.
- Drain the coolant into a large container.
- Disconnect the radiator ventilation system from the battery.
- Remove the silicone pipes of the VAZ 2114 cooling system by disconnecting them from the radiator and tank.
- Remove the mounting bolts from the casing.
- Hold the radiator and remove the skin and fan together.
- This will completely free the radiator, so you can easily replace it with a new one.
- Assembly of the unit is carried out in reverse order. After replacing the radiator, start the engine and check the efficiency of the new unit.
Radiator repair
In some cases, the radiator can be repaired, so you don’t have to buy a new spare part.
Most often, liquid leaks at the junction of plastic and metal parts. If there is a small leak, you can pour a special liquid with a coolant mixture inside the radiator. Thanks to its special composition, this product will seal the defects that caused the leak. If the damage is serious, repairs will no longer save the situation; you will still have to replace the radiator.
To check the tightness of the radiator, you can conduct a simple experiment at home.
- Fill the bathroom with enough water to submerge the radiator.
- Close all pipe openings tightly.
- Lower the radiator under water about 30-50 centimeters. Apply a pressure of 0.2 MPa to it.
- Watch what happens. If bubbles appear, the system is not sealed and needs to be repaired or replaced.
Thermostat problems
When the temperature reaches 95 degrees Celsius, the liquid begins to flow through the thermostat. Due to the operation of this unit, the engine requires a minimum of time and resources to warm up. The thermostat is located between the radiator and the engine.
Most often there are two types of faults.
- The valve closes. If the engine is not warmed up, it is difficult to maintain speed. It may simply stall.
- The valve opens. During frosty periods, you can operate the car, but you must turn on the heating at maximum speed. Otherwise, the power unit will simply overheat.
If you are unable to move the valve while repairing the thermostat, don't be afraid to lightly tap the housing with a simple screwdriver. This will solve a common problem.
When the thermostat is completely disassembled, the pipes are hermetically sealed, which will prevent coolant leakage. Only after this can you start working.
In general, the choice between antifreeze and antifreeze should not be a problem for you. Choose antifreeze. Although it is more expensive, it lasts longer and allows you to minimize possible problems with wear and tear of the cooling system. The imaginary savings due to antifreeze are not called that for nothing. In the future, you will pay much more to fix the damage caused by the use of antifreeze.
The VAZ-2114 car uses a hidden engine cooling circuit with an injector. It is highly complex and includes 28 elements. Traditionally, the assembly of the cooling system of this car is not of high quality. Therefore, throughout the entire period of operation, it requires constant monitoring, regular maintenance and repair. In this regard, many owners of this car are interested in the nuances associated with independent maintenance, repair and operation of the cooling system, among which the most common questions are:
- 1. How to properly replace the coolant mixture?
- 2. How to flush the cooling system?
- 3. How to remove air from the VAZ-2114 cooling system?
- 4. How to properly replace the cooling system pipes?
When to change?
Let's remember Soviet times, when all radiators, including products for the heating system, were made of copper. These units had enviable reliability, so replacing the stove radiator was one of the rare procedures, and maintainability was not in doubt. Sometimes it became necessary to clean the cavities of these products from the accumulated scale.
The beginning of the 90s was marked by the appearance of aluminum radiators, which were cheaper. Such units have gained considerable popularity among manufacturers, who still resort to installing them in their new and existing models of cars. AvtoVAZ also professes this trend, heroically equipping the Lada Kalina with aluminum versions of radiators.
The use of products of this type causes a number of problems:
- The aluminum product does not have durability and tends to develop leaks after a couple of years of intensive use. Such a case does not involve repair, since it is not possible to eliminate the leak in the product.
- Coolant evaporating through a leaking radiator creates toxic fumes that penetrate the cabin, have a sweetish taste and settle on the windows in the form of fogging, similar to greasy stains.
- Structurally, the manufacturer placed the on-board system controller under this radiator. If antifreeze gets inside this device, it will fail. Replacing the controller is not cheap, so taking steps to replace the radiator as soon as possible is a good idea here.
- Access to the radiator assembly is very difficult, so even such an event as cleaning is a very labor-intensive task.
Among the main reasons causing antifreeze leakage from the heating radiator is the use of cheap antifreeze by Lada Kalina owners. There are plenty of fakes on the market, so careful selection is one of the keys to trouble-free operation of the heating system. Counterfeits contain the presence of various harmful substances that have a negative effect on the aluminum structure, causing leakage.
Today, special sealing substances designed to seal a small leak from the inside have become quite popular on sale. This method is not always able to provide help, but the risk of clogging the entire cooling circuit is quite high. You should not trust such components, but should be inclined to replace the radiator as soon as possible.
Which modification of this element should I choose? Most owners unanimously recommend DAAZ (Dimitrovgrad Automobile Assembly Plant) products.
Briefly about the car
The VAZ-2114 hatchback is a fairly popular car that can still be found both on domestic roads and on the roads of the entire post-Soviet space. It was produced by AvtoVAZ OJSC from 2003 to 2013 and was one of the variants of the restyled series of the Samara-2 (VAZ-21093) family of cars.
During mass production, various engines with the same type of cooling systems were installed on it, which operate on the principle of internal heat exchange using a special cooling mixture of the “Tosol” type.
Cooling system diagram
Let's sum it up
As you can see, there are many reasons for engine overheating, and exceeding the operating temperature itself has a very detrimental effect on the condition of the internal combustion engine. In this case, it happens that the cooling system is clean, the antifreeze level is normal, the fan, pump and thermostat are working normally, but the engine still overheats. In this case, the culprit may be the OZ, since the fuel combustion process is disrupted when the ignition angle is knocked down.
Some engines can also become very hot after running on low-quality or unsuitable octane fuel. The result of working with such fuel is a violation of the temperature regime of combustion of the mixture.
In some cases, the cause of overheating is general wear and tear of the engine and its CPG. Simply put, the piston rings wear out, and insufficient sealing of the combustion chamber leads not only to disruptions in the combustion process of the fuel charge, but also to the breakthrough of hot gases. In this situation, the motor power drops and overheating may occur.
Also, prolonged and heavy load on the engine sometimes leads to overheating. For example, jammed brake pads can make it difficult to roll, causing the driver to actively load the engine. If you add to this the car air conditioner turned on in the heat, the engine will be loaded even more.
Maintenance
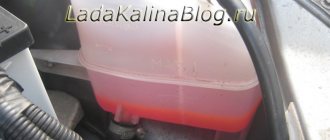
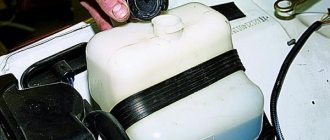
Regular maintenance of the cooling system comes down to checking the level of the coolant mixture in the expansion tank and monitoring its color. It is recommended to check before each trip or, in extreme cases, regularly every 500 - 600 km.
The level of the coolant mixture in the tank must constantly exceed the minimum level by 2...3 cm. Checking the level and adding fluid must be carried out only on a cold engine. The mixture intended for topping up must be of the same type as the liquid poured into the system. Mixing different types is not recommended.
IMPORTANT! In the event of an emergency, you can add clean water to the liquid, but the cooling ability of the mixture deteriorates, and the presence of water contributes to corrosion on metal parts. In addition, in winter, the diluted mixture can freeze and damage both the radiator and the engine. Therefore, the coolant mixture diluted with water must be drained as soon as possible and, after repairing and flushing the system, it must be filled with the recommended coolant.
Fix it yourself or go to a service station?
Once again I want to draw your attention, this is very important! All work on replacing cooling system elements is carried out exclusively with the engine turned off and the coolant cooled down.
You can replace the pipes, thermostat, radiator filler cap, and expansion tank cap yourself. Remove the filler cap on the radiator. Unscrew the drain plug on the engine and drain the coolant into a clean container.
As for replacing the gasket between the valve head and the piston block, repairing a rotten engine cooling jacket and repairing radiators, these works are best done at specialized stations. Since such repairs will require the use of specific tools and the necessary experience and knowledge.
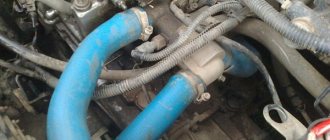
Replacing cooling system pipes
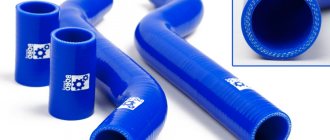
The cooling system of the VAZ-2114 car uses 4 rubber pipes:
- upper supply pipe - supplies cooled liquid from the radiator to the engine;
- lower outlet pipe - removes the heated liquid below from the engine to the radiator;
- two short pipes that connect the water pump and thermostat to the system.
If the pipes fail, they must be replaced. In this case, it is best to purchase silicone pipes.
To remove old and install new silicone (rubber) pipes, you need a set of wrenches, several screwdrivers and silicone lubricant.
Repairs associated with replacing pipes must be carried out in the following order:
- 1. Disconnect and remove the battery;
- 2. Drain all coolant mixture;
- 3. Remove the fan, soundproofing upholstery, trim and frame trim from the windshield;
- 4. Clear access to the air collector by removing its fastening elements;
- 5. Remove the front housing and release the clamps that hold the pipes;
- 6. Remove the pipes from the fittings and install new ones (silicone or rubber) in their place. Secure the new pipes with clamps. Before installation, it is recommended to lubricate the rubber pipes with silicone grease. It is also advisable to lubricate the clamp screws with silicone grease. Subsequently, this will allow you to easily unscrew them;
- 7. Install all the removed parts in their places, flush the system and fill it with new coolant mixture.
Why does the heater in a Lada Kalina car blow cold air?
Breakdowns are common not only to old, but also to new cars. Some owners of Lada cars notice that the heater blows cold air; Kalina may also be susceptible to this problem. This can happen for many reasons.
Regardless of this, it is better not to delay repairs. Here, as in the human body, one small violation can trigger a chain reaction. You can deal with such a breakdown yourself or in a service station.
Attention to every detail
It is easier to prevent a technical malfunction than to spend time and money fixing it later
In order to avoid having to repair the stove on your Lada (it doesn’t matter whether it’s Kalina or Vesta), you need to carefully monitor the technical condition of the car:
- every morning at Kalina’s parking lot, you need to check for dark spots indicating an antifreeze leak;
- inspect the system hoses for leaks;
- if any are found, then it is necessary to immediately change the tank cap;
- daily inspection of the stove radiator;
- If the stove blows cold air, then the reason should be sought in increased coolant consumption.
Daily checks of the vehicle’s “health” will help avoid many problems.
If the radiator valve is loose or the coolant reservoir is leaking, the problem will spread at an alarming rate within a short time.
The first result will be a breakdown of the vehicle's computer. Such a malfunction is not covered under warranty, so repairing the heater and replacing the computer will fall entirely on the shoulders of the car enthusiast. A small rearrangement of the on-board computer will help reduce the risk of such troubles for Kalina:
- carefully dismantle the cladding;
- unscrew 2 screws;
- gently squeeze the computer towards you;
- place it on a shelf in the glove compartment area;
- There is no need to disconnect the wiring harnesses;
- fix the computer in a new place;
- re-grounding is not carried out.
If everything is done correctly, then in the future the Lada Kalina will not be left without an on-board computer, even in the event of an unexpected problem. The main thing is for the driver to make sure that the fastenings are secure after rearrangement.
Technical specifics of restoration of functionality
In most cases, repairing a heater takes little time. If the Lada Kalina requires one, then if you have the necessary tools, you can do everything yourself.
In order to solve the problem with the stove on Kalina, you need to perform the following sequence of actions:
- drain all coolant;
- remove the air filter (the heater damper cannot be removed);
- the brake and gas pedal are dismantled for more convenient replacement of the radiator;
- in some cases there is a need to dismantle the steering structure assembly;
- the battery is removed together with the stand;
- remove the air duct;
- carefully unscrew the hose from the radiator;
- The interior heating hose is dismantled.
To save time in the future, it is necessary to fix the position of the parts in space. This will allow you to avoid delaying the repair of the Kalina heater. In some cases, the above algorithm does not work fully. The culprit here is the individual characteristics of the vehicle. In this case, there is no need to rush or start using brute force.
Experienced drivers recommend removing more parts and components of the vehicle, which will ultimately make it possible to replace the radiator and grille.
Regardless of the complexity of the repair, you must ensure that the coolant has been properly drained and then refilled. Any drips and leaks can negatively affect the technical condition of the iron horse.
During repairs, the car owner may notice wear and tear on some parts of the car. In this case, they should be replaced.
Firstly, this will eliminate the risk of repeated repairs. It is impossible to predict exactly when the car will start to feel unwell. Secondly, high-quality operation of the vehicle saves time and money that the driver would have spent on visiting a service station.
Removing air from the cooling system
Often during repairs, air enters the cooling system, which forms an air lock and interferes with the normal operation of the entire system. In order to remove such a traffic jam, there are several ways. Simplest:
- warm up the engine to operating temperature and turn it off;
- unscrew the coolant pipe clamp on the throttle body;
- remove the heating pipe of the throttle assembly, bleed the air and after the coolant begins to flow out, put it back on the fitting and tighten the clamp.
Correct driver actions
In situations where the engine overheats but the radiator remains cold, it is important to take the right measures to prevent the situation from getting worse and also try to prevent any serious malfunctions and costly breakdowns. Sometimes it happens that the driver panics ahead of time
This usually happens to motorists who have only recently gotten behind the wheel, or who have changed cars without having yet had time to get used to the peculiarities of its behavior and the operating modes of the engine itself.
Sometimes it happens that the driver panics ahead of time. This usually happens to motorists who have only recently gotten behind the wheel, or who have changed cars without having yet had time to get used to the peculiarities of its behavior and the operating modes of the engine itself.
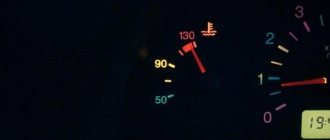
Here we are talking about short-term overheating, which can to a certain extent be considered the norm for many engines. Short-term overheating usually occurs when sitting in a traffic jam for a long time. Then the temperature sensor arrow displayed on the dashboard rises to the critical red zone. But as soon as the car starts moving, when airflow appears due to oncoming air flows, and the cooling fan is activated, the temperature returns to normal. That is, first, try to observe and see whether the temperature will drop after a jump upward, to the red zone.
But you shouldn’t wait and watch when the car was in motion, that is, there was oncoming air blowing, or the fan was running. In such situations, experts give several useful recommendations:
- If the car was moving under completely normal conditions that do not provoke short-term overheating, but the temperature still begins to increase and reaches a critical level, do not immediately turn off the engine;
- Also, do not try to cool the power unit by pouring cold water on it from the outside, or by adding cold water to the expansion tank with cooling liquid;
- If you ignore these recommendations, fill the engine with water or add it to the tank, you will probably have to repair the engine. Moreover, such repairs are often accompanied by a mandatory replacement of the cylinder block and cylinder head;
- If you want to cool the engine, lower the engine temperature with a cold radiator to normal levels, it is better to drive off the road, stop and turn on the heater in the car. It doesn’t matter if it’s spring or summer, the cabin is warm enough without the heating working;
- Turning on the heater will remove excess heat from the engine, transferring it to the interior of your car;
- At the same time, you cannot turn off the engine itself. Just move the gearbox to neutral and leave the engine idling;
- Wait a few minutes after completing all the steps described;
- At the same time, check for any signs of coolant leakage. To do this, you will have to get out of the car, look under the car and into the engine compartment;
- If there are no leaks, then the manipulations carried out with the stove and the idle speed of the power unit did not allow the temperature to drop below the critical level, turn off the engine.