Among car enthusiasts, a distributor is called an ignition distributor. In another way it is also called a breaker. This device is designed to connect or switch with the ignition coil and distribute sparks to each spark plug. There are distributors for contact and non-contact ignition systems. They are structured almost identically. The main components of the device are a breaker, a sensor with a distributor.
On VAZ-2109 cars, the distributor is equipped with a Hall sensor. Its function is to switch the contact ignition coil. Let's look at what the distributor on the VAZ-2109 is, how it works, and what it is needed for.
What do ignition malfunctions promise?
Difficulties in starting the power unit, strange color of exhaust gases, incorrect operation of the engine at idle speed - all this can be the cause of incorrectly adjusted ignition timing.
At the same time, many car enthusiasts blame the carburetor and spend a lot of time cleaning or repairing it. As a result, money and time are wasted, but there is no result.
On the other hand, if the ignition system does not produce a spark, and the spark plugs are regularly filled, then the problem may lie elsewhere.
An incorrectly set angle manifests itself as follows:
1. Powerful detonation appears during operation of the power unit.
It is not difficult to recognize the problem. The main symptom is an uncharacteristic ringing sound that is heard when you press the accelerator pedal.
This malfunction is a common occurrence among motorists who do not properly monitor the condition of their vehicle.
The cause of detonation is early ignition timing, which not only reduces the comfort of driving a car, but can also lead to deformation of the pistons.
Alternatively, the rings may be defective, which in this case will inevitably have to be replaced.
2. The appearance of smoke from the exhaust pipe.
— after starting the power unit, black smoke comes out of the exhaust pipe. This problem is a clear indication of pre-ignition.
3. Motor power decreases.
This is especially noticeable when the vehicle picks up speed.
There may be a delay of several seconds between pressing the gas pedal and the car starting to accelerate. If the car starts to accelerate, it happens jerkily.
4. Fuel consumption increases.
One of the main consequences of incorrect system configuration. This and the problem described above are evidence of late ignition.
This is explained by the fact that when the piston reaches the top point, the fuel mixture does not burn completely and continues to burn even when the piston moves back.
5. Uneven idle.
An incorrectly set ignition immediately manifests itself as engine malfunctions at idle.
In such a situation, experts recommend setting up the system first, and only then starting to check other systems.
Symptoms indicating a malfunction
It is not difficult to determine that a VAZ-2109 distributor with a carburetor is broken. The car will jerk when driving. However, there are no other reasons for this behavior. If the tank is filled with high-quality gasoline, the fuel pump and carburetor are working properly, then the distributor is to blame for the vibrations. When the car picks up speed, the engine will rev.
Malfunctions can also be judged by an engine that refuses to start. When you press the accelerator pedal and increase speed, detonation occurs. This also indicates a non-working distributor. If the dynamics have deteriorated significantly, then the distributor should be checked. When the fuel rises, the first thing you need to do is find out if the breaker is working, and only then turn the carburetor.
Operating principle
UAZ contact ignition system, composition and general structure, diagrams of the contact ignition system.
procedure for installing the ignition on a UAZ car; connection diagram for electronic ignition on a UAZ. On a VAZ-2109 car, the distributor works as follows:
- high voltage voltage is generated by a coil according to the principle of electromagnetic induction;
- This voltage goes through the high-voltage wire to the central contact in the ignition distributor cap, which is constantly in interaction with the slider;
- the latter distributes the electrical impulse over four contacts, each of which corresponds to a specific spark plug;
- The slider constantly rotates when the engine is running and thereby closes the central contact with the contacts of each spark plug.
The voltage to generate a spark is supplied to the spark plugs through wires in the order of operation of the cylinders - this is 1-3-4-2. The slider moves due to the drive shaft connected to the engine camshaft.
What is a distributor
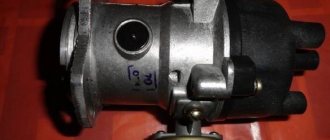
A distributor is a mechanism that distributes electric current between the spark plugs and is responsible for the appearance of a spark that ignites the combustible mixture in the cylinders. In VAZ 2109 models it is located near the battery, where the cylinder head cover ends. Its official name is ignition distributor-distributor. Car owners use two types of breakers: contact and contactless.
Conventionally, it can be divided into two parts: a cover made of durable material that does not conduct electric current, and the body itself, inside of which there is a shaft ending with a runner with a contact armature. The inlet hole for the high voltage cable is located in the center of the cover, closer to the edges there are outlet holes with contact brushes, from which the wires diverge to the spark plugs. Thus, the lid is an independent and functional part. During operation, under the influence of vibrations, it wears out, cracks or chips form on it, carbon brushes wear out, and it needs to be replaced.
The slider, whose axis receives a central high-voltage wire, rotates, alternately closing the carbon contacts of each spark plug wire in the order in which they must supply a spark to move the pistons in the cylinders. The speed of the runner directly depends on the crankshaft and other engine parameters.
The interruption is performed on the left side of the device according to the principle of a hammer and anvil. The rod mounted on the shaft has a ribbed shape (like a nut). The number of ribs corresponds to the number of cylinders. During rotation, the protruding ribs push the “hammer” towards the “anvil”, and the reduced sides, on the contrary, push them away. This is how connection and interruption of contact is made.
A vacuum corrector connected to the carburetor and throttle, when you press the gas pedal, creates a vacuum that pulls up the lever in the breaker, as a result of which the ignition angle changes and the electric charge is supplied earlier.
The procedure for removing and installing the distributor on a VAZ 2109-2108
Ignition timing angle VAZ 2109 carburetor
So, before you begin removal, pay attention to the installation position of the distributor relative to the body. Be sure to remember or mark it so that when installing it, put it in the same position
Then you need to disconnect the high-voltage wires from the distributor cap: 4 spark plugs and one central one from the ignition coil:
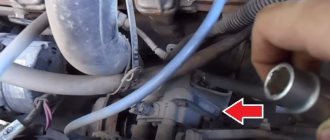
It is also necessary to disconnect the plug with wires, which is clearly shown in the photo below:
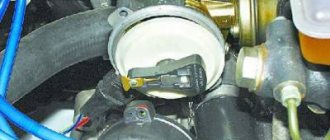
Then we pull off the thin hose from the vacuum corrector of the distributor:
Now you can proceed directly to unscrewing the nuts securing the VAZ 2109-2108 distributor itself. There are three of them in total: one is located in the center at the top:
And the other two are located on the sides, and it is more convenient to unscrew them with a regular open-end wrench, since a ratchet with a head simply cannot get there. Do not unscrew the side ones completely yet, as you need to set the TDC marks.
But before removing the ignition distributor, it is necessary to install the piston of the 1st cylinder at TDC. To do this, through the hole in the gearbox housing (after removing the rubber plug), you need to align the marks on the housing and the flywheel. With the gearshift lever in the neutral position, use a 19mm key to turn the crankshaft pulley to the required torque. This is what it should look like:
What can be put on the classics from the existing MPSZ
Coursework Vehicle Safety
Among the most well-known microprocessor systems, Maya, Secu 3 or Mikas MPSZ are most often used. Assembling any of them is not difficult, if you have the skills to correctly see and read the instructions with the diagram, and follow the sequence of installation actions.
When choosing a microprocessor system, you should not be intimidated by the fancy circuitry that product sellers like to show off, offering the services of a familiar electrician for “guaranteed high-quality installation for pennies.” All components can be installed on the classic with your own hands.
When choosing, pay attention to the quality of the block itself. It is considered good form if there is no warping of the plastic parts of the burrs or microcracks. The second indicator is the presence of a large scattering surface in the form of an aluminum base
The microprocessor remains the most capricious part and the choice of place under the hood or in the cabin must be taken very seriously
The second indicator is the presence of a large scattering surface in the form of an aluminum base. The microprocessor remains the most capricious part and the choice of place under the hood or in the cabin must be taken very seriously.
The ignition coils can be separated into a separate unit; alternatively, they can be mounted directly next to the spark plugs on the head cover.
High voltage wires
Construction and maintenance of the VAZ 2106 car distributor
Often, the main difficulty when repairing a carburetor VAZ 2109 is the reconnection of high-voltage wires that were previously disconnected from the distributor cover. It's also an ignition distributor.
The difficulty is that many people forget the connection procedure or simply do not know. But in practice, returning high-voltage wires is much easier than understanding the ignition module used on the injection VAZ 2109.
By following a few simple rules, you can easily return the wires to their rightful places.
- The ignition distributor cover is installed in its place, that is, on the distributor, only in a single position. Therefore, even if you wanted to, you won’t be able to confuse anything here. Otherwise the lid simply won't fit.
- There is an installation mark on the cover, which indicates the location of the wire socket from the first cylinder.
- The wires must be connected in the following sequence - 1, 3, 4, 2. Move counterclockwise when looking at the distributor cover from the side of the expansion tank.
If for some reason there are no installation marks on the VAZ 2109 carburetor distributor cover, just follow the connection principle shown in the image.
Ignition coil
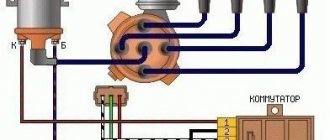
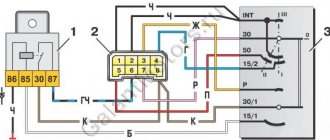
Connection diagram for a G8 switch
Before making the connection and setting the torque, let’s consider the main components of the VAZ ignition system:
- Distributor or breaker.
- Switch. The switch circuit on the G8 may vary depending on what type of ignition switch is installed. The connection diagram for the VAZ 2108 switch model 76.3734 is shown above.
- Directly the coil itself.
- Spark plugs that transmit the spark.
- ZZ.
- High voltage cables that operate in a specific order. The order is 1-3-4-2.
As for the VAZ ignition coil itself, its design consists of primary and secondary windings, which are wound on a special magnetic circuit. The primary has fewer turns and the wires are thicker, while the secondary has less thin wires and more turns.
Signs that the VAZ 2108 ignition coil on the injector or carburetor is failing and needs to be checked are as follows:
- Several hundred kilometers before the short circuit finally “closes,” the device will work correctly on a cold engine only 1-2 minutes after it is started. The internal combustion engine itself starts, but does not work correctly, and malfunctions may occur when driving at low speeds. Such failures are sometimes difficult to calculate, since the internal combustion engine can malfunction for no more than half a minute, then its operation returns to normal.
- You need to check the ignition coil if, during a cold start of the power unit and when you press the gas, the engine shakes strongly, but this problem goes away after a few seconds. As a rule, all you need to do is take your foot off the gas and press the pedal again.
- When the car accelerates and the driver changes gears, short-term jerks and vibrations may occur, and in some cases the dynamics are reduced. However, these signs will disappear as suddenly as they appeared.
- The engine does not start at all, and the short circuit does not transmit a spark to the spark plugs (the author of the video is Nail Poroshin).
Repair of VAZ 2106 distributor
On older VAZ 2106 cars, a contact distributor is installed, but such a system is not very reliable - due to malfunctions in the contact group (CG), various problems often arise:
- due to burnt contacts, the engine may not start;
- too large a gap in the CG affects engine power - the engine stops developing speed;
- If there is a small gap in the contacts, the motor jerks and works unstably.
To repair the VAZ 2106 distributor, it must be removed and troubleshooting carried out. Removing the device on the “Classic” is very simple, but before repairing it, it is recommended to align the crankshaft to the mark - this will make it easier to install the distributor after repair. We remove the distributor as follows:
- rotate the crankshaft until the marks align;
- we pull off the tips of the high-voltage wires from the spark plugs;
- unclip the two latches of the distributor cap and see what position the slider is in. If it is directed to the fourth cylinder, we make another full turn of the crankshaft. Usually, with correctly set marks, it should be located as in the picture below;
- pull off the hose from the vacuum regulator;
- unscrew the nut number 13, which holds the distributor, and dismantle the distributor.
Now the PR should be disassembled, perform the following operations:
- unscrew the fastening screws of the runner, dismantle the rotor;
- unscrew the nut located on the body, hold the screw on the other side of the body with a screwdriver;
- dismantle the fasteners, take out the plastic insulator;
- tighten the screws holding the contact group (KG);
- dismantle the CG;
- knock out the shaft pin;
- remove the oil deflector and washer from the roller, pull the shaft out of the housing;
- to get to the bearing, remove the locking washer of the ignition timing regulator rod from the top of the housing;
- Unscrew the bolts securing the regulator, dismantle the ignition timing mechanism;
- unscrew the screws (2 pcs.) that hold the bearing fixing plates;
- dismantle the bearing, lifting it from different sides;
The disassembly is now complete, all that remains is to troubleshoot and replace worn parts.
Possible malfunctions of the BSZ
If the VAZ 2109 ignition switch stops receiving pulses, it means that the wires may be broken and need to be replaced or connected. The second reason lies in the malfunction of the Hall sensor. Its condition is checked with a voltmeter. And if there is no voltage in an electronic device, it needs to be replaced.
The Hall sensor is located inside the distributor housing. To change it, you need to open the cover and disconnect the old sensor. Damage to the wires is also possible between the sensor and the ignition coil. The pulse supply is disrupted if the wires are loosened or their ends are oxidized.
Interruptions in the operation of the VAZ 2109 engine occur for various reasons. For example, carbon deposits and dirt accumulated on the walls or rotor of the distributor are observed. There are other negative factors.
| Causes | Actions |
| The electrodes are worn out or the spark plugs have been exposed to oil that flows from under the seal, and carbon deposits have formed on them. Cracks in the ceramic body of the spark plugs also do not contribute to the smooth operation of the engine. | Oily spark plugs can be washed in gasoline, dried, and the carbon deposits removed. But repair will not help worn electrodes or cracked insulators. Such spark plugs require immediate replacement. |
| If everything is fine with the spark plugs, but the engine does not start. | The carbon brushes in the breaker housing should be checked. |
| Faulty ignition switch. | It requires adjustment. |
The engine changes operating mode slowly and does not produce maximum power for the following reasons. The ignition timing is incorrectly set. Then it needs to be adjusted.
It happens that the weights in the ignition timing regulator get stuck. This occurs due to the weakening of the springs, which have exhausted their service life and need to be replaced. You can repair this defect yourself.
The correct operation of the ignition distributor greatly affects the functionality of the engine as a whole. If the unit breaks down, it will be impossible to start the engine, so every car owner should know everything about this device. What functions does the distributor perform on a VAZ 2109 car and how to replace it - find out in this article.
Signs that they need to be replaced
The main sign of the need to replace spark plugs is misfires (tribling). This is not always due to problems with spark plugs. To finally decide on the need to replace them, the easiest way is to install a known good one instead of the problematic spark plug.
The easiest way to identify a possibly faulty spark plug is with the engine running. To do this, it is necessary to sequentially disconnect the high-voltage wires (or the connector of the individual ignition coil) from each of them. The non-working cylinder will be the one from which, when disconnected, the nature of the engine operation does not change.
Also signs of a required replacement of spark plugs are:
- visual malfunction (contamination, carbon deposits in the gap area, change in the normal gray color of carbon deposits, its wetting, mechanical chips on the insulator);
- unstable engine speed;
- increased smokiness of exhaust gases;
- engine detonation;
- message or on-board computer.
Reasons for their natural and premature wear
The spark plug operates under extremely extreme conditions:
- high temperature in the working cylinder;
- aggressive environment in the form of a mixture of fuel, air and oil;
- high pressure during ignition;
- high voltage and temperature of electric spark.
The simultaneous action of these factors leads to an intensification of the processes of their natural wear. This process can be significantly accelerated in the following cases:
- reduction of compression, wear of valve stem seals due to oil entering the working volume;
- incorrect setting of the ignition angle, leading to the formation of increased carbon deposits;
- choosing spark plugs that do not match the engine brand;
- misfire in cylinders;
- incorrect gasoline/air ratio due to malfunctions of the flow meter, air leaks;
- incorrect operation of injectors.
Do-it-yourself ignition adjustment on a VAZ 2109
Ignition problems lead to incorrect engine operation. Adjusting the ignition of the VAZ 2109 with your own hands allows you to quickly and cheaply adjust the settings. Before starting, be sure to read the instructions for adjusting the ignition.
Diagram for setting ignition timing.
Lada 2109 with an injection engine is equipped with an electronic ignition module. Ignition adjustment is carried out by programming the electronic control unit. It is impossible to carry out such a procedure without a service station - you need special software.
Checking and adjusting the ignition timing is done while the engine is idling. The crankshaft speed should be in the range of 820–900 rpm.
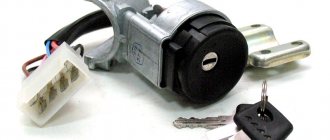
Photo of the ignition switch on a VAZ 2109.
- Warm up the engine to 90 degrees.
- Set the crankshaft speed at 820–900 rpm. If the idle speed goes beyond the limits, adjust the amount of fuel assemblies in the carburetor.
- Disconnect the vacuum hose from the fitting.
- Turn off the car engine.
- Remove any gap in the vacuum hose.
- Unscrew the three nuts securing the breaker-distributor.
- Remove the rubber plug from the gearbox housing - there is an inspection hole for the flywheel.
- Disconnect the first cylinder wire from the camshaft cover.
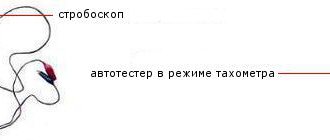
- Connect the strobe light to the place of the disconnected wire and to the battery.
- Start the car - the strobe light will begin to send impulses in time with the flywheel.
- Rotate the camshaft until the marks are compared with the mark on the flywheel.
- Mark the label.
Adjustment by marks is impossible without the device.
There are ways to adjust without a strobe. To make adjustments using a light bulb, you will need a crankshaft wrench and a standard 12-volt light bulb.
Setting the ignition timing by loosening the spark timing sensor.
- Use a special wrench to turn the crankshaft until the marks match. If you do not have a crankshaft key, engage 4th gear and push the car until the marks match.
- Connect a 12-volt light bulb to the wire connecting the distributor and the ignition coil.
- Connect the light bulb to ground using the second wire.
- Connect the central wire to ground Lada 2109.
- Loosen the bolts on the distributor body and turn on the ignition - the light should light up.
- Rotate the body to the right until the light goes out.
- After the light goes out, smoothly turn the distributor to the left.
- Stop when the light comes on.
- Tighten the housing bolts.
To carry out this type of economical ignition adjustment of the Zhiguli 2109, two people will be needed. One should be in the interior of the Nine, the second should rotate the distributor.
- Turn on the ignition and watch the tachometer needle.
- A second person must loosen the bolts securing the distributor and turn it.
- When you turn the key in the ignition, the tachometer needle sharply deviates and returns to zero.
- The distributor should remain in the position when the tachometer needle deviates.
- This method of adjusting the ignition timing requires patience, as it is very difficult to adjust the first time.
Ignition check
To check the adjustment of the VAZ 2109 ignition system, you need to drive out onto a flat road.
- Accelerate the car to 50 km/h.
- Engage 4th gear and press the gas pedal all the way.
https://youtube.com/watch?v=PlArkxUcB1E
The appearance of quiet and short detonation sounds means the ignition is set correctly.
Causes of ignition problems
As mentioned earlier, in order to set the ignition in the electronic system you will have to go into the “brains”, there you can also check the functionality of the sensors, so they greatly influence the operation of the system, regardless of the type of ignition.
On the electronic type, the main causes of failures are:
- Incorrect information transmitted from sensors to the ECU. If the connection to the brain and diagnostics showed strange data coming from one or more control devices, it is necessary to use a “substitution”. The easiest way is to find a car with known good sensors, install them and double-check the results. Here you need to understand that you do not need a new one, but a working sensor, because factory defects are not excluded even on a new mechanism.
- The incoming voltage - correct from a technical point of view is 5V, but if due to a violation of the mechanical integrity of the wires or another problem with the car’s electronics, this voltage changes, the sensor readings will also change after it. If this happens, the ECU begins to adjust engine operation based on incorrect data, which leads to incorrect operation of the entire mechanism as a whole. To check this breakdown, you will need a known-good system of wires leading to the sensor or a donor car into which you can install your sensor and test the system for functionality.
- Broken ECU - if the previous two options did not give a visible result, and installing your sensor and wiring in a working machine does not change its performance, only this option remains. You can try to reflash the “brain” of the car, but due to its low cost, it is better to immediately buy a new ECU and install it on the car.
ECU diagnostics Before moving on to the radical measures proposed in the third option, it is worth additionally checking the correct location of the marks. In cars with contactless ignition, this is the ignition installation of the VAZ 2114, and for cars with an electronic system, debugging is important to check the synchronization of the injection system with the gas distribution mechanism.
Distributor device with Hall sensor
On the VAZ-2109, the manufacturer installed a contactless type distributor equipped with a Hall sensor. It is four-spark, additionally equipped with a centrifugal and vacuum corrector.
In addition to correctors, the device has other elements that contribute to proper operation. Thus, the distributor is equipped with a special plastic screen. It is necessary to protect the working surfaces of the mechanism from dust and dirt. The slider mounted on the distributor rotor has a constant resistance of about 1 kOhm. In addition, the design includes thrust washers, lock washers and O-rings. The body is one-piece, aluminum.
Types of sanitary protection
The ignition system serves to ignite the air-fuel mixture located in the engine cylinders at the required moment.
The applied protection systems can be divided into three main types:
- Contact;
- Contactless;
- Contact transistor.
The first and third types are not of particular interest to us, since the VAZ 2109 uses a contactless or contactless transistor system.
https://youtube.com/watch?v=Ud-nuLSxwvk
The use of such schemes began in the mid-80s of the last century. Over time, engineers have been able to improve efficiency, performance and reliability.
BSZ began to use non-contact sensors instead of a breaker, which make it possible to instantly determine the speed of rotation of the crankshaft and the angle of its position.
Operating principle
The operating principle of the ignition system installed on the VAZ 2109 is as follows:
- The crankshaft position sensor performs its main tasks, sending a signal to the controllers;
- The controller processes the received information and calculates the sequence of switching on the ignition coils;
- The coil creates two sparks - igniting and idle.
The dry spark method involves creating sparks simultaneously in two spark plugs. One is igniting, and the second is idle, because it beats in time with the release of exhaust gases on the other spark plug. Thus, the cylinders where sparks are generated simultaneously create pairs - cylinders 1 and 4 and cylinders 2 and 3.
Coil
Main advantages
The ignition system used for nines has good reliability indicators, although it produces energy up to 50 kJ, and the breakdown voltage can sometimes reach 30 kV or more. BSZ is valued for its high efficiency.
There are several main advantages that characterize contactless ignition systems.
| Advantages | Peculiarities |
| SZ works with a Hall sensor | Because of this, the spark energy parameters are not affected by the voltage in the electrical network or the frequency of the engine. This is due to the fact that the time period of energy concentration in the ignition coil is always constant. This ensures high efficiency of the circuit |
| There is no mechanical interaction between contacts | This ensures there is no contamination or burning of contacts, so there is no need to clean them |
| No need to adjust the position of the contacts | This can be explained simply - they are not in the SZ VAZ 2109 |
| Minimal mechanical interactions between parts | This factor contributes to the absence of rotor vibrations, resonance, and uneven spark distribution across the spark plugs |
| The energy in the candles is constantly increased | It can reach 50 J, which allows you to avoid failures when igniting the air-fuel mixture in the cylinders. This is especially noticeable when accelerating a car. |
| Cost-effective and environmentally friendly | The use of the new SZ made it possible to improve fuel economy by approximately 5 percent, as well as reduce CO emissions by 20 percent |
| Stable cold engine start | Even if the battery is discharged to 6V, you can still start the engine without problems. This makes BSZ significantly different from other ignition systems that cannot boast of such stability. |
Scheme
Compression check
After checking the compression, you can breathe a sigh of relief or worry, since the cost of the repair depends on the result.
Impaired compression often causes the presence of oil in the VF, and also causes a number of other problems.
Compression check
To work you will need:
- Compressometer;
- A rag in oil, which you will use to determine the compression stroke;
- Adapter for spark plug holes. It is used when checking the combustion chamber for leaks;
- Compressor.
Now let's start checking.
- Warm up the engine to operating temperature, then turn off the fuel supply.
- In the case of a carburetor, you need to remove the hose, clamp or squeeze it with something, or lower it into a container.
- If you have an injector, remove the fuel pump fuse, start the engine and let it run. As soon as the fuel in the fuel rail runs out, it will stall on its own.
- Disconnect the ignition system by removing the center wire from the distributor (on the carburetor). The crankshaft position sensor at the injector must be disconnected.
- Remove all debris from the spark plug wells so that it does not end up inside the cylinders. Unscrew the spark plugs.
- Insert the compression gauge fitting while an assistant starts the engine. The starter should rotate the engine until the pressure gauge needle stops in one position.
- By analogy, measurements are carried out on each cylinder, the results are recorded on paper.
- To calculate ideal compression, use the formula - 1.2 * Compression ratio.
See your owner's manual for the compression ratio of your engine. Please also note that measurements may have some error.
What you need to know about verification
- If the indicator is 12 atmospheres, this indicates that your engine is almost in perfect condition.
- When checking the compression on a cold engine, the compression readings will be significantly lower. Perform the test only on the engine at operating temperature.
- If the battery is partially discharged, the test data will also not be accurate.
- The increase in compression occurs due to the combustion of oil in the cylinders.
Repair work
If you discover the presence of oil in the air filter of your VAZ 2109, you should definitely take immediate action.
Ignoring the presence of oil in the VF can lead to serious damage, including the need for major engine repairs. I don’t even want to imagine how much it will cost.
- Check the compression of your engine. If there are problems with it, the piston rings or the piston system are worn out, this can be determined by blue or dark smoke. Plus, the level of lubricant, that is, oil, will constantly drop.
- If the compression test shows that everything is fine, then you can breathe a sigh of relief. This suggests that the problem is not that complex.
- Most likely, the filter element is clogged or the hoses for removing crankcase gases from the crankcase are clogged. You will have to change the filter, wash or replace the output hoses.
The most important recommendation is periodic maintenance of all engine components and auxiliary mechanisms. It is better to prevent a disease than to eliminate its consequences later.
Replacing the distributor (ignition distributor) on a VAZ 2108-VAZ 21099
Direct replacement
1) First, de-energize the engine system by disconnecting the negative terminal from the battery. (Instructions and procedures are described in the article: “Replacing the battery” in the first paragraph).
2) Next, disconnect the high voltage wires from the distributor cover.
3) Remove the vacuum hose from the vacuum regulator fitting.
4) Then completely unscrew the top nut securing the distributor and wire holder.
5) Remove the holder from the car engine.
6) Use your hands or a screwdriver to disconnect the wire block from the distributor.
7) Now unscrew the two remaining nuts that secure the distributor at the bottom: use a wrench to unscrew the left nut of the distributor.
Then unscrew the right nut.
Installation: 1) First, remove the two screws from the cover and remove it.
2) Then turn the slider with strictly outer contact opposite the “first cylinder” terminal located on the cover.
3) Install the distributor in the reverse order of removal.
4) Place the negative terminal on the battery and set the initial ignition timing. (We recommend that you familiarize yourself with the process in the article: “Installing the ignition”).
Changing the cover
1) First, disconnect all high-voltage wires from the cover.
2) Then use a Phillips screwdriver to remove the screws holding the plastic cover to the distributor.
3) Remove the cover and replace it with a new one.
Note! The cover on the distributor is installed in only one position. And the high voltage wires are put on the cover in the order: 1-3-4-2. There is a marking “1” on the distributor cover itself, start counting from there in order, counterclockwise.
Replacing the slider:
1) First, remove the cover according to the instructions described above.
2) Next, remove the slider from the shaft by pulling it with your hand.
Note! The slider is installed in its place only in one position, when the slot on the shaft is directed in the opposite direction from the contact!
Additional materials Below is a link to a video with information on today's topic:
Reasons why oil can get into the distributor
In a VAZ 2109 car, oil from under the distributor can get inside this product through the oil seal on the shank. Externally it will look something like this. When disassembling the distributor, rust is clearly visible on the slider, the ember installed there is often completely erased, and everything under the screen is covered in oil.
The reason that led to the appearance of oil in the distributor of the VAZ 2109 is the clogging of a small hole in the base of the carburetor, which is structurally related to the ventilation system of the crankcase of the engine.
At idle speed of the engine, excess pressure arises in the crankcase, which forces oil through the oil seal into the distributor. To prevent the problem from reoccurring, the hole mentioned above should be cleaned. But the operation is quite complicated technically. Therefore, it should be performed at a service station.
Another reason leading to the appearance of oil in the distributor on the VAZ 2109 is severe wear of the oil seal.
To identify and eliminate this malfunction, the distributor must, at a minimum, be removed and, after completing the required amount of work, reinstalled.
Brief acquaintance - advantages
As noted above, the ignition system of the VAZ 2109 is non-contact transistor.
During its existence, this SZ has proven itself to be quite reliable, despite the fact that it produces high energy up to 50 J, and the breakdown voltage in it can reach 30 kV or more. The operating efficiency of a contactless transistor SZ is considered very high.
Advantages of this SZ:
- If the operation of the SZ is provided with a Hall sensor, then the spark energy indicator is not affected in any way by either the engine operating frequency or the voltage indicator in the vehicle’s electrical network. This happens because the time period of energy concentration in the ignition coil always remains unchanged, which is one of the reasons for the high efficiency of this ignition system;
- Since there is no direct mechanical interaction between the contacts, this means they do not burn or become dirty, and of course there is no need to clean them;
- There is no need to adjust the position of the contacts, for one reason, they simply do not exist;
- Since the mechanical impact of parts on each other in this system is minimized, this means that phenomena such as rotor vibration, resonance phenomena, and uneven spark distribution across the spark plugs are completely absent;
- Thanks to the constant increased energy in the spark plug, which can reach 50 J, ignition of the fuel mixture in the cylinders occurs without failure. This is especially felt during car acceleration, when everything happens smoothly, steadily and without jerks;
- Fuel economy has increased by approximately 5% and CO emissions have been reduced by 20–25%;
- In cold weather, starting a cold engine, even with a battery discharged to 6V, is more stable than with other ignition systems.
Signs of a faulty contact system
As we know today, there are distributors with non-contact and contact spark generation systems, let’s begin to understand the contact system. If you have a contactless device, then the instructions are a little lower for you:
- Symptoms that appear in the contact system are usually caused by either a change in the gap between the contacts or their contamination
- Since the performance of the contact distributor (see Design of the VAZ 2109 distributor: the difference between contact and non-contact ignition systems and ignition timing adjustment), the condition of its contacts has a huge impact, unlike a device that has a contactless system
- The condition of the contacts should be checked every 10,000 kilometers
- When a problem arises in the distributor in a VAZ 2109, it should be identified, since this includes wear on the shaft cams, the development of the contact stop that slides along them
- Possible wear of the bushings in which the shaft rotates, as well as destruction of the bearing in the movable contact plate, weakening of the contact spring, possible jamming of the contacts on their axis, as well as their burning, erosion or contamination
- Such malfunctions inevitably lead to changes in gaps or poor contact in the contacts
- And as a result of this - loss of engine power, complete cessation of its operation at idle, a noticeable decrease in throttle response, and the appearance of jerks when the gas pedal is sharply pressed
- With severe wear or destruction of the bearing in the movable contact plate, as well as with critical wear of the bushings, and a break in the negative shunt, a violation of the contact of the lever or contact pair, or even the contact itself, causes popping noises in the muffler or intake manifold
- This can also occur when the noise suppression resistor, which is located in the distributor runner, burns out
- If the engine does not start at all, this is most often due to either a lack of contact or a lack of gap in the contact pair, and also a breakdown of the slider (remove the slider and purchase a new one)
- The complete absence, contamination or burnout of contacts is easily determined visually, and if there is no discharge in the high-voltage armor wire coming from the ignition coil, then you need to replace the wire; if this does not solve the problem, change the coil
- If there is a spark on the central wire, but not on the spark plug wires, this indicates a malfunction of the slider
- Malfunctions also include - malfunction of centrifugal or vacuum regulators
- If a weak spark appears on the central wire or too much sparking between the contacts, this indicates a malfunction of the capacitor
- Note: During repairs (and in general) you should not install additional capacitors or capacitors with a larger capacity
- At nominal value, the capacitance of the capacitor is allowed within 0.15 - 0.35 microFarad
Purpose of the distributor cover
The design of the ignition distributor cap (aka distributor) has remained and remains virtually unchanged throughout the entire history of the use of this device as part of the ignition system of gasoline engines:
- On most ignition caps, the contacts for the spark plug wires are marked with numbers that correspond to the serial numbers of the corresponding cylinders
- In addition to protecting the distributor mechanism itself from moisture and dirt, it also serves the purpose of alternating the supply of high-voltage current from the ignition coil winding through high-voltage wires to the spark plugs
- It is because of this narrow specialization that the distributor cap has undergone almost minimal changes along the evolution of all car systems
Let's look at the design and operating principle of this much-needed part.
The distributor cap is a molded part made of non-electrically conductive material (insulator) that has the following device:
- Metal contacts are pressed into this part - these are the side and central electrodes
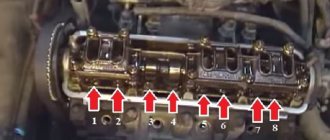
- The number of side electrodes strictly corresponds to the number of engine spark plugs (but not cylinders, do not forget that there are engines in which there is more than one spark plug for each individual cylinder); the distributor cover on the VAZ 2109 in our case has four side electrodes
- A high-voltage (armor) wire coming from the ignition coil is connected to the central electrode from the outside
- To the side electrodes - high-voltage (armor) wires going to the spark plugs
- Inside the cover itself there is a central contact equipped with a terminal that has a spring-loaded contact element (“carbon”), which transmits voltage to the central (main) contact of the distributor rotor (ignition distributor)
Schematic design of the lid
When installing the cover on the distributor body, it is important to take into account not only the order of connecting the armored wires, the orientation of the cover in relation to the “nose” of the runner is also important. The ignition distributor cover is attached to the distributor body using latches or screws (the distributor cover on the VAZ 2109 is secured with screws) To prevent the formation of condensation under the lid, it has a special ventilation hole
Features of device operation
The “sore spot” of the distributor cover and rotor (ignition distributor) are the electrodes pressed into it:
- The reason is simple - there is no direct contact between these electrodes and the central electrode on the slider, so a spark jumps when they approach through the air, which causes the side electrodes to char rather quickly
- In order for the distributor cap to function reliably, it must be kept clean both outside and inside.
- It is necessary to periodically check the condition of the electrodes contained in it.
- If carbon deposits or oxides appear on them, clean the contacts of the VAZ 2109 distributor cover with a flat file
- It is not recommended to use sandpaper due to the high probability of abrasive particles getting into the distributor mechanism
- In addition, you should carefully monitor the external condition and mobility of the central contact (“coal”) of the cap electrode
Distributor cap as an anti-theft device
Due to the increasing number of car thefts, some “savvy” owners began to use the distributor cap as an additional anti-theft device:
- By removing the cover, which can be removed quite easily, you will make it more difficult for a thief who wants to steal your car.
- Firstly, the car simply won’t start without it.
- Secondly, even if he finds or has a cap with him, having removed the armored wires, you did not mark their connection order, connecting at random it is difficult to quickly achieve correct operation of the ignition
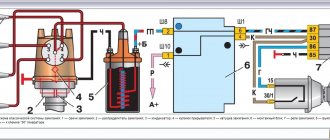
How does the Hall sensor and centrifugal mechanism work?
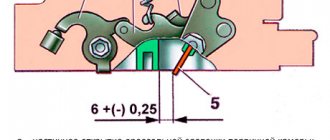
On a VAZ-2109 car, the distributor corrects the ignition timing during engine operation. This is possible due to the use of a centrifugal device in the design. It can affect the slider when the engine accelerates sharply. The centrifugal mechanism is similar in design to those devices that were installed on contact-type ignition systems. In addition, the breaker on the VAZ-2109 car is also equipped with a vacuum corrector. When a vacuum is created in the intake manifold, it is then transmitted through a special tube to the corrector chamber. There is a rubber diaphragm there. The latter is connected to a rod, which is fixed to the plate. This is where the Hall sensor is located. This element made it possible to remove the contact group from the distributor and make the operation of the ignition system more stable.
The Hall sensor, together with this plate, can move, thereby adjusting the ignition timing. In this case, the SOP increases or decreases. It depends on the number of revolutions and how intensely the engine picks them up.
Ignition settings
When setting up the ignition, you will need to do the most important thing - install the shafts according to the marks so that the gas distribution functions synchronously with the operation of the piston group. This is the first thing you should do before you start adjusting the ignition. It is worth noting that there should not be any particular difficulties during setup, especially on VAZ 2108-21099 cars. The thing is that the ignition distributor on the engines of these machines can only be installed in one position. Moreover, the ignition switch does not undergo any settings during this procedure, since it does not have any.
The distributor body rotates around its axis to make more precise adjustments. And this turns out to be enough. To accurately set the torque, you can use a simple circuit that uses a simple LED as an indicator. The Hall sensor is disconnected from the system, and positive power is supplied to its negative terminal. An LED is switched on between “+” and the signal LED, and a 2 kOhm resistance is connected in series with it to reduce the voltage. But the plus of the Hall sensor is connected to ground. Now all that remains is to slowly rotate the distributor housing. The moment when the diode lights up will be the desired one.
Replacing the distributor (ignition distributor) on a VAZ 2108-VAZ 21099
Direct replacement
1) First, de-energize the engine system by disconnecting the negative terminal from the battery. (Instructions and procedures are described in the article: “Replacing the battery” in the first paragraph).
2) Next, disconnect the high voltage wires from the distributor cover.
3) Remove the vacuum hose from the vacuum regulator fitting.
4) Then completely unscrew the top nut securing the distributor and wire holder.
5) Remove the holder from the car engine.
6) Use your hands or a screwdriver to disconnect the wire block from the distributor.
7) Now unscrew the two remaining nuts that secure the distributor at the bottom: use a wrench to unscrew the left nut of the distributor.
Then unscrew the right nut.
Installation: 1) First, remove the two screws from the cover and remove it.
2) Then turn the slider with strictly outer contact opposite the “first cylinder” terminal located on the cover.
3) Install the distributor in the reverse order of removal.
4) Place the negative terminal on the battery and set the initial ignition timing. (We recommend that you familiarize yourself with the process in the article: “Installing the ignition”).
Changing the cover
1) First, disconnect all high-voltage wires from the cover.
2) Then use a Phillips screwdriver to remove the screws holding the plastic cover to the distributor.
3) Remove the cover and replace it with a new one.
Note! The cover on the distributor is installed in only one position. And the high voltage wires are put on the cover in the order: 1-3-4-2. There is a marking “1” on the distributor cover itself, start counting from there in order, counterclockwise.
Replacing the slider:
1) First, remove the cover according to the instructions described above.
2) Next, remove the slider from the shaft by pulling it with your hand.
Note! The slider is installed in its place only in one position, when the slot on the shaft is directed in the opposite direction from the contact!
Additional materials Below is a link to a video with information on today's topic:
Contactless ignition system BSZ
Installing contactless ignition is a really necessary thing. You will feel the difference! Two different contactless dispensers are available for Moskvich. They differ in sensors: ATE 2 with Hall, SOATE with induction. ATE 2 costs
1300 rub. Its kit includes a distributor, a coil, a commutator and a harness. It is installed on the RR 147 drive, if the RR 118, then you need to buy a drive as well. Don't forget to buy new silicone high-voltage wires.
The commutator is attached next to the coil. After installing all this on the car, do not forget to increase the spark gap of the spark plugs to approximately 0.8 mm.
Adapter for distributor from VAZ-2108 for Moskvich
The VAZ-2108 distributor can be installed using an adapter. This BSZ has been successfully operated for two years on two cars: M-412 (1.8 l.) and M 2141(2) (1.7 l.).
As a unit that transmits torque, a modified shaft from the old Moskvich drive and a shank with a pin from the original distributor are used, rotating in ball bearing No. 6203 and two starter copper-graphite bushings, the inner diameter of which, after pressing, expands to a diameter of 13 mm.
Since the inner diameter of the bearing and the diameter of the shaft are different sizes, an intermediate sleeve is pre-pressed onto the shaft.
The adapter flange is milled, as can be seen in the picture, holes are drilled and threads are cut for the screws.
ATTENTION! The adapter is designed to drive a new type of distributor, with a crimp clamp
How to replace the distributor?
To dismantle, remove the negative terminal from the battery. Then remove all high-voltage wires that go to the cover. Next, disconnect the hose from the vacuum corrector. After this, remove the bracket, holding the wires. Installation of a new distributor on a VAZ-2109 is possible only in one rotor position. This makes the process easier. There is no need to make any marks. To install a new distributor, you need to install the device in its original place, and then tighten the nuts that secure it to the engine. This completes the replacement procedure.
(Added a photo) And again I’m struggling with the ignition. Then I’m driving, everything is fine, then I start sneezing and coughing again. It cools down again - everything is fine and again there are interruptions. It happens that the pedal is to the floor - and nothing happens... It jerks, as if the ignition is turned off .I changed the wires, the distributor cap and the slider...
I'm driving in the evening... I'm twitching, I decided to see what's wrong with the runner. I opened it, I see a picture that the runner has play... What should I do in such situations? I put a piece of paper to create a tighter fit between the shaft and the runner. I try to start it, it starts, and then it stalls. I turn the starter - there are no signs. Having opened the cover again, I find that the slider has begun to spin around its axis on the shaft without any interference. I look inside. And there is no retaining wall on it at all. 11:00 pm, what stores?! I thought for a very long time what to do. As a result, a thin screwdriver, a self-tapping screw and a lighter solve the problem. (If it were made of PCB, like in the USSR, I would I was never able to pierce it with a hot screwdriver to tighten the screw)
Next, in the morning I bought a slider, and when I arrived at work, I decided to look into the distributor... to see how everything works there. Imagine my surprise when I saw 2 screws there that MUST hold the ignition timing bearing.
I pulled out the whole thing and noticed that the bearing was also crooked... and it was still clamped...
Distributor for VAZ 2109
When a distributor malfunction appears on a VAZ 2109, malfunctions appear in the operation of the entire ignition system. Characteristic signs of distributor problems include unstable engine operation, which is especially noticeable at idle. As well as jerks that occur when driving, and the appearance of vibration of the tachometer needle on cars equipped with a tachometer. Knowing how the signs of a distributor malfunction appear on the VAZ 2109, you will be able to identify them and eliminate them.
Typical faults
Among the main and frequent breakdowns, several can be identified:
- So, the slider may burn out, and this may cause problems with starting the engine. The engine may start, but will immediately stall.
- If the fastening of the distributor is loosened, the OZ could be damaged. This can lead to difficulty starting, loss of power, and unstable engine idling. This is also one of the reasons for increased fuel consumption. To fix it, tighten the fastening with a 10 mm wrench - rotate two nuts, as well as one bolt.
- Another popular cause of malfunction is the distributor wires (VAZ-2109). They may be connected incorrectly or the order may be out of order. The engine may not start at all, or it will start, but at the same time it will “sneeze”.
- Oxidation or destruction of contacts in the cover is a common problem that occurs with ignition distributors for VAZ. If the contacts are oxidized, you can try to restore them with white spirit. This is one of the reasons why the engine troits.
- In addition, the distributor cover may be broken. VAZ-2109 quite often worries its owner about this. You can see the breakdown location very easily. It is clearly visible. A failed cover can cause current leaks, causing various interruptions in the operation of the motor.
- Another problem associated with the lid is the destruction or abrasion of the contact carbon in the lid. In this case, the engine will not start. To eliminate the cause, replace the coal separately or the entire lid. If the Hall sensor is malfunctioning, the engine will not be able to start. If the wires from the sensor are broken, the result will be the same.
- If the vacuum corrector is faulty, the power unit will not pull up. The power and throttle response of the engine will decrease. The vacuum regulator sets the angle under load a little earlier. One of the possible reasons is a lack of tightness in the regulator body or a leak in the hose from the carburetor. Or the rotary plate of the corrector may be stuck. You can try to fix the leak. But often a complete replacement of the distributor on a VAZ-2109 is required. The asking price is up to five hundred rubles.
How to remove and install the distributor on a VAZ 2109
- 1. Disconnect the wire from the negative terminal of the battery;
- 2. Completely disconnect all high-voltage wires;
- 3. Disconnect the throttle valve drive cable;
- 4. Unscrew all nuts. This is necessary in order to remove the device from the bracket that secures the wires;
- 5. To maintain the initial ignition timing, make marks on the distributor body and the drive of auxiliary elements;
- 6. Pull the wires out of the ignition distributor. To do this, use a screwdriver to bend the clamps;
- 7. Remove the rubber plug located in the crankcase hatch;
- 8. Start cranking the crankshaft until the piston of the first cylinder is located at TDC;
- 9. After unscrewing the remaining nuts, remove the distributor;
- 10. Installation and replacement of equipment on a vase is carried out in the opposite order.
Remember the marks and checking the initial ignition timing.
Compression check
After checking the compression, you can breathe a sigh of relief or worry, since the cost of the repair depends on the result.
Impaired compression often causes the presence of oil in the VF, and also causes a number of other problems.
Compression check
To work you will need:
- Compressometer;
- A rag in oil, which you will use to determine the compression stroke;
- Adapter for spark plug holes. It is used when checking the combustion chamber for leaks;
- Compressor.
Now let's start checking.
- Warm up the engine to operating temperature, then turn off the fuel supply.
- In the case of a carburetor, you need to remove the hose, clamp or squeeze it with something, or lower it into a container.
- If you have an injector, remove the fuel pump fuse, start the engine and let it run. As soon as the fuel in the fuel rail runs out, it will stall on its own.
- Disconnect the ignition system by removing the center wire from the distributor (on the carburetor). The crankshaft position sensor at the injector must be disconnected.
- Remove all debris from the spark plug wells so that it does not end up inside the cylinders. Unscrew the spark plugs.
- Insert the compression gauge fitting while an assistant starts the engine. The starter should rotate the engine until the pressure gauge needle stops in one position.
- By analogy, measurements are carried out on each cylinder, the results are recorded on paper.
- To calculate ideal compression, use the formula - 1.2 * Compression ratio.
See your owner's manual for the compression ratio of your engine. Please also note that measurements may have some error.
Causes of failure
There are several main reasons why a distributor may break and only need to be replaced:
- The appearance of cracks on the cover;
- Broken Hall sensor;
- Burnt out slider;
- Burnt contacts on the cover;
- Loose bearing holding the Hall sensor;
- Poor contact in the Hall sensor plug.
All these situations, in addition to poor sensor contact, are a signal to replace the distributor.
Unit location
Adjustment
In some cases, it is enough to adjust the ignition system to return the engine to its previous performance.
There are several symptoms that indicate this.
| Symptom | Causes |
| Excessive detonation of the piston system | A characteristic feature of this problem is a ringing sound when you press the gas pedal. The reason is early ignition, which can cause deformation of the piston rings. |
| Black smoke from the chimney when starting the engine | This indicates that the ignition is too early. |
| Engine power has decreased, fuel consumption is increasing | Here the ignition is already late, so the mixture cannot burn completely |
| The engine begins to idle unevenly | Caused by both early and late ignition. |
To adjust the distributor, you will need:
- Tachometer;
- Slotted screwdriver;
- Strobes;
- Wrench.
Let's get to work.
- Start the engine, increase idle speed to 800 units. Make sure that the engine temperature is at least 90 degrees.
- Align the crankshaft according to the marks on the cylinder block cover.
- Connect a 12 Volt light bulb to the output wire from the distributor. The second contact goes to ground.
- Turn on the ignition and watch the lamp. If it does not light up, loosen the nut that holds the distributor plate and begin to carefully, slowly turn the distributor body counterclockwise until the lamp lights up.
- Drive several kilometers at speeds up to 50 km/h. If the symptoms of the problem disappear, you have made the correct setting.
- If there are no consistent detonation sounds, you have set the ignition too late. Here the distributor needs to be turned clockwise.
- If there is no positive result, the distributor will have to be repaired or replaced.