Print this article Font size 16
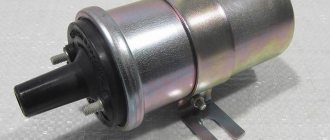
The ignition system of the VAZ 2109 consists of a number of devices whose task is to create an electrical discharge that ignites the air-fuel mixture in the engine. Among these devices there is a distributor.
Distributor and ignition distributor are synonyms. Remember this so that in the future there are no problems with misunderstanding of instructions for repairing the ignition system .
Possible malfunctions of the BSZ
If the VAZ 2109 ignition switch stops receiving pulses, it means that the wires may be broken and need to be replaced or connected. The second reason lies in the malfunction of the Hall sensor. Its condition is checked with a voltmeter. And if there is no voltage in an electronic device, it needs to be replaced.
The Hall sensor is located inside the distributor housing. To change it, you need to open the cover and disconnect the old sensor. Damage to the wires is also possible between the sensor and the ignition coil. The pulse supply is disrupted if the wires are loosened or their ends are oxidized.
Interruptions in the operation of the VAZ 2109 engine occur for various reasons. For example, carbon deposits and dirt accumulated on the walls or rotor of the distributor are observed. There are other negative factors.
| Causes | Actions |
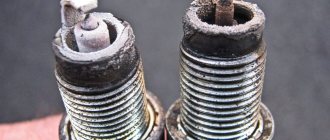
| The electrodes are worn out or the spark plugs have been exposed to oil that flows from under the seal, and carbon deposits have formed on them. Cracks in the ceramic body of the spark plugs also do not contribute to the smooth operation of the engine. | Oily spark plugs can be washed in gasoline, dried, and the carbon deposits removed. But repair will not help worn electrodes or cracked insulators. Such spark plugs require immediate replacement. |
| If everything is fine with the spark plugs, but the engine does not start. | The carbon brushes in the breaker housing should be checked. |
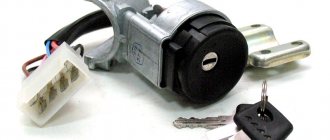
| Faulty ignition switch. | It requires adjustment. |
It happens that the weights in the ignition timing regulator get stuck. This occurs due to the weakening of the springs, which have exhausted their service life and need to be replaced. You can repair this defect yourself.
Where is?
The oil seal is a rubber ring on a metal base. The main purpose of the rubber seal is to prevent oil leakage, and the secondary purpose is to protect the unit from dirt, dust and moisture when the bolts are sufficiently tightened. The oil seal is located on the camshaft immediately behind its pulley. The rubber gasket may cause a knocking sound when the engine is running.
Location of the oil seal behind the pulley
Signs of a faulty contact system
As we know today, there are distributors with non-contact and contact spark generation systems, let’s begin to understand the contact system. If you have a contactless device, then the instructions are a little lower for you:
- Symptoms that appear in the contact system are usually caused by either a change in the gap between the contacts or their contamination
- Since the performance of the contact distributor (see Design of the VAZ 2109 distributor: the difference between contact and non-contact ignition systems and ignition timing adjustment), the condition of its contacts has a huge impact, unlike a device that has a contactless system
- The condition of the contacts should be checked every 10,000 kilometers
- When a problem arises in the distributor in a VAZ 2109, it should be identified, since this includes wear on the shaft cams, the development of the contact stop that slides along them
- Possible wear of the bushings in which the shaft rotates, as well as destruction of the bearing in the movable contact plate, weakening of the contact spring, possible jamming of the contacts on their axis, as well as their burning, erosion or contamination
- Such malfunctions inevitably lead to changes in gaps or poor contact in the contacts
- And as a result of this - loss of engine power, complete cessation of its operation at idle, a noticeable decrease in throttle response, and the appearance of jerks when the gas pedal is sharply pressed
- With severe wear or destruction of the bearing in the movable contact plate, as well as with critical wear of the bushings, and a break in the negative shunt, a violation of the contact of the lever or contact pair, or even the contact itself, causes popping noises in the muffler or intake manifold
- This can also occur when the noise suppression resistor, which is located in the distributor runner, burns out
- If the engine does not start at all, this is most often due to either a lack of contact or a lack of gap in the contact pair, and also a breakdown of the slider (remove the slider and purchase a new one)
- The complete absence, contamination or burnout of contacts is easily determined visually, and if there is no discharge in the high-voltage armor wire coming from the ignition coil, then you need to replace the wire; if this does not solve the problem, change the coil
- If there is a spark on the central wire, but not on the spark plug wires, this indicates a malfunction of the slider
- Malfunctions also include - malfunction of centrifugal or vacuum regulators
- If a weak spark appears on the central wire or too much sparking between the contacts, this indicates a malfunction of the capacitor
- Note: During repairs (and in general) you should not install additional capacitors or capacitors with a larger capacity
- At nominal value, the capacitance of the capacitor is allowed within 0.15 - 0.35 microFarad
Compression check
After checking the compression, you can breathe a sigh of relief or worry, since the cost of the repair depends on the result.
Impaired compression often causes the presence of oil in the VF, and also causes a number of other problems.
Compression check
To work you will need:
- Compressometer;
- A rag in oil, which you will use to determine the compression stroke;
- Adapter for spark plug holes. It is used when checking the combustion chamber for leaks;
- Compressor.
Now let's start checking.
- Warm up the engine to operating temperature, then turn off the fuel supply.
- In the case of a carburetor, you need to remove the hose, clamp or squeeze it with something, or lower it into a container.
- If you have an injector, remove the fuel pump fuse, start the engine and let it run. As soon as the fuel in the fuel rail runs out, it will stall on its own.
- Disconnect the ignition system by removing the center wire from the distributor (on the carburetor). The crankshaft position sensor at the injector must be disconnected.
- Remove all debris from the spark plug wells so that it does not end up inside the cylinders. Unscrew the spark plugs.
- Insert the compression gauge fitting while an assistant starts the engine. The starter should rotate the engine until the pressure gauge needle stops in one position.
- By analogy, measurements are carried out on each cylinder, the results are recorded on paper.
- To calculate ideal compression, use the formula - 1.2 * Compression ratio.
See your owner's manual for the compression ratio of your engine. Please also note that measurements may have some error.
Dismantling
After dismantling the distributor, you can disassemble the device in order to repair its components, or completely replace the distributor with a new unit.
- De-energize the car by removing the negative from the battery;
- Disconnect the high-voltage components and the vacuum ignition corrector hose from the distributor;
- Remove the drive cable responsible for the throttle valves from the bracket. Next, the fastening nuts are unscrewed and the bracket is dismantled;
- Before removing the ignition distributor, apply a mark to the housing of the distributor and drive of auxiliary elements. This way you can simplify your task of setting the ignition timing for its precise setting. The mark is applied to the metal by scratching;
- Press the latch holding the block with the power wires and disconnect it from the distributor;
- Place the piston from the first cylinder to the top dead center position by moving the engine flywheel clockwise;
- Unscrew the remaining ignition distributor screws. The first fastener was removed when removing the damper cable sheath bracket;
- Remove your damaged distributor.
Disassembly and repair
Quite often, repair work with the distributor is associated with wear and the need to change the seals (coupling). To change the oil seal, as well as other failed components of the distributor, we bring to your attention the appropriate instructions, as well as video tips.
- Remove the ignition distributor cap by releasing the locking clip.
- Remove the slider. It is wiped with a clean rag and checked for mechanical damage. If there are chips or cracks, the element must be replaced.
- The runner must fit tightly on the shaft, which is achieved due to the presence of a plate spring with a pressing action. If it stretches or breaks, replace it.
- There is a resistor in the slider housing. The normal reading of its resistance is 1 kOhm. By measuring the data with an ohmmeter, you can draw conclusions regarding the performance of the component.
- Remove the low voltage wiring terminal. To do this, unscrew the mounting screw from the housing.
- Remove the plastic screen that serves as dust protection.
- A power wire comes from the Hall sensor and is held by the holder's claws. Using a screwdriver, the claws are opened and the wire is removed. Next, you need to unscrew the pair of mounting screws securing the Hall sensor support plate.
- Remove the vacuum corrector. Just be sure to disconnect it from the support plate lever before doing this. To perform this operation, carefully remove the retaining ring from the pin.
- The next step is to remove the pair of screws that hold the corrector to the distributor body.
Disassembling the unit
- Lift the corrector lever slightly, which will allow you to remove it from the sensor plate pin and remove the corrector itself.
- These steps will allow you to easily remove the support plate by lifting it with a flat head screwdriver. Remove the element. The plate must be replaced if the bushings are worn out or there is mechanical damage to the unit.
- Unscrew the two fasteners to disconnect the plate and the Hall sensor.
- You need to remove the oil seal, that is, the coupling. It is located on the distributor shaft. The coupling is closed with a thrust washer. That, in turn, is fixed with a retaining ring. You first need to remove the ring, which will make it possible to remove the thrust washer.
- Remove the oil seal by knocking out the pin with a small-diameter borer. Determine the dimensions of the boletus during the repair process.
Checking for damage
- There are adjusting washers under the oil seal.
- Remove the roller along with the centrifugal regulator from the distributor body.
- Clean the housing using kerosene and a dry cloth. Make sure that there are no mechanical damage, chips or cracks on the case.
- Examine the condition of the bushings. The roller rotates on them, and with severe wear, the roller begins to become loose. Also, the device is replaced along with the bushings if there are signs of wear, defects, or damage.
- To disassemble and replace damaged elements of the centrifugal regulator, you first need to remove the weight springs using a screwdriver.
- If the springs are intact and undamaged, not deformed, make notes on their seats. If you mix them up during assembly, problems may arise.
- Remove the driven plate along with the screen from the shaft.
- Make sure how effectively the weights move along their axes. Movements should be free, without any jamming. If there are problems, the weights are changed.
- It is a mistake to check the movement of loads without first removing and cleaning them.
How to correctly set the ignition on a VAZ 2109 carburetor - detailed instructions
The setup process is as follows:
1. Start the car engine and ensure that the engine speed is approximately 800 rpm. To set the idle speed within such limits, it is enough to use a slotted screwdriver to adjust the screw responsible for the amount of fuel mixture in the carburetor.
2. After setting the idle speed to the above value, turn off the car engine.
3. Disconnect the rubber hose from the vacuum corrector. Carefully bend the hose approximately in the middle or plug it with a screw of a suitable diameter.
4. Connect the positive terminal of the strobe to the “+” terminal of the battery;
5. Connect the negative wire of the strobe to the “-” terminal of the battery;
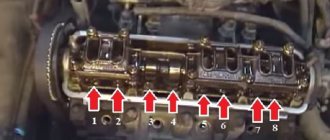
6. Disconnect the spark plug wire from the socket of the first cylinder as shown in the image:
Disconnect the spark plug wire
7. Install the strobe sensor into the socket and connect the high-voltage wire to it;
8. Remove the plug from the clutch housing hatch:
Removing the stub
9. Turn on the ignition and start the engine. We direct the actively changing luminous flux generated by the strobe into the clutch housing hatch:
We direct the strobe into the clutch housing hatch
10. When the light is flashing, it seems that the mark located on the flywheel is stationary. If the ignition is installed correctly, the first mark should be between the technological notch and the previous mark on the scale.
Tags
11. If after the described operations it was discovered that the ignition adjustment of the VAZ 2109 is incorrect, we continue to work.
12. Using an open-end wrench, slightly loosen the fastening nuts of the ignition system distributor:
Mounting nuts
13. After loosening the fastening nuts, turn the distributor body to the right side - if it is necessary to increase the ignition angle, and to the left side, if it is necessary to decrease the angle.
14. Connect a rubber tube to the vacuum corrector and check that the ignition is installed correctly. If the normal result is not achieved, we make repeated adjustments. How to check the correct operation of the system will be described below.
Compression check
After checking the compression, you can breathe a sigh of relief or worry, since the cost of the repair depends on the result.
Impaired compression often causes the presence of oil in the VF, and also causes a number of other problems.
Compression check
To work you will need:
- Compressometer;
- A rag in oil, which you will use to determine the compression stroke;
- Adapter for spark plug holes. It is used when checking the combustion chamber for leaks;
- Compressor.
Now let's start checking.
- Warm up the engine to operating temperature, then turn off the fuel supply.
- In the case of a carburetor, you need to remove the hose, clamp or squeeze it with something, or lower it into a container.
- If you have an injector, remove the fuel pump fuse, start the engine and let it run. As soon as the fuel in the fuel rail runs out, it will stall on its own.
- Disconnect the ignition system by removing the center wire from the distributor (on the carburetor). The crankshaft position sensor at the injector must be disconnected.
- Remove all debris from the spark plug wells so that it does not end up inside the cylinders. Unscrew the spark plugs.
- Insert the compression gauge fitting while an assistant starts the engine. The starter should rotate the engine until the pressure gauge needle stops in one position.
- By analogy, measurements are carried out on each cylinder, the results are recorded on paper.
- To calculate ideal compression, use the formula - 1.2 * Compression ratio.
See your owner's manual for the compression ratio of your engine. Please also note that measurements may have some error.
What you need to know about verification
- If the indicator is 12 atmospheres, this indicates that your engine is almost in perfect condition.
- When checking the compression on a cold engine, the compression readings will be significantly lower. Perform the test only on the engine at operating temperature.
- If the battery is partially discharged, the test data will also not be accurate.
- The increase in compression occurs due to the combustion of oil in the cylinders.
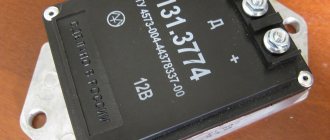
Distributor in a contactless ignition system
The contact ignition system, which is installed on the antediluvian classic VAZ models, is an example of Italian reliability, stability and maintainability. This system (not the ignition system in principle, namely the VAZ one) was developed by the Fiat concern in 1963 and remained practically unchanged throughout the entire era of the reign of the classic Lada, right up to the moment when the last VAZ 2107 was rolled out of the gates of the Izhevsk plant. the last seven already had a contactless ignition system; it did not undergo any significant changes.
On cars of the Samara family - 2108, 2109, 2114, the ignition system is contactless. What does this mean and what are the differences between it and the contact system? Here they are:
- there is no contact group in the VAZ 2109 distributor;
- the operation of the contactless ignition system is controlled electronically, and not by single-cell electromagnetic relays;
- adjustment of the ignition timing is carried out using other methods;
- The VAZ 2109 contactless distributor is more compact than classic VAZ distributors.
The operating principle of the ignition system and its main tasks have not changed with the use of a contactless system. It has become easier to maintain and has become less dependent on mechanical wear of the contact group, but more on the quality of electronic semiconductor components. Electronic control units of old 2109 require mandatory testing before purchase, since the quality of domestic radio components may not always be stable.
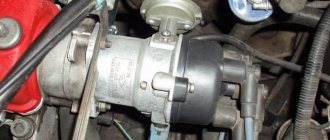
Purpose of distributor VAZ 2109
In any ignition system, contactless or contact, there are two circuits - high voltage and low voltage. The distributor, the ignition distributor, is exactly the device that deals with both high-voltage and low-voltage wiring. Its main task is to distribute high voltage between the spark plugs at the right moment and in a certain order.
The distributor works as follows: High-voltage voltage is generated in the ignition coil by electromagnetic induction. It is supplied via a high-voltage wire to the central contact of the distributor cap. The contact is in constant interaction with the slider, which distributes the current across four contacts corresponding to the spark plug in the cylinder. The slider is in constant rotation and alternately closes the central contact with the spark plug contacts. Current is supplied to the spark plugs through high voltage wires in the order determined by the order of operation of the cylinders - 1-3-4-2. The slider is driven by a drive shaft, which is connected to the camshaft.
Operation of the hall sensor and centrifugal mechanism
The VAZ 2109 distributor device allows you to adjust the ignition timing while the engine is running. This is achieved through a centrifugal device, which is capable of moving the slider with a sharp increase in the number of revolutions. The design of the centrifugal mechanism is similar to those installed on distributors with a contact ignition system.
The VAZ 2109 distributor also has a vacuum corrector. It works as follows: when a vacuum is created in the intake manifold, to which the corrector is connected, the vacuum is transmitted through a tube to a chamber with a rubber diaphragm. The diaphragm is connected to a rod, which is hinged to the plate on which the hall sensor is located. It was this sensor that replaced the contact group in the distributor and made the ignition system more stable. Together with the plate, the sensor can move, adjusting the ignition timing, increasing or decreasing the angle, depending on the intensity of the set of revolutions and the vacuum in the manifold.
Malfunctions in the distributor
Since the 2109 distributor has a minimum of mechanical parts, it is not as susceptible to wear as a distributor with a contact group. However, they exist and you need to be prepared for them.
- The hole for ventilation and pressure compensation on the distributor shank often gets clogged. This leads to the fact that crater gases, having no other outlet, break through the distributor shaft seal and oil the slider.
- Breakdowns to ground occur in the distributor cap due to microcracks.
- Due to poor quality elements, the hall sensor fails;
- The distributor shaft bearing becomes loose.
All these troubles can be solved quite simply, if you don’t mind the time, everything can be eliminated with your own hands. The VAZ 2109 distributor, the price of which is not much more than 1000 rubles, is, in principle, a consumable unit, so making a decision to repair it may be unprofitable in terms of time spent. I wish you the right spark distribution, and good luck on the roads.
Reasons why oil can get into the distributor
In a VAZ 2109 car, oil from under the distributor can get inside this product through the oil seal on the shank. Externally it will look something like this. When disassembling the distributor, rust is clearly visible on the slider, the ember installed there is often completely erased, and everything under the screen is covered in oil.
The reason that led to the appearance of oil in the distributor of the VAZ 2109 is the clogging of a small hole in the base of the carburetor, which is structurally related to the ventilation system of the crankcase of the engine.
At idle speed of the engine, excess pressure arises in the crankcase, which forces oil through the oil seal into the distributor. To prevent the problem from reoccurring, the hole mentioned above should be cleaned. But the operation is quite complicated technically. Therefore, it should be performed at a service station.
Another reason leading to the appearance of oil in the distributor on the VAZ 2109 is severe wear of the oil seal.
To identify and eliminate this malfunction, the distributor must, at a minimum, be removed and, after completing the required amount of work, reinstalled.
VAZ 2109 fingers ringing
A few days ago I started having problems with speed. We swam from 1000 to 1500. Then our fingers began to ring. When accelerating. It was all about gasoline. Because something similar has already happened because of gasoline. I went and refueled at another gas station, but it didn’t help. Last time it ended there. But this time - nothing. Well, I think the speed is due to the carburetor, the fingers are due to the ignition. Or all together. The problem was more with the carburetor. Because I didn't touch the ignition. and at the same time I thought that perhaps the timing belt had slipped a tooth. Today I went to the garage to deal with this problem.
I started by removing the timing belt cover and checking the marks. everything is in place. Then I removed the carb, it was necessary to change the thick textolite gasket. I had a cracked one. I've been wanting to change it for a long time. The carburetor was removed for a reason. there was an air leak.
and then, quite accidentally, I touched the vacuum seal on the distributor with my hand. and saw this -
OK. My friend, Max, is switching from a carburetor to an injector in my garage. and he has an already removed distributor with a vacuum seal, which he no longer needs.
I decided to remove mine in order to make it more convenient to get to the stopper. It's good that I did it. and then we saw this -
I installed the distributor. I started the car. Everything is fine!
1) Hello everyone! VAZ 21099 turned on the ignition (my fingers ring for 1-3 seconds), the car stopped moving, the speakers are not good, I set the speed early, the dynamics are good, but my fingers ring terribly. The timing marks are shifted by 1 tooth, I put the marks on the car and the car doesn’t move either! What are people’s thoughts? I've already broken my head! Thanks to everyone Guys. This is the trouble. Nine injector, the other day such a dregs appeared that when you start and give it fire, up to 2500 rpm it jerks and does not move, and after 2500 it starts to tear normally, I can’t even get through the ring. This is only in wet weather the number of the question you are answering! The fingers of the VAZ 2109 carburetor are ringing.
Why do my fingers knock in the engine when accelerating? Let's understand the problem"
Why do my fingers knock in the engine when accelerating? Let's understand the problem
Why do my fingers knock in the engine when accelerating?
To answer this question, you need to understand why this phenomenon occurs. In normal conditions, ignition of the combustible mixture occurs evenly. Explosive combustion of fuel begins near the spark plug and simultaneously spreads in different directions. The explosion propagation speed is about 20-30 m/sec. In the event of detonation, the over-enriched mixture begins to explode immediately after entering the combustion chamber. The blast wave moves chaotically, colliding with the walls of the cylinder, the remainder of the mixture explodes. The wave speed can reach 1000 m/sec.
Consequences
. As we have already found out, detonation is essentially uncontrolled combustion of fuel. At the same time, the cylinder walls heat up unevenly; in places where the blast wave hits, the temperature rises significantly. This can lead to deformation of the cylinder block. The piston may also overheat and become deformed. A blast wave under certain conditions can damage the valves. It can also damage the connecting rods. In any case, systematic and severe detonation will lead to the need for major engine repairs.
This phenomenon can be caused by a large number of factors. They have varying degrees of danger. Sometimes, a small detonation is quite acceptable. All possible options for the occurrence of this phenomenon will be discussed below.
The most harmless is detonation, which occurs with a sharp increase in speed. If you sharply press the gas pedal at 1000 rpm, accelerating the operation of the power unit to 4000-5000 rpm, you can hear a short-term detonation. This is quite a common occurrence. There is no need to be afraid of this; in this case, detonation will not lead to dire consequences. The reason is a sharp increase in the fuel supplied to the engine; the amount of air initially remains at the same level, this causes premature oxidation of the fuel, which is accompanied by explosions. The only way to combat this phenomenon is to avoid a sharp increase in speed.
But sometimes detonation can appear during normal operation of the power unit. In such cases, it is necessary to identify and eliminate the malfunction as quickly as possible. Otherwise, it will lead to engine repair. So, detonation may have the following reasons:
- Incorrectly set ignition timing. As this indicator increases, the point with maximum pressure during fuel combustion shifts to TDC. Because of this, increased pressure occurs in the cylinder, and accordingly appears. If you experience unexplained knocking noises, be sure to check that the ignition is working correctly;
Error in operation. If the fuel consumption sensor fails, the on-board computer may give erroneous commands. As a result, the engine begins not only to twitch, but also to detonate;
Almost all modern cars are equipped with a knock damping sensor. If you observe the phenomenon regularly, then check the condition of this small device. If necessary, you need to replace it;
Low octane number. Each car has its own compression ratio; accordingly, this indicator is calculated based on the fuel that will be used in the engine. The higher the compression ratio, the higher the octane number should be. If you fill the tank with fuel with a lower rating, an uncontrollable reaction will occur in the cylinder. If, in order to save money, you have filled with lower quality gasoline, then it is advisable to drain it and fill with fuel with a suitable octane number. Sometimes, a similar phenomenon may occur.
Settings
The strobe is used like this:
- the red wire is applied to the “plus” on the coil;
- black – to the body;
- the clamp is connected to the veins installed on cylinder number 4.
After this, the actual adjustment begins.
The work is carried out in the following order:
- start the engine, bring its speed up to 800 and no more (measurements are made with a tachometer);
- the beam from the strobe is aimed at the inspection hatch;
- the long line is placed in the zero position (scale in degrees).
The angle is adjusted by rotating to the right - this increases the angle, respectively, movement in the opposite direction decreases it.
It is not difficult to find out the exact direction - it is indicated by the scale marked on the distributor (there is an o and a “plus” there). Each division corresponds to 8 degrees. For this reason, adjustment is slow. After finding the desired position, the distributor is secured.
Preparation
As previously noted, you can do without such a device as a strobe light, but if you want to set up the ignition yourself, then there is still a reason to purchase it.
Before you start setting the angle, do the following:
- start the engine;
- heat it up to 90 degrees;
- increase the speed to 800;
- remove the pipe used to discharge the fitting;
- the dismantled tube is clamped with a finger - this will allow you to find out whether vacuum is actually occurring;
- if it is present, the speed is increased until it disappears;
- then the engine is turned off and the pipe is bent so that there is no gap left in it;
- use a wrench to unscrew the nuts securing the distributor;
- clean the inspection hole from dirt (it is located in the crater of the gearbox and is closed with a plug).
There is a special scale with which the set angle is determined. This should be discussed in more detail, since you need to set the ignition according to the marks. For this:
- Use a flat screwdriver to turn the flywheel until a long strip appears;
- in the future, during adjustment, you need to ensure that it remains clearly in the triangular cutout (this is the zero angle, that is, the starting point of adjustment).
If everything is done correctly, then cylinders 1 and 4 move to the TDC position.
When the scale is poorly visible and you are not sure that you have found the necessary feature, then you can verify the correctness of the position in another way.
There are pulleys on the camshaft gears. They must coincide with the mark on the wall of the timing belt protective housing.
High voltage wires
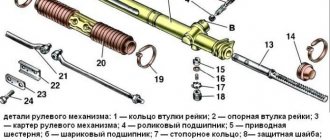
Construction and maintenance of the VAZ 2106 car distributor
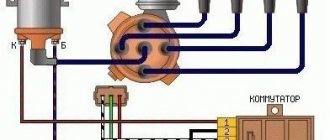
Often, the main difficulty when repairing a carburetor VAZ 2109 is the reconnection of high-voltage wires that were previously disconnected from the distributor cover. It's also an ignition distributor.
The difficulty is that many people forget the connection procedure or simply do not know. But in practice, returning high-voltage wires is much easier than understanding the ignition module used on the injection VAZ 2109.
By following a few simple rules, you can easily return the wires to their rightful places.
- The ignition distributor cover is installed in its place, that is, on the distributor, only in a single position. Therefore, even if you wanted to, you won’t be able to confuse anything here. Otherwise the lid simply won't fit.
- There is an installation mark on the cover, which indicates the location of the wire socket from the first cylinder.
- The wires must be connected in the following sequence - 1, 3, 4, 2. Move counterclockwise when looking at the distributor cover from the side of the expansion tank.
If for some reason there are no installation marks on the VAZ 2109 carburetor distributor cover, just follow the connection principle shown in the image.
Final stage
When oil gets into the ignition distributor, a VAZ 21093 or another model from this line of cars is repaired according to general rules. In this context, it should be noted that disassembling any mechanism involves performing related work. When the distributor is disassembled, it is necessary to clean all its parts from dirt and soot. They should be carefully wiped with a dry cloth. If necessary, remove carbon deposits using a solvent. At the same time, without mixing up or losing fasteners and small parts.
The photo shows the ignition distributor disassembled. Each part has its own purpose and installation location. After the oil seal is replaced and the assembled distributor is installed in its normal place, the ignition is adjusted. It should be noted that the ignition setting procedure has its own specifics. Practice shows that it is preferable to entrust this matter to an experienced specialist.
Required parts and tools
It goes without saying that first you need to purchase a “contactless ignition kit” for the VAZ 2107
When purchasing it, it is very important to know what the engine size is and its brand. Remember this and do not believe unscrupulous sellers who assure you that this data is completely irrelevant
The cost of such a kit ranges from 2-3 thousand rubles.
You will also need a set of high-voltage wires, four spark plugs (they must have DVRM written on them).
The tools you will need are a couple of self-tapping screws, a set of wrenches, drills, and various screwdrivers.
How to regulate
Practice shows that most often problems with the ignition system are observed in older models with a carburetor type of power plant.
To perform the setup you will need the following tools:
- Screwdriver Set;
- strobe light (you can basically do without it, but with its help you can set the angle more accurately);
- 10mm wrench (suitable for both socket and socket wrenches);
- tachometer (it is available in almost any car multimeter).
VAZ 2109 distributor slider
Replacing the distributor slider
I drove a nine-wheeler for 2-3 days after repairing the starter relay, that is, not repairing but replacing the wires, and then the car began to stall at idle... then sometimes it wouldn’t start at all, and I got out of the car that I thought this had happened, I opened the hood, I looked, I thought , again the starter relay is floating or the switch started... or even some kind of wires from the starter or fuses I thought... every time when I couldn’t start I went out, opened the hood and tapped the starter relay, the switch pulled the wires from the starter and started just like that... but not always this trick worked... sometimes I had to leave the car and after work come and try again and somehow it would start. And after that I looked, opened the distributor and there... In short, I bought a slider for 250 tenge, changed everything in the photo...
Old runner
New slider
dust screen
All! changed! Ready!
Theoretical basis
The ignition system, not only of the VAZ 2109, but also of other cars, is a chain of interconnected devices and components that ensure the appearance of a spark on the spark plugs and the subsequent ignition of the air-fuel mixture in the internal combustion engine.
The system includes:
All these elements are switched using low and high voltage wires.
One of the main components is the ignition distributor, which performs two main functions - it sets the moment of spark supply (depending on the speed of the power unit) and supplies the spark to the cylinders.
The correct operation of the devices mentioned above determines the ignition timing, that is, the time when a spark is supplied to the spark plugs to ignite the air-fuel mixture.
Incorrect setting of the torque can cause malfunctions in the engine, problems with starting it and “floating” rotation of the crankshaft at idle speed.
To fix this, you need to know several nuances, which will be discussed in the article.