If the door does not open either from the inside or from the outside of the VAZ 2114, then adjustment of individual structural elements will be required. The driver's door is subject to wear and tear more than others. This body part can become jammed due to a faulty lock or handle.
Masters claim that the car requires regular care and periodic diagnostics of faults. These actions will prevent breakdowns or extend the life of individual vehicle elements.
Causes of problems opening the door
If incorrect operation of the VAZ 2115 design is noticed and the rear door does not open from the outside, then the reason lies in the locking mechanism or poor adjustment of the door fragment. The following factors indicate the need for repairs:
- the door slams loudly when closing;
- an unpleasant creak appeared;
- there is a rebound from the car rim;
- the door leaf has shifted;
- an increased gap appeared between the body and the door rim;
- subsidence, sagging, movement of the door pillar to the side;
- when closing there is a sharp kickback because the backlash is set incorrectly;
- the door closes only after a strong push;
- the lock is broken or blocked, the handle (external, internal) does not work;
- There was a crackling noise in the door panel while the vehicle was moving.
Special attention is required to the gaps, hinges, internal filling of the door, lock and handle. The exterior of the vehicle is inspected in a closed and open state. It is also determined whether there is any distortion or other changes in the body shape. The doors should be at the same level, the diameter of the gaps should be no more than 1–2 cm. Having examined the condition of the hinges, a search for mechanical damage is carried out, the functionality of the opening mechanism and the operation of the lock cylinder are checked.
If the car has been in an accident, the adjustment is performed after straightening or replacing damaged parts.
Assembly basis and disassembly of the front door VAZ 2113-2114-2115
The basis of disassembling and assembling the front door in the correct sequence
Instructions for repairing and replacing body parts of the VAZ 2113 2115, stages of disassembling and removing the doors of the VAZ 2114, the procedure for assembling and installing the tailgate. Body elements for Lada 2113, body care for Lada 2115. Adjustment of doors, hood, bumper.
- Front door window regulator
- 1 – window lifter handle
- 2 – facing
- 3 – socket
- 4 – gasket
- 5 – window lift mechanism
- 6 – cable sheath
- 7 – roller
- 8 – glass
- 9 – seal
- 10 – external seal
- 11 – internal seal
- 12 – clip
- 13 – sliding glass fastening plate
- 14 – cable
Press out the socket 3 and slide the trim 2 of the handle 1 of the window lifter until it comes out completely. Remove the handle and the trim.
- Interior view of the front door
- 1 – lock release button
- 2 – door trim
- 3 – armrest handle
- 4 – inner door handle
- 5 – outside rear view mirror
- 6 – door fastening bolts
- 7 – door opening limiter
- 8 – power window switch
- 9 – door trim pocket
- 10 – reflector
- 11 – external door lock
After unscrewing the screws, remove the armrest handle 3 and the door trim pocket. Using a screwdriver, remove the lining of the inner door handle 4. Unscrew button 1 to turn off the lock.
Remove the adjustment knob for the external rear view mirror 5, the inner lining and, after unscrewing the fastening screws, remove the mirror.
Unscrew the fastening screws and remove down the guide grooves of the sliding glass, then disconnect the glass frame 12 from plate 13, unscrew the nuts securing the window regulator, remove it and take out the sliding glass through the top.
- Power window
- 1 – roller
- 2 – cable sheath
- 3 – window lift support
- 4 – window lift mechanism
- 5 – gear motor
- 6 – sliding glass fastening plate
- 7 – bracket for fastening the gear motor
- 8 – cable
Part of the Lada Samara 2 is equipped with electric windows.
The glass is raised by transmitting torque from the gearmotor 5 to the window lift mechanism 4 and then by vertically moving the cable 8 with the sliding glass mounting plate 6 attached to it.
Before disassembling the door of the VAZ 2113 and subsequent removal of the window regulator, it is necessary to disconnect switch 8 from the connector of the gearmotor 5. Remove the window regulator, unscrew the supports 3 and disconnect the gearmotor.
- Front right door lock
- 1 – key guide
- 2 – lock switch arm
- 3 – shutdown rod
- 4 – external drive rod
- 5 – key
- 6 – lock release button
- 7 – shutdown button rod
- 8 and 17 – shutdown levers
- 9 – outer door handle
- 10 – bracket for internal handle
- 11 – inner door handle
- 12 – lining of the inner handle
- 13 – internal drive rod
- 14 – internal lock body
- 15 – external drive lever
- 16 – intermediate lever
- 18 – external lock body
- 19 – lock drive finger
- 20 – dog
- 21 – lock retainer
- 22 – ratchet
- 23 – lock fastening screw
Disconnect rods 4, 7 and 13, outer 9 and inner 11 door handles from the lock. Unscrew the two fastening nuts and remove the outer door handle of the VAZ 2114.
- Attaching front door locks and handles
- 1 – inner door handle
- 2 – front door
- 3 – internal drive rod
- 4 – button
- 5 – outer door handle
- 6 – handle key
- 7 – lock cylinder
- 8 – handle seal
- 9 – button pull
- 10 – external drive rod
- 11 – lock switch handle
- 12 – lock switch arm rod
- 13 – lock lock pin
- 14 – lock retainer body
- 15 – external lock
- 16 – internal lock
- 17 – gearmotor thrust
- 18 – door lock locking motor
If equipped with electric door locks, after removing the door trim, disconnect the gearmotor connector 18 and rod 17.
Unscrew the screws and remove the lock 8. Remove the inner door handle assembly with bracket 10, having first unscrewed the fastening screws.
Reassemble the door in reverse order. For reliable fastening, lubricate the threads of the lock and retainer screws with sealant type UG-9. Before installing the door trim, check the condition of the holders.
- Attaching rear door locks and handles
- 1 – lever
- 2 – button pull
- 3 – button
- 4 – lock drive rod
- 5 – internal drive rod
- 6 – door panel
- 7 – pen key
- 8 – door handle body
- 9 – key guide
- 10 – handle seal
- 11 – traction
- 12 – external lock
- 13 – lock lock pin
- 14 – lock retainer body
- 15 – internal lock
- 16 – gearmotor thrust
- 17 – door lock locking motor
- 18 – inner door handle
Dismantling and assembling the rear door of the Lada Samara 2 is carried out in the same way as the front door.
What will be needed for repairs
If the front door of the VAZ 2114 does not open from the outside, then an analysis of the problem is carried out, based on which the optimal repair method is selected. Most often, work requires:
- key to 10;
- Screwdriver Set;
- hammer;
- pliers;
- Silicone Grease;
- marker;
- knife;
- anti-corrosion substance.
If it is determined that the problem is in the closing device, then a cylinder or a solid lock is purchased. Disassembly will show whether there is a chance to repair or adjust the device.
Removing and installing the outer door handle on VAZ 2113, 2114 and 2115
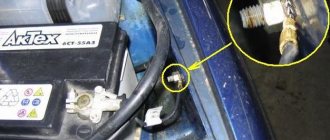
The first step is to remove the door trim. After this, access to the lock mechanism and its rods from the inside opens.
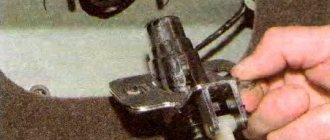
Now unscrew one nut securing the handle from the inside, as shown in the photo below.
The second nut is located on the outside:
From the outside, move the handle slightly to the side, as shown clearly:
And then it is necessary to disconnect the two rods from the handle mechanism of the VAZ 2114-2115 from the inside. This can be done using a flat screwdriver, and the shorter it is, the more convenient it all is.
The rods are hinged, so you will have to apply moderate force to disconnect them from the lock mechanism. After which you can finally remove the handle and replace it with a new one.
It is worth noting that the price of a new factory handle for the front doors is around 300 rubles, but the rear ones can be bought a little cheaper - from 200 rubles apiece. Installation occurs in the reverse order of removal.
Replacing the door on a VAZ 2113, VAZ 2114, VAZ 2115
In case of a side impact, the main door of the car suffers, but besides this, the fender and bumper of the car can also be damaged, but you can still drive with a broken bumper or fender, but if the driver’s door is very dented, it will no longer be comfortable, because when turning sideways, it will constantly rest against a person, therefore a very deformed door must be replaced immediately, especially since if it is knocked on a second time, then the possibility of getting a more serious injury increases.
Lock: repair, unlocking, assembly
If the back or other door of a VAZ 2114 does not open, then you will have to work from the interior. It is important to take care of lighting. To open the door, replace or unlock the lock, the following instructions are provided:
- The plugs on the handle of the door element are removed.
- Three screws are unscrewed: two on top, one under the armrest.
- The cover is removed.
- The handle locks are disabled.
- The decorative panel comes unfastened.
- Electrical wiring is disconnected.
- The handle and plastic cap of the lock are removed.
Recommendations
Reassembling and lubricating individual parts will not work if the fragments are heavily worn. It is better to remove the cylinder from the core and install a new one. Recommendations for replacing the VAZ 2114 door lock:
- Partial repairs or lubrication will only temporarily restore life to the closing mechanism. If problems arise, it is better to replace the entire cylinder.
- After installation, it is necessary to periodically lubricate the mechanism. Experienced motorists use silicone substances for this.
- The repair procedure is carried out in a well-lit room at a comfortable temperature.
- To change the element, you will need a set of screwdrivers, pliers and lubricant.
- Sometimes the springs have to be replaced along with the cylinder. They are purchased separately.
The cylinder fragment is sold as a set. The price depends on the manufacturer. If you buy a cheap Chinese version, it will cost about 150 rubles. It is better to give preference to VAZ spare parts. The cost of such a kit is 400-500 rubles.
Withdrawal procedure
Depending on the reason, a complete or partial replacement is performed. It is not recommended for the average person to engage in reassembly, since there are too many nuances in this process, but almost anyone can replace the mechanism. Step-by-step instruction:
- Three screws are unscrewed. They are located on the inside of the handle. To do this, use a Phillips screwdriver to remove the cover.
- The front trigger glass position switch is removed along with the wiring harness block. To do this, the wires are first disconnected.
- The plug on the armrest handle is removed, the element is picked up with a thin corner of a screwdriver.
- Unscrew the 2 screws on the handle that hold the inner panel.
- The plastic clips are pressed out to remove the lining.
- 6 pistons are removed to remove the door card.
- The external fastenings are removed, the nuts are unscrewed with an 8mm wrench.
How to remove cravings
To remove this piece, you will need an impact screwdriver and a size 8 wrench. The piece is attached to the internal locking mechanism and the lock switch. Algorithm of actions:
- The internal lock of the outer handle rod is completely disconnected.
- The handle is removed along with the rods.
- The pin is removed from the end of the rods.
- The plastic tip is removed from the core of the cylinder device.
- The return spring is removed. The old larva is being removed.
Installing a new part
The removal and assembly algorithm is the same, although the instructions for installing the cylinder mechanism have its own nuances. Before inserting a new cylinder into the core, the part is lubricated with a silicone substance and only then inserted into the handle. Further algorithm of actions:
- The return spring is inserted next to the cylinder.
- The functionality of the key is checked. It should turn easily in all positions.
- A pin is installed on the tip of the rotary rod. Connection is being made.
- The inner and outer panels are screwed on, the handles are fixed, and the plug is returned to its place.
- The main three screws are tightened from the inside.
Preventing door jams
The main reason for the breakdown: long-term operation, but the service life of the part is reduced if the driver does not carry out preventive maintenance. Basic moments:
- Cleaning of internal parts, treatment with special substances.
- Power loop lubrication.
- Removing adhered dirt. The procedure is carried out at least twice a year: in spring and autumn. Active ingredients for treatment: Liqui Moly Schnell-Reiniger cleaner, Liqui Moly Wartungs-Spray weiss dirt-repellent white lubricant.
- Lubrication of hinges, internal parts, rubber seals, door stops.
Thanks to these actions, fixation improves. Lubricants with an anti-corrosion effect preserve the elasticity of parts.
The procedure is especially relevant before the winter season, when the treatment prevents the mechanism from freezing when moisture enters. Spring prevention minimizes damage to the door mechanism from ultraviolet radiation.
How to install euro handles on a VAZ 2109, 2114.
To install the Euro handle on a VAZ 2109, 2114, we squeeze it out and try to insert it into the socket. The fit is a little tight. After installing the handle in the technological hole, you need to push it a little in the direction of travel of the car and the handle completely sits in place. Now you can screw it on
Door opening rods are included with the Euro handles. Two short ones go to the rear doors, two long ones to the front ones. We put on the required rod and adjust it by unscrewing or screwing the plastic attachment onto the rod. We try to open and close the door. If the door does not open, then unscrew the plastic cap a few turns; if the door does not close, then tighten it.
All! Euro pen installed! Now all that remains is to assemble the door card. It is assembled in the reverse order of disassembly.
How to install Euro handles on a VAZ 2109, 2114 is no longer a secret for you!
Product delivery options
Note! Below are the shipping methods available specifically for this product. Payment options may vary depending on the delivery method.
Detailed information can be found on the “Delivery and Payment” page.
Parcel by Russian Post
Available payment methods:
- Cash on delivery (payment upon receipt)
- Using cards Sberbank, VTB, Post Bank, Tinkoff
- Yandex money
- QIWI
- ROBOKASSA
Shipping throughout Russia. Delivery time is from 5 to 12 days.
Parcel by Russian Post 1st class
Available payment methods:
- Cash on delivery (payment upon receipt)
- Using cards Sberbank, VTB, Post Bank, Tinkoff
- Yandex money
- QIWI
- ROBOKASSA
Shipping throughout Russia. Delivery time – from 2 to 5 days. More expensive than regular delivery by Russian Post, approximately 50%. Parcel weight up to 2.5 kg
Express Parcel EMS
Available payment methods:
- Cash on delivery (payment upon receipt)
- Using cards Sberbank, VTB, Post Bank, Tinkoff
- Yandex money
- QIWI
- ROBOKASSA
Shipping throughout Russia. Delivery time – from 3 to 7 days. More expensive than regular delivery by Russian Post, approximately 100%.
Transport companies
Available payment methods:
- Using cards Sberbank, VTB, Post Bank, Tinkoff
- Yandex money
- QIWI
- ROBOKASSA
Delivery is possible to any locality where there is a representative office of the transport company. Delivery time – from 2 to 10 days. Sending large parcels is approximately 50% more profitable than by Russian Post.
Courier delivery in Togliatti
Available payment methods:
- Cash upon receipt
- Using cards Sberbank, VTB, Post Bank, Tinkoff
- Yandex money
- QIWI
- ROBOKASSA
Delivery time from 1 to 12 hours.
Pickup from our warehouse
Available payment methods:
- Cash upon receipt
- Credit, installments
- Using cards Sberbank, VTB, Post Bank, Tinkoff
- Yandex money
- QIWI
- ROBOKASSA
Pickup times must coincide with store opening hours.
Every car owner's vehicle contains myriads of small parts that, if they break down, do not deserve due attention, although they have a significant impact on the smooth operation of all vehicle mechanisms. For example, the strength of sound depends on the frequency and speed of vibration of small particles propagating in a certain composition of the medium: liquid, gas, solid. Likewise, in a car, any inconspicuous detail fulfills its purpose in a complex of auto elements that form a single body, subordinate to a specific goal: calm and comfortable movement in various climate conditions. Car door handles are not an exclusive element from the general composition of transport components.
The car handles on the outside of the body follow the contour of the vehicle’s body. The doors of expensive cars have chrome door handles. Modern luxury cars are equipped with an electronic access system that requires scanning the owner's thumb to open the car door. Owners of domestic cars are taking small steps closer to luxury and style, replacing old handles with external euro handles, made with the latest technology and appropriate design, which will serve their purpose perfectly, providing comfort and convenience to the owner of a VAZ 14-15 vehicle.
The thought of replacing the door handles of a VAZ 14-15 comes only when they break down or components break, leaving the car owner with a non-functional door. Such a small thing can cause serious inconvenience due to a faulty door handle mechanism, be it an internal or external door handle. This element is usually made of plastic and metal, representing a curved plate that provides access to the car. It's worth considering simple door handles as one of the most commonly used car components. They may not be able to withstand harsh tugging, door slamming and other unreasonable behavior, which will result in serious inconvenience with access through a window or side door, and even worse, through the trunk. Taking care of door handles is as important as changing the oil. The price is affordable, and the benefits of unhindered access are invaluable.
Since 2005, it has been allowing you to experience the wonderful moments of a luxurious exterior when driving vehicles of the 14 and 15 VAZ models. Replacing the handles with euros will provide minor luxury, comfort and reliability in the same style and color scheme. The company has been manufacturing high-quality parts for many years, constantly testing the resistance to external influences and durability of the coating of external Euro door handles of VAZ, which indicates their reliability, high strength and carefree driving
The company's specialists pay special attention to details in the production of any product. That is why all handles are easy to install, without adjustment or alteration
How to change and replace the door handle on a VAZ-2114: photos and videos
VAZ-2114 owners have repeatedly faced the problem of replacing a door handle. This process is quite simple, but people often get confused with it and, out of ignorance, damage the element itself or a neighboring one. The article will tell you how to replace a door handle from the outside without much effort.
Video about replacing the inside rear door handle (carefully mat):
The process of replacing the internal door handle on a VAZ-2114
One of the simplest operations is replacing the door handle from the inside. So, motorists often figure out what needs to be done.
Broken interior door handle.
But, nevertheless, we will describe the complete technical replacement process:
- By prying and pulling with a screwdriver, we remove the door handle trim. We remove all elements including the handle trim.
- The next step is to dismantle the door card. Without this operation, replacement will not be possible, especially when the handle is broken. We remove the door card.
- Disconnect the wire rod of the handle. Disconnect the drive rods from the handle.
- We dismantle the handle, removing the fastening, and install a new one. We install a new handle and attach the rods.
- We reassemble. We install the handle lining into the card.
Exterior door handle replacement process
Many car enthusiasts think for a long time about how to approach the replacement process, but everything is much simpler than it seems at first glance. To determine the fastening method, just look at the technical documentation, where you can clearly see that the door handle is attached inside.
Based on this, one can logically guess that in order to remove the outer door handle, it is necessary to dismantle the door trim. Next, the process will follow the same pattern:
- When the casing is dismantled, remove the thrust rods from the handle lock. Remove the door handle thrust rods from the frame
- Remove the screws securing the outer handle and pull it out. Unscrew the screws securing the rods
- It is worth remembering that it is also necessary to remove the rubber seals that are located under the handle. Unscrew the fasteners and remove the handle
- Assembly is carried out in the reverse order.
Handle selection
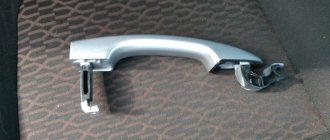
General view of external door handles
Choosing a pen is quite simple, if you don’t take Euro pens. All spare parts of this nature are produced only by the manufacturer, or rather AvtoVAZ. So, let's look at the articles:
- 2109-6105180 – original catalog number of the internal door handle.
- 2108-6105177 – article number of the outer door handle.
Causes of malfunction
There can be several reasons for a door handle malfunction. So, the motorist himself can damage the element during operation, or outsiders can do it. Let's consider the main reasons why the product will have to be removed:
- Road accident. This is perhaps the most common reason. So, damage to the door will be a reason to remove the door handle. Also, damage to the external element can lead to such actions.
- Handle breakage due to wear. Usually, this is a breakdown of the plastic part, a break due to frequent opening or excessive pressure using brute force.
- Actions of third parties that led to the breakdown of the element.
conclusions
Removing the door handle on a VAZ-2114 is quite simple, both internal and external. Many motorists are puzzling over how to do this correctly, but just look at the technical documentation or open the Internet.
Do-it-yourself engine start | Motorist's benefit
Probably, many have already heard about remote starting of a car engine; recently we have already published information about how autostart works and how it works. Those who are interested can read this article in more detail. Today we will talk about how to independently make a remote car engine start at home.
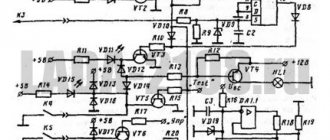
Adding the engine auto-start function to a regular alarm system
In this example, we will connect the autostart function to the StarLine A6 car security system. The image shows a schematic diagram of connecting all elements including the remote start module.
The image shows a schematic diagram of connecting all elements including the remote start module.
To connect you will need:
- Universal 4-pin relays – 2 pcs.
- Universal 6-pin relays (22.3777) – 1 pc.
- Schottky diodes SR360 (60A), analogue of diode 1N5822 60A – 3 pcs.
You shouldn’t have any problems assembling the circuit; the only nuance in this story is the low pulse duration of the additional channel on the StarLine A6 alarm (0.6 sec.) or long (10 sec. and 30 sec.), which in one case is not enough to turn on the starter , and in the other there is a lot of this. To solve the problem, it is necessary to reprogram the additional channel for 0.8 seconds, this is enough to start the starter. In the following photos you can see how the assembly and connection were carried out.
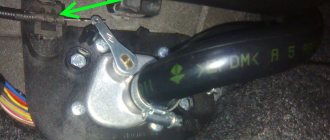
The photo shows the connection of diodes to output 85 of the starter relay
We hide the assembled circuit in the torpedo niche
The standard alarm program on channel 3 gives a pulse mode of 0.8 seconds. The first press of the button turns on the ignition, the second turns on the starter, only after 1.5 seconds the engine stalls and the ignition turns off. If the second time you press and hold the button, the engine runs until you release the button, this problem can be solved by reprogramming the alarm to supply a negative contact to certain relay contacts.
Before reprogramming, we have Relay 22.3777 supplies +12 current to the 4th contact when a minus appears and disappears on the 5th contact, and relay 21.3777 supplies a plus to the 4th leg as soon as a minus appears on the 5th.
After programming, relay 22.3777 supplies minus 12 volts to the 4th contact when a minus appears and disappears on the 5th contact, and relay 21.3777 supplies a minus to the 4th leg as soon as a minus appears on the 5th. As a result, we have a remote start with three clicks , and on the fourth, we turn off the engine. The positive aspect of this circuit is the presence of relay 22.3777, which makes a pause for the fuel pump (pause between the 2nd and 3rd press).
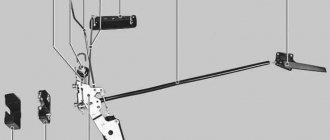
Replacement
The replacement process will take you no more than 10 minutes; the most difficult thing will be to unscrew the bolts securing the lock to the door. There is no need to adjust the lock after replacement, since the adjustment is made only on the hinge, and during operation the hinge will not unscrew and, therefore, will not change its position.
Tool
The only tool you need is a ratchet (driver) with a TORX T40 bit or a T40 wrench.
Step-by-step instruction
Attention: Under no circumstances unscrew both bolts at the same time; if you unscrew two bolts at once, the inner part of the lock (drive) will fall into the door and then you will have to remove the door trim to get it out.
- Unscrew one bolt and remove it
- Then unscrew the second bolt, but not all the way, pull the lock towards you and turn it to the side, or use a pin as shown in the picture.
- We screw the previously unscrewed bolt into an empty space and then unscrew the bolt securing the lock. This will prevent the lock drive from falling into the door.
We install the new lock in the reverse order, avoiding unscrewing both bolts at the same time.
Varieties
The Lynx Euro pens have a factory designation, which determines the differences between the sets.
- IN 1. This designation indicates that the package contains four handles - two rear and two front. In this case, the front larvae do not have.
- AT 2. There are also four handles, a pair for the rear and front doors. Only here the larvae are present.
Which one should I choose? The question is purely individual. On the one hand, B1 have a solid, smooth structure that is not spoiled by key holes. For external tuning they are simply perfect.
Article on the topic: Find out what and how to clean the VAZ 2114 mass air flow sensor: 3 best options
The second option is preferable for those who value quality, visual appeal, but at the same time reliability. After all, the presence of a cylinder will give you the opportunity to open the car with a key if problems arise with the alarm or key fob.
Connection diagram and setup
In the basic instructions, Starline provides a diagram for the A91 model:
Shown here is the harness going to the dashboard. Let's figure out what is connected where:
- The diode connected to the wire break must conduct current in the direction “towards the limit switches”;
- Above we talked about the 1N5401 diode;
- The second diode connected to the alarm wire may be designated 1N4001 (it is cheaper).
Now let's look at what is in the second bundle, located under the first:
From the two blue cables shown above, make T-shaped bends and extend the cords to the alarm installation location. And a 1N4001 diode is installed in the gap in the handbrake wire. The cathode of this diode “looks” towards the switch. Finally you will make the connections:
- The “green-yellow” and “green-black” wires from connector X3 are connected to the turn signal leads.
- Another tap coming from the cathode is connected to the “brake input” of the Starline A91 Dialog signaling system. The cord is designated as “orange-purple”.
It was discussed how to connect all the signal wires with your own hands. Queue for the security forces.
The steps listed in this chapter can be completed before installing the alarm. The functionality of standard equipment should not be affected.
Connecting the autostart connector
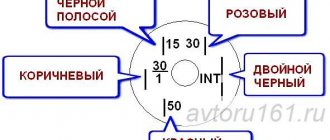
In VAZ 2114 cars, unlike the “nines”, an ignition switch with three terminals is used: 50, 15 and 30. The latter is connected to the battery, and contact 15 closes with it when the key is turned. Well, the 50th terminal is the “output "to the starter. Similar designations are used not only by VAZ.
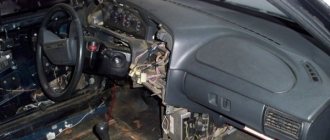
As for model 2114, the lock escutcheon is secured with three self-tapping screws, as well as three metric screws. Unscrew them and you will see the following:
According to the basic instructions, power for the signaling can be taken from pin 30 (a T-tap is needed). And the “yellow” power cable coming out of connector X1 is connected to terminal 15. Further, if autostart is needed, then:
- The connections above must withstand significant current (up to 30 A);
- The “red” wire coming from the ignition switch is broken;
- The Starline A91 Dialog module is reached by bends coming from the break point;
- The thin wire from connector X1 should connect to terminal 50, while the power cord in “black and yellow” insulation will become the output to the starter.
Also, as stated in the installation manual, do not forget to cut the gearbox selector loop. The action makes sense if autorun is used.
Those who have an immobilizer activated in their car will have to install a crawler. You can buy a BP-3 unit from Starline to connect it to the “pink” control cord of the alarm:
All those who do not want to break the wire of the standard reader make a crawler with their own hands:
- The additional loop antenna contains 50 turns of PEL-0.3 wire;
- The internal antenna of the unit must contain the same number of turns of any wire;
- Both antennas are combined into a circuit opened by relay contacts.
The instructions cannot be completed here. The method of connecting the tachometer was not considered.
It is clear that the loop antenna will need to be combined with a standard reading device. And all the antennas included with Starline crawlers do not fit well with VAZ immobilizers.
The wire in “black-gray” insulation coming from connector X3 is connected to the high-voltage input of the tachometer (see figure). Your alarm will not burn out as a result, but will be able to control the speed:
All Starline security systems, as it turns out, are well compatible with any VAZ cars. This applies even more so to the A91 Dialog model. By the way, do not forget to connect the “ground” of the main unit (“black” cord of connector X3).
Software setup
We will configure only the functions responsible for autorun. You can activate the programming mode as follows:
- The security is turned off, the key in the lock is moved to the “0” mark;
- The Valet button connected to the A91 Dialog main unit is pressed 6 times;
- After step “3”, turn on the ignition immediately;
- 6 beeps sound;
- Use the Valet button to select the function number (see below);
- To set the required value, press the corresponding key on the key fob.
The system operates in Dialog mode, so the function number, as well as its value, will be displayed on the key fob. All the options in question are listed in the table:
Information was taken from the installation instructions. Switch the values of the following functions: 12-3, 11-4 and 9-3.
To set the value to “4”, press the third key until the melody appears. Then the button is pressed again. Having chosen the value 4 for function 11, it is better to perform the following check:
- The “yellow” cord coming from block A91 and connected to terminal 15 is temporarily disconnected;
- Start the engine “with the key”;
- The alarm LED should start flashing.
All these tips are given in the standard instructions. True, they advise disconnecting all wires except three.
Connection diagram and setup
In the basic instructions, Starline provides a diagram for the A91 model:
Shown here is the harness going to the dashboard. Let's figure out what is connected where:
- The diode connected to the wire break must conduct current in the direction “towards the limit switches”;
- Above we talked about the 1N5401 diode;
- The second diode connected to the alarm wire may be designated 1N4001 (it is cheaper).
Now let's look at what is in the second bundle, located under the first:
From the two blue cables shown above, make T-shaped bends and extend the cords to the alarm installation location. And a 1N4001 diode is installed in the gap in the handbrake wire. The cathode of this diode “looks” towards the switch. Finally you will make the connections:
- The “green-yellow” and “green-black” wires from connector X3 are connected to the turn signal leads.
- Another tap coming from the cathode is connected to the “brake input” of the Starline A91 Dialog signaling system. The cord is designated as “orange-purple”.
It was discussed how to connect all the signal wires with your own hands. Queue for the security forces.
The steps listed in this chapter can be completed before installing the alarm. The functionality of standard equipment should not be affected.
Connecting the autostart connector
In VAZ 2114 cars, unlike the “nines”, an ignition switch with three terminals is used: 50, 15 and 30. The latter is connected to the battery, and contact 15 closes with it when the key is turned. Well, the 50th terminal is the “output "to the starter. Similar designations are used not only by VAZ.
As for model 2114, the lock escutcheon is secured with three self-tapping screws, as well as three metric screws. Unscrew them and you will see the following:
According to the basic instructions, power for the signaling can be taken from pin 30 (a T-tap is needed). And the “yellow” power cable coming out of connector X1 is connected to terminal 15. Further, if autostart is needed, then:
- The connections above must withstand significant current (up to 30 A);
- The “red” wire coming from the ignition switch is broken;
- The Starline A91 Dialog module is reached by bends coming from the break point;
- The thin wire from connector X1 should connect to terminal 50, while the power cord in “black and yellow” insulation will become the output to the starter.
Also, as stated in the installation manual, do not forget to cut the gearbox selector loop. The action makes sense if autorun is used.
Those who have an immobilizer activated in their car will have to install a crawler. You can buy a BP-3 unit from Starline to connect it to the “pink” control cord of the alarm:
All those who do not want to break the wire of the standard reader make a crawler with their own hands:
- The additional loop antenna contains 50 turns of PEL-0.3 wire;
- The internal antenna of the unit must contain the same number of turns of any wire;
- Both antennas are combined into a circuit opened by relay contacts.
The instructions cannot be completed here. The method of connecting the tachometer was not considered.
It is clear that the loop antenna will need to be combined with a standard reading device. And all the antennas included with Starline crawlers do not fit well with VAZ immobilizers.
The wire in “black-gray” insulation coming from connector X3 is connected to the high-voltage input of the tachometer (see figure). Your alarm will not burn out as a result, but will be able to control the speed:
All Starline security systems, as it turns out, are well compatible with any VAZ cars. This applies even more so to the A91 Dialog model. By the way, do not forget to connect the “ground” of the main unit (“black” cord of connector X3).
Installing euro handles on a VAZ 2114
Locking mechanisms, handles and other elements of VAZ 2114 cars, to put it mildly, do not have a very attractive design. One such example is standard door handles. Fortunately, on the market for spare parts and auto accessories you can select and purchase Euro handles for the VAZ 2114.
How are they different from the original ones, you ask? There are differences, here are some of them - smooth operation of the product, excellent appearance and more convenient design. In addition, it is worth noting the higher quality of the materials from which the modified handles are made.
As a result, they will last much longer than stock ones.
Varieties
Today, the most popular products on the auto goods market are: - Euro handles Lynx VAZ 2114. Products from this manufacturer are in greatest demand in Russia. Great demand is due to their stylish design, quality of materials used, trouble-free operation and proven durability of use;
— Prosport. They are slightly inferior to the previous brand, but in terms of quality they are significantly ahead of stock products from AvtoVAZ.
Installation of a new larva
To install a new lock cylinder, you will need to follow a few simple steps:
- Unpack the new kit, prepared for replacement, and lubricate the internal moving parts.
- Install a new return spring. Usually it is not included in the standard replacement kit and is purchased separately. When installed correctly, the key should rotate freely back when in the hole.
Installing a new return spring
- Install the pin in the end of the swivel rod.
- Reassemble the door in the reverse order as described in the previous section.
https://youtube.com/watch?v=cFcsEhNbr3Q