Welcome! Want to learn how to properly replace a trunk lid lock? If yes! Then, in this case, we have prepared an article especially for you, after reading which you can easily replace the trunk lock on cars of the Samara family. The duration of replacing the trunk lock will be around 10-15 minutes, but if this is not the first time you are doing this work, then you can do it in 3-5 minutes. The entire progress of the work will be in photographs, making everything very clear to you.
Adjusting the latch and replacing the trunk lock on a VAZ 21099:
Removal:
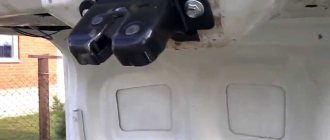
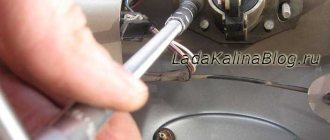
- First, to remove the lock from the trunk lid, use a wrench or an extension with a head cap to unscrew the two nuts that secure the lock to the trunk lid.
- Once the retaining nuts are removed, remove the inner lock from the cover by hand.
- Next, remove the small spring from the same place and check its condition.
Note! If the spring suddenly becomes too compressed or skewed, replace it with a new one!
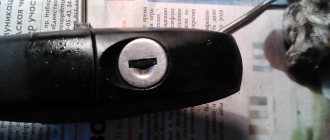
- And then, from the inside of the trunk lid, remove the button with the cylinder and check the condition of the button in the same way.
Note!
Replace the lock button that is not working and also slows down when pressed with a new one!
Installing the lock yourself
First, you need to remove the casing. Then you need to drill two holes to secure the activator. The ground wire is clamped with the activator screw and sealed with sealant. The frame, which is included in the activator kit, bends at approximately an angle of 90 degrees. Although it is better to bend it in such a way that it is easier for the cable to pull out the tongue.
The next step is cutting a steel rod, approximately 4 cm long, which is installed in the activator ring. An adapter is put on its second end, to which the cable is attached. The fastener for the cable sheath can be made from the rest of the frame, which will be clamped with the windshield wiper motor bolt.
Then we lay the wiring inside the trunk door and lead it through the rubber shell into the cabin. In the cabin, you need to bend the edge of the headliner and lay the wire down along the rear pillar, then run it under the carpet and sound insulation. The plastic sheath is then peeled off at the end of the cable and soldered to the frame using a copper washer. Everything is lubricated with sealant.
Next, when installing the trunk lock, the cable is attached to the tongue. It presses well, because the cable is single-core and steel. Next, the shell mount is screwed on. You need to adjust its tension. Connecting the lock according to the standard electrical diagram. You can use the standard activation button. Now all that remains is to check how the trunk opens.
The rear of the eighth and ninth series VAZ cars are designed in such a way that when there is a counter flow of air, they contaminate the rear viewing window of the vehicle. These models drive almost all the time with a dirty rear end. And accordingly, with contamination of the rear part of the vehicle, sand, dirt, moisture and salt solutions get into the trunk lock structure, leading to corrosion on the critical mechanisms of the lock, which often leads to its failure.
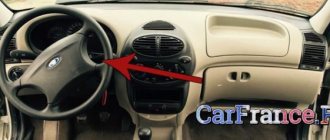
But the opening of the mechanism can be activated using a button that is located at the driver’s hand in the car interior. Thus, you don’t have to worry about dirt in the closing mechanism, and it will create more trouble for intruders who want to check the contents of the trunk. It is possible to improve the “closing-opening” device of the trunk on most Zhiguli models.
Installation:
Note!
The trunk lid lock of the VAZ 21099 car is not dismountable, so do not try to repair it or do anything with it. If the lock is in a defective condition and is faulty, then it must be replaced with a new one!
- First, put the entire system back together. That is, if you previously removed the button with the cylinder and a small spring, then install them in their places in the reverse order of removal.
- Next, take the new lock in your hands and install it in its place, still tightening it with the same fastening nuts.
- After installation, try closing and opening the trunk lid. If, when closing the lid, the trunk lock suddenly does not fit into the hole in the latch, usually in this case a distinct knock is heard in the area of the lock, and the lid closes very poorly, in this case:
First, pick up the extension cord with the union head and use it to remove the two bolts that secure the clamp.
Next, adjust the clamp and then screw these bolts back. Thanks to this operation, achieve clear closing and opening of the trunk lid.
Many owners of VAZ 2108, 2109 and their successors 2113 and 2114, to put it mildly, are not satisfied with the rear door lock. Due to the low quality of these parts and the less than perfect design, there are often cases when it is almost impossible to adjust, much less force it to open using an electric drive. And often castles simply fall apart, almost in the literal sense of these words. Opening the trunk after hitting a bump is generally a classic... If your car does not have such problems and you don’t really believe in this, know that you are very lucky!
But there is an alternative solution to the problem - installing a lock on the Lada Kalina.
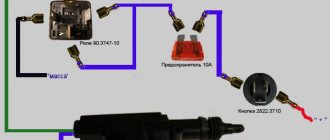
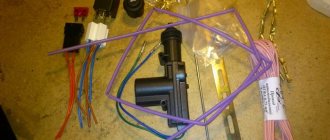
To carry out this modification, you will need the following: - lock from Lada Kalina (part number 1118-5606010-10), - approximately 15 cm of corner 30 x 30 mm, 1-2 mm thick., - M6 x 50-60 bolt (for the mating part ) or a mate to the lock, - two M6x 25-35 bolts + 4 M6 nuts + washers, - a trunk lock motor reducer (in principle, almost any motor will do, it doesn’t require much effort because the lock is not opened by an external drive, but by a spring inside the lock itself) lock) - cable or rod for connecting to the lock + fittings, - everything necessary to connect the electric drive for opening the lock - button, wires, relays, terminals, heat shrink. - dye.
Tools: - electric drill, - grinder, - files and needle files, - hacksaw for metal (in case the grinder is not convenient), - spanners and open-end wrenches for 8 and 10, - vice (it’s hard without them - the parts are too small), - crimp for terminals, - pliers, - lighter (for heat shrinking)
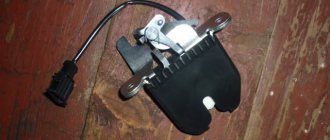
In principle, the point of this modification is to replace the standard Samara trunk lock with a lock more reminiscent of a door lock. At least that's how it is on foreign cars. You can try to build this from “chisel” door locks, but why if there is a Kalina lock, made in the image and likeness of foreign cars? The trunk lock from Kalina is in many ways similar to a door lock - it can be opened with a cable, and the tongue is in plastic, like on the silent locks mentioned higher. Below is a photo of the castle from Kalina without any modifications.
The first thing we will do to modify the lock is to cut off all the protruding metal at the top of the lock. The picture below shows what to cut down. It is also necessary to slightly shorten the “opener” lever, and ideally it is also advisable to make a cut with a needle file for better fixation of the opening mechanism cable. All these modifications are shown in photos 3 and 4. The already modified lock is in photo 5. The block with the wire is a limit switch. Ecgo can be used to turn on the trunk light or alert the driver that the rear door is not closed. In principle, a useful thing. But whether to use it or not is up to you to decide.
The next step is to make a bracket for the new lock.
We have 2 studs on the trunk lid and 2 holes in the lock. But they are located in different planes at an angle of 90 degrees... Therefore, we will attach the lock to the corners of 30 x 30 mm. You can leave the standard lock. It is possible to make the new lock open with a key, but it is not yet entirely clear how. If you wish, you can limit yourself to a cable for emergency opening... Therefore, there are actually 2 options: leave the old lock (or rather, the part with the button) as a plug or even weld a hole on the trunk lid. The first option seems to be the simplest in this situation, so we set about modifying the standard lock. The entire modification consists of sawing off almost its entire working part (tongue and its brackets) parallel to the mounting plane of the lock itself. We will need the mounting ears, so we don’t touch them. The modified trunk lock can be seen in photos 6 and 7.
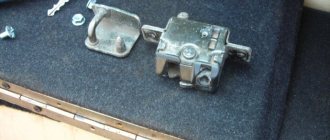
The counter part of the Lada Kalina lock is a U-shaped bracket made of a rod, onto which the lock snaps. Everything is like in foreign cars. It may happen that the “answer” is not available in the store. Then there are also 2 options: wander around foreign car dealerships and pick up something similar or make it yourself.
Let's consider the last option. You can quickly make something like this... We take a piece of the same 30x30 corner and an M6 bolt with a nut. The corner will need to be “bent” a little - this can be done with a sledgehammer. The bolt also needs to be “bent” a little. This is necessary because the platform under the “lock” on the body is tilted, and the lock stands vertically when the trunk lid is closed. The finished “response” is in photo 8.
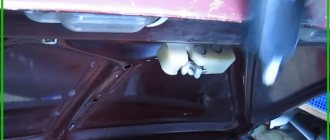
During installation, all this requires fitting from the inside, i.e. from the salon. We drill all the holes with a little more hardware so that adjustment can be made. Photo of the assembled lock and comments on photos 9, 10 and 11
It is advisable to paint the manufactured brackets and the “response” before installation, even with aerosol paint from a spray can. We install a new lock on the car. Between the lock from the Kalina and the corners, it may be necessary to install M6 nuts as adjusting spacers (we screw them onto the bolts that secure the lock to the corners) or several washers, depending on the specific case. This is necessary because the lock may be too low. A lock installed on a VAZ 2108-2109 from a Lada Kalina, inside view in photo 12.
The implementation of an electric drive for opening the lock in this case is the simplest. We simply place the motor on the desired side and connect it to the “opener” lever on the “Kalinovsky” lock. You can connect it with almost anything, the main thing is that it is possible to adjust and the coupling itself is as rigid as possible. In this particular case, everything is connected by a cable, only the lever is not equipped with the cable itself, but with a “chip” with 2 holes. A cable is inserted into one hole, and with the other hole the “chip” is put on the lever. The drive diagram is clearly visible in photo 13.
We will not dwell in detail on the description of the wiring, installation and connection of the button (to prevent the button from melting, we connect it through a power relay) and other points relating to electrics. As a supplement, we recommend reading this and this
What does installing a lock on a Lada Kalina on VAZ 2108, 2109, 2113 and 2114 give: - the trunk lid closes much more quietly - this lock is stronger and more difficult to break into. - if you are passionate about tuning your car, then you can easily weld the hole from the trunk lock button and thereby level the surface - the new lock initially has such a useful thing as a limit switch
Money spent (prices are approximate and in dollars - at least some stability in difficult times): - trunk lock from Lada Kalina - 12-15 dollars - drive motor - 4-5 dollars - wires, terminals, heat shrink, button, etc. for electrics – from 4-5 dollars – cable + accessories (cable locks) – 4-5 dollars
Total: approximately 25-30 dollars + 5-6 hours of time
We are discussing this improvement on our forum
Useful video
You will get additional interesting information on this issue from the video below:
Source
1. Open the trunk lid on a VAZ 2108, VAZ 2109 car and use a screwdriver to remove ten fastening caps for the upholstery.
As are the trunk trim lids.
2. Remove the trunk lid lining.
3. Unscrew the two fastening nuts and remove the lock from the trunk lid. Note that the two "ground" wires are attached under the left nut. Reinstall the loader cover lock in the reverse order before removal. After installation, adjust the lock to lock.
4. If, when closing the back door, the lock does not fall into the latch hole (knocks are heard and the tailgate closes with great force), loosen the two mounting bolts and move the latch in the desired direction. Then tighten the mounting bolts.
5. If the luggage compartment has vertical play in the closed position or closes with great force, adjust the height of the latch. To do this, unscrew the two mounting bolts and remove the lock.
6. If there is a game, remove the adjustment plates or add them if the luggage lock is closed with great force. Install the latch and check that the trunk is easy to close.
Hood adjustment
To adjust the hood cover, it is necessary to adjust the height of the pin in relation to the radiator and fenders (front) of the car. It is the pin with the spring system that holds the hood closed. Cups are often installed on the pin, connected by a spring, and the pin itself is held in place by a locknut on the hood lid. Therefore, to adjust, the bolts holding the hinges should be loosened, the position of the hood lid should be changed so that there are no gaps between the body and the lid, and the hinges should be tightened again.
If there are problems with closing the hood lid, the pin mount itself must be moved so that it coincides with the lock socket, or the lock itself must be moved.
Adjusting the fifth door
The ideal gaps around the perimeter of the fifth door or tailgate are 5/2 millimeters. The location of the latch must be adjusted. The work is carried out similarly with adjustments of other doors. The hinges must be loosened by first marking the location of the lock. After this, the location of the latch is adjusted. The bolts must be tightened to check the correctness of the new position. If the trunk door begins to open well, tighten the bolts securely.
Installation of silent locks
Locks for "nine" doors, as a rule, are distinguished by a specific sound when opening and closing. The problem is in the design of the lock - the completely metal structure, which is also fixed on the outside of the door, makes an unpleasant clanging sound when opening and closing. It is impossible to open or close such a lock silently. The situation can be corrected by installing improved locks, the locking tongue of which is coated with a durable and wear-resistant polymer. By the way, these were the first to be installed en masse on VAZ cars on Lada Priora and Lada Kalina. But owners of “nines” who want comfort in this matter will have to take care of the silent lock themselves.
To work, you will need an impact screwdriver, as well as WD-40 (it is impossible to do this job without penetrating fluid).
After removing the first fastening bolt, it is necessary to install a nail, pin or piece of wire into the resulting hole to hold the lock itself. Otherwise, you risk “losing” it at the door.
After all the bolts are unscrewed, the old lock is removed and a new one is installed. The main thing is to carefully tighten all the bolts. You will also need an impact screwdriver for this. Otherwise, the car is vulnerable.
It is quite possible that after replacing the lock, additional adjustments to the door will be required, but you already know how to do this.
Adjusting the trunk lid
Having talked about how to replace a door with your own hands, let's talk about how to adjust the trunk lid on a VAZ 2114 after installing it.
To do this you will need:
- When closed, outline the approximate location of the symmetrical arrangement of the lock and its lock;
- Release the fasteners, and then fix the lock and its analogue in the new position (do not tighten the fasteners “to the end”. It is enough for the parts of the lock to maintain their position);
- Check the functionality of the trunk. If it opens and closes and unlocks and locks without problems, the locking position should be permanently fixed if difficulty or misalignment occurs. The fastening should be loosened and the position of the lock and lock adjusted, then repeat the test.
READ How to Fix the High Panel of a VAZ 2109
Thus, almost every driver can repair or replace the trunk lid of a VAZ 2114. The most important thing is not to put off this event “for later,” because when the first signs of distortion or difficulty with locking appear, you can do this by simply adjusting the lock, whereas with a break latch, you will have to replace the entire device.
Video: How to Adjust the Trunk Lid of a VAZ 2109
Welcome! Want to know how to properly replace your trunk lock? If so! Then, in this case, we have specially prepared an article for you, after reading which you can easily replace the trunk lock on cars of the Samara family. It will take you about 10-15 minutes to replace the trunk lock, but if this is not the first time you are doing this job, then do it after 3-5 minutes. The entire progress of the work will be in photographs, so it will be very clear to you.
Result:
Adjustment
The door of the VAZ 2109 is hanging
To adjust the doors on the “nine” you need to have only two tools with you:
- A good screwdriver;
- Hammer.
Front doors
On the “nine” the front doors are adjusted as follows:
- The position of the latch changes;
- Before carrying out this procedure, you need to carefully outline the contours of the latch on the stand;
- If the front door of the “nine” closes too tightly, then you need to loosen the bolts of the clamp, move it a little outward, and then tighten the screws thoroughly;
- If the front door closes poorly, then the latch must be pushed inward.
Note. During the operation, care must be taken to ensure that the door does not sink or protrude relative to the body.
- If the door drops below the level when closing, then the latch must be raised;
- If the door rises when closing, but sags in the open position, the latch must be lowered.
Note. To ensure that the adjustment of the latch is not disrupted in the future, it is reasonable to install a gasket under it. It is better that it is not rubber, but waterproof sandpaper. The gasket will help fix the distance of the latch from the post so that the pin of the mechanism does not touch the cover of the external lock.
- If you need to adjust the inner handle of the lock, you should move the bracket under the fastening screws. There are oval holes on the inner panel of the door that will help in this matter;
- If the internal handle does not cope with its duties and the door does not open well, then the bracket bolts are loosened, the handle is moved to the desired position, and the screws are tightened.
How to adjust the front doors
Front left door lock VAZ 2104: 1 - internal lock drive lever; 2 — spring of the locking lever; 3 — external drive lever; 4 — lock switch rod; 5 — rod of the lock lock button; 6 — bracket; 7 — lock button; 8 — external drive rod; 9 — external handle of the lock; 10 — lock switch; 11 — cracker spring; 12 — retainer block; 13 — lock rotor; 14 — external drive rod; 15 — lock retainer body; 16 — lock ratchet; 17 — spring of the central roller; 18 — lock release roller; 19 — central roller; 20 — locking lever; 21 — rod of the internal drive of the lock
On the “nine” body, a special latch is installed in the doorway, which is responsible for the correct closing of the doors and regulation of the gaps when closing them. Changing the position of the latch can greatly affect how the door closes and what gaps there will be. Before starting the adjustment, the door is opened and the lock is loosened. There is no need to unscrew the bolts all the way. It is enough that the latch begins to move freely relative to the body.
Basic faults
The main trunk problems that a VAZ car owner may encounter include:
- Inability to close the trunk. The reason for this is often misalignment of the guides or blocking of the platform;
- Inability to lock trunk. The reason for this, as a rule, is the explosion of the paired part of the lock, made of silumin;
- Appearance of cracks. This can occur either due to misalignment of the fasteners or due to damage to the door frame;
- The appearance of squeaks when opening / closing. Most often occurs due to wear of the seal.
To eliminate them, you need to disassemble the trunk and replace worn parts (and in some cases, for example, general misalignment, simple door adjustment. We will tell you how to adjust the trunk on a VAZ 2114 at the end of the article).
The process of installing a lock on a VAZ 2109
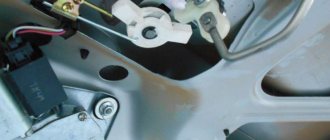
This is where the fun begins - either I’m lucky, or others have had less luck, but it turned out that the lock from Kalina fits perfectly onto the bracket, which is already screwed to the boat under the rear wiper motor. True, I had to bend the petals a little and drill holes (from the trunk side). I found a photo of Kalina's castle and showed the excess parts with a dotted line - cut them off using a grinder or a hacksaw.
I immediately felt the disadvantage of this bracket - the connection is a little flimsy, so the lock can move and, as a result, the trunk of the Nine will not close. To make the connection stronger, you need a major corner. During my search, I came across a plate with perforation. I made a corner out of it and cut a hole for the lock lever (which opens the trunk). In the photo you can see this corner. You install it on the lyada and attach a lock to it. The rigidity is sufficient, so the door will not open while moving.
1 Troubleshooting the trunk lock of the “nine”
It just so happens that low-quality locks accompany almost all representatives of the VAZ model range. At the same time, a clear pattern emerges: the newer the Lada model, the easier it is to replace the lock in its trunk and hood. Thus, installing locks on a Lada Grant does not require any special skills and takes a maximum of 20 minutes of time. The same cannot be said about the work of replacing locks in the trunk and hood of a VAZ-2109. “Nine” blockers are more complex designs, which is why you will have to tinker with them a little.
But, as they say, let's start in order. The first thing that VAZ-2109 owners should know about is the constant need to adjust the trunk lock latch. There are many cases where the owner took the car to a car repair shop with an urgent need to replace the lid lock. Then it turned out that the lock was working, just its lock had moved a little. Therefore, in order not to repeat the fate of those poor fellows, we will study the algorithm for self-adjusting the latch.
Repairing the trunk lock of a “nine” involves removing the trim. To do this, use a screwdriver to pry up the 10 fastening pins and remove them. We remove the casing and start working with the blocker. First, using a socket wrench or wrench, unscrew the 2 nuts securing the lock on the trunk lid. This must be done extremely carefully, since immediately behind the fasteners there are 2 “negative” terminals. We also disconnect them, after which we pull the lock out of the hole in the trunk lid.
Next we work directly with the fixative. To dismantle it, remove 2 mounting bolts. After this, we determine the optimal position of the part and screw the clamp into place. If the problem lies not in the latch, but in the lock itself, then we continue to work further.
Remove the adjusting washers and pull out the entire lock. Next, we install a new blocker. To do this, we place it in place of the broken part and tighten the fastening nuts. We assemble all other parts in reverse order. At the final stage of replacing the lock, we fasten the trunk lid trim.
Change your hat
To remove the trunk you will need:
- Winch;
- Socket head set;
- Slotted screwdriver;
- Set of wrenches.
Replacement procedure
The replacement of the VAZ 2114 trunk itself is carried out in the following order:
- Open the trunk and secure it to the desired size.
- Remove where the top hinge of the gas-filled flat head screwdriver attaches, push it into the trunk and disconnect.
After removing the trunk, you should carefully inspect the condition of its hinges. If they or their fastenings are misaligned or cracked, replace them.
Produced as follows:
- Remove the gaskets from both injectors.
Reassembly and installation of the rear door is carried out in the same order as during disassembly, but in reverse order.
Rear door adjustment
The rear door is adjusted in the same way. The bolts on which the hinges are attached can and should be loosened, then adjust the position of the door and tighten them properly. As in the previous case, it is much more convenient to do this if you have previously transferred the outline of the original position of the loops to the stand.
The slightly open door must retain its resistance to mechanical stress. This can be easily checked by pressing on the door with a gradual increase in load and then gradually decreasing it. If the door has retained its position, it means that the fastenings themselves are still reliable.