Trunk lock device
The trunk lock of the VAZ 2107 consists of the following parts:
- rotor axis;
- case cover;
- drive extension;
- lever arm;
- spring;
- rotor;
- frame;
- retainer;
- retainer plate.
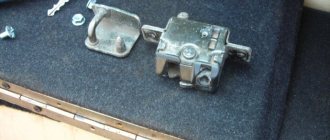
A retainer with a plate is installed on the car body, with which the rotor and lock body engage. If any of the parts is damaged, it must be replaced. If it simply does not work well, but there is no visible damage, you must first try to lubricate the device and adjust the position of the lock relative to the latch on the body. If these operations do not help, the part should be replaced with a new one.
Adviсe
- When adjusting clearances, never loosen all bolts at the same time. You must leave at least one bolt tightened. Otherwise, the body panel will dangle in the opening and will slide off when you want to tighten it, holding it in the desired position. Always try to gradually move the panel into the desired position by loosening one bolt or the other.
- You can use a simple technique. It consists of tightening the fastening bolts so that they can hold the body panel, but at the same time allow it to be moved into the desired position in place with little effort. You need to experiment and understand with what force you need to tighten the bolts.
- When installing the doors, hood and trunk lid, you can temporarily remove the lock hinge from the opening. This will allow the doors and hood to open and close freely. Having aligned the desired panel according to the gaps, you can screw the lock loop back into the opening and adjust its location.
- It is possible to place washers under the hinges to change the position of the panel by the required few millimeters. In this case, it is advisable not to overdo it with the thickness and number of washers, so that this is not noticeable and is not an additional sign of the car being repaired. There are even special shims for such purposes that can be inserted under the mounting bolts without removing them.
- Sometimes, when all parameters for the location of a body panel are adjusted as much as possible and the gaps are even, but the panel is not at the same level as adjacent panels. This often happens with edges that protrude slightly. In this case, you can press this edge, having previously made a safe stop for this panel, so as not to damage anything.
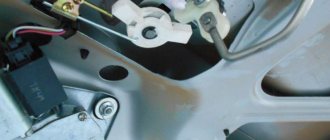
How to remove the trunk lock
As soon as a problem occurs in the trunk lock, it is necessary to immediately repair it. To do this, you will need to remove the lid opening mechanism. This is done in order to repair or replace the trunk lock. The procedure for removing the trunk lock is as follows:
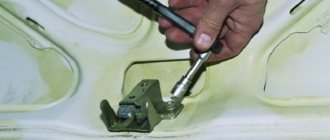
- Initially, it is necessary to outline the outline of the mechanism, thereby indicating the position of the device on the cover. This is done so that the lock does not need to be adjusted again.
- Using a key set to “10”, you need to unscrew the 2 nuts that secure the lock to the trunk.
- Now you can dismantle the device from the car, and then, pushing the cylinder inside the cover, remove the core.
- The core or cylinder is dismantled together with the spacer bushing.
Particular attention should be paid to the rubber seal, which must be replaced if worn or if there are signs of deformation.
The process is not at all difficult, and it takes no more than 15 minutes to complete. The new cylinder with the mechanism is installed in place in the reverse order of removal. You need to install a pre-lubricated lock on the trunk of a VAZ 2107, but we will learn about this in more detail later.
Luxury or necessity
The automatic trunk opening feature is found in many new cars. Drivers like this feature, because you quickly get used to good things. To open the luggage compartment in a car, just press a button in the cabin. The lock comes into operation as a result of the operation of the electric drive.
This feature may seem like a small thing and an insignificant addition until the cold weather arrives. In cold weather, the lock on the trunk often freezes, making opening the compartment a difficult task. You have to spend time defrosting the mechanism. In the case of an electric drive, such problems will not arise. Also, such a mechanism makes car hacking more difficult, which is also an important advantage.
Mostly imported cars are equipped with this function, and not all of them. Domestic manufacturers have only recently begun to equip their models with such functionality. Every car owner can equip his car with an electric drive for the trunk. This will not be difficult to do, but you will still have to tinker.
Adjusting the trunk lock
Often, owners of sevens encounter difficulties when opening the trunk lid. Moreover, they are directly related to the fact that the mechanism jams due to a violation of the location on the lid. The setup process is quite simple:
- Loosen the fastening nuts.
- Move the device higher or lower depending on the reason why the trunk cannot be opened.
- Secure the nut by hand and then tighten it with a wrench.
As a result, it is necessary to check the quality of the device. If there is a gap (between the lid and the trunk walls), jamming, or the device jams when opening, you still need to adjust it. As soon as the mechanism is working properly, you need to mark the position of the lock with a pencil, which will allow you to install it in place the first time next time.
Kit selection
Installation will not be possible if you do not have at your disposal a set of equipment necessary for installation. Buying it is not difficult, but you need to think about which specific option is best for you.
In total, 2 solutions to the current situation are being considered. Namely.
Safety kit
Category: Light trailers
- Factory set. Purchased from trusted and reputable manufacturers. The kit contains almost everything you need, so you don’t have to assemble different elements. But the price is naturally higher;
- Amateur kit. Here we are talking about independently preparing all the necessary components. The motorist is faced with the question of where exactly to get them and how to choose a set so that everything fits. It is difficult to do this without relevant experience and certain knowledge. But you can save a lot of money financially.
I don’t know what exactly you will choose, but I want to give one piece of advice. Buy an electric drive equipped with an inertia mechanism. This will allow you to turn off the drive when an obstacle appears in the path of the luggage compartment lid. Roughly speaking, the drive will not pinch your hand or head when you poke around in the trunk.
So the inertial mechanism is a very useful thing.
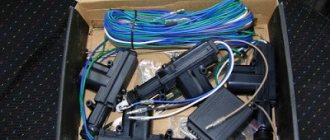
If we talk about assembling a homemade kit, then it is important to collect several basic elements. These include:
- power window module 2 pieces;
- 2 mechanisms for lifting glass;
- wires;
- diodes;
- electromagnetic relay;
- five-pin relays;
- four-pin relays;
- Relay connection block;
- springs for the lid lock;
- power tools;
- wiring;
- nuts, bolts;
- Bulgarian, etc.
As you can see, the set is quite impressive. Therefore, consider whether it is worth trying to assemble the kit yourself. Sometimes it is much easier and even more economical to purchase a ready-made factory kit with a guarantee and all the associated benefits. Price does not always play a key role.
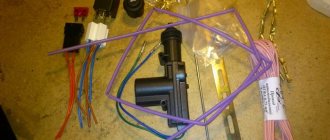
Installation of the activator
Initially, it is necessary to install an activator, which is an electric drive that works to retract or repel, depending on the connection. The first step is to remove the lock and install the activator rod. To remove the lock, you will need to unscrew two nuts.
Read, it may come in handy: Tail lights connection diagram, malfunctions, replacement and repair, instructions with video and photos
After this, you need to drill a hole in the side of the lock to insert the rod and connect it to the lock tongue. The rod will need to be bent (secured), it should look something like the one shown in the photo below.
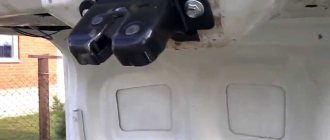
After fixing the rod to the lock, the latter can be installed in place. It is advisable to remember the tilt level of the lock and install it as well, so that you do not have to adjust it during installation. Now you can attach the activator to the trunk. To do this, you will need 2 self-tapping screws and a special plate, which comes with the product. After this, you can manually try to see if the lock will work when opening. When the activator is installed on your VAZ 2107 car, you can proceed to the next stage - connection.
Common instrument panel faults
The instrument cluster on the VAZ 21099 or 2109 is a fairly reliable unit. However, even this can fail over time.
The main malfunctions characteristic of the VAZ instrument panel:
- The lights on the instrument panel of the VAZ 2109 stopped lighting. If only a few light bulbs refuse to work, then most likely the reason lies in their burnout. If the instrument panel lighting stops working completely, then most likely the problem is a poor power supply. As practice shows, power problems are usually caused by either damaged wiring or oxidation of contacts at connections and connectors. If this is the case and the backlight does not light up due to oxidation, then you can get rid of this problem by cleaning the contacts or replacing them. If the problem lies in the lighting sources, then replacing the lamps will solve it.
- Another problem, oxidation on the circuit board, is common in older vehicles or vehicles that have moisture. Due to oxidation of the board, the backlight and some instruments may not work, in particular, fuel level and coolant temperature controllers, tachometer, etc. If the needles do not rise on the tachometer, speedometer, fuel consumption sensor and generator voltage, or they work chaotically, then you need to carry out a full check of the dashboard.
- VAZ 2109 cars are characterized by the problem of a non-working speedometer. As a rule, it appears as a result of wear of the cable connected to the box, or due to repairs to the device and its incorrect connection. If the cable is worn out, then you just need to replace it, there is nothing complicated about it. The main thing is to connect the cable correctly so that its tip fits exactly into the groove on the tidy speedometer.
- Damage to the board itself. Such a malfunction occurs quite rarely, but, nevertheless, it should not be forgotten. If the structural board fails, the shield will have to be repaired, but if this does not help, then it will need to be replaced.
Read more: Replacing engine mounts Golf 3
Connecting the product
Before carrying out connection work, be sure to disconnect the negative terminal from the battery. To begin with, we present the diagram according to which the product will function.
The electric lock will be supplied with 12V power directly from the battery, although you can also use a wire from the cigarette lighter. First, connect the wire to the “+” terminal of the battery.
The battery supplies power to the relay, which can be located both in the cabin and in the engine compartment, which will be much more rational. From terminal “86” the wire is fed to the trunk opening button, which can be located in any convenient place on the dashboard. To install the button that will open the trunk lid, you will need to drill a hole of the appropriate diameter in the dashboard.
The wire from the relay terminal “30” is laid through the cabin to the activator. Its length must be at least 5 meters. The wire can be laid together with the standard wiring. This wire must be connected to the green wire of the activator using female-male connectors. The blue wire must be short-circuited to vehicle ground. Now you can check how the electric trunk lock of the VAZ 2107 functions. It is enough to spend 2-3 hours so that the trunk will eventually open using the VAZ 2107 button. After completing the work, do not forget to connect the negative terminal to the battery.
What do you need for work?
A similar connection diagram for the trunk button attracts many.
To realize your idea, you need to prepare materials and tools.
The set consists of:
- electric drive (activator) of the luggage compartment lock;
- universal 4-pin relay;
- fuse blocks;
- fuse;
- wires;
- female type terminals;
- trunk opening buttons;
- heat shrink tube;
- electrical tape;
- plastic clamps.
The block is placed for safety reasons. Mounted on the positive wire. The fuse can be taken as standard, 10 Ampere. Do not need anymore.
Determine the length of the wiring individually. But practice shows that 5-6 meters is enough with a margin.
At any car market it will not be difficult to buy the entire set. It will cost 600-800 rubles. Maximum 1000 rubles.
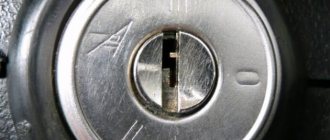
How to open the trunk of a VAZ classic without a key
How the trunk lock on the VAZ 2107 works and what it is is already known. It remains to figure out the question of how to open the trunk of a VAZ 2107 without a key, since you often have to deal with the need to dismantle the device.
If the rear compartment lid slams shut, you will need to use a spare set of keys to access the compartment. If you cannot find the keys, then there is an option to contact specialists who will help you open the device within 5 minutes. However, for these five minutes you will need to pay a lot of money, and besides this, you still need to find a good specialist.
If the key is left in the luggage compartment, you can get to it from the passenger compartment. To do this you need to do the following:
- From the interior, disassemble the back of the rear seat, for which you just need to dismantle the back.
- Remove the fiberboard stand to create a gap through which you can get to the keys in the compartment.
- To do this, you need to use a hook made of steel wire of the appropriate length to reach the key, hook it and remove it.
This is the easiest and most painless way to open the lid without deforming the car.
If the key is lost, then there is no point in getting into the luggage compartment. To do this, it is recommended to take a powerful flat screwdriver (one with a blade instead of a key in the cylinder), insert it into the cylinder (maybe hammer it in there a little) and forcefully turn it towards opening the lock. But this option should be used as a last resort, since the larva will then be unsuitable for use.
Read, it may come in handy: VAZ 2107 bumpers can be easily removed and installed
There are also such ways to open the trunk lid:
- Tap your fist on the location of the license plate. This barbaric method helps in 30% of cases. It all depends on the force of the impact, so if you are tired of trying to open the trunk lid, then use this method.
- Use an awl or knife to pierce the rubber seal. Try to reach the lock tongue through the rubber seal, and by sliding it to the side, open the trunk lid.
- Try using any other key (from another car, house, garage) that is suitable in size. There are times when this works.
Which option is better depends on the situation. In any case, coping with such a problem will not be difficult. To make sure you don’t have to try to open the trunk on the seven, you should regularly monitor the quality of the mechanism, apply lubricant and change the cylinder.
Subtleties of choice
When choosing a trunk, carefully study the types and information about the load capacity. If the trailer has a spring suspension of any design, which facilitates maneuvers over bumps and holes, then in the case of a roof rack on a car, with a shock-absorbing suspension of the car, it is separated by that very roof. It does not have pronounced properties to level out vibrations and take on the vector impacts of the load mass. But a body with inter-window pillars is a damper between the road and an additional high center of gravity. Therefore, they attach the trunk as low as possible to the roof, even one centimeter is important.
Trunk design
The golden rule: if the car has a pair of roof rails, then the corresponding cross members are selected. The dimensions must correspond to the distance between the rails
This is critical for even distribution where most of the weight is on key fasteners
If there are no elements, a set of fasteners is used to establish a connection between the trunk and the top of the car. The components of a basic trunk are few:
- Longitudinal arcs.
- Cross bars.
Support struts, which consist of:
- Brackets.
- Corners.
- Plastic platforms.
- Bolts, nuts and washers.
In practice, car racks come in different forms. The material used and the mechanical properties of the fasteners, together with the performance of the vehicle’s roof, determine the design and future purpose of the device.
Easy luggage rack selection
When purchasing a roof rack for your car, you should check:
- Vehicle make.
- Roof and body type.
- Year of manufacture of the car.
These parameters will help you avoid mistakes when purchasing. Subtleties follow
It is important to know what the roof rack supports and roof mounting rods are made of. They are made of steel and aluminum
When using the trunk for a short period of time, they stop with steel fasteners. With prolonged use, they become unusable and worsen their aerodynamic properties.
Advantages of aluminum racks:
- Anti-corrosion coating. With it, the service life increases significantly, therefore, the car owner saves money.
- Improved aerodynamics. The lower the air resistance, the more fuel the car saves.
- The aluminum basket is lighter. Installation and dismantling occurs quickly.
- An important parameter is the size of the structure. It is better to use a car trunk with adjustments.
Trunk mounting methods
Let's look at ways to attach a car rack to the roof:
- Full-time. When purchasing a car, the luggage rack fasteners are already included. And the mounting holes are hidden behind the door seal. This option is convenient and allows you not to waste energy searching for the necessary equipment. To ensure that the racks hold tightly, the set uses special bolts.
- Universal. Also called door. Installed using universal fasteners, fixed in the area of the body's counter-relief, which follows the bend of the door. This option is expensive to install and takes time. Only a specialist can select the exact model of a universal trunk.
- Use of roof rails. A large number of vehicles have roof rails. These are devices that run parallel along the roof on both sides, made of plastic or metal. With their help, even installing a car rack yourself is much easier. Sometimes roof rails are equipped with mounting points to facilitate the installation process.
Important points
Even after the above information, the economical driver will say: “So what? A special trunk is expensive, the box is small, and an expeditionary one is certainly not needed. I will assemble from different sets.” Today there are all luggage racks with all the components, but if such a car owner manages to assemble the suitable parts separately, after the fifth time, he will pass on his experience to his colleagues in the garage:
- Crossbars and roof rails are selected by measuring the roof.
- Simple supports are made of cheap plastic. Therefore, they are susceptible to destruction, since they cannot tolerate both heat and cold.
- It is more practical to use stands made of aluminum, steel or ABS plastic. They will last much longer without losing their properties.
- The larger the volume of the trunk, the more things it can hold.
It’s convenient to have a large trunk and not think about how much space is left in it, but:
- You will have to pay extra for the volume.
- Increased fuel consumption.
- The design will have deteriorated aerodynamic properties.
Any model has a permissible load. When purchased, an incorrectly selected car rack will lead to deterioration in vehicle control and rapid wear of the structure. The roof of the car also has a permissible load capacity.
Optimizing space in the seven
It is not at all necessary to have an apiary for twelve hives or a serious homestead, so that sometimes you need to transport a fairly large load or a lot of small items. Situations are different, and especially when going on a trip in a VAZ 2107, not everyone wants to burden themselves with a trailer. This is why there are additional luggage racks.
But first, let’s deal with the standard, ordinary trunk of the seven. It is far from the ideal of rational distribution of space, in fact, as in all classic Zhiguli cars. The side members, wheel arches, niches, gas tank and rear suspension cups form a kind of labyrinth for dumping all sorts of rubbish. Only the size of the trunk of a VAZ 2107 is quite difficult to measure with a tape measure. It turns out to be an intricate figure, however, there are heroes who did it. The photo shows the dimensions and geometry of the trunk.
Drawings and dimensions of the false floor in the trunk of a VAZ 2107
Based on its geometry, the niche between the side members begs for a kind of organizer for tools, spare parts and small items, which you can easily assemble with your own hands from chipboard or pressed plywood. The cover of this organizer will be a false floor. The result is two independent compartments - one for hardware, the second for luggage.
The design is quite simple to assemble. For assembly, you will need to cut five blanks (or more, depending on the desired number of niches under the raised floor):
- 580x115 mm - three pieces, two of them will lie along the side members, and one will be a partition in the center;
- 780x115 mm - will fit between the rear bumper mounting pipes;
- 840x115 mm - the farthest side, between the thrust cups of the springs.
The structure is screwed together using furniture screws; the false floor itself, the size of the cover of the first tier, will be the same as the dimensions and contours of the perimeter of the resulting niche.
It is better to screw the hinges to it not in place, but by fixing the lid with several screws and removing the entire structure from the trunk, in a convenient place, on a workbench, for example. After this, you can sheathe the resulting organizer with any material - from leatherette to carpet. As a result, the trunk is always tidy, the floor is level and clean.
Sources:
- https://semerkavaz.ru/raznoe/zamena-zamka-bagazhnika-vaz-2107/
- https://7vaz.ru/remont/zamena-zamka-bagazhnika.html
- https://provaz07.ru/salon-i-kuzov/zamok-bagazhnika-vaz-2107.html
- https://provaz07.ru/tyuning/bagazhnik-s-knopki-vaz-2107.html
- https://provaz07.ru/salon-i-kuzov/kak-otkryt-bagazhnik-vaz-2107-bez-klyucha.html
- https://ladamaster.com/razmer-bagazhnika-vaz-2107