Did you feel vibration when braking? One of the reasons may be uneven wear of the brake discs, which are best replaced in pairs. Discs are also changed when their thickness becomes less than 17.8 mm. Replacing brake discs on all modern Lada cars (XRAY, Vesta, Largus, Granta, Kalina, Priora and Niva 4x4) is performed in the same way without significant differences.
Required:
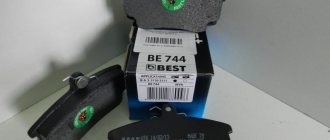
- new brake discs (Granta, Priora, Kalina): catalog number: 2110-3501070 (13 inches) and 2112-3501070 (14 inches)
- new brake discs (XRAY, Vesta, Largus): 7701206339 (without ABS) and 7701207795 (with ABS).
- set of tools.
Raise the car on a jack and remove the wheel. Unscrew the brake fluid reservoir cap and spread the brake pads, checking the brake fluid level (pump out if necessary). Then:
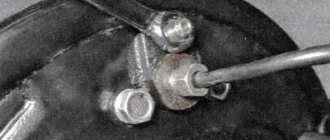
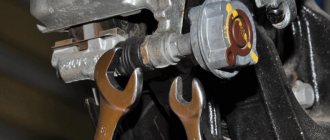
- remove the brake hose (No. 4) from the strut bracket (No. 5).
- Unscrew the 2 bolts (No. 2) securing the caliper.
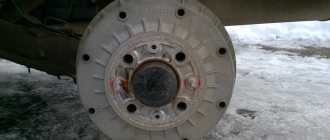
Hang the front brake by the suspension spring, preventing the brake hoses from twisting. To remove the brake disc, you will need to unscrew the 2 mounting bolts on the wheel hub, holding the brake disc with your hand from turning. If the brake disc cannot be removed, tap the disc with a hammer on the contact plane of the wheel (hitting the working surface (No. 1) of the disc with a hammer is unacceptable).
Installation of the brake disc is carried out in the reverse order, after first cleaning the adjacent surfaces from dirt. After installation, you must press the brake pedal 2-3 times and check the brake fluid level. The whole process is also shown in the video:
Let us remind you that to prevent squeaking brakes, it is important to choose the right brake pads.
It is important to monitor the condition of the brake discs on the Lada Priora. The front ones are installed in all trim levels. At the same time, the rear ones are usually installed by the owners themselves. It is important to replace in a timely manner. If the disk is worn down by at least 2-3 mm, it is necessary to install new parts. The thickness should be checked using a caliper.
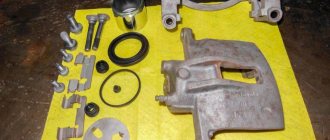
How to remove the Priora caliper
You will need : remove the front wheels and prepare a 17mm spanner.
Procedure :
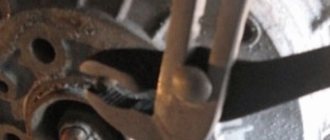
- Unscrew the two bolts securing the shoe guide to the steering knuckle using a 17mm wrench.
- Remove the pad guide from the disc along with the bracket and pads.
- Make sure that the brake hose is not stretched; to do this, tie the caliper to the suspension spring.
If you have to unscrew the working cylinder from the tip of the brake hose, then you should close the hole in the hose in any way so that the brake fluid does not leak out.
Installing the Priora caliper is done in the reverse order. Check that the brake hose is not kinked. After installation, do not forget to check the brake fluid level in the reservoir and remove air from the brake system.
Replacing the front brake discs of Priora
You will need : remove the caliper and prepare a ring wrench “7”.
Procedure:
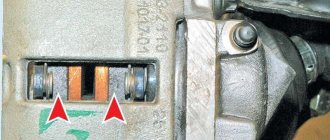
- Unscrew the two guide pins using a 7mm wrench.
- Remove the Priora brake disc with your own hands. If this cannot be done, then you should knock it down with a hammer.
Installation of brake discs is carried out in the reverse order.
The mating surfaces of the hub and disk should be cleaned of rust and scale. If a small particle of dirt gets between them, then it will cause the disc to run out and vibrate when braking. In order for the Priora brakes to work properly, when replacing brake discs, be sure to replace the brake pads with a new set.
Perforated
These elements have a more complex structure. The design combines two thin metal disks 5 millimeters thick. Between them there are so-called channels through which air flows. Thanks to such ventilation, the operating temperature of the disk is reduced by one and a half to two times. And as we know, when braking, a friction force arises, which is converted into thermal energy. Disks require high-quality heat dissipation.
If it is not there, the metal will overheat. As a result, we get literally crooked disks, and possibly cracked ones. The braking distance is also reduced. Compared to non-ventilated analogues, it is 15 percent lower. In addition, the service life of the brake pads increases, since the friction material no longer operates under critical temperature loads.
Which brake discs are best for Priora?
The front brake discs on Priora have catalog number 21120-3501070. They are also used on VAZ cars of the tenth family (see the best brake discs).
According to reviews, good brake discs are standard ones. If you want to buy alternative brake discs, then pay attention to Brembo discs.
Source xn—-8sbabr6ahc3e.xn--p1ai
Sooner or later, any part of the car wears out during its operation, first ceasing to efficiently perform its basic technical functions, and then completely requiring a complete replacement. In many cases, this process is also accelerated by our domestic roads, most of which, unfortunately, are in rather poor condition.
One of the most famous (in the negative sense of the word) parts of the Priora car in our country, which require frequent replacement, are its brake discs. Many auto mechanics cite dirt and dust on the roads as the main factor contributing to the frequent occurrence of this type of breakdown.
The fact is that dust, getting into the space around the parts and accumulating between the pads and the disc, interferes with the normal operation of the entire braking system of the car, which significantly accelerates the wear of its components. Therefore, replacing Priora brake discs is a fairly popular service in all car service centers in the country.
Do you know how to change the brake discs of your “iron horse” yourself, without using the services of auto mechanics and thus saving money? This is done according to fairly simple instructions, which you can read right now below.
Original and fake
Now there are a huge number of fakes on the market, which are sold under the famous brands Zimmerman, ATE, Bosch and Brembo. It is quite easy to distinguish an original from a copy. First of all, this is the thickness of the disk. If it is less than one centimeter, most likely you have a copy in your hands. Reviews from motorists recommend paying attention to the junction of the two parts of the disk. The internal grooves should connect smoothly to the work surface.
If there is a strict 90 degree angle, such discs will simply crack. Well, the last factor is the price. It is two to three times lower than the original. Compare the cost of the same model at different retail outlets. If it is significantly different, and the disc has different weights, one of the stores is selling a fake.
Instructions for quickly and easily replacing Priora brake discs:
- We get rid of the support. Immediately before replacing the main elements of the car’s brake system, it is necessary to remove the caliper. The tools required for this action are a 17-size wrench.
Remove the two front wheels of the car and unscrew the shoe guide bolts that secure them using the above tool. Carefully remove the pads and their guide along with the bracket from the discs. Carry out the process so that the brake hose is not stretched or twisted, otherwise it may be damaged, and you risk losing brake fluid in this situation.
Tie the caliper securely to the suspension spring. You need to put it back in place at the end of the job exactly the opposite.
We replace disks. To complete our main task, we need the “7” key. Using this tool, unscrew the two guide pins, allowing you to easily remove both brake rotors from your car. Installing new disks in place follows the same procedure, only in reverse order.
An important point: if you want to install old drives for further use, then you should definitely make sure that they are suitable for this. In addition, you will have to try hard to clean them of scale, dirt and rust. Therefore, it is best, for your own safety, to purchase new car parts and install them.
Source avtodoc24.ru
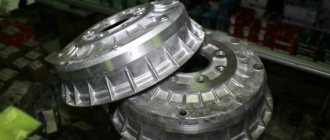
Brake discs on the Lada Priora were installed only in size R14 and ventilated. For them, the minimum thickness is 17.8 mm. If, when measuring with a caliper or other device, it turns out that the thickness is less than acceptable, the disks must be replaced, on both sides.
To perform this repair you will need the following tools:
- head for 17 mm and 7 mm
- ratchet and crank
- hammer
- copper grease
- calipers
Instructions for replacing brake discs on a Priora
So, the first step is to jack up the front of the car, and then remove the front wheel brake caliper.
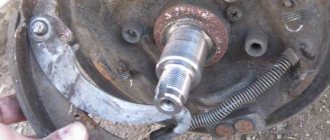
After that, using a 7 mm socket and a wrench, unscrew the guide pins of the brake disc, as is clearly shown in the photo below.
To minimize the risk of breaking the studs, tap them with a hammer first without using excessive force. And only then unscrew it. Then you can tap the area where it contacts the hub with a hammer.
Now you can try to remove it with your hands, or with the help of special devices. If you can’t remove it by hand, and you don’t have a puller at hand, you can carefully knock it off from the back with a hammer, of course, using a special wooden spacer.
We finally remove the Priora brake disc from the front wheel hub, which is clearly demonstrated in the photo below.
Before installing new discs on the Priora, it is necessary to clean the surface of the hub with a metal brush if there is rust or other formations on it. It is also worth applying copper grease to the contact area between the hub and the inside of the disk.
This procedure will reduce the occurrence of vibration and extraneous sound when braking, as well as reduce the temperature effects on the elements of the braking system. Replacement is carried out on both sides simultaneously. To ensure that the surface of the disc remains smooth and free of defects, it is necessary to use only high-quality pads, and it is advisable to replace them at the same time!
The price of a new brake disc on a Priora is from 900 rubles per piece. Of course, there are more expensive options, even up to 1500 per unit, but factory components for around 1000 rubles per unit are also quite good.
Source priora-remont.ru
About braking efficiency
When the pads come into contact with the disc, gases are formed (boundary layer), which prevent good adhesion of the friction material to the working surface. Thanks to the presence of grooves, they are easily removed. In the case of non-ventilated discs, these gases continue to slide across the metal, preventing the pads from working properly. As a result, the braking distance increases. As we have already said, preformation allows you to reduce its length by 15 percent. 100% adhesion is ensured between the metal of the disc and the working surface of the pad. In some cases, in addition to holes, grooves are used. They have a depth of about two millimeters and are directed towards the rotation of the disk. The grooves clean the working surface well of accumulated dirt, sand and other deposits that have formed there when the car was driven. In the absence of perforation, this dust settles deeply on the surface of the disc. This causes a squeaking sound when braking. The driver cannot understand the cause of the malfunction, especially if the pads have recently been replaced.