The safety of the driver and passengers of the vehicle directly depends on the performance of the braking system. After a certain mileage, its components wear out, one of which is the caliper. Nevertheless, it is quite possible to repair the brake caliper, although most often it fails due to the process of souring of the guides or pistons.
Why is this dangerous in practice? If this unit malfunctions, the brake pads begin to wear unevenly. The same goes for brake disc wear. As for the pads, increased wear may be observed, for example, on the outside compared to the inside. Uneven wear indicates that the pistons are putting too much pressure on only one of the pads, while the other does not take part in the process. Urgent repair or replacement of the caliper is required, without waiting for it to completely jam.
About the reasons for caliper failure
This brake system component can break down due to improper maintenance or due to insufficient quality. The main reasons why caliper repair may be required are as follows:
- improper operation, which is associated with filling the guides with poor-quality lubricant - because of this, the boot swells and later “sours”;
- in the future, repair of the brake calipers may be necessary due to moisture getting on the guide, which leads to a breakthrough of the boot;
- Another reason is the piston itself, the body of which is also vulnerable to moisture getting inside;
- low-quality working fluid (brake) can corrode the piston from the inside if the concentration of water in it exceeds the norm.
Video tip for DIY caliper repair:
How to change the front brake cylinder
Judging by user requests, Kalina owners practically do not experience any breakdowns related to the front brake wheel cylinder. It is safe to say that the unit installed at the factory is quite reliable and must be replaced in exceptional cases. It is for such cases that I decided to write this article.
First, as usual, below is a list of the necessary tools:
- Jack
- Balloon key
- Head 13, TORX E14 with wrench
- Open-end wrench for 15 and 17
- Flat blade screwdriver
Repair of caliper guides
They are not difficult to detect - these are special bolts that are attached to the ears of the case. They need to be changed as soon as pockets of corrosion become noticeable. The repair process will look like this: unscrew the old guide and insert a new one in its place.
The main thing is not to forget about high-quality lubrication, and also check the condition and tightness of the anthers - there should be no cracks or tears on them.
Do-it-yourself caliper repair - preliminary inspection
The return movement of the piston in this unit is ensured by a cuff. Firstly, it creates a tightness, and, secondly, it acts as a kind of spring. When the piston moves, it undergoes a slight deformation, but then returns to its previous state, slightly pressing it into the body. Determining the malfunction is quite simple - if you hang the wheel, it should rotate freely as soon as you press or release the brake pedal. There should be no signs of overheating on the discs themselves, otherwise you will need to repair the caliper yourself.
When conducting a visual inspection, we must make sure that there is no noticeable difference in the thickness of the outer and inner pads. The piston should move so that when pressed it easily sinks into its body. Its surface should not have noticeable traces of dirt or corrosion particles. You also need to conduct a superficial inspection of the boot and ensure its integrity.
DIY caliper development procedure
Let's move on to a description of the repair itself. The algorithm will be something like this:
- First you need to lift the car using a jack and unscrew the wheel, locking the steering wheel in the extreme position.
- The mounting spring is removed, and the surface near the brake hose is thoroughly cleaned. To do this, you can blow it with compressed air.
- The brake hose must be clamped with a clamp to prevent leakage of working fluid.
- We continue to repair the caliper ourselves. After this, unscrew the bolt that secures it and remove the hose itself to the side. It is necessary to ensure that dirt particles do not penetrate inside it.
- After this, the caps on the guides are removed, and they themselves are unscrewed using a 7 mm hexagon.
- Using a screwdriver, we recess the piston, moving its body away from the disk to a sufficient distance. You can begin dismantling the old caliper.
- First, take it out of the case and check for moisture. We take the piston out of the housing. To do this, you can remove it from the disk without disconnecting the caliper from the hose. Just press the brake pedal and it should fall out on its own. How to clamp a brake hose? Any tight clamp will do, you can even use the one that is used to secure caps to wheel rims at a tire shop. You can use a vice in which to firmly clamp the body, and remove the piston itself with pliers. Or use compressed air, making sure that the part is not damaged during removal.
- We take out the old cuff, first removing the remaining working fluid. We thoroughly clean the surface in which the protective cover was located and the cuff seats. We rinse and blow with air, after which you can install a new cuff.
- When repairing the front caliper, lightly water the working surfaces of the piston with brake fluid. The piston itself is laid strictly vertically and slightly recessed. We put a protective cover on top. In this case, you need to make sure that the rubber band does not jam.
- Now the piston can be recessed completely, but you need to be careful to prevent the boot from twisting.
- We unscrew the brackets that are equipped with the caliper. We clean the surfaces on which the pads move. Care must be taken not to damage the threads in which the guides are attached. The bracket is screwed into its original place.
- We lay the block, making sure that it has taken its position and is not stuck anywhere. The guides must be cleaned of the slightest particles of dirt. The caliper is put on the bracket, and its guides are tightened with your fingers. We put on the caps and fix the springs. Don't forget to put grease under the brake pistons boot and remove any excess grease from around it.
- All that remains is to put the hydraulic fluid hose back in place and bleed the entire system with a few presses of the brake pedal. We lower the car to the ground using a jack and check the level of working fluid in the tank - refill if necessary. This completes the caliper rebuild.
The design of this brake element
There are two types of disc calipers - front and rear, their design and repair method are slightly different, but their main elements are the same:
- The housing in which the piston (cylinder) is mounted.
- Bypass valve.
- Sealing ring.
- Piston (cylinder).
- Cylinder boot.
- Retaining ring.
- Frame.
- Pressure bar.
- Pads.
- Guide boot.
- Guides.
- 14. Fastening bolt.
- Brake hose.
The difference between the rear disc caliper is the presence of a parking brake.
Therefore, the piston (4) has a special thread through which it is screwed onto the parking brake rod (1). Thanks to this, it can operate under the influence of two drives - mechanical (parking) and hydraulic.
How to replace the brake wheel cylinder on a VAZ 1117-VAZ 1119?
Note! There are two ways to replace this cylinder, both of them are very similar to each other and are done almost identically, but they differ only in that in one method you will need to completely drain the brake fluid from the car, and in the other you don’t even have to drain it at all, whichever you choose you decide for yourself, if you suddenly want to drain the fluid, we’ll say right away that the work will be very easy and there will be no dirt because the fluid will be drained, but if you choose the second method, then it’s not a fact that you won’t spill brake fluid from the hose, but it’s not very it has a good effect on human skin, but if you do everything correctly and competently, you won’t even spill anything, we’ll come back to this issue and tell you below how to replace the cylinder without draining the brake fluid from the car, and by the way, if you decide to drain it anyway , then in this case, study the article entitled: “Replacing brake fluid on a VAZ”, it says that you need to add fluid when replacing it, but since you are draining it, without adding anything, you simply loosen one of the fittings and, together with an assistant, drain all liquid through it!
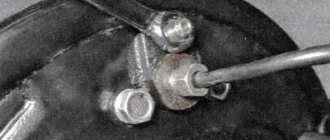
Removal: 1) Now remove the wheel you need from the car (For information on how to remove wheels, read the article: “Correct replacement of wheels on modern cars”) and proceed with the replacement, first remove the brake hose from the bracket to which it is attached, this bracket is welded into the telescopic stand, and the hose with the part indicated below in the photo by the arrow goes into it, as soon as it is disconnected from the bracket, loosen (Do not unscrew completely) the nut of its fastening as shown in the small photo.
Causes of failure
The caliper as an element of disc brakes is subjected to significant temperature loads, as well as exposure to external adverse factors: dirt, dust, moisture, chemicals. All this happens due to the fact that his device does not allow him to be protected from these negative phenomena. If there is significant overheating, as well as if the boot ruptures, the lubrication of the guides may disappear.
Improper maintenance of the guides, in which some craftsmen manage to stuff inappropriate lubricant into their boots: graphite or similar, leads to their swelling and souring, after which they jam or knock when suddenly activated.
A rupture of the piston boot causes dirt and moisture to enter it. After which it stops working - it starts to jam or, conversely, knock.
Repair kit
Replacing a caliper is a drastic measure; often you can limit yourself to repairing and replacing its components. Basically, the standard repair kit includes rubber elements:
- cuffs,
- anthers,
- protective rubber bands of the fitting,
- piston sealing rings.
But depending on the necessary repairs, they may include:
- retaining rings,
- clamping brackets,
- guides,
- directly the pistons themselves.
Thanks to the repair kit, you can significantly save and improve the operation of this brake system unit.
Signs of trouble
The breakdown of the caliper components and their impending repair can be understood by some signs that occur during braking:
- The car pulls and pulls to the side when braking.
- It feels like when braking you have to put more force on the pedal or, conversely, less.
- The brakes rattle or knock when driving over bumps or when stopping.
- The brakes are jamming, which will be indicated by possible skidding.
- The appearance of brake fluid leaks on the wheel.
- Feedback in the pedal, expressed in a strong pulsation when pressing the brake.
If these symptoms appear, you should not delay repairing faulty caliper elements. You must first figure out why this happened and make repairs immediately. You can learn more about the signs and causes in the attached videos at the end of the article.
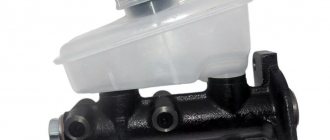
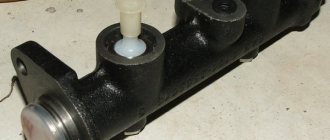
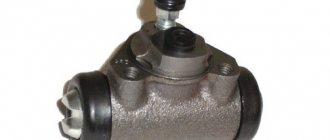
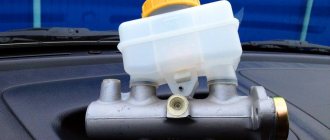
What is a brake cylinder and what is its working principle?
The brake cylinder is one of the main elements of the brake system. The rear brake cylinder body is made of alloy. Do not confuse the rear brake cylinder with the master cylinder. The main brake cylinder is designed to convert brake fluid pressure into fluid pressure, and the rear brake cylinder on the wheel is designed to convert brake fluid pressure into brake pressure on the pad. In other words, the rear brake cylinder presses on the pads, thereby stopping the car.
If the brakes rattle
This type of brake has pressure springs or floating calipers.
They are responsible for securing the pads to the caliper body. The reason for their failure is metal fatigue or poor quality. As a result, they lose their elasticity and stop pressing the pads against the body. Because of this, the pads rattle at the slightest passage of irregularities and may come into uneven contact with the disc, which will lead to the appearance of a shoulder or grooves on it. Also in this case, the staples themselves may rattle.
What should you do when your brake calipers or pads rattle? If it is not possible to replace them, then you should try to loosen them with your own hands using pliers to make them more rigid. To do this, you need to pull them out of their seats, unclench them and insert them into place, after which they will stop rattling for a while.
Replacing caliper pins and boots
I think there is no need to explain once again that due to poor lubrication of the caliper fingers, certain problems can arise, for example:
- uneven brake pad wear
- tight movement of the bracket and even wedging it
- wear of the fingers, which will lead to rattling and knocking of the caliper
If there is enough factory lubricant in the guide pins, it can last up to 100,000 km. But there are times when practically new cars find themselves without lubrication in these parts. That is why it is better to check everything yourself. Also, lubricant can “leave” through a torn finger boot, so their integrity must be constantly monitored.
If you decide to replace the guide pins, as well as the caliper boots on your Kalina, then for this small repair you will need the following tool:
- 13 and 17 mm wrench
- Flat blade screwdriver
- Lubricant for caliper pins
- Brake cleaner (if equipped)
Replacing guides and their lubrication
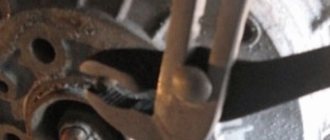
So, the first thing you need to do is remove the wheel bolts. Then lift the car with a jack, and finally unscrew the bolts and remove the front wheel. Then, using a flat-head screwdriver, bend the locking washers of the caliper bolts and unscrew the top bolt, as shown in the photo below.
We disengage the brake hose from the front strut, then use a screwdriver to push the cylinder down a little so that you can then tilt the bracket up without any problems.
And we fold it back, as mentioned above.
Now we have access to the upper caliper pin. With a slight movement of your hand, you can remove it by slightly pulling it to the side, overcoming the force of the boot.
Now that the finger is removed, thoroughly rinse it with cleaner and the boot, if it is intact. If necessary, take a new finger and boot.
Now you can apply new lubricant in small quantities so that excess does not get on the active working surfaces (brake pads and discs). For this procedure, I used MC1600 lubricant, which at one time was actively advertised in videos on YouTube and on third-party Internet sites. But I took it not because of advertising, but because of the lack of more or less normal lubricants in the store at the time of purchase.
According to the stated characteristics, the operating range of this lubricant is from -50 to 1000 °C. By the way, I didn’t expect that the cost of this bag is only 80 rubles. I thought it was several times more. Although, I can’t say that it’s particularly cheap! If you are constantly servicing the brake system while on the road, then of course it is more profitable to buy a large tube. If I'm not mistaken, it costs about 600 rubles per 100 grams.
The piston (cylinder) is faulty
Poor quality of brake fluid, the appearance of rust on the surface when the boot of at least one piston (cylinder) ruptures or as a result of prolonged downtime of the machine entails its partial jamming.
This will initially be heard when its operation is delayed, when the pads begin to knock on the disc. In order to make the repair yourself in this case, you need to disassemble the caliper and pull out the rusty piston; this must be done after the guides have been unscrewed and the boot and retaining ring have been removed.
If the cylinder still moves even slightly, you can squeeze it out using a compressor by inserting a hose into the hole for supplying brake fluid. This can also be done without first disconnecting the housing from the brake system; you just need to press the pedal, after which the created pressure will squeeze the cylinder out of its seat. If it is tightly jammed, then a preventive measure can be soaking it in gasoline and other similar liquid.
It is worth considering that the rear caliper piston cannot be removed, but is simply unscrewed along the threads with pliers or a similar tool. After this, you need to wash the cylinder seat and clean it of dirt and rust. It is also worth doing with the piston (cylinder) itself. Next you need to insert the cylinder into place. It would be useful to replace its boot with a new one during assembly. You can see this in more detail in the attached video.
replacing brake discs 13″ to 14″
To upgrade from 13" to 14" brake discs you will need:
- brake disc 260mm (14" in people)
- caliper bracket from VAZ 2112 (officially “brake pad guide”)
- some tools
- Straight arms
This article is especially for those who want to have a minimum of hemorrhoids during this process.
| Loosen the wheel mounting bolts. Raise the car with a jack. Unscrew the wheel nuts. We remove the wheel and put it under the front suspension (just in case, otherwise you never know. It’s better to lay a board between the wheel and the suspension). |
| Next, take the head (or socket wrench) and unscrew the two caliper mounting bolts (located on the back side). |
| The second bolt is not indicated in the photo; it can be easily seen by bending down or feeling it with your hand. On the left is a photo with the caliper already removed for clarity. |
| Next you need to unscrew the two guide pins. Do not under any circumstances try to unscrew them with just a 7mm spanner! Take and put on two keys at once, or even better if you find a long head on “7”. |
These pins are screwed into the hub; they simply pass through the brake disc and press it against the hub, helping to put on the wheel when replacing it. It wouldn’t hurt to shed these pins a couple of times on both sides with a WD tool and at the same time shed the mounting diameter of the brake disc on the hub.
If you were able to unscrew the pins, consider half the job already done (on a car with a mileage of less than 20,000 km, the pins can be unscrewed quite simply, but if the car, like mine, has a mileage of around 55,000 km, and is also somehow adjusted by AvtoVAZ, you will be able to unscrew them It’s not easy.
Now we begin to knock on the brake disc from the inside with a heavier hammer through a piece of wood. The main thing is not the force of the blow, but the symmetry of the blows on opposite edges of the disc. The disc has a very tight fit (a normal brake disc has a groove for the hub of 58.6 mm, the hub has a groove of 58.5 mm + corrosion). We knock on the hub from the inside, turn it 180° (if you prefer, you can knock at least every 30° turn). In the holes of the wheel bolts you can clearly see how tightly the disk is pressed to the hub, and you need to knock on the side where the pressure is stronger.
Guide faulty
The main problem if the brake does not work can be jamming and souring of the caliper guides.
Repairing this malfunction with your own hands will not be difficult. By the way, in this case there is no difference when disassembling both the front and rear calipers. To do this, you need to unscrew and pull out both guides. Clean them from dirt or poor-quality lubricant, remove and replace the torn boots with new ones, after filling them with special grease for calipers.
Which brake brake should I choose?
The modern market is full of different types of rear brake cylinders, so when buying this element, it is not easy to make a choice. Numerous reviews on the Internet will help us with this. Having studied the content on this topic, we came to the following conclusion: By and large, all brake cylinders in the same price category have the same quality, but the rear brake cylinder from ATE turned out to be the highest quality and most desirable. Our Basalt, which is one of the best domestic manufacturers of these products, does not lag behind.
It’s only recently that I started making quality products. The Belarusian company fenox, whose products are, to put it mildly, “unreliable,” even wanted to buy it, but they couldn’t buy it. The products also perform well.
Signs of a faulty caliper
Signs of a faulty brake caliper:
- increased braking distance;
- difficulty rolling;
- the car pulls to the side when braking;
- pedal vibration when braking;
- grinding noise in the caliper area when driving: it is worth noting that the reasons can be different, from a trapped stone to banal wear of the pads, but wear of the pads can be caused by a faulty caliper;
- characteristic signs of overheating on the brake disc;
- uneven wear of pads from one caliper;
- excessive heating of the disk.