Dimensions of valve guides for VAZ 2108
VAZ 2109-08 valve dimensions check
Inspection and troubleshooting of parts Notes Parameters of valve springs to determine their elasticity.
Outer spring: free height 45.2 mm
height under load 26.0+1.7 kgf 33.7 mm
height under load 46.2+2.4 kgf 24.7 mm
Inner spring: free height 34.1 mm
height under load 9.0+0.8 kgf 29.7 mm
height under load 27.5+1.5 kgf 20.7 mm.
a – intake valve seat b – exhaust valve seat I – news seat Ii – seat beyond repair
The size of the gaps between the valve and the guide sleeve, mm: nominal gap for intake valves 0.022-0.055
nominal clearance for exhaust valves 0.029-0.062
maximum permissible gap for intake and exhaust valves 0.3
If the gap is less than the maximum permissible, try replacing the valve. If the gap exceeds the maximum permissible, replace the guide bushing in order. Implementation 1. Wash the parts of the cylinder head in gasoline, wipe and dry them. 2. Clean the combustion chambers from carbon deposits. Examine the head. If there are cracks on it or the consequences of burnout in the combustion chambers, replace the head. 3. Measure the flatness of the surface adjacent to the cylinder block. To do this, place a metal ruler with its edge on the plane of the head along the center, and then along the diagonals, and use a feeler gauge to measure the gap between the plane of the head and the ruler. Replace the head if the gap exceeds 0.1 mm. 4. Clean carbon deposits from the valves. This can be done with a suitable metal device.
6. Defects in the working chamfer of valves that cannot be removed by lapping can be sanded using a special machine. When grinding, it is necessary to maintain the dimensions specified in the figure. The different dimensions for the VAZ-21083 engine are given in parentheses (see notes)..
5. Examine the valves. Replace valves with the following defects: deep scratches and scratches on the working chamfer, cracks, deformation of the valve shaft, warping of the valve disc, burnout effects. Shallow marks and scratches on the working chamfer can be removed by grinding the valves. 7. Measure the position of the valve springs. Replace bent, broken or cracked springs. Measure the elasticity of the springs. To do this, check the height of the springs in a free state, and then under two different loads. If the spring does not meet the required parameters, replace it (see notes).
9. The most significant defects of valve seats can be eliminated by grinding. When grinding, maintain the dimensions specified in the figure (see note 1). First, the chamfer is ground at an angle of 20°, then the chamfer is ground at an angle of 45°. After grinding, you should grind the valves, then thoroughly clean and blow through the block head with compressed air so that there are no abrasive particles left in the channels and combustion chambers. The different dimensions for the VAZ-21083 engine are given in parentheses. 10. Measure the gap between the guides and valves (see note 2). The gap is calculated as the excess between the diameter of the hole in the bushing and the diameter of the valve shaft.
8. Measure the position of the valve seats. The working chamfers of the seats should be free of wear, pitting and corrosion. Minor defects (small marks, scratches, etc.) can be removed by grinding the valves.
11. Examine the valve lifters. If there are nicks, scratches or other damage on the working surface of the pusher, replace the pushers. 12. Examine the shims. Their working surfaces should not have burrs, nicks, scratches, signs of stepped or uneven wear, or metal rubbing. If such defects occur, the washers should be replaced. Concentric effects of running in with the camshaft lobes are allowed on the washers. 13. Measure the length of the cylinder head mounting bolts, since they are stretched when tightened multiple times. If the bolt length exceeds 135.5 mm, replace the bolts. 14. To check the tightness of the head, plug the opening in the cooling jacket pipe at the rear end of the head, turn the head over with the combustion chambers facing up and pour kerosene into the cooling jacket channels. If kerosene leaks, the head is probably not sealed and should be replaced.
Good afternoon, gentlemen of the opposition. Having used the search to my heart's content and read articles on the site, I decided to change the guides to VAZ ones. I bought short guides from 2108, pressed out the old ones, tried to insert new ones, but they fell in there “with a whistle”, with almost no effort. We measured them with a micrometer, it turned out they were VAZ ones, the outer diameter was 14.05mm, and the ones pressed out of the head were 14.07mm. In the book, Kotov recommends bushings with a diameter of 14.05mm - 14.08mm, original, Ural, they can probably be selected according to size. I can’t find VAZ repair ones at all, and how long will I have to bore the seats? How to maintain alignment without special equipment?
In general, what can you advise in this situation? I would like to supply high-quality automotive ones. VAZ or similar ones. Thank you in advance.
Install only Ural ones, and factory ones at that. They are better than 2108 because they are longer. Alignment in what sense? If you mean during pressing, then you take the head, put it in the oven, heat it up to 250-300 degrees and the guides will practically fall into the seat by themselves, but since there is a decent amount of tension implied, so they may not fall through, then you help them - through a spacer of some thread with a hammer to the end of them and that’s it.
AutoNews / Reviews / Tests
Replacing Valve Guide Bushings VAZ 21083
How to replace valve guides on a VAZ without the help of others
One of the advantages of cars produced by Russian factories is the ability for the owner to carry out repairs of all components and assemblies, right up to complete disassembly of the engine. If a car enthusiast has begun to master the repair of the cylinder head, then he needs to figure out how to replace guides . This procedure, compared to other manipulations, is not difficult, but is essential for ensuring the performance of the motor.
What is a valve guide used for?
The elements of the block head play an important role in ensuring smooth operation of the motor. In particular, you need to carefully monitor the condition of the valves, because it depends on them how well the cylinders will be filled with a flammable mixture and freed from fuel combustion products. This work is entrusted to valves that promptly open and close the gaps in the channels for the flow of fuel mixture and exhaust gases.
Each valve has a working part in the form of a disk (plate), which fits tightly to the seat and a rod. It is through the rod that the reciprocating motion necessary for the operation of the mechanism is transmitted to the plate. In order for the valve stem to move strictly along its own axis, it is placed in a special bushing.
The valve guides are made in such a way that the valve does not have the ability to oscillate to the sides. The absence of a gap between the surface of the rod and the inner surface of the sleeve also helps the valve seal protect the combustion chamber from engine oil. Even taking into account the fact that very strong alloys are used for valves and guides, wear is inevitable. This is why valve bushings need to be replaced from time to time.
Obvious signs of the need for such repairs are:
- engine oil entering the combustion chamber (increased oil consumption, blue exhaust smoke);
- characteristic noise from the head;
- replacing valve guides with new ones;
- replacing valves after they are damaged (especially when the stem is bent);
- cylinder head overhaul.
Replacing valve guides. Do it yourself!
Shows an easy way to replace valve guides
at home, without special tools...
VAZ 2108 Cylinder head repair. Replacing guide bushings.
Repair of the cylinder head of a VAZ
2108-2109……
Replacement
of burnt
valves
.
Replacing guides
...
We are preparing the engine for replacing VAZ valve guides
Any work related to car engine repair requires preparation. This is especially important when it comes to the gas distribution mechanism. In the process of bringing the engine back to life, it will no longer be possible to get by with a simple set of wrenches. The design of individual elements requires special devices.
How to remove guides
Before carrying out work, you need to warm up the entire block head to 100 degrees. The aluminum from which the head is made has a very high expansion coefficient, much less than that of the bushing. When heated, the tension of the connection between the head and the bushing decreases. In this case, you can press out the old bushings practically without damaging the seats. This is done using a sledgehammer or hammer.
Also, sometimes special mandrels are used to remove elements. With this tool you can remove the guide exactly along the axis. Many experienced craftsmen use pneumatic hammers or special drifts when replacing valve guides on a VAZ-2108.
If you can’t knock out the bushing, you’ll have to drill it out. It is best to use a machine rather than a drill. If you use a drill, the likelihood of damaging the socket increases. After dismantling, pay attention to the inner surface of the mounting sockets. They should not contain roughness, scratches, or other defects. If they are present, then you will have to additionally treat the surfaces.
Why are guide bushings needed?
At the beginning and middle of the last century, car cylinder heads were made of cast iron, and the valves were simply inserted into precisely drilled holes. But subsequently, manufacturers abandoned cast iron heads due to their heavy weight and insufficient removal of excess heat, and they were replaced by lightweight cylinder heads made of aluminum alloys. These metals have excellent thermal conductivity, but have little resistance to wear from friction.
To solve the problem, a guide sleeve was invented - an intermediary between the soft alloy of the cylinder head and the steel valve stem, which constantly moves up and down during operation. Made of cast iron or special bronze, it is securely pressed into the cylinder head body, and the valve is inserted inside with minimal clearance.
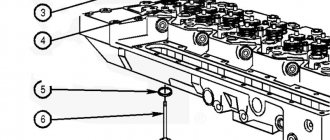
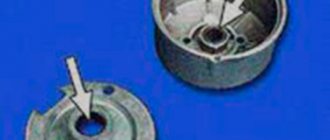
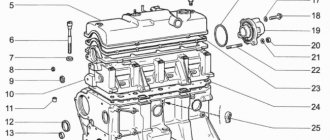
The engine diagram shows the location of the guide bushings
The bushing itself is a hollow cylinder, made exactly to size for a specific car model. The outer surface is polished and smooth to the touch, and the inner surface has a spiral-shaped groove in the form of a thread. Motor oil moves along it, lubricating the valve axis and reducing friction. A shallow recess is made in the upper part of the guide part, into which a retaining ring is inserted.
Important point. The guide elements for the intake and exhaust groups of valves differ in design, although they may look the same in appearance (for example, parts for Russian VAZ 2108-09 cars). The difference is this: in the bushing for the exhaust tract, the oil groove is made along the entire length of the hole, and for the intake tract - only halfway. But products for the “classic” VAZ 2106 also differ in size; with the same diameter, the exhaust elements are longer than the inlet elements.
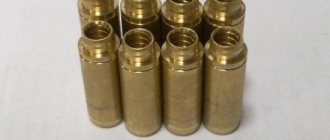
Bronze bushings for VAZ 2109 all look the same
Bushings perform the following functions:
- as the name implies, they direct the movement of the valve so that its plate is clearly aligned with the seat and fits tightly to it;
- take on the load from the friction force that occurs during the translational and reciprocal movement of the valve stem;
- the valve cup gets very hot in the combustion chamber, and the bushing transfers this heat to the aluminum alloy of the cylinder head;
- Thanks to a special groove, the part provides lubrication of rubbing surfaces.
Cast iron parts of VAZ 2106 - intake bushings are shorter than exhaust bushings
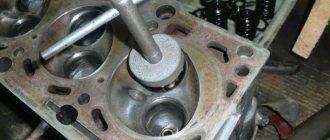
When the element is pressed into the cylinder head hole, its upper part of smaller diameter protrudes several millimeters above the surface. This is necessary to install an oil seal on it (also known as a valve seal), which prevents lubricant from the upper part of the engine from entering the combustion chamber through the inner hole of the bushing.
This is what the protruding part looks like where the oil seal is put on
Checking and repairing cylinder head parts. Valve guides. Repair dimensions
1. Using a metal ruler, check the deviation from the plane of the surface of the block head. Limit value: 0.05 mm (gasket side); 0.03 mm from the collector side). 2. Check the combustion chambers, intake and exhaust ports and cylinder bore for cracks. If damage is found, replace the cylinder head.
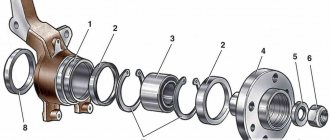
Valve guides
3. Using a bore gauge, measure the inner diameter of the valve guide in several places along mutually perpendicular diameters. Nominal value: 6.500-6.015 mm.
4. Using a micrometer, measure the diameter of the valve stem in several places along mutually perpendicular diameters. Nominal value: 5.955-5.970 mm (inlet valve); 5.935-5.950 mm (exhaust valve).
5. Calculate the gap between the valve stem and the guide sleeve. Nominal value: 0.03
0.06 mm (inlet valve); 0.05
0.08 mm (exhaust valve). If the value obtained is greater than the nominal value, replace the valve and bushing.
Replacing the guide bushing
6. Using a suitable mandrel, press the guide sleeve out of the block head.
7. Ream out the mounting holes of the cylinder head in accordance with the repair dimensions of the bushings (see table).
8. Using a suitable mandrel, press in the guide bushing. The bushing should be pressed into place on the top side of the block head (see Fig. NA 2.085).
Attention: the intake and exhaust valve bushings have different lengths:
36.3-36.7 mm (intake valve); 40.841.2 mm (exhaust valve).
Repair dimensions of valve guides
| Size, mm | Size designation | Diameter of bushing bore, mm | Outer diameter of the bushing, mm |
| Nominal | — | 11,000-11,018 | 11,050-11,060 |
| +0,05 | 5 | 11,050-11,068 | 11,100-11,110 |
| +0,25 | 25 | 11,250-11,268 | 11,300-11,310 |
| +0,50 | 50 | 11,500-11,518 | 11,550-11,560 |
| +0,50 | 50 | 11,500-11,518 | 11,550-11,560 |
9. After installing the bushings, insert the new valves and check the clearance between the bushing and the valve stem using a travel indicator while rocking the valve stem.
10. Check that the valve is seated correctly. If necessary, treat the locking surfaces of the valve seats.
What nuances need to be taken into account
Almost all bushings have a special thrust collar, which is located on the outside. It allows you to fix the element as accurately as possible in a vertical plane on the cylinder head. If the bushing is smooth, then installation must be carried out using a mandrel. As for the intake valves, the guides should not protrude on them. Otherwise, their aerodynamic drag will increase.
The bushings installed on the exhaust valves hide the stem as much as possible in order to protect it from high temperatures. It also allows for very good heat dissipation.
Causes of parts failure and their consequences
A characteristic feature of the guide elements is that they do not fail at once, but wear out gradually. The lifespan of parts on budget cars ranges from 180 to 300 thousand km, and on more expensive foreign cars it can reach 1 million km. The wear process is influenced by several factors that can accelerate it:
- the quality of the motor oil used and the timeliness of its replacement;
- temperature conditions of the power unit, the more often the engine overheats, the faster the rubbing surfaces wear out;
- the quality of the fuel and combustible mixture, whose vapors penetrate into any leaks and contribute to the process of slow destruction of parts.
Scan
Sometimes it happens that the valves do not fit into the new bushings. This is due to the fact that when pressed in, the guides change their diameter slightly. To get rid of this problem, you need to use a sweep. It allows you to bore the element to the desired diameter. It is recommended to use diamond reamers as they will last longer than steel ones. Replacing valve guides with your own hands can be done quickly if you have experience. If you don’t have it, you need to see how an experienced craftsman performs this work.
Source
Product added to bookmarks!
APPLICABILITY: VAZ 2101, 2102, 2103, 2104, 2105, 2106, 2107, VAZ 2121, 21213, 21214, 21218, 2129, 2131 (Niva), VAZ 2123 (Niva-Chevrolet).
Increased valve guide wear can be a problem on camshafts with high valve lift. Even if the engine is equipped with a smoother camshaft, wear on the guide bushings may still be a problem. When the valve guide clearance increases, the valves may not sit evenly on the seat and leaks may develop, causing power to “leak” from the combustion chamber. Worn bushings can also allow oil to leak into the cylinders. When oil is mixed with the working mixture, it reduces the octane number of the fuel and the fuel in the combustion chamber will already be lower in octane number; oil contamination will increase the chance of detonation, especially at high compression ratios.
The best way to prevent wear on the guide bushings is to install bronze guide bushings. If this is done correctly, they will “outlast” cast iron bushings for a long time. While bronze bushings are only slightly more expensive, installing them is a smart investment because... In addition to reducing valve-bushing clearances, they withstand lack of lubrication. And if you want to achieve high engine performance, then use bronze bushings.
These bushings are not recommended for installation on high-speed engines of VAZ cars.
When do you need to change guides?
The main symptom indicating that the valve bushings have become unusable is increased engine oil consumption. When the rod has lateral free play (play), the valve stem seals are no longer able to prevent the penetration of lubricant into the cylinders from the upper engine compartment, where the camshaft is located. It flows into the increased gap between the valve stem and the inner diameter of the bushing and freely enters the combustion chamber.
Blue smoke coming out of the exhaust is a sign of oil combustion.
Signs of oil consumption due to problems with the guides are:
- bluish smoke from the exhaust pipe from escaping combustion products of lubricant that constantly enters the cylinders;
- the car practically does not lose in dynamics, but smokes a fair amount;
- light “fluffy” carbon deposits on the spark plug electrodes;
- liquid oil is observed on the skirts and threaded parts of the spark plugs.
Advice. By the carbon deposits on the spark plugs, you can determine the cylinder into which the largest amount of lubricant gets. This will be useful for performing diagnostics.
This is oil deposits on the spark plug.
Since oil can also penetrate into the chambers due to the fault of the cylinder-piston group, it is necessary to carry out diagnostics to accurately determine the malfunction. As an example, it is proposed to take the popular VAZ 2106 car:
- Measure the compression in the cylinders. The goal is to ensure that the piston rings are in good technical condition.
- Remove the valve cover, loosen the chain and unscrew the camshaft gear, first aligning the marks.
- Dismantle the camshaft along with the bed and remove the rocker arms. Unlock the valve springs of the cylinder whose spark plug is more heavily covered with carbon deposits.
- Carefully remove the oil seal and try to rock the rod sideways with your hand, while moving it up and down.
To feel the play, the valve must be pulled out by the stem and rocked to the sides
If there is play, you can safely continue disassembly, since to replace the bushings you need to remove the cylinder head. If you have no doubts, check the other valves, the picture should be approximately the same.
Why does deformation occur, its consequences
As the engine operates, the guide bushing wears out, so alignment with the valve stem may be lost. As a result, the element breaks more strongly, the valve “walks” and does not fit very tightly to the seat. This causes the seat chamfer to break. As a result, the valve burns out. To repair it, it is necessary to replace it, as well as change the saddle. And of course, replace the valve guides on the VAZ-21083.
In addition, due to valve instability, oil seals become unusable. They do not retain oil as the angular displacement of the rod increases. As a result, oil enters the combustion chambers and its consumption increases. Consequently, carbon deposits will appear on the valves, and harmful emissions from the exhaust pipe will increase significantly. As a result, you may end up having to replace the lambda probe or catalyst (on injection engines). Moreover, it should be noted that replacing the caps will not help, since even new ones will soon become unusable.
The procedure for replacing guide valves on a VAZ 2106
The whole procedure is divided into several stages:
- Preparation of tools.
- Partial disassembly of the engine, namely, removal of the cylinder head.
- Selection and purchase of new parts.
- Dismantling worn elements and pressing in new ones.
- Reassembling and starting the engine.
The first step is to disconnect the battery from the on-board network
Advice. It is worth following exactly this sequence of actions - first disassembling the engine, and then purchasing spare parts. The dissection will show you exactly what parts you need. If you recently changed the valves (5-10 thousand km ago), then you need to pull them out to try them on with the new bushings in the store. The old valve group will have to be replaced.
Preparing the necessary tools
To disassemble and replace the guides, you will need:
- standard set of open-end and ring wrenches;
- a set of sockets with a powerful wrench and ratchet;
- a torque wrench for tightening the cylinder head bolts and camshaft nuts during assembly;
- screwdrivers, pliers;
- 36 mm wrench for manual rotation of the crankshaft;
- mount;
- puller for unlocking valves;
- heavy hammer;
- mandrel for knocking out and pressing in bushings;
- 8.025 mm reamer with knob;
- container and hose for emptying the cooling system;
- rags.
Installing new guides
First you need to measure the diameter of the sleeve and seat in the head. The difference should be no more than 0.05 mm. Minimum value 0.03 mm. If the socket is larger, then you need to look for the appropriate bushings. If the diameter is too small, you will have to drill holes. It is recommended to warm up the head before pressing in new elements. But the bushings are best cooled using liquid nitrogen. And if there is none, then you can simply put them in the freezer for a day or more.
When working, it is best to use a tool for replacing valve guides. It is much more convenient than a hammer and a simple mandrel. Rubbing surfaces must be lubricated with engine oil. Pressing in occurs in the same way as pressing out. All work is done using a hammer and sending.
Size of valve guides for VAZ 2101
;:;lr.;rr-.r.iZ3t fishing, for example, aluminum bronze. 175 Bushings made of non-ferrous metal alloys provide more intense heat removal from Fig.4. Mandrel for pressing in and out of valve stem guides and, better yet, valve bushings of VAZ-2101 engines. -2108, -21081, operate in conditions of de -21083, -1111, -11112 and MeMZ-245 engines. lack of lubrication. Therefore, they are naturally more often used in more powerful engines. The engine may also have a cast iron cylinder head (for example, on an Opel-RecordE car). In this case, there is no need for special guide bushings - they are made integral with the head. Compare the bushings in Fig. 1 and 2. The outer diameter of the Audi bushings equal to 12 mm, and not 14 mm, like the VAZ cast iron bushings. The pressing force of brass bushings is two to three times less than cast iron ones, nevertheless, their fit in the block head is quite reliable. Pay attention to the place where the oil seals fit (on in these engines they are the same, interchangeable).The cap is pressed onto the bushing shown in Fig. 2 without impacts, by simply pressing through the mandrel, and holds very securely here. The disadvantages of cast iron bushings are known - this is the need to seat the cap with considerable force, despite the fact that the fit on the bushing is not always reliable. What are the conditions for fitting the bushings? Here the views of engine specialists may be different. If the bushings of VAZ engines are pressed in at room temperature, then the head of the MeMZ-969A engine is recommended to be heated to 190-210 ° C before this, go-SOZA RUDDER 6 /96 117 20 1^45° 1.25/.SCI,> – – -35 yuo-40 5×45°,5Х175I”i’.”
What materials are used to make bushings?
Let's talk about what materials are used to make high-quality bushings. On sale you can find the following items made from:
- bronze;
- brass;
- special cast iron alloys;
- metal ceramics.
When it comes to thermal conductivity and cost, bronze and brass are ahead of all others. That is why most of the bushings that are found on sale are made from these metals. When replacing valve guides, pay attention to what metal they are made of.
Video on replacing guide bushings
The essence of the process of replacing guides is the same for cars of any brand, the difference lies in the complexity of disassembly and the shape of the bushings. This procedure is quite labor-intensive and will take a lot of your time. Be prepared for the fact that along the way, some other malfunction will probably appear in the engine and this will also have to be eliminated. On the other hand, you will save a lot of money by replacing the bushings yourself.
Download price lists
To download price lists, you must log in. If this is your first time on the site, please fill out the registration form.
Bronze valve guide bushings VAZ 2101-2107, Niva, Chevrolet NIVA (8 pieces)
- We guarantee fast processing of your order during business hours (we work from 11-00 to 20-00, Saturday and Sunday are days off).
- We guarantee reliable packaging of your order (when sending it by Russian Post or transport company).
- We guarantee the fastest possible dispatch of your paid order (within 2-4 business days after receipt of payment).
- We guarantee a refund or exchange for another product (with recalculation) within 14 days from the date of receipt of the order (the product must be in good condition, without traces of installation, delivery costs are not reimbursed).
- We guarantee a free exchange of goods (transportation costs at our expense) if the purchased goods turn out to be defective.