A characteristic feature of domestically produced cars is that their repair and maintenance can be carried out on their own. The main thing is to have the necessary knowledge, instructions and the desire to cope with the task on your own. But still, in the case of replacing valve guides, which has a number of its own specific features, it is better to carry it out at a service station. However, many motorists cope well with this task in their own garage.
Cylinder head and valve design
The functioning of the valve mechanism on VAZ 2106 and VAZ 2109 cars depends on the operation of the chain drive (modern car models are equipped with belt drives).
The structure of the cylinder head is quite primitive: these are seats, springs, guide bushings. The valves in the system close automatically using built-in springs. To prevent engine oil from leaking into the combustion chamber, an oil seal is attached to the bushing.
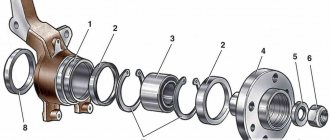
Diagram of the cylinder head of the VAZ 2106
The valve mechanism operates in difficult conditions with high temperatures and oil starvation. Its main task is to ensure the tightness of the entire system. Problems in its operation can cause a decrease in power, increased fuel consumption and rapid wear of the timing belt.
Replacement process
As mentioned above, a special attachment is required to remove and install the guides. Let's look at what it is and how to use it.
Description of the tutorial
The mandrel for removing and installing the guide consists of two parts. The first part is a rod of a certain length, machined on a lathe and having different diameters in certain places. The largest diameter of the rod occupies its main length and is 18 mm. The rod is held by hand by this part, and it limits the rod from slipping to the other side when removing the bushing, which will protect the surface of the block head from being hit with a hammer. The diameter of the second part of the rod is equal to the diameter of the sleeve. The length of this part is equal to the depth of the hole in which the sleeve is located. The third part of the stem is the shortest - its diameter corresponds to the internal diameter of the valve stem (the diameter of the inner surface of the guide). Its purpose is to ensure that when knocking out the bushing, the direction of the rod strictly corresponds to the direction of the bushing and does not create a distortion of the rod when hitting it with a hammer.
The second part of the rod is similar to a socket head. It is distinguished from a socket head by the absence of edges inside (a cylindrical hole with a diameter and length equal to the diameter and length of the upper part of the guide). In the upper part of the head there is a hole with a diameter equal to the inner diameter of the sleeve and the outer size of the rod on the working side. As can be seen from the description of the mandrel, finding a replacement for it using available materials is not so difficult. To do this, at a minimum, you will need a cylindrical rod of a convenient length, the diameter of which on one side is equal to the outer diameter of the sleeve. As an attachment, you can use an old oil pump rod from a VAZ, after grinding off the gear.
To install the guide in place, use a socket of the appropriate diameter or a suitable hollow tube. Further in the text the terms “mandrel”, “rod”, “head” will be used, implying both a special mandrel and suitable available means.
The process of removing a worn guide and installing a new one
To remove the bushing, turn the cylinder head over with the working part facing up. Next, take the stem, insert it into the valve hole and carefully press it out with a hammer.
In this process, the accuracy of the blow is important. If you hit the surface of the cylinder head with a hammer, this will disrupt the plane of the cylinder head. To knock out the bushing, the blow must be strong, and for this it is better to use a heavy hammer. To install a new bushing, place the cylinder head on the surface in the position in which it is placed on the engine. Then take the new bushing, coat the outer surface with oil and install it in the desired hole.
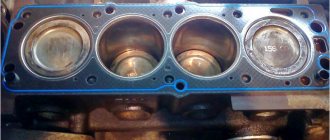
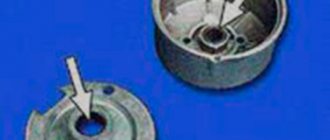
Next, put the head on it and insert the rod. Gently hitting the top of the rod with a hammer, press the bushing guide into place. When installing, pay attention that the selected means do not touch the top of the oil seal seat (marked with arrow 1), since upon impact the seat will be deformed or a piece will break off from it. The head should rest against the base of the oil seal seat (marked with arrow 2).
There are no problems with removing and installing the guide bushing. This is a simple procedure that requires certain knowledge, accuracy and precision when working.
Something else useful for you:
General arrangement of cylinder head bushings
On modern cars, valve heads are made of special alloys.
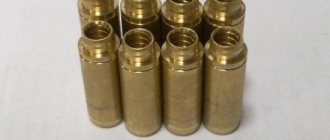
Valve guides for VAZ 2106
On the VAZ 2109, for example, the guides are made of wear-resistant material and are pressed into the head at high temperatures, so changing them is quite difficult. But it is still necessary to carry out the replacement procedure, since the bushing, despite its strength, wears out over time, losing its tightness. The problem is especially acute for engines with a large number of valves.
How to profitably exchange a used car
To guarantee the legality of the used car exchange service and its objective cost, the purchase and sale process should be carried out at a trusted auto center. Here the client will be offered:
- Diagnostics of the old model, on the basis of which its cost will be determined;
- Selection of cars for exchange, completely new or with a clean mileage history: all cars undergo forensic examination, therefore the car dealership will never sell a car with a “dark past”;
- Legal support of the transaction: the client enters into a notarized agreement and, if necessary, can use the credit services of the car dealership’s partner bank;
- Efficiency of the service: the client does not need to look for buyers for his vehicle; he does not need to settle issues with the traffic police or the bank. The listed functions are the task of the auto center.
Thus, with minimal documents, it is possible to buy an improved car within one to three days. The used car exchange service makes it possible to regularly change the owner’s vehicle fleet by purchasing its best models.
Purpose of sleeves
The main task of the valves is to supply the combustion chamber with a fuel-air mixture and remove exhaust gases from it. Each engine cylinder has two valves - intake and exhaust. A rod moves in the guide bushing, which lets in/out exhaust gases and the fuel mixture. The combustion chamber is sealed due to the precise “fitting” of the head on the seat.
The quality of engine valve operation depends on the guide bushings and seats. During operation, they wear out and cannot maintain high engine performance. In such a situation, they will have to be changed.
How to replace valve bushings on a VAZ 2106
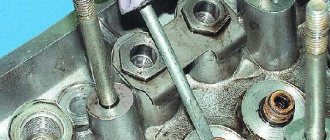
- Open access to the valve bushings by turning the two outer pins, which prevent the installation of the mandrel. They are loosened by screwing four nuts onto them in pairs. You can resort to a special pin driver.
The VAZ 2106 cylinder head studs are unscrewed to access the valves - The guide bushing is easily pressed out by hitting the inserted mandrel with a hammer. Before you begin removing the old bushing, you need to turn the cylinder head over.
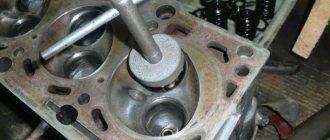
Pressing the VAZ 2106 guide bushing out of the socket using a special tool - The part is installed in the saddle, then pressed into the plane of the cylinder head with a hammer and a mandrel. Retaining rings are put on the bushings and in this state they are pressed into place. The intake valve bushings on the VAZ 2106 are slightly shorter than the exhaust valve bushings. The inside is covered with grooves that lubricate the valves. The length of the grooves differs between intake and exhaust valves: in the first case they go only to half of the seat, in the second - to its bottom.
Pressing in new guide bushings VAZ 2106 - Once the installation of the bushings is complete, their holes are rotated, and their diameters differ.
The holes in the VAZ 2106 guide bushings are deployed after installation
Why can cartridges fail?
The main reason for failure of guide bushings is their wear. As a result, the consumption of lubricating fluid increases, since the backlash of parts leads to rapid failure of the valve stem seal and oil leaks into the combustion chamber. As a result, there is the formation of carbon deposits, a violation of the temperature regime of the engine, an increase in the toxicity of exhaust gases and breakdown of the catalyst (if the car has one).
Worn valve bushings VAZ 2106
Timely replacement of engine oil and proper operation of the vehicle’s internal combustion engine allows you to extend the life of the bushings and change them every 180–200 thousand kilometers. However, due to valve clearances and engine oil non-compliance with recommended standards, lateral wear of the bushings and a decrease in valve mobility along the axis of the rod may occur due to an increase in the radial load on it. For this reason, after changing the valve stem seals, the gap in the guide bushings must be adjusted. If the gap is too large and play is detected, the bushings must be changed.
Product added to bookmarks!
- Description
- Reviews
APPLICABILITY: VAZ 2108, 2109, 21099 (Lada-Samara), VAZ 2110, 2111, 2112, VAZ 2113, 2114, 2115 (Lada-Samara 2), VAZ 1117, 1118, 1119 (Lada-Kalina), VAZ 2170, 2171 , 2172 (Lada-Priora), VAZ 2190, 2191 (Lada-Granta), VAZ 2192, 2194 (Lada-Kalina 2) with an 8-valve engine.
SM brand belongs to the German company SM Motorenteile GmbH (the former name of the company was MVI Motorenteile GmbH ). SM (Schoettle Motorenteile) company was founded in 1978 in Stuttgart by German entrepreneur Wolfgang Schoettle. SM brand quickly established itself and became a well-known brand, first in Germany and then throughout Europe.
SM Motorenteile company has been successfully operating in the global automotive market for more than 30 years. All the company's products are distinguished by a wide range and high quality. The company's leading engineers have developed various advanced engine repair programs to extend its service life.
SM Motorenteile's product range covers valves, pistons and piston rings; powder metallurgy parts, drives and pumps, high-precision rotating parts, as well as simple and complex aluminum castings. All products are manufactured in accordance with international norms and standards.
Includes: 8 bushings and 8 retaining rings.
Signs of faulty guide sleeves
Wear of valve guides can be easily and quickly determined by the vehicle owner. The main symptom of this malfunction is an increase in engine oil consumption.
The first thing to check when engine oil consumption increases is the car's engine valves. Another sign of a malfunction may be a characteristic motor noise in the head area. The easiest way to check this is to open the hood of the car, start the engine and listen carefully. If a strange and unusual noise is noticeable against the background of the engine operation, then it is worth diagnosing the valves and guide bushings.
Tools and materials
Replacement of guide bushings is carried out using the following tools:
- hammer;
- sweeps at 8.022 and 8.028;
- mandrel for pressing out and pressing in bushings.
The bushings are changed using a stepped mandrel - a brass or bronze tool. It rests against the guide sleeve, after which it is knocked out with a hammer blow. This method of pressing out does not harm the cylinder head as much as using a regular hammer and chisel. A special puller is used not only to remove bushings, but also to replace them.
Stepped mandrel used for pressing out VAZ 2106 guide bushings
The best tool for replacing guide bushings is a push-out puller. Such devices allow you to remove valve bushings without damaging the seating plane on the cylinder head. The presence of this tool allows you to avoid scoring and other cylinder head defects that may appear when using a mandrel and hammer.
Puller-extruder for guide bushings VAZ 2106 - universal tool
Wear detection
The nature of the operation of the valve stem-bushing pair causes increased wear on the inner surface of the latter. It becomes noticeable when the vehicle is driven for a long time (about 150 thousand km). At the same time, the use of low quality oils can significantly speed up the life of the bushings. Therefore, it is always advisable to determine the degree of wear before replacing them. There are two methods for this:
- Using a micrometer paired with a bore gauge. These tools measure the minimum internal diameter of the bushing, as well as the maximum diameter of the valve stem travel area. The difference between the obtained diameters will give us the width of the required gap. When taking measurements, one should not forget about the conical and barrel-shaped nature of the wear of the rod, as well as the fact that the diameter of the bushing changes with height. All surfaces must be thoroughly cleaned of dust and dirt before starting measurements.
Set of bore gauge and micrometer for determining bushing wear - Using a dial indicator with a special stand (micrometric bore gauge or indicator-type bore gauge). If the resulting gap value goes beyond the limits indicated in the manual, then a new valve is taken and the measurement procedure is repeated. If in the second case the gap is beyond the permissible limits, it means that the spare parts need to be replaced.
Bore gauge with dial indicator for measuring clearances between the bushing and the valve