How to change the valve cover gasket on a VAZ 2114: when is it necessary and how to do it
Any car enthusiast makes sure that his car is in perfect condition. If there are any problems with transport, they must be resolved promptly. So, if you see that there is a leak between the valve cover and the engine block, then you should suspect that the cover gasket is leaky.
Such an element does not have a global function in the operation of the system. But if problems arise with the gasket, then you should not turn a blind eye to them, despite the fact that the motor will work properly.
The faulty part must be replaced, otherwise oil will leak from under it. This point can cause a number of problems. So the valve cover gasket of a VAZ 2114 can be replaced independently without the involvement of specialists. Some craftsmen are of the opinion that the gasket needs to be changed every time the cover is removed. This point must be taken into account when carrying out various works.
Reviews
| № | Positive |
| 1. | Alexander: in two years of using the car I have never changed anything. I carry out prevention systematically, as prescribed by the instructions. I believe that a moderate driving style, high-quality oil, and original parts can work wonders. |
| 2. | Kirill: at 65,000 km I tightened one rod because it started to click when it was “cold”. I haven't changed anything until now. Everything is original installed. |
| 3. | Vasily: I replaced the timing belt in a year and a half. I thought it would be difficult, but it turned out to be the opposite. I recommend that motorists carry out preventive maintenance on their own. |
| 4. | Gennady: adjusting the valve clearances on Grant is not easy, but I was able to do it myself, without outside help. Instructions and video tutorials on the Internet are always at hand. |
| 5. | Ignat: after a year of using the car, the valves began to knock. At the service station the technician said that there was no need to change it, they limited themselves to tightening it. I still ride, no complaints. |
| 6. | Vladislav: for three years of using the car, I installed all the spare parts myself and did not contact the service center. Which is what I recommend to other Grantmakers. There were no major breakdowns, they were so insignificant. Fuel and oil filters don't count. |
| Negative | |
| 1. | Victor: My timing belt fell off within the first year after purchase, which turned out to be unexpected. I installed the new one myself, the process is not complicated. |
| 2. | Ivan: at 45,000 the valves began to knock, so I took it to the service station. The master said that the second and third valves were defective. Replaced with new ones. Buy Lada Granta in 16 cl. |
| 3. | Vasily: at the second service, I replaced the timing belt at the service center. Three teeth suddenly broke off, the quality is poor. |
Related link:
Expert advice on replacing the clutch cable on a Lada Grant
What do you need to know about the motor?
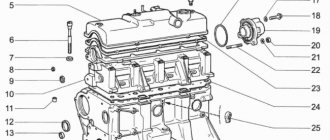
Before the valve cover of the VAZ 2114 is removed and the gasket is replaced, it is worth talking about the features of the engine. If you don’t know anything about design features, then the best solution would be to turn to specialists. Remember that to carry out such work you will need a certain tool.
Diagram of internal combustion engine components
| № | Detail number | Part name |
| 1 | 2108-1003298 | screw |
| 2 | 2108-1003278-01 | Washer |
| 3 | 2108-1003277-01 | Sleeve |
| 3 | 2108-1003277-02 | Sleeve |
| 4 | 2108-1003274 | Cover pin |
| 5 | 2111-1003260 | Cylinder head cover |
| 6 | 2108-1003271 | Bolt M12x1.25x135 |
| 7 | 2108-1003265 | Washer |
| 8 | 14328201 | Plug 10 cup |
| 9 | 14329101 | Plug 30 cup |
| 10 | 1118-1003011 | Cylinder head |
| 11 | 2101-1002042 | Sleeve |
| 12 | 14329201 | Plug 36 cup |
| 13 | 10158601 | Plug 16 spherical |
| 14 | 11183-1002011-10 | Cylinder block |
| 15 | 14234330 | Bolt M10x1.25x65 |
| 16 | 2108-1003284-10 | Ring sealing |
| 17 | 2111-1003284 | Ring sealing |
| 18 | 2111-1003286 | Bolt |
| 19 | 2111-1003288-10 | Stub |
| 20 | 10725911 | Nut M6 low |
| 21 | 11197773 | Conical spring washer 6 |
| 22 | 13541221 | Hairpin M6x22 |
| 23 | 2108-1003270-10 | Cover gasket |
| 23 | 2108-1003270-11 | Cylinder head cover gasket |
| 24 | 21083-1003020-10 | Head gasket |
| 24 | 21083-1003020-11 | Head gasket |
| 25 | 2112-3855020 | Knock sensor |
| 25 | 2112-3855020-01 | Knock sensor |
| 25 | 2112-3855020-02 | Knock sensor |
| 25 | 2112-3855020-03 | Knock sensor |
| 26 | 2101-1002040 | Sleeve |
In particular, a car enthusiast needs to have on hand the following details:
- ratchet with extension;
- head at 10;
- screwdriver with Phillips head.
Diagnosis of malfunction of the gas distribution mechanism
The process of diagnostics and identification of the source of failure is quite complex. Sometimes, without digital equipment, it is impossible to conduct a full inspection and assess the general technical condition of components and assemblies.
- Always go by ear. Feel the motor running. If you hear extraneous, previously uncharacteristic sounds, knocking on “cold” or “hot” - most likely the reason is in the timing belt;
- Pay attention to the level of fuel consumption, acceleration dynamics, and the informativeness of the accelerator pedal. Passivity, poor “responsiveness” are factors indicating a possible breakdown;
- Rhythmic operation at idle: in good condition, tact failures, tripping, and vibrations are unacceptable. The average speed is 950 rpm, the minimum is 850 rpm, the maximum is 1050 rpm.
Why do you need a gasket?
It is clear that without such a gasket the car will work as before. But you need to understand that it plays a certain role, even if it does not affect the technical features of the car. It is important that when a leak occurs, a number of serious problems can arise.
The gasket has a certain service life. It must be promptly replaced as it wears out.
If we consider the main task of this part, then it is worth saying that it is to ensure the tightness of the connection. In order for the connection between the valve cover and the engine part to be tight, a gasket is needed. You don’t need any special skills to find the cap, because it has a neck for filling engine oil.
Replacing the timing belt Lada Granta 8 valves
This topic was discussed in detail earlier, we will not dwell on it. Once again we remind you of the importance of purchasing an original drive belt for a technical device.
The vast majority of breakdowns occur due to the fault of owners who skimp on quality parts.
Original timing belt and fakes
When to replace?
It is worth figuring out exactly when it is necessary to replace the valve cover gasket on a VAZ 2114. The plant tries to use only high-quality gaskets, which is why the initial part lasts for a long time. After a certain period of time, parts lose their elasticity and may harden. This is why cracks and leaks can form.
Even a small leak can cause dirt and dust to enter the motor. Many car enthusiasts change the part when changing the oil. This is an excellent solution to the problem, as leaks can be completely eliminated.
Cases when it is worth replacing include:
- We noticed a clear oil leak at the junction.
- The motor is undergoing routine repairs, in which case a replacement can be performed.
- Carrying out technical inspection.
- Removing the cover.
How to replace?
Domestic cars are not perfect; over time, you may notice that oil is leaking from under the gasket. In this case, it is simply necessary to make a replacement. Of course, you can try to tighten the bolts more tightly, but this is unlikely to help solve the problem. If you are wondering how to change the valve cover gasket on a VAZ 2114, then you should proceed sequentially. Anyone can cope with such a task as replacing the valve cover gasket 2114.
The sequence of your actions should be as follows:
- First you need to loosen the clamps and disconnect the hoses.
- The next step is to remove the locking plate and remove the end of the cable.
- You will need to unscrew the bolts that allow you to tighten the cable bracket.
- You will see two nuts that will also need to be unscrewed and removed, as well as the rubber bands that are used for the seal.
- The valve cover can be removed.
- The old part is removed and the new one is installed.
When the cover is removed, it is worth cleaning the oil separator screens. This manipulation can be done by unscrewing the bolt and removing the cover.
Self-replacement - what needs to be taken into account?
The replacement process is considered quite simple, but you need to understand that it is not always possible to carry out the work smoothly.
That is why when carrying out work you should follow simple tips that will help you avoid mistakes:
- When removing the lid, you should wash it in turpentine.
- The optimal solution would be to use high-quality gaskets.
- All parts used must be clean; when carrying out work, experts advise wiping the edges of parts to remove any existing oil.
- During installation, you can use a sealant; it is applied to the joints.
- After the replacement is completed, you need to check the oil level.
- To check the system, you need to start the car; carry out a second inspection after making the first trip.
- The groove under the gasket should be cleaned as thoroughly as possible.
Tips for quality work
Not in all cases, motorists are able to carry out the procedure without problems. Sometimes an oil leak forms almost immediately after several kilometers of driving. There may be several most popular reasons for this:
- use of low-quality gaskets;
- insufficient amount of sealant used, careless application of it to the surface;
- misalignment of the cover caused by improper tightening of the fasteners.
You need to know that for cars there are diagrams for tightening the bolts on the covers, which can be found in the car’s operating instructions.
The replacement must be carried out when the engine has cooled down so that thermal expansion does not negatively affect the performance result.
To work with fasteners, you usually need a 10mm wrench. After unscrewing all the bolts, you must thoroughly rinse the parts to remove any remaining grease or old sealant.
Application of sealant
It is advisable to tighten the bolts using a torque wrench. If there is no scheme according to which the operation is carried out, then it can be found on the official website of the manufacturer. In any case, the fasteners are tightened from the middle to the edges.
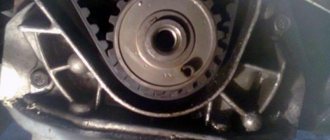
Valve cover replacement process
Valve cover removed from a VAZ-2114 engine
So, in order to replace the valve cover gasket on a car, you will need certain tools. What exactly is needed? Let's consider this question: a ratchet with an extension, a 10-mm socket, a screwdriver with a Phillips head.
Now that everything is ready, we buy a new gasket from the list recommended below and we can get to work.
Don't forget about the new sealant.
Let's consider the sequential stage of performing replacement operations:
- Loosen the clamps and remove the hoses shown below.
Shows which hoses need to be removed
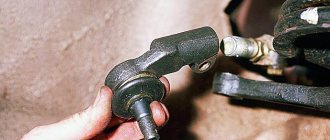
- After removing the locking plate, disconnect the accelerator cable.
Remove the locking plate and dismantle the throttle cable
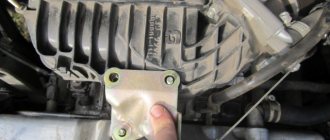
- Unscrew the mounting bolts securing the accelerator cable bracket to the receiver.
The process of dismantling the accelerator cable bracket
- Unscrew the nuts securing the valve cover.
Unscrew the valve cover mounting bolts
- We remove the rubber seals.
When the nuts are unscrewed, it is necessary to remove the seals
- Remove the valve cover upwards.
Pull the lid up
- Now you need to clean the oil separator screens. To complete the process, you need to unscrew the valve cover.
Unscrew the oil separator fasteners
Removing the oil separator cover
Oil separator screens that need to be cleaned If the screens are dirty, they need to be washed.
- If the nets are dirty, they need to be washed.
During the cleaning process
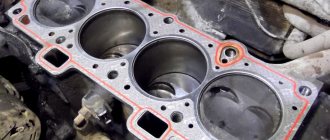
- We install a new gasket. When performing the process, we use a sealant.
Applying sealant
- If everything is tightened correctly, the gasket will fit perfectly and prevent oil leakage.
Place the gasket on the sealant
- We carry out the assembly in the reverse order.
Preparing for work
The valve cover gasket can be replaced in any convenient place - in an open area or in a garage. There is no need to drain engine lubricant or antifreeze. What tools will be needed for disassembly:
- a head with an extension and a knob, suitable in size to the cover mounting bolts;
- flathead and Phillips head screwdrivers;
- pliers;
- rags.
Work is carried out with the power unit cooled down to a comfortable temperature. If you don’t have time to wait for the engine to cool down, perform disassembly wearing cloth gloves that protect your hands from burns.
Before replacing, prepare the following consumables:
- a new gasket element selected according to the car model;
- O-rings for bolts (installed on certain brands of cars);
- high temperature sealant and degreaser such as white spirit.
The use of sealants to treat the seal before installation is not necessary. For example, on engines of classic VAZ 2101–07 models, the gasket does not require additional sealing. On 16-valve engines with a wider flange, the use of sealant is desirable, but not required.
Advice. Take your time to buy and change a gasket that leaks a little oil at one point. First, check and tighten the threaded connections - perhaps the seal has sagged and the bolts have become loose. If the operation does not help and drips still appear, the gasket element will have to be replaced with a new one.
Analogues (manufacturers)
Valve cover gasket made by Goetze
Of course, the manufacturer and many automotive experts recommend installing the original valve cover gasket, but, as practice shows, substitutes are often of higher quality and have a much longer service life.
So, let's look at which analogues of the original part are recommended for installation on a car:
| Manufacturer's name | Catalog number | Cost in rubles |
| Glaser | X08964-00 | 300 |
| Goetze | 50-025881-00 | 750 |
| Ajusa | 56021200 | 1000 |
| Trialli | GZ 101 7022 | 1500 |
As you can see, the cost of alternative gaskets is quite high, but as practice has shown, the service life of the parts is twice as long as the original.
Valve cover gasket made by Elring
Conclusion
Despite the simplicity of the algorithm for replacing the timing mechanism on an eight-valve engine, it is still better to contact a service station for professional installation. The timing belt is not a mechanism that you can skimp on the quality of tuning.
Subject to the manufacturer's recommendations and moderate driving style, the timing service life is more than 80,000 km.
Frequent breakdowns that occur are due to the fault of the owners of the technical equipment, as a result of violation of the rules for using the machine.
Reasons for gasket failure
When all the processes have been sorted out and the choice of valve cover gasket has been decided, it is necessary to consider the reasons for the failure of this element:
- Wear. Perhaps the most common reason is that during use this element tends to crack because it is constantly exposed to hot oil.
- Stretching. Constantly high temperature negatively affects the rubber product, which loses its physical properties and stretches, which entails a loose connection and the passage of lubricant.
- Oil streams. Occurs due to gasket breakdown. This usually happens after the engine overheats severely.
Oil Creek
- Pressure. Excessively high pressure can squeeze the gasket out of its seat, which will cause oil to flow like a river.
Consequences of untimely replacement
Dirty valve cover and filter elements
There are not many consequences, but they are quite compelling to change the gasket in time.
- Firstly, this is directly related to oil leakage, which reduces the volume in the engine. Even if the loss is insignificant, it may just be enough for the internal parts of the power unit to wear out faster.
- Secondly, air constantly gets under the valve cover, which can affect the quality of the air-fuel mixture and the engine will begin to “eat” a sufficient amount of fuel.
- Thirdly, dirt and foreign objects, as well as water during winter and rainy periods, can enter through the resulting cracks. This can negatively affect the operation of the power unit, cylinder head and other elements, as well as affect the performance of the entire system as a whole.
- Fourthly, leaked oil contaminates the outer part of the block, onto which dirt clings. It can also affect the operation of the power unit and other elements.
How to replace the cylinder head cover gasket on a VAZ 2114
Removal procedure:
Remove the decorative trim from engine 11183 (1.6i)
We disconnect the drive cable from the throttle valve and, together with the mounting bracket, move it towards the radiator
Using a Phillips screwdriver, loosen the clamps securing the three hoses of the crankcase ventilation system. Remove the hoses from the cylinder head cover pipes.
Using a 10 mm socket wrench, unscrew the two nuts securing the cylinder head cover
Remove the washer and rubber bushing from both studs.
Remove the cover.
Remove the gasket from the cover.
Flushing
Unscrew the oil filler plug.
Using a 10 mm socket wrench, unscrew the two bolts securing the oil separator housing.
We remove the body.
Remove the oil separator screens.
We wash the removed parts in kerosene, wipe with a rag and blow with compressed air (from a tire pump).
We assemble the oil separator in reverse order.
Replacement instructions
Before you begin, open the hood and look for any elements that may interfere with the removal of the valve covers from the cylinder head mounting flange. Usually before disassembly you have to remove the following parts:
- an air duct laid from the throttle body to the air filter;
- the filter element housing itself;
- a cable connecting the throttle drive to the accelerator pedal;
- crankcase ventilation pipe;
- electrical wiring harnesses.