Every motorist sooner or later encounters problems with his car and, as a result, the need for maintenance. Even if everything is fine with the machine, experts advise periodically checking the condition of parts and all mechanisms.
To ensure that your car lasts a long time and does not cause material and mental problems, you should promptly contact specialists if the slightest problem occurs. Experienced drivers often carry out diagnostics and repairs themselves.
Frequency and signs of replacement
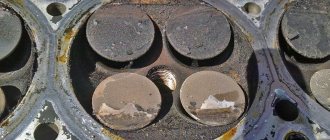
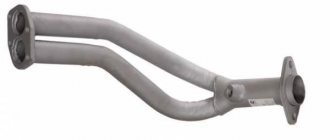
There is no specific time frame for replacing the cylinder head gasket on the Lada Kalina. Over time, it can become unusable under the influence of various factors. The gasket can break through in different places and, depending on the location of the crack, the signs of damage will be different. The symptoms will be the same for both 8-valve and 16-valve engines.
Symptoms of gasket damage:
- When the gasket breaks along the side of the cylinder circumference, gases begin to escape outward. At the same time, the noise level of the VAZ Kalina engine increases sharply, which will be immediately noticeable to the driver.
- A hole between the cylinders disrupts the operating mode and the engine begins to operate unevenly and triple.
- Destruction of the gasket with a rupture entering the coolant supply channels. At the same time, gases begin to enter the cooling system. One of the external signs of such a problem will be a decrease in the fluid level and the appearance of white steam in the exhaust gases. Gas bubbles may appear in the expansion tank. Another sign is the appearance of an emulsion in the oil, accompanied by an increase in the level of lubricant in the crankcase. Oil can also go into the cooling system, which is easy to detect by its presence on the surface of the liquid in the expansion tank.
- Another indirect symptom of a gasket burnout is the appearance of stains or leaks of oil or coolant on the parting line of parts and on the side surface of the engine crankcase.
Causes of malfunctions and diagnostics
Failure of rubber-metal joints can be determined by a number of signs:
- Steering wheel play. The steering wheel turns with greater effort, and its free play also increases.
- Alarming sounds that appear every time you turn the steering wheel.
- Difficulty controlling the car in turns.
- Uneven wear on the right and left front tires.
It is better to start inspecting the steering tips on the left side of the car. To do this, turn the steering wheel to the right all the way. It’s best if the car is standing on an overpass - it’s more convenient to inspect the part.
The first thing to check is the condition of the steering tip boot. If there is even the slightest crack on it, then the hinge must be replaced without question. Otherwise, dust that gets inside through it will simply make normal car control in corners impossible.
To examine the condition of the ball joints in more detail, place the car on a jack, lifting the left side so that the left front wheel rotates freely, and check the tip play. If a part is loose, this also indicates that it needs to be changed.
Do-it-yourself replacement of the internal combustion engine valve cover gasket
If we don’t talk about a specific car model, the gasket is changed as follows.
First of all, I disconnect all the hoses and pipes that are connected directly to the valve cover. Next, I unscrew the gas pedal drive cable. Then I unscrew the bolts and remove the cover. Then I remove the old gasket.
In order for the sealing element to work effectively and to avoid leaks in the future, it is important to thoroughly clean the surfaces of oil. You also need to thoroughly degrease both surfaces - both the cover and the cylinder head. Gasoline or carburetor cleaning fluid is suitable for degreasing.
Next, you can install the cylinder head cover and tighten the bolts. Here it is better to use a torque wrench - it is important not to overtighten.
Select the vehicle modification to search for the valve cover gasket
Engine: volume - 1.6 liters, power - 82 hp, type - petrol, model - VAZ-11183. Drive: front. Year of manufacture: 2011-present time
Engine: volume - 1.6 liters, power - 87 hp, type - petrol, model - VAZ-11186. Drive: front. Year of manufacture: 2011-present time
Engine: volume - 1.6 liters, power - 98 hp, type - petrol, model - VAZ-21126. Drive: front. Year of manufacture: 2011-present time
Engine: volume - 1.6 liters, power - 106 hp, type - petrol, model - VAZ-21127. Drive: front. Year of release: 2013-present time
In the next step, for an expanded selection, you can enter the vehicle's Vin code to go to illustrated catalogs, where you can find the layout of parts down to the bolt and duplicates that are not in the catalog of analogues.
- Description
- Reviews (0)
- Question answer
Valve cover gasket for Lada Granta / Kalina-2 / Priora, Datsun for 8-cl engines. White silicone.
Preparing to remove valves
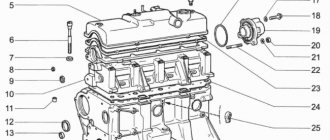
We will make a replacement on this engine (21120)
However, on a VAZ-2112 engine it is easier to replace valves by dismantling the cylinder head: to press in new guides, the cylinder head plate would have to be heated. It's best to leave the valve guides in place. But then you will have to remove different equipment:
- There is a connector under the fuel pump hatch (photos 1 and 2). Turn it off so that the fuel pump stops pumping;
- Start the engine and let it stall;
- Remove the air filter: loosen clamps 1 and 2 and disconnect connector 3 (photo 3). Then use a 10mm wrench to unscrew the screw (photo 4).
All actions are illustrated by one photo.
Lowered the pressure, almost removed the filter
Remove the plastic filter housing along with the supply hose.
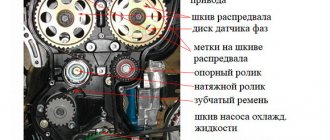
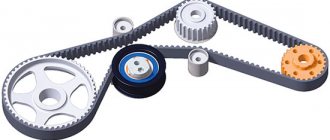
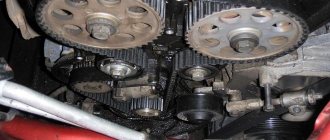
Disassembling the timing mechanism
Our goal is to remove both camshafts. On the VAZ-2112 engine, valve replacement can be performed even without removing the cylinder head. But the shafts will interfere in any case. Procedure:
- The negative terminal is disconnected from the battery;
- Remove the wires from the spark plugs, then disconnect them from the coils;
- The ignition module must also be removed (photo 2), and the crankcase ventilation hose must also be removed (photo 3);
- The bracket fixing the injector wiring is screwed to the cylinder head cover (photo 3). Remove it! The same is done with the bracket of the second harness (DPZ and IAC);
- It will be necessary to remove the receiver (photo 4). And the intake manifold holes are covered with fabric.
We change it with our own hands
Necessary tools
To replace tie rod ends you will need:
- Special puller for ball joints.
- Socket wrench 19.
- Torque wrench.
- Hammer.
- Spanner 13.
- Keys for 27 and 24.
- Jack
- Penetrating lubricant
How to change: step-by-step instructions with photos
- The front wheels of the vehicle must be suspended and removed. Next, on the left steering knuckle stand, use a 19mm wrench to remove the fixing nut.
Step one. Remove the 19 mm nut
Loosen the pinch bolt on the steering knuckle
Step 3. Knock out the rod end pin from the steering knuckle
The penultimate step. Release the steering tip
Removing the tie rod end. Rotate clockwise
Assembly is carried out in reverse order. Similar actions should be carried out on the other side of the car.
After replacement, it is recommended to check and adjust the wheel camber, since most often after the procedure it is disturbed.
How to replace (video hint)
Checking the correct operation of the steering should be mandatory for every car owner, as it seriously affects the safety of car operation. In addition to faulty tie rods, excessive play in the steering wheel can be caused by worn tie rod ends.
Replacing valves (tool)
On cars with an eight-valve engine, valve replacement can be done on your own if you have certain skills in this matter, as well as special tools. To work you will need:
- A tool with which you can remove crackers from the valve (desiccant).
- Remover for caps that remove oil. The choice of oil for the 8-valve Lada Kalina engine must be taken care of in advance.
- Head at “13” and knob.
The process of replacing valves on an 8-valve valve
The process of replacing valves on all engines with eight valves is almost identical. Subsequence:
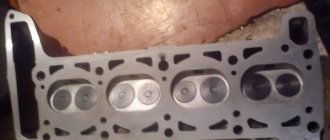
The cover was removed and the camshaft was visible.
We got to the cylinder block
In the case when an old valve is installed, it must be thoroughly cleaned of carbon deposits. If the valve is new, then it must be ground in so that fuel or air does not escape from the combustion chamber.
Setting the valve clearance
The process must be carried out on a cold engine with the valve covers removed. To do this, it must be dismantled by unscrewing the fastening bolts. Then you need to remove the cover that covers the timing belt. There is no need to touch the alternator belt.
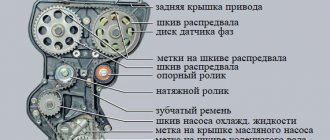
Remove the timing cover, then remove the spark plugs for convenience
The spark plugs are turned out so that the engine can be cranked more easily. The oil is also completely removed from the head to make work easier. You can use a syringe for this. If the camshaft has worn cams, it should be completely replaced. A device that recesses the valve is screwed into the place where the cover is attached. Use a wrench to turn the crankshaft until the marks on the pulley match the marks on the belt cover. After this, you still need to turn the crankshaft three teeth. In this case, the piston will reach its dead center. There is no need to change the oil after this procedure.
This checks the valve clearance
First you need to check the clearance on the first and then on the third cam. The probe should have a size between 0.2 and 0.35 mm. If the move is large, then you need to change the washer. If all the work is done correctly and using a special tool, then there will be no difficulties in the process. All remaining valves are regulated according to this principle.
The video below describes the process of adjusting the valves; the basic principle is the same, since the Kalina and Samara engines are of the same family.
Installation of a new VAZ 2110 steering end, key points
As already mentioned in the previous sections, replacing the steering ends of a VAZ 2110 disrupts the wheel alignment setting on your car. In order to somehow preserve it, we advised you to count the number of revolutions of installing the product on the steering rod. For the same purpose, a new VAZ 2110 tip must be purchased completely similar to the failed one.
Before installing the part on the car, the amount of lubricant in the hinge joint of the product is also checked. There is no point in feeling sorry for her. The boot is then pressed firmly into place, protecting the joint, and the end is screwed back onto the tie rod at the same number of turns as we previously counted during removal.
When doing everything according to the manufacturer’s instructions, you should not forget about the tightening torque of bolted connections. A special torque wrench will help you with this. Working with him is extremely simple. The regulated tension forces according to the official instructions are as follows:
- for securing the ball pin of thrust from 27 to 33 N;
- the tightening bolt is tightened with a force of 19 to 30 N.
If you don’t have this kind of key, nothing bad will happen. The main thing is to tighten it without unnecessary fanaticism, but also firmly enough. We remember that after completing the work, it is highly advisable to visit a service station to adjust the wheel alignment. The number of revolutions is a very rough measurement. Even one millimeter difference in the installation of the old and new parts can significantly affect the final result.
Engines "Lada Kalina"
Machines of this type are equipped with several types of engines. Each of them has its positive and negative sides. The first Lada Kalina produced by AvtoVAZ was equipped with an engine with eight valves. Its working volume was 1.6 liters. Then the car began to be produced with an engine with 16 valves, with a slightly smaller volume, only 1.4 liters. The most expensive model of the Kalina, which is a sports type, is equipped with an engine from the Priora, which has 16 valves and a volume of 1.6 liters. Three years ago, the brainchild of VAZ began to be equipped with a new engine. It, like the first engine, has 8 valves and a volume of 1.6 liters, but differs from its “brothers” in that it has a lighter piston system. As a result of this change, power increased and the engine began to behave more responsively. Today, this engine is mainly installed on the Grant, which replaced the Kalina Sedan. Perhaps in the future every Lada Kalina will be equipped with such an engine.
What to choose?
When starting to replace tips, most owners of domestic tens ask themselves questions: which ones are better?
You have two options to choose from.
| Part type | Peculiarities |
| Factory originals | Good quality, full compliance with the design of your car. |
| Imported, manufactured under contract | There are different manufacturers, so the quality may vary. If you find a good contractor, the level of tips they produce may be higher than the factory original. But the cost will be slightly different. |
As you can see, both options have their own characteristics and advantages. So make the choice yourself.
When choosing tips, pay special attention to the quality and integrity of the rubber boot.
Valve cover gasket: purpose and causes of failure
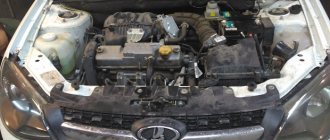
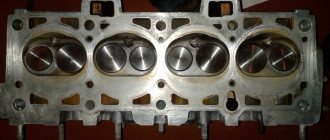
After the driver lifts the hood and looks into the engine compartment, the valve cover is the first element to look at.
This cover is designed to seal the timing belt, which is located in the cylinder head. This element also has an oil filler neck for pouring oil into the internal combustion engine. The cover is usually attached to the cylinder head with bolts. Removing the cover allows you to get to some elements of the timing mechanism without having to remove the cylinder head. The cover is attached to the head through a sealing gasket. However, it should be noted that oil leakage through the valve cover gasket leads not only to increased lubricant consumption, but also to severe external contamination of the engine, which requires periodic cleaning of the internal combustion engine. Moreover, heavy oil leakage through the valve cover gasket on many engines means that oil gets into the spark plug wells, spark plugs become dirty, etc.
The gasket itself is a rubber product, which allows the element to operate under conditions of constant temperature changes and not lose its properties as a result of constant contact with engine oil. In this case, sooner or later the rubber dries out and becomes hard, and the gasket material cracks. For this reason, oil begins to gradually leak through the gasket, contaminating the engine compartment and the outside of the power unit.
During vehicle operation, replacing the valve cover gasket is a standard procedure that has to be carried out quite often on some internal combustion engines. The valve cover gasket is usually replaced in the following cases:
- an oil leak has appeared or oil leaks have become too intense;
- when the engine or timing belt is repaired, that is, the valve cover is removed;
In other words, you can change the valve cover gasket both when subtle signs of leakage are detected, and during repair work that involves disassembling the internal combustion engine, removing the cylinder head, etc. Let us add that some car enthusiasts change the gasket every 15-30 thousand kilometers traveled, regardless of whether there is a leak or not. This is quite justified considering how much a valve cover gasket costs, it allows you to always keep the power unit clean, and also makes it possible to assess the condition of individual timing elements after removing the cover to replace the gasket.
How to remove the valve cover and replace the gasket on a VAZ 2110-2112 8-cl.
So, the first thing you need to do is open the hood of the car and, using a 10mm socket, unscrew the two bolts securing the throttle cable bar, as is clearly shown in the photo below.
Take it to the side and secure it so that it does not interfere with us in the future.
Then, using a Phillips screwdriver, unscrew all the clamp screws on the hoses that fit the valve cover. In the photo below they are all marked with arrows:
And remove all three pipes:
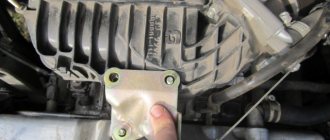
When you have completed this step, you next need to unscrew the two nuts securing the valve cover to the cylinder head body.
And only after this, carefully remove the valve cover, lifting it up without sudden movements.
Now as for replacing the gasket. It is installed in the groove of the cover from the inside. We pry it with our fingers or a thin object and pull it out. This procedure is clearly shown in the picture below.
After this, we wipe the surface of the cylinder head and the groove of the cover dry, install a new gasket and you can put everything back in place.
Also, it is worth paying attention to the integrity of the rubber seals under the cover fastening nuts:
Typically, such rubber bands are sold complete with a gasket. The price of such a kit is about 120 rubles for VAZ 2110-2112 with 8-valve engines. After installation, we connect everything in place.
Steering mechanism: parts and principle of operation
Cars of the Lada Samara model line received safety steering, which can be adjusted to the height of the steering column. The VAZ 2110 car has a rack and pinion mechanism, which includes the following parts:
- Retaining ring.
- Steering wheel.
- Casing.
- Column.
- Bracket.
- Adjustment lever.
- Traction and tips.
- Shaft bearing.
- Upper shaft.
- Hole for sound signal.
The steering mechanism works on a simple principle: the driver, by turning the steering wheel, changes the direction of movement of the car. Levers and shafts ensure the transmission of force to the chassis of the VAZ 2110. This model line does not provide an electric or hydraulic booster, so more effort is needed to turn the car than on foreign cars. The steering column allows you to adjust the tilt of the steering wheel; the mechanism is adjusted manually.
Replacing the valve cover gasket of a VAZ 2108, 2109, 21099 engine
We will replace the valve cover gasket of the engine block head 21083 (2108, 21081) of VAZ 2108, 21081, 21083, 2109, 21091, 21093, 21099.
Such work will have to be done, for example, if there is an oil leak under the cover. It is also recommended to do this every time you remove the valve cover while repairing the car engine.
Necessary tools, accessories and spare parts
— New valve cover gasket for engine 21083 (21081, 2108)
— Key or head at “10”
Preparatory work
— Remove the car engine air filter housing