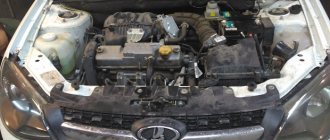
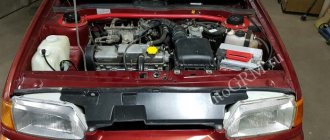
2013 was the year of birth of the Lada Kalina 2, which was almost completely modernized compared to its predecessor. The car has become popular not only in the regions of the Russian Federation, but also in countries far and near abroad. The car belongs to the small class, but has quite good capacity.
Lada Kalina 2 or VAZ 2192 is equipped with a line of power units with a displacement of 1600 cm3. They differ not only in power indicators, but also in the number of valves in the cylinder head. There can be 8 (engine 11186) or 16 (engines 21126 and 21127), the timing mechanism is driven by a toothed belt.
Timing belt - what is it?
Features of model 2110
The features of this model include the following:
- Availability of ventilated brake discs.
- Galvanization of parts that most often rusted in older models.
- On-board control system.
The gas distribution mechanism on the VAZ 2110 suffers from frequent breakdowns, or more precisely, from damage and ruptures of the timing belt, which is a closed rubber ring, the dimensions of which vary in different engines. It is possible to replace it without any particular difficulties; if you have time, you can figure out this procedure yourself, saving on repairs in the workshop.
And also, its damage may indicate problems with the gas distribution system, which are worth investigating. Let's look at how to replace a belt and analyze damage to the timing belt.
About the engine
The engine performance of the 2110 is quite good for the time it was produced.
On 2110 cars, a variety of engines were installed, both carburetor and injection, with 8 valves (VAZ 2111, 21114) and with 16 valves (VAZ 21120, 21124).
List of VAZ 2110 engines:
- 2111,
- 21114,
- 21120,
- 21124.
According to the standard, the VAZ 2110 was equipped with an 8-valve engine, in variations numbered 21114 and 2111, which differed in minor characteristics. The 8-valve engine, marked 21114, earned the greatest recognition due to its high power and relatively low fuel consumption.
The standard operating mileage for this engine is 250,000 km. When using high-quality oil poured into the engine, you can extend the life of the car by 20–30 thousand km.
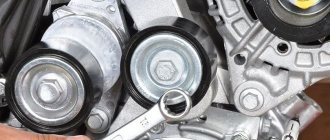
Purpose of the crankshaft pulley
The crankshaft pulley on the VAZ 2110 serves the following purposes:
- Reducing the amplitude of crankshaft vibrations during resonance. In particular, for this purpose, some craftsmen install a lightweight version of the crankshaft.
- Reducing noise from the operation of the power unit.
- Rotation of mechanisms that are directly involved in the operation of the motor. This happens with the help of gears and a belt.
- The damper, in turn, addresses pulses corresponding to the number of crankshaft revolutions to the ECU.
Crankshaft damper pulley VAZ 2110
The VAZ 2110 car has a crankshaft damper pulley. The pulley itself transmits torque to additional units. The part is a flat ribbed wheel with a special hole for installing a belt. To improve performance, automakers equipped the pulley with a damper. Damper - a rubber layer to dampen vibrations that occur in cars. However, with this innovation, the life of the pulley has been reduced because the damper loses elasticity due to excessive loads. Sometimes the pulley breaks completely, which is why the VAZ 2110 stops moving.
Possible faults
The crankshaft pulley is removed in the following cases:
- In the case of a VAZ 2110 hub turning. In most cases, this occurs due to careless repairs. The VAZ 2110 car is equipped with a special fixing sleeve, which is pressed into the gear. If installed incorrectly, it may fall out, which will cause the hub to rotate.
- In case of lubricant leakage from under the crankshaft oil seal. It needs to be removed and replaced with a new one.
New oil seal - In case of strong resonance.
- Incorrect pulley type installations.
- Incorrect damper installation.
- A split in the place where the damper is installed. In this case, replacement is necessary, and better yet, together with the crankshaft gear.
- When removing the crankshaft - for repair work, changing bearings, etc.
Lada 2112 2007, 89 l. With. - with your own hands
Lada 2112, 2007
Lada 2112, 2007
Comments 48
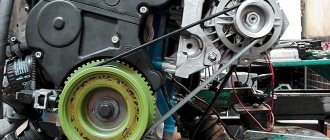
I don’t know what they write about here regarding belt tension on 2112, on PRIOR everything is tightened little by little through the tension roller. The right branch of the belt through the guide roller should already be laid: - through two camshaft pulleys, a crankshaft toothed pulley, through a pump and have sufficient tension. In this case, the marks on the camshaft pulleys and the crankshaft toothed pulley must be fixed using the corresponding counter marks
In this position, holding the belt with your hand on the left side of the branch, on the side of the tension roller, so that it does not weaken and does not jump over the teeth, no matter where and in what place (and this is possible even for one tooth), we place or slip the tension roller under the belt , insert its bolt and tighten everything with such a turn of the roller by hand that the belt does not loosen and does not jump over the teeth
Next, spin the engine several times, or maybe it’s better, by the wheel with 4-5 gear engaged, and make sure that all the marks on all the pulleys match perfectly. How to recognize the mark on the ring gear of the generator drive pulley on the crankshaft, I have already written below and given a drawing. With the wheel removed and the stand hanging with the steering wheel turned, this ring and the DPKV are clearly visible, or almost well, through the mirror.
Then, after cranking the engine several times by hand, carefully, slowly - and what the hell is not joking, the marks didn’t match when parked and the valves were bent with the starter, yikes, then you begin to tighten the roller to working condition. At the moment when, when cranking the engine, the right branch self-tensions when viewed from the side of the pulleys - and the left one weakens, this is where you need to tighten the roller - like how everyone around writes and rips off each other. On a Priora, the tension of the roller can be general or weak, the belt will jump, or the roller may be pressed against the belt so that it and other damn spare parts will feel sick
At the moment when, when cranking the engine, the right branch self-tensions when viewed from the side of the pulleys - and the left one weakens, this is where you need to tighten the roller - like how everyone around writes and rips off each other. On a Priora, the tension of the roller can be general or weak, the belt will jump, or the roller may be pressed against the belt so that it and other damn spare parts will become sick.
Don't be afraid to start the engine to see how your video lives when the engine is running. Nothing will happen to either the belt or the roller when adjusting in a tightened state. The main thing is that the belt does not dangle too much, otherwise it will either fly off or fly like plywood over the toothed pulleys and fucking bend the valves. If the tension roller is dead, overtightened, the belt may hum a little from the overtightening, which in turn will affect on a PUMP, therefore, it will not last long due to a strongly tightened belt (of course it will not immediately fall apart) - then we begin manipulations to tension the roller. The ROLLER on the Priora should be alive when the engine is running. It should vibrate inconspicuously on the tension spring and this is clearly noticeable, and when you press the gas sharply it jumps, pushing up well with the belt and this can be seen even by a blind mole.
What is written in the Talmuds about how to pull a roller does not always coincide with reality. Therefore, it may be that when you set it up as written in the bible for dummies, the roller will simply rest in peace and will not work properly. Therefore, everything is relative to different manufacturers and defects.
In general, honestly, it’s better to under-tighten the roller a little than to over-tighten it. The roller, the pump and the belt will live. The main thing is to watch and listen for extraneous sounds in the timing belt area.
More than once I had cases where the belt was about to fly off, dangled and shouted, pull me up, even rubbed the protective cover. The casing probably saved the day because the belt did not fly off and the piston did not stick into the valves.
But for those who have plugless pistons, they are destined to drive on loose belts. Well, just think, it fell off, hey, hey, but everything lasts a long time and doesn’t break. By the way, the tenth cans have 2110 and some others may have rollers with flanges, they don’t have to worry too much about it, these rollers won’t let the belt fly off just like that from weakness. — It’s okay to slip over the teeth of the pulleys, well, just think, the traction has dropped or it’s completely stalled, corrected it, tightened it and again the gas is up to the limit. The main valve head and pistons cannot be killed. They already write on the Internet that AvtoVAZ began producing engines with 98 hp. and 106 hp with plugless pistons - Freebie please! But the 1.8 liter engines are 122 hp. Not yet, just look for and install such pistons yourself.
So, change the pumps themselves and the safety belts. brr timing belt and don’t be afraid of anything. The main thing is logical thinking and the right approach to what you want to do.
Belt faults
Malfunctions of the timing belt can arise as a result of its long-term operation, and can also be the result of incorrect adjustment or malfunctions of the pump or tension roller. These include:
- violation of the integrity of the belt (cracks, delamination);
- deformation;
- belt break.
If any of the specified malfunctions are detected, the belt must be replaced.
Causes of belt breakage
One of the common problems with the model is the failure of the timing belt. The reasons for this may be different:
- Simple wear and tear caused by a long period of use of the vehicle;
- Regular increased loads under which the engine has to work intensively;
- Mechanical damage as a result of improper operation or received during the repair of other components;
- Manufacturing defect.
Over time, it stretches so much that the gear teeth jump by 1-2 links. This disrupts the valve timing and causes interruptions in engine operation. But this is the best-case scenario for such a situation. The worst is when the strap breaks and the valves bend.
List of damage to the timing belt on the VAZ 2110
Replacing the timing belt of a VAZ 2110 8-valve injector with your own hands is carried out:
- As a result of increased tension, the surface begins to become shaggy. Gaps appear.
- If the product was loosely tensioned, this leads to cutting off the tooth. In such a situation, replacing the 8-valve timing belt on a VAZ 2110 is required immediately.
- The teeth are largely worn. This is also a consequence of poor tension adjustment.
- The surface of the product is covered with small cracks. This happens due to prolonged overheating or hypothermia.
- Sometimes the wear area is between the teeth. This is also the result of poor belt tension.
- If oil constantly leaks from the engine and gets on the belt, then the product is removed. Then you need to find and fix the leak. The timing belt is replaced with a new one.
- On a VAZ 2110 with 8 valves, the timing belt is changed if there was a misalignment during its installation. Its end wear is observed.
When driving the car, you must constantly listen to noises. When it is clearly audible in the engine area, it means you need to stop and tighten the belt.
In some cases, the tooth skips. This problem is indicated by a signal from the sensor. It is necessary to stop and carry out another drive adjustment.
Belt life
From time to time you need to inspect the belt and replace it if:
- the belt structure began to delaminate;
- cracks appeared on the surface;
- the teeth that are on the inner surface of the consumable are damaged.
But what could be the reasons that the consumable has reached a state where it is no longer possible to do without replacing it:
- the consumable was not properly tensioned initially;
- the belt has been used longer than expected;
- a lubricant has reached the surface;
- the water pump did not work well;
- the tension roller had play.
If you do not periodically inspect the belt and do not change it on time, this can ultimately lead to a break. And a break is very serious, since in this case the pistons will collide with the valves. As a result, they will be damaged and the engine part will have to be seriously repaired. A broken belt drive will cause real chaos, as a result of which other timing parts will also suffer serious damage.
The manufacturer promises that you should be interested in the condition of the belt only after 50,000 km. This is not entirely true, because premature wear of consumables can be influenced by a number of factors, such as aggressive driving or weather conditions. Therefore, it is recommended to inspect the belt drive after 20-25,000 km.
Signs by which you can determine the need to replace the VAZ 2110 timing belt
To replace the timing belt on time, you need to monitor the condition of the engine. The timing belt needs to be replaced if:
Replacing the VAZ 2110 timing belt and tension pulley with your own hands
- there are oil leaks on it;
- there are many cracks and signs of increased wear on its surface;
- timing belt teeth are damaged;
- the belt has delaminated, cuts, bulges or folds have appeared;
- threads appeared on the surface.
Honda GC 135 engine analysis
We directly disconnect the engine from the unit (remove the pulleys, starter flywheel, frame, etc.), we get the following:
We unscrew the cover bolts, pry the cover evenly around the perimeter (it sits on the sealant) and remove it, we get the following:
We remove the magneto and flywheel (lock the shaft, unscrew the nut and knock it off the cone by tapping). Don't forget about the keys, don't lose them.
Next is the crankcase. The plane of connection between the crankcase and the head is at an angle. We unscrew it around the perimeter of the crankcase (there are many of them), pry it along the seam with a strong screwdriver (it sits on the sealant). The direction of removing the crankcase is along the crankshaft, and not along the plane; the guide tubes are visible there in the photo.
We gained access to the crankshaft, later we will unscrew the two bolts with the numbers 12.
In order to avoid problems later when assembling and installing the timing belt in the correct position, we will make notes on the pulley and crankshaft gear relative to the marks on the belt. We remove the belt, unscrew the bolts on the crankshaft, remove the piston (here you will have to play around, since it comes out at a certain position. Remove the crankshaft. We received the following picture from the cylinder side
And then we are engaged in examining the problems. In my case, it was a ring on the piston (there were no scuffs on the cylinder). I bought the rings in a Honda brand store (on Google) for 1000 rubles, since the search for a cheap equivalent did not yield anything. Well, since the oil spilled through the air filter, then I carefully cut out the paper of the old filter, bought a regular filter for Lada cars (I don’t remember exactly which model for 100 rubles, the width and thickness were the same), removed the parallon, cut it to the required length and secured it with sealant. By the way, a native filter for GC135 costs approximately 500-600 rubles.
We received a new filter. When assembling, we clean anything, remove old silicone, degrease, apply sealants where necessary, check for unnecessary parts. After assembly, the engine does not start on the first try, so do not be alarmed
Causes of belt breakage
One of the common problems with the model is the failure of the timing belt. The reasons for this may be different:
- Simple wear and tear caused by a long period of use of the vehicle;
- Regular increased loads under which the engine has to work intensively;
- Mechanical damage as a result of improper operation or received during the repair of other components;
- Manufacturing defect.
Regardless of the causes of the problem, it must be eliminated.
Over time, it stretches so much that the gear teeth jump by 1-2 links. This disrupts the valve timing and causes interruptions in engine operation. But this is the best-case scenario for such a situation. The worst is when the strap breaks and the valves bend.
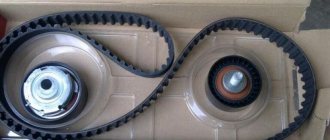
Help in choosing a timing belt and rollers
The reliability, efficiency and operating life of the motor depend on the quality of the rollers and belts chosen for replacement.
Research shows that the cost of a belt is from 450 rubles, and rollers will cost you at least 600 rubles.
When buying spare parts, be guided by the opinions of VAZ 2110 car owners. There are many forums. Also consult with specialists at the service station. They will be able to give professional advice, or even order quality components for you.
Surveys among owners of AvtoVAZ’s creation, namely the VAZ 2110, showed that the most popular belts are products manufactured by the following companies:
- Gates;
- Bosch;
- Kraft;
- Power Grip;
- Dayco;
- Contitech.
As for videos, it’s better to pay attention to the following brands:
- Gates;
- Power Grip;
- VPZ;
- BRT;
- Dayco;
- Marel.
Of course, the choice is purely individual and depends on the financial capabilities and available assortment of a particular store. But if the necessary elements are not available in your city, you can always order them online. Nowadays this is not a problem.
Manufacturer's recommendations
- Your primary task as a car owner is to periodically visually inspect the unit.
- In addition to replacing the element, it is necessary to simultaneously replace the tension rollers.
- VAZ 2110 comes with 8 and 16 valves. The replacement process also depends on this. So, in an 8-valve valve, one tension roller is installed, and in a 16-valve valve, a support and a tension roller are installed.
Replacing the timing belt of a dozen is not difficult. It is not necessary to contact specialists. It is quite possible to do it on your own.
Set of tools
To complete the job of replacing the timing belt you will need:
- A set of spanners and open-end wrenches;
- Mount;
- Screwdriver Set;
- A special key with which to tighten the roller or simple pliers with curved rings;
- Car jack;
- Rags, protective gloves.
Many people ignore the advice on using gloves. Especially in the summer when it's hot. But they are needed to protect you from injury.
There is no need for an inspection hole. You will need to remove the right wheel to remove the timing belt if your Ten is equipped with power steering. So you can't do without a jack.
Preparatory work
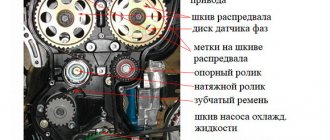
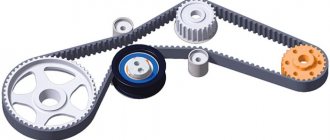
Before you start work, familiarize yourself with the timing system diagram and the location of the marks on the camshaft and crankshaft.
This is what a detailed timing belt diagram looks like.
Diagram: 1. Crankshaft pulley. 2. Timing belt. 3. Water pump pulley. 4. Tension roller. 5. Intake camshaft pulley. 6. Upper timing belt protective cover. 7. Exhaust camshaft pulley. 8. Phase sensor synchronization dial. 9. Support roller.
A – TDC mark on the crankshaft pulley. B – Mark on the oil pump cover. C – Installation mark on the protective cover. D – Mark on the exhaust camshaft pulley. E - Mark on the intake camshaft pulley. F - Installation mark on the protective cover.
Tools for work
To carry out all the work you will need:
- New timing belt for the 16-valve VAZ-2112 engine.
- Socket head for “10” and “17”.
- The key is "17".
- Screwdriver.
- Tensioner pulley key.
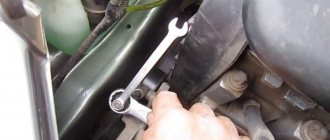
Step-by-step replacement procedure
- First of all, after opening the hood, remove the negative terminal from the battery.
- Next, remove the timing belt protective cover by unscrewing 6 bolts using a “10” socket.
- Remove the chip from the crankshaft sensor. Read more about all sensors on the VAZ-2112.
- We unscrew one bolt that secures it and remove the sensor.
- You will then see that the pulley is missing a number of teeth, this is to allow the sensor to detect TDC and also block it in order to unscrew the pulley.
- Next, align this hole for the sensor with the pulley, and insert an object through the hole (a hex key with a “12” size works well - approx.).
- When the pulley is blocked, we “tear off” this generator nut.
- Then loosen the bolt on the tension pulley and remove the old timing belt. If necessary, we also shoot videos. Usually, along with replacing the belt, both the pump (water pump) and the rollers are replaced. We have already written in detail about checking the pump for play and about choosing a pump for a 16-valve engine.
- You can install a new belt by removing the tension roller, or by turning the exhaust camshaft pulley (pulley on the right side - approx.) with a key to “17”.
- We fix the crankshaft pulley bolt back and align the marks with the housing on the oil pump.
- Next, make sure that the pulley marks on the camshafts align and that the drive gear does not go astray.
- The next step is to tension the belt using a tension roller using a special wrench. However, if you don’t have one, you can use two nails and a screwdriver inserted between them.
- We tighten the belt until you feel its elastic state between the two camshaft pulleys. Don't forget to tighten the tension roller nut.
- Afterwards, we turn the crankshaft two full turns, if all the marks match and remain in place, then the work on replacing the timing belt can be considered complete.
- We tighten all the nuts until they stop, put the crankshaft sensor in place, connect the power supply to it and put the protective cover in place.
If all work is carried out in such a strict order, the entire replacement can be done with your own hands within an hour.
Checking the condition of the belt
First, remember that you need to check the condition of the belt once a year, or every 10-15 thousand kilometers. Replacement is carried out after every 50 thousand kilometers.
To examine the status of an item, follow these steps:
- Remove the plug from the protective front timing cover;
- Remove the alternator belt so that it does not interfere with you;
- Unscrew the six bolts, which will allow you to remove the cover;
- Access the belt and examine it.
If you notice any of the following, be sure to replace the belt:
- The element has bulges or cuts;
- Broken threads and traces of delamination appeared on it;
- There are abrasions, cracks or folds;
- Oil is leaking.
Features of labeling
Before installing another timing belt, it is better to set the crankshaft and camshaft to the specified marks from the very beginning. We set the gears to 0 position. Points A, B, C, D, E, F must match as shown in the picture. After this, you need to set the marks on the camshafts and the belt casing in the same position.
To check the location of the crankshaft, remove the plug from the box, which is installed under the thermostat, and look for the flywheel. If the marks on the camshaft and the casing match, then there should be a match in the cut on the flywheel and on the metal casing.
All alignments must be clear, the marks must match for proper operation of the belt. After the mark is installed on the flywheel, it must be fixed in this position so as not to break off the thread. And then, as mentioned, you can begin to tension and adjust the timing belt.
Belt replacement
Replacing the timing belt must be described separately, depending on how many valves your VAZ 2110 has - 8 or 16. Self-repair of the unit on an 8-valve engine is considered easier, although you should not have any serious problems with a 16-valve engine.
8 valve
The sequence of work will be as follows:
- Disconnect the battery by removing the negative cable;
- Unscrew the bolts from the belt protective cover;
- Remove this protective cover;
- Remove the front wheel on the passenger side, while simultaneously removing the mudguards and engine compartment protection;
- Turn the generator pulley clockwise so that the marks on the cover and the pulley match;
- Remove the protective plug from the gearbox and check in the resulting hole to see how much the control marks match;
- Using a metal screwdriver or other object, you need to block the flywheel;
- After this, you can unscrew and remove the generator pulley;
- Make a few turns to loosen the nut that holds your belt tensioner pulley in place;
- Remove the old belt. You won’t need it anymore, so feel free to send it to the landfill;
- The space needs to be cleaned and degreased. White spirit is perfect for this;
- After rinsing, dry everything using a dry and clean cloth;
- Install the new roller following the direction arrows. If they are missing, then take the inscription into account. It should be located from left to right, that is, you could read it without any problems;
- To tighten the belt, move the roller counterclockwise;
- Check that all marks and the degree of belt tension match correctly;
- The compression ratio should be checked on a cold engine and at an air temperature within 15-30 degrees Celsius;
- Turn on the motor and with the unit running, check whether you have installed everything correctly;
- If the sound is normal, then the installation was completed correctly;
- Reassemble the removed elements in reverse order.
The replacement can be considered complete.
16-valve
Diagram of the timing mechanism 16 valve VAZ 2110
Two types of engines are installed on the VAZ 2110 - with 8 and 16 valves. At the same time, replacing a 16-valve valve is considered more difficult. Experienced craftsmen assure that for a high-quality timing belt change it is enough to put in a little more effort and attention.
Therefore, in this case, the work must be done as follows.
- Remove the six nuts that hold the protective cover in place. Remove the protection cover.
- Release the crankshaft sensor.
- Find an area on the pulley that is missing a tooth. It will act as a guide to find top dead center.
- Install the piston from the first cylinder so that it is at top dead center.
- Align the pulley and crankshaft sensor, lock the pulley, unscrew and remove it.
- Next, loosen the nut located on the tensioner pulley.
- Remove the old belt and also remove the tensioner pulley.
- Clean the freed space from dirt, oil, and clean it with a dry cloth.
- Install a new belt and secure the pulley with bolts. It is recommended to replace the roller itself at the same time.
- Make sure that the belt and drive marks match, as well as the timing gear marks.
- Tension the belt using the tensioner roller.
- Check the elasticity after stretching.
- Make two full revolutions of the crankshaft to check the quality of the assembly.
- Make sure that the marks match, after which the pulley can be installed in place.
- Turn on the engine, check for correct installation, and then reinstall the protection casing.
Video
It’s rare that a car owner has not heard of the devastating consequences of a broken timing belt. The valves “fall” into the cylinders and break the pistons at top dead center. Sometimes, after this breakdown, the engine cannot be restored, or the repair involves such high costs that it is simply abandoned in favor of a contract engine. How often or after how many kilometers the timing belt needs to be changed, as well as how to evaluate its safe life, we will figure it out together with the specialists of the Auto-Master service.
Content: