How to check ball joints
To obtain the maximum amount of information about the condition of the lower ball joint, the same conditions should be created as when the car is moving. That is why simply putting the car on a lift and pumping the wheels will not bring concrete results.
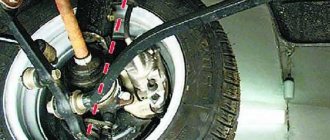
The test is carried out as follows: the car is installed with the lower arm on a suitable support, after which the wheel play in the vertical plane is checked, i.e. by swinging at the top and bottom points. Additionally, it is recommended to insert a mounting bracket between the lever and the trunnion and swing it.
Symptoms of Bad Ball Joints
There are several symptoms of hinge failure on Niva 21213 and 2123:
- Creaking around the wheels when turning the steering wheel. It occurs, more often, when the wheel turns in place, when the driver begins to maneuver in the yard or parking lot.
- Knocking noise when driving over bumps. It's a dull thud. It can occur when a wheel falls into a large hole or even small joints in the asphalt.
It is not recommended to drive with such symptoms for a long time. Appropriate repairs should be carried out as soon as possible.
Replacing the lower support
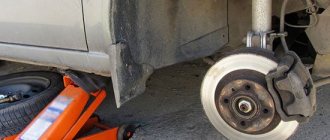
To remove the Niva 2121 ball joint, jack up the car and remove the wheel, clean all elements from dirt using a metal brush or compressed air, unscrew the adjustable
hub nut (with the cap installed, use a chisel).
Using a 22 mm spanner, unscrew the nut securing the assembly to the steering knuckle (KC).
Place a stop at the lower point of the suspension arm (screw jack, bottle jack, block of wood).
Release the ball mount from the lower arm using two 13 mm wrenches.
Move the PC away from the lever.
Using a puller, press out the ball joint pin.
If you don’t have a special device at hand, insert a block into the space between the upper suspension arm and the rebound buffer bracket, after compressing the spring using a block or jack and tightening the support pin nut. Then hit the PC eyelet with concentrated blows until you get the result.
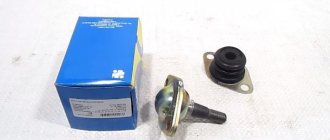
Before installing new supports, do not forget to fill it with ShRB-4 lubricant.
Symptoms of a problem
The ball joint on the Niva consists almost entirely of metal. But if the integrity of the rubber boot is damaged, water can get inside along with dust. This is possible even with small cracks. As a result, extraneous noises and squeaks appear while driving. These are one of the first signs of rapid wear of the ball joint, by which you can determine the need for replacement.
New ball joints on a Chevrolet Niva are installed quite simply; the procedure can be done in any garage using standard equipment. The only problem may be the need for a special tool - a removable key for ball joints.
The puller may differ in appearance, but the principle of its operation is the same in all cases. The work is done in a certain order:
- The car is raised using a jack or a special car lift.
- Front wheel removed
- Using a 22mm wrench, unscrew the ball pin fastening nut.
- A stop is installed under the lower arm, then using a 13mm wrench, unscrew the nuts from the part body.
- The bolts are removed from the mounting holes, then the steering knuckle along with the lever support is moved to the side.
- After this you will need a special puller. It is installed on the ball, then with the help of it the pin is pressed out of the steering knuckle.
- After this, the fist is moved to the side, and the hinge is removed from the hub.
If a puller is not available, then it is not necessary to postpone the repair; you can completely make do with improvised means. This will require a pry bar and a little patience to knock the finger out of its seat.
After performing these steps, the ball joint is replaced with a new one. Then you need to perform all the steps in reverse order to install the parts in place and reassemble the car. It is important to remember that replacing the balls must be done simultaneously on both sides. They have the same resource, and if one of them fails, then the other will most likely also have a damaged boot and show strong signs of wear.
Video 2 process
Source
Reg.: 12/21/2004 Threads / Messages: 3 / 674 From: Moscow, VAO Age: 35 Car: VAZ 21214 01 distributed injection
Name: Alexey Reg.: 03/05/2005 Threads / Messages: 93 / 4534 From: Moscow, Northern Administrative Okrug Age: 41 Car: Shniva 2016 90 tkm
Antokha
Under the lower ball. First, jack up the car and remove the wheel! Either you put bricks under the lower ball joint (the closer to the hub, the better.), or a second jack. You lower the car onto the bricks (the spring compresses). And finally, rock the car down so that the spring settles at least a couple of millimeters more.
And go ahead with the song (or whatever vocabulary you have).
And it should be placed closer to the hub so that the load on the spring is greater. (From the category “give me a lever and I will move the earth” (c))
Then you unscrew (but not completely) the lower ball nut (attachment to the steering knuckle). You raise the car, take out the bricks (the second jack) and tap the place where the ball cone fits. The fit should come unstuck with a characteristic sound (it will hit the half-unscrewed nut under the action of a spring).
Then you put it on the bricks again (the second jack) and then it’s a matter of technique: unscrew the bottom nut all the way, unscrew the three nuts securing the ball to the upper arm, and remove the ball.
I don’t think it’s worth describing the assembly.
Reg.: 12/06/2004 Threads / Messages: 627 / 51712
Reg.: 12/21/2004 Threads / Messages: 3 / 674 From: Moscow, VAO Age: 35 Car: VAZ 21214 01 distributed injection
Reg.: 12/06/2004 Threads / Messages: 627 / 51712
Name: Alexey Reg.: 03/05/2005 Threads / Messages: 93 / 4534 From: Moscow, Northern Administrative Okrug Age: 41 Car: Shniva 2016 90 tkm
Reg.: 12/21/2004 Threads / Messages: 3 / 674 From: Moscow, VAO Age: 35 Car: VAZ 21214 01 distributed injection
Added after 2 hours 48 minutes 38 seconds:
The operation was successful, it seems no one/nothing was hurt, tomorrow it will go to pieces.
Reg.: 12/06/2004 Threads / Messages: 627 / 51712
Who can argue that lubrication is needed! I was talking specifically about TRACK-Champion, which still come WITH LUBRICANT under a hermetically sealed boot
Added after 1 minute 58 seconds:
oh, somehow it turned out crookedly, in general, the previous message was a response to ZanudE
Reg.: 12/08/2004 Messages: 2238 From: Nizhny Novgorod Age: 52 Car: UAZ Patriot 2013 diesel 51432
canek.spb
Well, how are they not related? Change the bushings and unscrew the ball joint, at least the top one.
Alex A. Bel.
Stock up on two 8mm bolts, 100mm long, or better yet 120mm, with solid thread. You will use them to pull the ball into place. You can, of course, tighten the springs with ties, but, IMHO, bolts are still advisable.
Reg.: 12/09/2004 Threads / Messages: 9 / 976 From: St. Petersburg Kolomyagi Age: 50 Car: 214 May 11, A6 Avant 12 and Kalina 2008
Reg.: 12/08/2004 Messages: 2238 From: Nizhny Novgorod Age: 52 Car: UAZ Patriot 2013 diesel 51432
Reg.: 12/09/2004 Threads / Messages: 9 / 976 From: St. Petersburg Kolomyagi Age: 50 Car: 214 May 11, A6 Avant 12 and Kalina 2008
Reg.: 12/06/2004 Threads / Messages: 627 / 51712
Reg.: 01/18/2005 Threads / Messages: 2 / 891 From: Saransk Age: 42 Car: VAZ 21214; Shniva; UAZ 31514: LuAZ 969
What kind of ties? What are you doing? What bolts?
Now I’ll tell you how I change ball joints without a puller and without any long bolts.
We're filming. (the wheel is removed, the car is jacked up). Do not jack under the levers! 1. Unscrew the lower ball joint nut 3 turns. 2. Lightly hit the lever with a sledgehammer or 0.5 kg hammer in the place where the support is inserted. Under the action of the spring, the support pops out of the conical hole 3. We do the same with the upper support.
Let's put it on. 1. We install the lower support without any problems. 2. Upper support. We place the brake hose brackets under the threads, disconnecting them. We tighten the nut. 3. Place a jack (rolling or UAZ) under the lower arm and jack it up. Until we see that the car is being lifted with the jack. In this case, the upper support almost overtakes the upper arm. Usually here I ask someone to stand on the bumper and screw on the support. If there is no assistant, I take a piece of water pipe 20 mm long and 0.5 m long, put it on the protruding bolt for fastening the axis of the upper arm, rest it on the lever and slightly press down. Fitting the support is not a problem.
Reg.: 02/03/2005 Threads / Messages: 85 / 2821 From: Adler Age: 46 Car: was. 2121 1.7carb. Born 1986 now: Toyota Lucida 2.2 TD EFI 4wd full time X-limited, 2131 1.8 carb, LPG, EUR, born 2004
2 thanks all, comrades! I'm not touching it yet. I'll do everything at once, both silent and ball joints.
Source
How to change ball joints on Niva 21213
We hang and remove the front wheel.
Unscrew the front wheel bearing adjusting nut
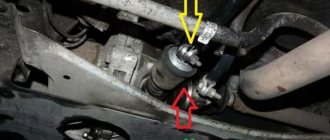
Using a 22mm spanner, unscrew the nut securing the ball joint to the steering knuckle.
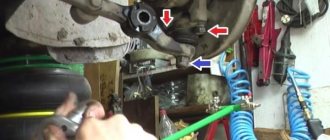
We install the stop under the lower arm.
Using a 13mm wrench, unscrew the nut of the bolt securing the ball joint to the lower arm, holding the bolt from turning with a wrench of the same size.
Unscrew the nuts of two more bolts.
...and move the steering knuckle with the ball joint away from the lower arm.
Use a puller to press the ball joint pin out of the steering knuckle hole.
You can also use a puller like this.
We move the steering knuckle to the side and remove the shank of the outer drive joint housing from the hub.
Remove the ball joint.
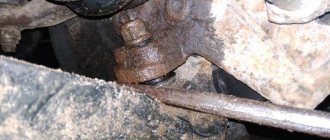
If there is no puller, unscrew (not completely) the nut securing the ball joint to the steering knuckle (photo 1). We compress the spring with a stop installed under the lower arm. We insert the mounting blade with its edge between the end of the lower arm eye and the support pressure plate.
Having unscrewed the nut of the support pin and the adjusting nut of the front hub bearings, move the steering knuckle to the side and remove the stop. We unscrew the nuts of the bolts securing the ball joint to the lower arm (see photo 2) and remove the ball joint.
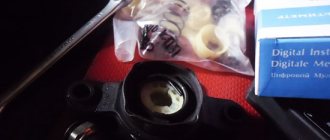
Removing the pressure plate and protective cover of the ball pin When installing a new cover of the ball pin, put ShRB-4 lubricant in it. We assemble and install the ball joint in the reverse order.
Video
Video tutorial on replacing the ball joint on a VAZ 2121 (Niva).
To replace the upper ball joint you will need the following tools:
You will also need a lift to make it convenient to work.
For details and nuances of the work, watch the video lesson.
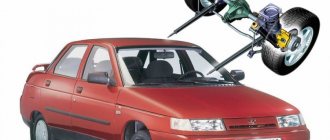
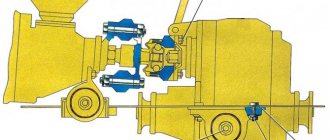
Unlike the classic VAZ family, the Niva 2121 rarely ends up with a twisted wheel on the side of the road. It's all about the slightly different operation of the suspension, which does not receive a critical load in certain operating modes. Although the ball joints themselves are used in a similar design.
Tips for extending the life of ball joints and further operation
The main culprit for the rapid failure of ball joints is a weak seal. The rubber used on the boot weakly resists external factors and quickly breaks, after which dirt and water get into the joint and the ball joint begins to knock. If you buy cheap ball joints, then in any case you will have to buy good boots separately. Polyurethane anthers perform well in terms of resistance to aggressive environments.
- The second point: increased wear on ball joints. The car's suspension is structurally from the 60s. The size of the ball joints is too small to carry even average loads, not to mention constant use on poor country roads. When choosing expensive manufacturers, you can be confident in the quality of the parts, but I recommend checking for the presence of lubricant under the anthers, since in many cases there is none there at all.
The service life of ball joints on a Chevrolet Niva is too ambiguous. Depending on the manufacturer and where the car is operated, ball joints can last from 5 to 50,000 kilometers.
After replacing the ball joints, you should take the car to have the wheel alignment checked.
If you have any problems with dismantling and installation work, then there are many videos on the Internet on how to get out of this or that situation. A common situation is turning the pin together with the nut when removing the ball joint.
What ball joints are in the field?
Three generations. They differ from each other in the geometry of the body:
- Until 2009, a “kopek” knot was used. At the same time, there were identical parts on top and bottom. Art. – 2101-290419; 2009-2016 the element was unified with the model created jointly with GM. Art. – 2123-2904192. Suitable for 1st generation. 2016 – present, the data allows us to obtain the original wheel running distance. Interchangeability with other generations is excluded. Art. – 21214-2904082.
How to check ball joints
To obtain the maximum amount of information about the condition of the lower ball joint, the same conditions should be created as when the car is moving. That is why simply putting the car on a lift and pumping the wheels will not bring concrete results.
The test is carried out as follows: the car is installed with the lower arm on a suitable support, after which the wheel play in the vertical plane is checked, i.e. by swinging at the top and bottom points. Additionally, it is recommended to insert a mounting bracket between the lever and the trunnion and swing it.
Checking the product.
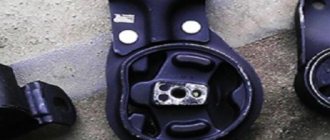
Before replacing ball joints on a Chevrolet Niva, you need to inspect their appearance for damage. Typically, such an assessment is carried out by specialists at a service station. But this cannot always guarantee a good result; in addition, this method is quite expensive. When inspecting yourself, you must first of all pay attention to the main signs of malfunctions:
- Large gap gap
- Damage to the surface of the boot
If only the boot is out of order, and the wear is not so strong that there is a backlash, then you can only get by by replacing it. If the problem is more serious, then the owner is faced with the question of choosing a high-quality and inexpensive part. The most common options on the market are products from Kedr, Phobos and Trek. Usually the cost of the sets is the same and does not exceed 3,000 rubles.
Replacing the lower support
To remove the Niva 2121 ball joint, jack up the car and remove the wheel, clean all elements from dirt using a metal brush or compressed air, unscrew the adjustable
hub nut (with the cap installed, use a chisel).
Using a 22 mm spanner, unscrew the nut securing the assembly to the steering knuckle (KC).
Place a stop at the lower point of the suspension arm (screw jack, bottle jack, block of wood).
Release the ball mount from the lower arm using two 13 mm wrenches.
Move the PC away from the lever.
Using a puller, press out the ball joint pin.
If you don’t have a special device at hand, insert a block into the space between the upper suspension arm and the rebound buffer bracket, after compressing the spring using a block or jack and tightening the support pin nut. Then hit the PC eyelet with concentrated blows until you get the result.
Before installing new supports, do not forget to fill it with ShRB-4 lubricant.
Replacement features
How to remove the old ball joint and put on the new one? This question is also very relevant. After all, it is not enough just to purchase a new product. It still needs to be properly secured in the right place so that it can serve for a long time. But to do this, you need to properly remove the old supports without damaging other parts of the car. Both the lower and upper supports always need to be replaced.
So, how to remove the support on a Niva Chevrolet carefully? For this purpose, prepare in advance a special wrench for removing ball joints. It will not be possible to cope with this matter without him. First, the car is placed on a jack, after which it is necessary to remove the front wheel. Now we take a wrench (in most cases this is a 22 wrench) and use it to carefully unscrew the ball stud fastening nut. Immediately remove the anthers.