Promval Niva Chevrolet, specifics
balancing washers on the conveyor shaft
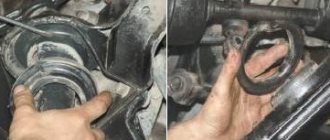
Original. The popular name is "chandelier". On the plus side, good mileage. Next we go into the negative. Yes, you can buy a rubber coupling and hinges separately. But you will not balance this node anywhere. The main problem is pricing. The supplier of this spare part is a monopolist, and then “our Russia” begins. In 2022, the wholesale price for this part increased by more than 30%, and we continue to grow with each delivery. Therefore, on my website, this part is delivered to order by prior agreement.
soft and hard shaft for shnivy
- Hard washout, city of Saratov. I have specifics when working with these machines. I spend very little time working with standard engines. And at some point I noticed that when the clutch is “operated quickly,” there is a failure. It turned out that it was the rubber coupling that was “twisting”. At standard 75 horsepower, it more or less lives, but with increased engine power and quick operation of the gearbox, it quickly breaks down. Now I generally recommend installing a “hard” flush. Another plus is the elimination of the standard gearbox (helicopter) shank; it, like flanges, can be completely crooked and requires alignment and additional machining. The hard flush of the Chevrolet Niva hides only one small trick related to the year of manufacture of the car. Before 2008, the gearbox shank had 6 splines, after which it had 21 splines. There are already “Chinese counterfeits” for this product, but since I work directly with the factory, this issue does not really concern me.
- Promval Niva Chevrolet, the Volgaavtoprom brand and a couple of “Chinese options” that I happened to see. Wasted money doesn't last long.
17
Handout pillows.
In this new detail, we are completely on the side of the AvtoTAZ designers. A detail that can truly be called tuning. There is a lot of “rubber meat” and the design already works completely differently. We recommend replacing the old-style transfer case cushions with new-style ones as soon as possible. On many sites dedicated to the Niva, these pillows are advertised as spare parts for the Niva-Urban, and they ask for a lot of money. Meanwhile, this part is simply installed on the M-ki. Catalog number 21214-1801012-02.
An example from history. The reliability of Mercedes suspensions has already gone down in history and legend. We are not talking about modern multi-links, which have 20 parts, we are talking about cars produced in the 90s. The secret is simple, almost all silent blocks and pillows were the size of a fist, which is why they cost 300-500 thousand.
| Authorization |
vibrations
The topic, vibrations in the Niva, is probably the subject of the largest number of articles dedicated to the Niva family. Most of them, as always, are quite general. Recommendations as a carbon copy: replace the universal joints with CV joints, center the transfer case and you will be happy. But all this is a fight against “first order” vibrations, from which the car simply shakes. I want to talk about vibration in the “second order” field and methods of struggle. As a rule, it manifests itself either in the form of “seasickness” or in the form of shaking mirrors, when it is impossible to read the license plate of the car driving behind. That is, you don’t feel any obvious vibrations, but when you get out of the car after a long drive, you are left with something “wrong” in your head.
Centering method
To carry out this work you will need a lift, although with some skill you can get by with simple supports. First you need to prepare the car. If there is a lift, it is raised up. If supports are used, the corners of the machine are jacked up one by one and it is placed on them. Please note that all supports must be stable, otherwise the work will be unsafe. You should also prepare the tool in advance. If there are no plans to simultaneously replace other parts, then it is quite possible to get by with a ratchet and a “13” head. During operation, an assistant must be in the cabin.
Adjustments are made in the following order:
- To begin with, you should evaluate the condition of the splines on the cardans. If they are very worn, then most likely you will not be able to perform the alignment correctly. In case of significant wear, parts should be replaced;
- The transfer case mount is inspected. Often the displacement can be seen with the naked eye;
- Next, loosen the transfer case mount. Just don’t unscrew it completely;
- After this, start the engine and “accelerate” the car to a speed of 80-90 km/h. In this case, the transfer case will fall into place on its own;
- The crucial point is to consolidate the result obtained. This can be achieved in 2 ways. Mechanics argue which one is better, but both are used in everyday life. Most often, the engine is turned off, and with its help the transfer case and cardan shafts are stopped.
- All that remains is to quickly tighten the nuts. Disadvantage here 2. Stopping the box in this way can have a negative impact on its condition.
- Also, you need to tighten the fastener as quickly as possible, otherwise it will be of no use. A more reliable, but technically complex method is to tighten with the engine running;
- The car is lowered to the ground and testing is performed.
If the vibration persists, the procedure should be repeated.
Design features
A manual transmission is, of course, a complex device that has a rather complicated operating principle. However, this article will focus on such a component of a modern transmission as its input shaft.
So, how does the input shaft used in a car’s gearbox work, and what are its features? Let's remember what was said in the first section of the article.
The input shaft is a part that is intended to rigidly connect part of the moving unit of the gearbox to the engine and carry out synchronous interaction with the motor itself.
The primary one has a fairly substantial size and is made monolithically of high strength steel. At one end it has a flywheel connected to the engine, and at the other there is a set of gears that go into the body of the box itself.
Each gear is welded onto the shaft rod in such a way that when heated and rotated at a high number of revolutions per minute, the shaft does not fall apart, and the owner does not have to invest in expensive repairs.
The primary type resembles a cylinder with a stepped shape. Each stage has a set of ribs that determine the gear principle of the shaft. It is constantly present in the transmission lubricant, so its service life is quite long, and replacement is required only when carrying out major and preventive repairs of the gearbox.
Is it possible to drive with worn oil seals?
Further operation of the vehicle is not recommended for several reasons. Firstly, engine oil consumption increases due to its leakage through rubber products. Secondly, the power unit becomes contaminated with adhering dirt and dust.
But, the most compelling reason to refuse to drive a car with leaking oil seals is the fact that loss of oil can lead to serious damage to the internal combustion engine, which can be eliminated by carrying out a major overhaul of the engine.
Another common problem is transmission malfunction. However, drivers encounter this kind of trouble most often in the event of a malfunction of the rear oil seal. Failures of electrical equipment mechanisms and all kinds of sensors are less common.
Replacing the intermediate shaft on Niva 21213 video
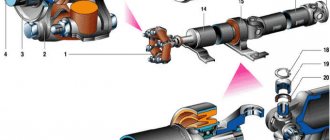
Transfer case installation diagram
| 1 – stud for fastening the flanges of the intermediate cardan shaft and the drive shaft of the transfer case; 2– adjusting shims; | 3– nuts securing the transfer case to the body; 4– nuts securing the transfer case suspension brackets to the axles |
EXECUTION ORDER
1. Make sure that the engine mount mounts are correctly installed in the brackets (the centering washers of the front engine mount mounts must fit into the corresponding holes in the side brackets) and that the transfer case supports fit snugly to the bottom of the body. If necessary, straighten the surface of the body under the supports. 2. Install the transfer case on the vehicle without fully tightening bolts 4 and 5 of the transfer case suspension brackets (see Fig. Transfer case installation diagram). 3. Moving the transfer case lengthwise and crosswise, as well as in the vertical direction, find a position in which the flanges of the transfer case drive shaft and the intermediate driveshaft are at the same level, parallel, and the gap between them is minimal. The transfer case shafts must be located parallel to the bottom of the body. 4. Having installed the previously removed adjusting shims under the suspension brackets (supports), fully tighten the nuts securing the transfer case suspension brackets. 5. Attach the front and rear propeller shafts to the transfer case shafts; Connect the flexible shaft to the speedometer drive and the wires to the differential lock warning lamp sensor. 6. When replacing the transfer case, as well as when the rear engine mount “settles”, causing vibration of the transfer case, it is necessary to select and install a new thickness of gaskets 5 (see figure from paragraph 8).
Procedure for selecting shims
1. Make sure that the engine mounts are installed correctly in the brackets (see subsection 2.2). 2. Separate the flanges of the transfer case drive shaft and the driveshaft intermediate shaft. 3. Loosen the nuts securing the transfer case supports to the body, remove the adjusting shims and, moving the transfer case along and across the body, as well as in the vertical direction, find its position in which the disconnected flanges are at the same level, parallel and the gap between them is minimal , and the transfer case shafts are located parallel to the bottom of the body. 4. Fill the resulting gap between the body floor and the supports with the required number of gaskets. 5. Align the centering flanges without creating tension in the transfer case and engine supports and, holding the transfer case in this position, tighten the previously loosened nuts securing the transfer case supports. 6. Insert and secure the transfer case and intermediate shaft flange bolts; if the bolts pass freely into the flange holes, then the alignment is carried out correctly, otherwise repeat the operations to align the flanges.
Reg.: 12/06/2004 Threads / Messages: 4031 / 23190 From: Moscow Age: 65 Car: 21214M, 2013
The topic is about standard intermediate shafts between the steering wheel and the gearbox in 2121 and subsequent models.
Double CV joints are discussed in their own topic.
Alexey aka ALER.
yes, it’s probably more convenient, I just didn’t have such a clamp with me, and I took it apart even before they brought me the wash-out, naturally there was a clamp on the new one.
It will fit, but you will have to remove the front driveshaft. It tore after the CV joint boot immediately along the CV joint shaft.
Are these spare parts or the load is not calculated?
This is, of course, correct, but I didn’t even think about it, not for a moment, even with sealant.
| 765 posts on previous pages |
| Reg.: 02/22/2012 Messages: 267 From: Ryazan Age: 40 Car: VAZ-21213 1999 VAZ-21043 2008 Logan 2008 Reg.: 04/05/2011 Messages: 71 From: Kazan Age: 37 Car: VAZ 21213, 1997 Reg.: 06/24/2012 Messages: 739 From: Russia. Cool. Age: 36 Car: Niva 21213.1995 Registered: 01/12/2007 Messages: 223 Thanks: 7/1 |
Eliminate vibration with additional fasteners
Installing the third support of the transfer case on VAZ 21213/21214 vehicles allows you to reduce the level of vibration of the transfer case; with this support it is easier to center the transfer case. The part can be purchased at auto stores or made yourself. The finished product comes with three long studs (for model 2121); to install the third support on this machine, you will need to unscrew the short studs from the transfer case housing and install new studs from the kit. We carry out repairs as follows:
- dismantle the front passenger seat in the cabin;
- remove the floor tunnel lining;
- in the cabin we move aside the carpet covering the body amplifier (in front of the handbrake lever);
- remove the transfer case (alternatively, you can simply hang it up, but removing the third support makes it easier to install);
- We attach the bracket of the new support to the body of the RC;
- we install the transfer case in place, center it in the optimal position, and fasten the side supports;
- we combine the third support with the body, drill two holes in the bottom;
- Using washers, bolts and nuts (from the kit) we attach the support to the bottom of the body.
Vibration is eliminated more effectively by installing a subframe under the transfer case. You can also make such a device yourself or buy a finished product at a car store.
In order to install the subframe, the transfer case must be removed. It is more convenient to carry out such work in a pit; we carry out repairs as follows:
- leave the car in neutral gear;
- disconnect the propeller shaft from the transfer case, it is advisable to mark the driveshaft flange and the drive shaft so that during installation, align the driveshaft according to the marks - this way, the occurrence of unnecessary vibrations is eliminated;
- dismantle the muffler mounting bracket;
- remove the gearbox traverse;
- jack up the transfer case, remove the side fastenings of the transfer case;
- We treat the places where the subframe fits to the body with Movil;
- place the subframe on the gearbox studs;
- we mark the attachment points of the subframe on the side members, drill holes, attach bolts to the body;
- we tighten all fastenings, except for the transfer case supports themselves;
- we perform alignment of the steering wheel;
- Finally tighten the transfer case supports.
It should be noted that installing an additional support or subframe on the steering wheel does not always lead to the desired effect; in some cases, vibration only increases.
Intermediate shaft faults
During operation of the intermediate shaft, oil leakage may occur. It indicates that the oil seal is in unsatisfactory condition. Damage to the intermediate shaft oil seal can affect the condition of the entire gearbox, since the release of transmission oil will affect all components of the box.
Rice. General view of the secondary shaft.
Another malfunction may appear when all gears or only a certain number are engaged, most often these are the second, third and fifth. When these gears are engaged, the required transmission of torque to the vehicle's driveshaft does not occur. This indicates a weakening of the correct fit of the intermediate shaft gears. When such a problem arises, there are two ways to solve it. The first is to replace the intermediate shaft as a whole. In this case, its bearings and seals are immediately replaced. The second involves welding a weakened gear. The main disadvantage of this method is that if this gear fails, the entire shaft will need to be replaced, which is not very economical.
Gearbox device
More or less experienced drivers know that the purpose of the gearbox is to provide the most optimal torque. It consists of three main components - the primary shaft, or, as it is called, the drive shaft, the secondary shaft (driven) and the intermediate one. The primary shaft receives torque from the engine flywheel, and the secondary shaft, in turn, transmits this energy to the car’s driveshaft. There is no rigid connection between these shafts, and they work independently of each other. The role of the connecting link is performed by the intermediate shaft, hence its name.
In general, the gearbox is a collection of gears and shafts and is controlled using a gear lever located inside the car. During shifting, special forks engage the corresponding gears in the process, and locking locks eliminate the possibility of engaging several gears at once.
replacing an elastic coupling on a field without removing the transfer case
If you see progress during this stage, once you find the best position for the weight, play with its weight.
5) If there were no significant vibrations of the rear cardan, or they were eliminated, similarly raise the front axle (without lowering the rear), remove the wheels and place them on stands. We clamp the rear brakes with the handbrake and similarly look and eliminate the vibration of the front driveshaft.
6) After this, we do dynamic centering of the transfer case, fortunately the car is on stands, and this is done easily. The technique has been published more than once.
PS As a result, I am now driving a Niva, which has no noticeable vibrations in the transmission, perhaps I was lucky and did not have tricky exotic problems, I had a bad rear driveshaft, which was discovered by removing it and test driving with the lock on. The cardan was replaced with a CV joint, kindly provided by our friend “FreeLamer”, then the remaining vibration of the shaft was eliminated using the method described above.
replacing the Niva clutch slave cylinder
The clutch master and slave cylinders can also cause big problems. I had a leaky clutch giving the effect of the clutch sticking. Sometimes it was impossible to turn off the transmission, sometimes to turn it on. We remove the front cardan, we have already removed it. The flange of the front gearbox is visible, i.e. if the cardan was in place, it would be impossible to unscrew the rcs. Bolts 13, two pieces. It is advisable to photograph the mount itself as it stood. And then (six hours later) I twist it in my hands and can’t remember how it stood.
The cylinder is covered in snot, it’s obvious that it’s dead. Code to buy new 2101-1602515
That's it, the cylinder is removed, the new one is installed in the reverse order. But first I also changed the main one, it goes higher up the hose.
Pull the clutch cable
On Niva I try to buy everything from the factory, from Lada-Image in blue and white boxes. New slave and master cylinders.
Promval 21213 and its alternative
The trophy raid ended with a technical failure for us. Breakage of the intermediate shaft of our Niva. The technical meeting took place on May 3. We got home in the evening, and it was just brutal. We realized about the leak later, but it looked like this: you’re driving along, and suddenly the traction disappears. In general, the gear is engaged, the engine is running, everything is as usual, but you are standing still. It's like the transfer case is in neutral. So it is, the moment from the box to the RK goes through the groove, and at the junction of the donut and the flange it began to turn. Somehow we got out of the forest onto the highway, 170 km to the city. We started, drove more or less 4th gear for 100 km, trying not to breathe. After 100 km the connection began to disappear. Stop, play with gears, drive slowly. Until at some point they were no longer able to go. The house is 60-70 kilometers away. The navigator, but in fact an excellent pilot, and a friend suggested an option. The steering wheel was loosened on the mounts and pushed forward as far as possible towards the checkpoint. Somehow the wash-out caught a snag, and we quietly paddled home at 50 km/h. And about the trophy raid itself. The breakdown resulted in a study of the device and a debriefing of the flight. It turned out that 21213 uses a CV joint shaft. The CV joint is practically the same grenade as on the wheel drives. The advantage of a CV joint shaft is reduced vibration and greater comfort. At the same time, the 21213 industrial shaft has a stated disadvantage - less reliability compared to the industrial shaft based on crosses as in the 2121 fields. I will remember this for the rest of my life
Device and purpose
The unit consists of the following parts:
- elastic coupling;
- flange;
- shaft;
- CV joint
In early Niva models, an intermediate shaft with a rigid connection in the form of a cross was installed. However, in recent years, manufacturers have been installing CV shafts on CV joints. Both types of parts are available in stores. Therefore, it will be useful for the owner of a Chevrolet Niva to know the difference between the shafts on the crosspiece and the CV joint.
In the intermediate shafts on the constant velocity joint, the rigid type connections are replaced with a movable connection. This reduces vibration, slows down wear of parts and ensures smooth acceleration when starting from a standstill. The design of the intermediate shaft on CV joints has the following advantages:
- low shock loads on the transfer case and gearbox;
- reduced fuel consumption (by 1-1.5 l/100 km);
- reduced noise in the cabin;
- increased service life;
- maintaining torque even with large deviations;
- Availability of sealed protection against dust and water;
- lower percentage of power loss when transmitting torque;
- increased service life of the part (according to manufacturers);
- simplified shaft installation.
The advantage of a shaft with a cardan is its high strength and reliability.
It is capable of transmitting great forces, so for off-road use and other harsh operating conditions it is worth installing a universal joint shaft. In this case, slight discomfort from vibration is the price to pay for reliability. The factory part number is GM 212302202092000. However, stores offer analogues with different markings from different manufacturers.
Troubleshooting Methods
Some manipulations can be performed independently, without the services of a sometimes expensive car service.
But many people prefer to take risks by purchasing new parts.
The engine and gearbox mounts must be periodically monitored. If the car is operated in harsh conditions, then the load on these components increases significantly. The Chevrolet Niva driveshaft must be balanced, but only with a certain runout tolerance. Some drivers send the driveshaft for restoration, while others prefer to buy a new one.
A certain amount of vibration can be eliminated if you replace cardans with crosspieces with cardans with CV joints.
In this case, you will have to make minor changes, since the shank flanges are not identical. Finally, you can center the transfer case yourself if you loosen its fastening and, moving it along the plane, achieve such a position that the gap between the flanges is minimal. This refers to the flanges of the transfer case drive shaft and the intermediate shaft.
Removing and installing the rear propeller shaft
Before removing the Chevrolet Niva rear driveshaft, you must set the gearbox lever to the neutral position and release the handbrake. In order to maintain the balancing of the driveshaft after installing it back on the car, when removing it, you need to mark, with paint or a center punch, the position of the shaft housing and the holder of the differential drive gear shaft crosspiece.
The intermediate stage has been completed. Now, to remove the universal joint, unscrew the bolts and remove the rear universal joint clamps. To prevent the propeller shaft from turning when the flange bolts are loosened, you need to thread a screwdriver through the crosspiece holder. We attach the needle bearing caps to the spider body with tape or tape to prevent them from falling when the driveshaft is removed.
We lower the driveshaft, namely its rear part. After this, we remove the cardan, or rather, its front part, from the transfer case. Having removed the cardan, the transfer case is wrapped in a regular plastic bag. This is necessary to prevent loss of transmission fluid, as well as to prevent contamination of the internal elements of the removed driveshaft.
When installing the cardan back into place, you need to use the clamps of the crosspiece holders. It is necessary to remove the plastic bag from the transfer case and thoroughly wipe the free surface. Then the driveshaft is inserted into the transfer case. Next, take the cardan by the back and set it to its original position. In this case, it is necessary to ensure that the installation marks match. If they do not match, then rotate the rear wheels and ensure that the marks on the drive gear flange align with the marks on the cardan. Remove the tape or insulating tape that secured the bearing caps and install new clamps and bolts. This is how the driveshaft is removed and installed.
When and how do you need to change the seals of the VAZ 2123 transfer case?
Reference! Parts must be replaced if transmission oil leaks occur at the interface between the drive shafts and the transmission housing.
If this is not done, the transmission will leak. Without lubrication, transfer case parts will quickly fail.
Step-by-step instructions for replacing the oil seal of the Niva Chevrolet
To work, you need to have free access to the bottom of the car. Therefore, replacement of RK oil seals will be carried out on an inspection ditch, overpass or lift.
You will need the following tool:
- hexagon 12;
- open-end or socket wrench 24;
- waste container;
- flat screwdriver;
- hammer;
- mandrel;
- syringe for filling transmission oil;
- new self-locking nuts for fastening the flanges.
The algorithm for replacing the Niva Chevrolet transfer case oil seal is as follows:
- drain the oil from the transfer case into the prepared container;
- unscrew the bolts securing the cardan, the drive shaft oil seal of which is to be replaced;
- engage the gear, lock the differential and put the car on the handbrake;
- Unscrew the nut securing the propeller shaft drive flange.
- remove the washer;
- pull the flange off the shaft;
- use a screwdriver to remove the old oil seal;
- clean the seat and apply sealant;
- lubricate the rubber seal of the new oil seal with oil;
- using a mandrel and a hammer, press the part into place;
- install the flange and washer, tighten them with a self-locking nut;
- secure the cardan.
Important! The self-locking design does not allow for reuse of parts. Therefore, the flange nuts must be replaced with new ones. After completing the work, it is necessary to fill the transfer case with fresh transmission oil.
After completing the work, it is necessary to fill the transfer case with fresh transmission oil.
Replacement
Before carrying out work, it is necessary to provide access to the lower part of the car by installing it on an overpass or inspection hole.
To change drives you will need:
- Balloon wrench.
- Jack.
- Keys for 13, 17 and 27.
Replacing the drive is done as follows:
- Unscrew the cardan from the front gearbox.
- Jack up the car.
- Remove the front wheels.
- Unscrew the shock absorbers from the lower control arms.
- Unscrew the nuts holding the CV joint bearing housings.
- Unscrew the gearbox from the front suspension cross member. To do this, you will need to unscrew the bolts and nuts holding the housing and fastening the suspension brackets of the unit.
- Raise the gearbox and secure it in the raised position.
- Remove the protective cap from the front wheel hub and unscrew the nut.
- Remove the centering sleeve.
- Raise the front lower control arm by compressing the suspension spring.
- Unscrew the ball joint.
- Move the steering knuckle to the side.
- Unscrew the fastening and move the exhaust pipe away from the exhaust manifold (this operation is necessary when replacing the right-hand drive).
- Pull the gearbox back.
- Remove the drive.
Installation is performed in the reverse order of removal.
Signs and types of malfunctions
To fix a problem, you first need to identify it. The spline connection serves for quite a long period of time (on average 30-50 thousand kilometers), without causing concern for a long time, but not a single part lasts forever, and diagnostics should be carried out if:
- while driving, unnecessary noises, knocks, and unpleasant sounds are heard;
- there are jerks and vibrations in the cardan;
- when all-wheel drive is engaged, there is a beating of the steering wheel;
- The steering wheel play has increased.
Worn splines will sooner or later completely disable the driveline, which can lead to adverse consequences and even an accident. To avoid this, it is necessary to get a quality repair of the splined universal joint in a timely manner.
The following problems may arise with spline joints:
- wear of splines on shafts;
- crushing of spare parts;
- the appearance of sharp edges, the presence of other defects: nicks, burrs;
- wear of the splines in the bushing;
- breakage of individual teeth.
ATTENTION! Wear is accelerated by the action of excessive torques, dynamic loads, and contact of the hub with the shaft. Once problems have been discovered, you should not delay fixing them and it is better to entrust this procedure to experienced professionals
Check the old outboard bearing
It is produced in approximately the same way
inspection of the old bearing applying for replacement. Even before the appearance of hum, grinding and vibration, its appearance can tell about this. Usually, deformation of the bearing and protective insert is immediately noticeable, and traces of grease are visible on the housing. To be sure that the bearing needs to be replaced, you can hang the rear wheels (or just one) with the engine running and listen for noise from the cardan side. It is possible that it is not the bearing itself that is to blame for the resulting vibration, but the crosspiece or rear axle gearbox.
More accurate diagnostics can be performed at a specialized car service center.
Promval Niva Chevrolet, theory
As a rule, when transmission vibrations occur in fields and shnivy, everyone rushes to look at the cardan shafts. There is, of course, some truth in this, except for one remark. In the theory of machines and mechanisms, there is a recommendation: start looking for the cause of vibration either directly from the source of rotation (that is, the engine itself) or from bodies of rotation that have a high angular velocity. Let's go down the chain. The first is the flywheel with clutch. Nothing can happen to it after capitalization or installation, except that when replacing the crankshaft cuff, it could be put in a different position. Next comes the clutch disc, clutch basket, gearbox, centering rubber-metal bushing and finally the Chevrolet Niva flush. The clutch kit consists of metal rotating parts, and, if the manufacturer is of a good level, as a rule it does not produce vibrations. But the hero of this article contains ball joints, a rubber coupling and a spline connection. When the slightest play occurs, vibrations have room to roam. In the vast majority of cases, the rubber coupling is to blame. Yes, it is sold separately, BUT the assembly requires balancing after assembly. There's a dead end here. Even in my native St. Petersburg, there are no companies where this can be done in good quality. The best option is to take a new assembly.
Lada 4×4 5D Snow Queen › Logbook › Second Repair: Replacement of the Promval
After one year + five months, that is almost ONE AND A HALF
After a year of quite active but
careful
operation and
51,000
kilometers (and also eight months after the previous repair), the Niva suffered a second breakdown. Compared to the first breakdown, which, in principle, cannot even be called a breakdown (although if it had not been changed in time, perhaps the consequences would have been the same), the second one is already more serious - the Intermediate Shaft was “covered”. At first, light vibrations began at a speed of about 30-40 kilometers per hour. No more. And five days later, when I try to start at the Crossroads on a flat road - “crunch...” and that’s it - not a single speed is engaged. I've already reached the Garage in tow!
So, look at the Video of what happened:
I almost guessed the breakdown. The fact that it was Promval - I realized immediately when, even before the breakdown, I was turning the transfer case in Neutral at 5th speed - these were the very same vibrations that were on the move. But I thought that it was the Elastic Coupling that had fallen apart, but it turned out to be a CV joint.
After reading many interesting articles, and listening to a huge number of opinions, which were in almost equal numbers both for the “Sondovsky” Promval “CV-CV joint” and for the Zavodskoy Val, and also for the old-style Promval, which is on the Cross, it was decided the decision was to take the new “ShSUR-CV joint” shaft. This choice was also made because I have a “Niva-Comfort” subframe installed, which, by the way, made my work easier by “holding” and moving the “Razdatka” on itself and thanks to which it is likely that the new CV joint will also may break minimally.
At the beginning, an overview Video of the new Industrial Shaft “CV-CV joint”:
And now a photo of the general view below:
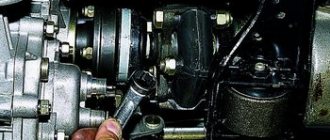
So, replacing Promval. The work was carried out in the Garage on a concrete floor and soft bedding; the height of the Niva was quite enough to carry out all the necessary activities while lying on its back. Using a key set to “13”, unscrew the exhaust valve from the transfer case side.
Next, use the same Key set to “13” to unscrew the front and rear Cardan shafts from the “Transfer case” side:
And again, use the Key “13” to unscrew the fastening of the Rear Cardan Suspension Bearing:
Next, using the same Key, I free the “Transfer Case” from the “Subframe”, for which you need to unscrew the six bolts in the places indicated in the photo with a green arrow:
Now with two Keys on “19” you need to unscrew 3 bolts on the Elastic Coupling of the Promshaft. You need to unscrew those bolts whose nuts face the transfer case. To prevent the clutch from turning, set the gearbox to First Gear:
Next, pull out the bolts towards the Engine:
Now you can remove the Promshaft by moving the Transfer Case as far back as possible. Moreover, the “Razdatka” itself remained lying on the “Stretcher”. Those who don’t have it simply remove the “Razdatka” itself.
Next you need to remove the Fluid Valve Flange. I tried it myself first with the head: I fixed the gearbox in First Gear - it didn’t help, the “Box” was turning. Then I tried to fix the Flange with a screwdriver - the knife did not help, the screwdriver began to bend:
Realizing that if you “squirm” further, the head may break, I took a “30” spanner with a round end:
Let’s replace the bent screwdriver with a more powerful “lock” and with a “jerky” force of the legs we somehow managed to unscrew it:
Now you can install the new Promval. First, the Flange is removed from it and installed in place of the old Flange:
The principle of packing a valve with an oil seal
A special cord made of cotton, linen and hemp materials can be used as materials for stuffing oil seals. Such a cord, as a rule, must be impregnated with a special mineral oil of thick consistency, and is used specifically for valves used in pipelines with water less than 100 degrees. If we are talking about valves that are operated in an environment with a water flow of more than 100 degrees, then an asbestos cord is used to pack the seals, which is pre-impregnated with graphite on natural drying oil.
Before you start stuffing the valve seal, it is absolutely necessary to seal it. To do this, first of all, you should unscrew the union nut, remove the bushing, and also carefully remove the stuffing box and replace it with a new one. After the nut is screwed back in, you should make sure that the spindle can turn freely.
So, the principle of packing a valve with an oil seal is quite simple. At the first stage, you should unscrew the stuffing box and install a new stuffing box in ring-shaped shapes. In order for these rings not to overlap each other, but to have a proportional butt at the ends, it is necessary to prepare the stuffing box in advance and cut it into even and clear pieces.
It is also extremely important to take into account that the gland packing rings are laid in such a way that the angle of displacement of the joints can be equal to 90 degrees. At the final stage, the covers of the stuffing box valves are tightened tightly and firmly using special bolts. However, despite the fact that the covers must be sealed tightly, the same element as the spindle must always rotate freely
However, despite the fact that the covers must be sealed tightly, the same element as the spindle must always rotate freely.
But, even if a person is aware of how to properly stuff valves with an oil seal, it is always necessary to firstly, without fail, carry out a number of safety requirements. Before carrying out the work itself, you should make sure that the pressure is set while the valve is cool
Next, it is extremely important to ensure that the old padding is completely removed. Next, it is necessary to ensure that all materials are suitable and show no signs of corrosion. The stuffing box itself must be used with the appropriate cross-section, which is determined by measuring the diameter of the stuffing box and the diameter of the rod
The stuffing box itself must be used with the appropriate cross-section, which is determined by measuring the diameter of the stuffing box and the diameter of the rod.
However, the most important condition for proper gland packing of a valve is the rule that is responsible for cutting the packing into separate rings. It is strictly forbidden to wrap the packing around the rod in one piece.
Source
You can make payment in one of the ways convenient for you:
- To a SberBank or Alfa-Bank card. The most profitable method for the buyer, as well as the most convenient one, is to use the Sberbank Online service, Alfa-Click, an ATM, or through an operator at the bank. After placing your order, the manager will send you the card details. If you do not have a SberBank or Alfa-Bank card, you can also top up your card using the details at any SberBank or Alfa-Bank branch. Payment is credited within an hour.
- Yandex money. Customers who have Yandex.Wallet can quickly and easily pay for an order in our online store, the commission will be 0%.
- Yandex.Checkout is an online payment acceptance service. A convenient option with a large selection of payment methods for your order: plastic cards of any banks, including credit cards, in cash through terminals, ATMs or phone shops, Qiwi Wallet, Yandex.Money, WebMoney, from your phone balance, purchase on credit (payment in installments) . Please carefully check which email address you provided during the ordering process, as you will receive a receipt for payment for your order. Yandex.Checkout commission for transfer will range from 3% to 6% .
- QIWI wallet. If it is more convenient for the client to use a QIWI wallet or, if it is not available, to pay through the nearest QIWI terminal, the manager will provide you with the wallet number. Commission 0%.
- Payment at any bank using an invoice or receipt (+3% to the cost). If you do not use electronic wallets and plastic cards, we provide the opportunity to make payments at any bank in Russia. The site manager will send you a pre-filled receipt “Form No. PD-4” by e-mail; please carefully check the e-mail address you provide. The bank commission will be approximately 3% and depends on the bank itself
- Cash on delivery upon delivery by the Transport Company (payment for purchase upon receipt of the order).
- Cash on delivery upon delivery by Russian Post (payment for purchase upon receipt of the order). The order arrives at the post office, after which you pay its cost and pick it up, in which case the Russian Post charges a commission.
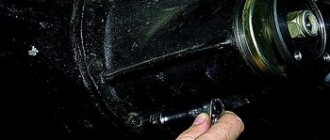
Specifics. Flanges and helicopters.
The results surprised even us, although it seems that nothing in this car should surprise us anymore. The photo shows the gearbox flange, also known as the transfer case flange. And it seems like a rotation part with an even number of splines and an even number of holes. But you can’t “take” an AvtoTAZ so easily. This part has a landing diameter (along the splines) and a mating plane. We made a device from the transfer case output shaft. We very carefully centered them for axial runout, and clamping the flanges, as we do on transfer cases and gearboxes, began to check them for runout of the end plane. The results are depressing. 20% of products DO NOT have runout. There were flanges where the runout reached 0.5 mm. To avoid doubts about spare parts, we removed the flanges from the conveyor machines, the result was the same. On checkpoint “helicopters” the picture is exactly the same.
Who is to blame and what to do?
I think that the first question is rhetorical))) But let’s try to answer at least “why this is so.” I am a mechanical engineer by education and work, production technology is at an average level, so I turned to a military plant technologist for advice. How it should be: the workpiece is made with a press, rough processing is carried out with allowances, a thermal treatment is made, the part is processed completely according to the “main and landing” dimensions. How it was done: the last stage was removed. After heat treatment, the part warps and does not come out clean. Or it is placed on a cylindrical mandrel during finishing processing, which cannot be done. Since with this design, everything is centered on the splines.
The answer to the second question. We buy a box at the factory containing 100 “semi-finished” flanges wrapped in oil paper, drag them to the lathe, set up the “finishing fixture” and finish the entire batch.
Flush hole between the gearbox and transfer case in NIVA-VAZ-2121-21213-21214-2131
At the beginning, when I just bought the Niva and looked at the design of the shaft between the gearbox and the transfer case, I was very surprised by the design. Especially to the point that the transfer case needs to be aligned relative to the gearbox using adjusting plates and... in general, this is unrealistic! Still not understanding why the designers made such a mistake
promval 21213
and not like the same GAZ-69 and etc. of the crosspiece-crosspiece type and a movable spline connection
GAZ-69 flume
And so the idea of a CV joint-CV joint was born.
But everything would have remained in my head, because in Saratov I didn’t find a person who could cut the splines, so I made a couple of rollers for testing, I installed one for myself, and I bought the second from him.
And this roller lay idle with me from May to August. I decided to combine the replacement of the transfer case with the installation of an exhaust valve.
I gave it to a turner at work to drill the axle/transfer case flange under the gearbox seal. And making the washer. There was no good steel, there was only a nail, so they made a puck for me from a checkpoint helicopter. The thickness of the washer is 5 mm.
First, I assembled one end of the roller. I pressed the CV joint on the side of the retaining ring, added grease, hammered in the plastic plug and put on the boot. And I calculated which side the moving part would be on. My moving part is on the gearbox side, where the distance from the CV joint to the nut is greater.
"BEFORE"
I removed the transfer case and removed the helicopter from the gearbox. At the gearbox, I measured how much the nut can be screwed on, cut off the nut, since its end does not play any role, and the stroke of the shaft is limited
I installed a ground flange with a washer and tightened the nut onto the threaded fastener. Using a grinder, I cut off the end of the gearbox shaft flush with the nut. That's it, now there is no return, you won't be able to install the flush!
THERE IS NO ROAD BACK!
Then I put the RK in the same place along the footprint of the pillows and measured the distance between the flanges. I cut off the excess end of the roller and installed the roller without the second CV joint to make sure that the distance was enough. So I removed and installed the roller 3 times. I trimmed it a little and put it back on. When the distance became ideal, I put on the boot and the second CV joint and applied lubricant. The plastic CV joint plug is not needed here.
He unscrewed the transfer case, hung it on a stand and moved it back so that the roller could fit through freely. The connection of the gearbox flange with the CV joint was sealed with sealant. I lifted the transfer case and screwed its supports to the body.
AFTER
Promval CV joint-CV joint
I did not replace the studs on one side of the CV joint with bolts to make installation easier; I decided that it would be more reliable with studs and self-locking nuts. I screwed the cardan shafts... you can go!
The promval was tested for 1,300 km, sometimes carrying sawn wood under harsh loaded conditions. Everything is great, but there are a number of disadvantages
:. — First, previously the strong rocking of the RK held the sway, but now the sway has given complete freedom to the RK and she hangs freely on two pillows. You definitely need to install a third support! — Secondly, immediately after installation, there was strong vibration during dynamic acceleration or heavy load. Gradually the vibration went away. The new CV joints were to blame for everything; they worked very hard to turn.
Pros:
— There is no need to set the RK. — You can tilt the steering wheel back, thereby unloading the crosspiece of the rear cardan, that’s actually what I did. — At speed 90 there is no more vibration, and at any other speed there is no more vibration. — The car also has a better “feel”; it feels like there is a tight connection in the transmission with the engine. For three days I couldn’t get used to it, I stalled at traffic lights and it was hard to start uphill at first.
In time I went to change all this. But what happened to the native industrial site
Native industrial site
A little more and the coupling would have completely torn apart, and then I would have simply stood in the middle of the road.
https://www.drive2.ru/l/288230376152433027/
next article:
Installing a Valeo clutch from Niva Chevrolet to Niva
With every new thousand km, it was felt that the clutch was asking for replacement. And then one fine day the car just stops
remont-vaza.ru
FakeHeader
Comments 99
Good day, a question has arisen, namely about simplifying this design. just take two flanges without welding and put a spacer between the cardan and the box, thereby allowing it to be adjusted to the distance between the box and the RC
Hello. Do not quite understand. Without welding, two forks and a spacer, on bolts. Why not? If only it didn't hurt
Can you find out the size of this welded washer? Or is this an individual size?
Depends on the crosspieces used
And from the Volga it matches the holes?
Can not say.
thank you, I’ll check it myself and write back, the Volga crosspieces will be stronger
And I installed this while the RK is in neutral, there is no vibration, but as soon as I accelerate the RK dances, but under load it bows out a little and there is vibration... if you install a third support... can you advise?
The third support is needed in principle. I have never seen any jumping, swinging transfer cases other than the Niva. With any shaft, if there is an uneven load on the axles, they try to break free))
And I installed this while the RK is in neutral, there is no vibration, but as soon as I accelerate the RK dances, but under load it bows out a little and there is vibration... if you install a third support... can you advise?
It is also necessary to check the cardan shafts so that the crosspieces work without jamming, otherwise the biting joint will try to turn the transfer case, which will also result in shaking and vibration. Well, and a third support so that she sits without rocking the boat.
Hello. Interesting idea. I'm just busy looking for a suitable solution for replacing the seal. There are only some doubts. 1. The so-called “rudimentary” element in the form of a rubber coupling is present even on some modern foreign cars (for example, bmv x5, as far as I know). 2. This type of shaft (with a constant length) serves as the third support of the river. But only in the case of the usual third support does it hold on to the body, and in this case this improvised support “holds” on the bearings rk and kp. Those. all loads to hold the gearbox and gearbox on one axis fall on the bearings of these units, their seats, as well as on the front cover of the gearbox and its flimsy attachment points. And I’m afraid that the photographs presented confirm this (RK is all “snotty”). Please tell me, is this so?
Sehen Sie Online-Videos, Teilen Sie mit Freunden
RU
- Home
- Trending
- Live TV
- Home
- Trending
- Live TV
- Subscriptions
Library
- History
- Watch later
- Popular Right Now
- Liked videos
- My playlist
Best on Clip-Share
- Film & Animation
- Autos & Vehicles
- Music
- Pets & Animals
- Sports
- Gaming
- Comedy
- Entertainment
- Howto&Style
- Science & Technology
9:19Zusammenfassen Let's Dance 2022 Show 1: Wer ist raus? Wer ist der Beste?dofu fus0:37Let's Dance 2022 - Das Tanzalbum (Best Of)Polystar Compilations2:54Nikita Kuzmin privat: So kam der junge Profitänzer zu "Let's Dance"News.de1:24Let's Dance 2022: Deswegen verlässt John Kelly "Let's Dance" »Prominente Nachrichten1:25Doppelte „Let's Dance“-Trennung: Sendung ohne Zuschauer & Luca Hänni wieder Single?it's in TV3:01Let's Dance 2022: Steffi Jones ist rausdofu fus3:07Regina Luca privat: DIESE Männer haben die “Let's Dance”-Granate vo ll im GriffNews.de1:13Let's Dance 2022 Vorschau für den 02/21/2020 (RTL)GrasshalmClips2:26Let's Dance 2022: Ilka Bessin und Erich Klann sicher mit 17 Punktedofu fus2:42Let's Dance 2021 || Die Rap Queen muss Let's Dance nach zwei Folgen verlassenjao7120116:19 RED AND WE TELL SCARY LEGENDS BY THE CAMPFIRE CATS YOUTUBERS Views 181K11 hours ago
18:30Now you will find out how KREOSAN “survives” and makes his videos
Installing a New Seal
After removing the axle shaft, the metal shield where the brake pads are attached will remain hanging on the copper pipe with the fluid, so it should be fixed by inserting the 2 upper bolts back into the holes. Then follow the instructions:
- Remove the thick rubber gasket from the rear axle flange.
- Pull out the old oil seal by prying it with a screwdriver or pliers. Clean the seat and wipe with a rag.
- Lightly lubricate the new seal with transmission oil and insert it into the socket of the Niva rear axle as evenly as possible.
- Using a round pipe adapter, press the oil seal into the socket with light blows of a hammer. You can use an old seal as an additional attachment.
At the end of the procedure, you must thoroughly wipe all parts free of oil - the brake cylinder, pads, drum and metal shield. Before reassembling, it would be a good idea to check the axle bearing for wear and grease. Wear is indicated by difficulty turning, binding, or slight noise. If you discover a malfunction, take the axle shaft to the nearest car service center; you will not be able to replace the bearing without special equipment.
To check the grease inside the bearing, you need to pry the plastic covering the rollers with an awl and remove it. Then add thick Litol-type lubricant inside and put the plastic in place, and then begin assembly.
At the end, it is important to check the oil level in the rear axle gearbox of the Chevrolet Niva. The test is carried out on a fully assembled car, standing on a level surface.
The filler plug is unscrewed from the gearbox housing, after which the oil level is determined visually or using a thin wooden stick.
Chevy Niva blower shaft malfunctions
The parts of the shaft gradually wear out under the influence of load, temperature and chemical exposure. The last two factors concern the rubber coupling and boot. These problems manifest themselves as follows:
- Vibration when starting to move or during acceleration. The reason may be deformation of the bolts or flange of the elastic coupling, or loose bolting of the intermediate shaft.
- Vibration when driving. At speed, the shaft vibrates due to incorrect relative positions of parts, poor assembly or wear of the hinges, or loss of balancing washers. Such manifestations are also typical for deformation of the coupling, flanges or loose threaded fasteners. Another reason for vibration is that the cardan crosspieces turn tightly.
- Traces of oil on the boot. A lubricant leak is possible in two cases: the fastening clamps are loosened or the rubber of the intermediate shaft joint cover is torn.
Also interesting: Niva transfer case: repair, installation
To troubleshoot problems, it is necessary to check and tighten threaded connections, replace the boot, balance the shaft or replace individual parts. Most of the listed operations require dismantling the industrial shaft. If repair is impossible, all that remains is to replace the assembly part.
Reasons why a hinge joint fails
The internal CV joint on a Chevrolet Niva is a high-quality and reliable part of the automobile chassis system. Listed below are the main reasons that provoke early wear and failure of the unit.
- Incorrect, illiterate, extreme (rapid start with inversion of the drive drive and slipping) driving.
- Lack of care for a part that needs periodic cleaning and lubrication.
- Unfair production of the hinge assembly using low-quality materials and violation of technological rules.
Several signs listed below indicate that there may be a problem with the grenade and the internal CV joint on the Chevrolet Niva needs to be replaced.
- The appearance of a crunching sound when making turns. This phenomenon occurs if the SR requires lubrication of the connections, or a mechanical inclusion, for example, dirt, gets into it.
- Interruptions in the movement of the car at the start, when the speed increases or, conversely, when it decreases.
- Increased vibration when turning, accelerating, or driving at high speeds.
To make a final diagnosis, auto mechanics have created several simple techniques.
How and where to make repairs?
Any work must be performed exclusively at a dealer service station. Only the most modern and best equipment is used here. This service employs the best craftsmen who regularly improve their skills when working with equipment and devices.
You should not use services located in garage cooperatives. First of all, they will not give a guarantee for the work performed. Often at such stations, “masters” remove original spare parts and replace them with fake ones. As a result, after a short mileage other mechanisms fail.
Repairing a spline joint is a complex procedure that must be done exclusively at a dealer service. To do this, you should use only the best equipment that is available at the dealership. Yes, service at a dealer service presupposes that the client has money. But every penny invested will be worth it, because everything is done with high quality. A guarantee is provided for the repairs made. If the splines break off or “lick off” during running-in, the service assumes all obligations to eliminate the malfunction.