Disconnect the wire terminal from the negative terminal of the battery.
On the left side of the steering column, use a Phillips screwdriver to unscrew the lower screw and the upper self-tapping screw connecting the upper and lower steering column casings.
Similarly, unscrew the screw and self-tapping screw on the right side of the steering column. Press the steering column adjustment lever down and lower it.
. remove the upper steering column cover. Unscrew the three screws securing the lower casing.
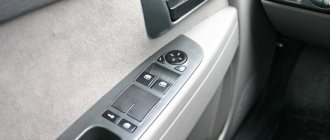
Location of screw holes a
and self-tapping screws
for
fastening the lower casing.
Remove the lower casing.
Disconnect the wiring harness block from the left steering column switch.
Squeezing the locks (top and bottom) with your fingers, remove the left steering column switch. Similarly, remove the right-hand stalk and left switch.
. At the same time, we additionally disconnect the wiring harness block of the liquid crystal display of the instrument cluster.
Left steering column switch
Right steering column switch
We install the steering column switches in the reverse order. If necessary, remove the connector for the steering column switches. To do this, after removing the steering column switches.
. disconnect the wiring harness block from the connector.
Use the 8-mm socket to loosen the coupling bolt of the connector.
. and remove the connector from the steering column. We install the connector and steering column switches in the reverse order. We put the connector on the steering column until it stops and position it so that the contact connectors of the steering column switches are located horizontally.
The problem with steering column switches occurred quite often on previous models of front-wheel drive cars, starting with the tenth family. The most common breakdown is when the low beam headlights are on, the high beams spontaneously start to turn on and blink constantly. To fix this, you need to replace the steering column switch that has failed. The first step is to get to them, and to do this you need to remove the steering wheel cover of your Kalina.
Removing the plastic cover under the steering wheel:
- First of all, lower the steering wheel to the lowest position
- Take a Phillips screwdriver and unscrew all the casing mounting bolts, of which there are only 7 pieces
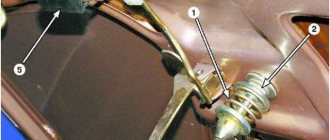
- The side ones are located at the very top on the right and left sides, one at a time:
- Now you need to unscrew the bottom bolts, three of which are shown below:
- And two are also below, at the very end:
- After which you can carefully remove the casing, first its lower half, and then the upper
With this all done, you can now proceed directly to replacing the steering column switches.
Dimensions of Granta liftback wipers
| № | Location | vendor code | Price, rub.)* |
| 1. | Front right (400mm) | 3397004667 | from 150 |
| 2. | —/— left (600mm) | 3397004673 | from 190 |
| 3. | Rear wiper size Grant liftback, station wagon (500mm) | ||
| 4. | Analogues from AVS Crystal | AV9014426S | from 250 |
*prices are as of September 17, 2018.
The given prices are for budget components; when purchasing products from famous brands, the cost increases.
Removing and installing high beam, turn and wiper switches:
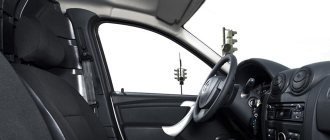
This does not require any tools, since everything is attached with latches and can be changed in just a few minutes. As an example, I will show everything on the right lever, which is responsible for the wipers and on-board computer.
- The first thing you need to do is disconnect the small plug with the wires, just press the two plastic latches along the edges and pull it towards you:
- Now you need to disconnect the large plug from the switch, it does not have any locks, just apply a little force and pull it to the side:
And now you can safely remove the steering column switch itself, for which you just need to press the latches on the sides and pull the lever towards you:
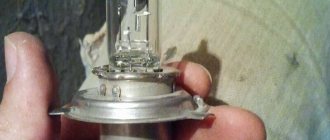
- It is easily removed and the left one, which is responsible for high beams and turns, is removed in the same way, even easier, since there is only one plug. The removed lever is shown in the picture below:
After this, we install a new switch in place of the failed one, replacement is carried out in the reverse order of removal.
The steering column switch is a long-standing problem with front-wheel drive cars. Lada Kalina was no exception and therefore it is difficult to avoid breakdowns in this regard. Most often, the steering column switches on the Lada Kalina break down gradually, let’s put it this way.
Types of wipers for Lada Granta
Domestic VAZ models can be equipped with one of three types of windshield wipers:
- frame;
- hybrid;
- frameless.
By default, frame type is installed from the factory, as the most economical option. However, this design is short-lived and ineffective due to rapid wear and deformation under the rays of the sun. The basis of the brush is a metal strip with movable arms and a rubber cleaner.
The hybrid version of the wiper differs from its predecessor in that it is smaller in size and low-slung. The frameless model is made of impact-resistant plastic with a rubber seal at the end.
The non-contact option is considered the most effective, with a long service life and good adaptation to temperature changes.
There is a fourth type of brushes - winter ones. They are designed for use at sub-zero temperatures. The structure at the base is sealed with an additional layer of plastic. There is a special ledge on the surface for removing snow and ice from the windshield.
The method of fixing all four types is “J”-shaped. Previous modifications had an excellent mechanism, which is considered outdated and ineffective.
Preparation for replacement and necessary equipment
To replace the old switch you will need a Phillips screwdriver, a dry, clean cloth or thick napkins. And, of course, a new detail. Before changing the Kalina steering column switch , you have to carefully get to it, since such procedures are usually carried out rarely. Don't forget to disconnect the negative battery terminal.
The first stage of preparation is removing the steering wheel. First, move it to the lowest position. Using a Phillips screwdriver, carefully unscrew the 7 fasteners of the plastic casing. We remove first the lower and then the upper part.
The second stage is dismantling the old switch. It does not include anything complicated - you don’t even need tools, everything is attached with latches. For example, we will take the right lever, which is responsible for the on-board computer and wipers. Disconnect the small plug with the wires by pressing the latches and pulling towards you. Now, guided by the same principle, we pull out the large plug. You may have to make an effort here.
We see the steering column switch, which is held on by clamps. We clamp them and pull the lever towards ourselves. The other levers are removed in exactly the same way. The only thing worth mentioning is that they can be held by fewer or more plugs.
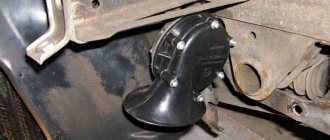
Where is the wiper relay located on the Granta liftback?
Many motorists are faced with the fact that their windshield wipers periodically stop working properly, suddenly turning on or off. In 95% of cases, the reason lies in the relay - regulator. It is located under the dashboard on the left side. For access with subsequent replacement, you will need to unscrew the plastic cover and remove the relay. Next, replace it with a new one and close the plastic case again.
The Grant liftback rear (front) wiper relay has several pause modes. This is very useful for reducing the frequency of cleaning when there is light rain. The pause range varies from 1 to 65 seconds. The driver independently regulates the most optimal mode. Catalog number: 723.3777. The product is completely identical to the relay on the VAZ, Priora, Kalina, Kalina 2 models. On VAZ models produced before 2001, a relay with four contacts is installed, unlike the new ones, which have six.
Lada Kalina steering column switch connector and its replacement
Remove both switches as described above. Now, if the car has an airbag, you need to disconnect the block with wires from the slip ring.
The connector can be removed along with the slip ring, but it is better to describe the complete disassembly process. Therefore, to remove the ring, unscrew the nuts using a screwdriver. You should be careful here, since the slip ring is a very delicate element of a balanced system. If you turn something incorrectly or roughly, there is a chance of disturbing the centralization of the ring during assembly.
Next, you need to disconnect the horn wire block. Use an 8 mm socket to loosen the tension and calmly remove the connector.
We install a new connector for the steering column switches. Next, we carefully assemble the system:
- Tighten the bolt with an 8 mm socket very gently;
- We install the connector in a position in which the central fastening screw of the lower masonry could be screwed in;
- We install the lower masonry in its rightful place and adjust the position of the connector;
- When the desired position is found, remove the bottom cover and, without moving the connector, tighten the fasteners;
- Next, we assemble the system using the reverse principle in relation to disassembly.
Pinout of Kalina steering column switches is a simple matter for a person who has at least once taken on the task of repairing or at least disassembling the steering column space. Be careful and don't be overconfident.
Reviews
| № | Positive |
| 1. | Gennady, 42 years old: a year has passed since buying the car, there are no complaints, everything works properly. The windshield wipers will last one more season, after which I will replace them with new ones. By the way, the original factory ones were installed. |
| 2. | Kirill, 38 years old: there is no money to buy a garage yet, so the car sits on the street all year round. This is of course bad, but what can you do? Despite the harsh winter, the wipers withstood the frost and clean well, without islands. Installed from the factory: 3397004667, 3397004673. |
| 3. | Vyacheslav, 35 years old: Grant is already in its second year, overall I’m happy with the car. I don’t drive it much, I fill it with good oils and fill it with high-quality fuel. Surprisingly, the seals are in good condition, and the windshield wipers are also in good condition. My advice to car enthusiasts. For this price it is difficult to find something better. |
| 4. | Nikolai, 41 years old: I work as a taxi driver, I drive all day long, the car is working hard. The other day I replaced the right wiper because it started to leave a little streaks. I don’t consider this a defect, although it could still serve as a service. |
| 5. | Dmitry, 39 years old: I work as a manager in a car store, specializing in spare parts for domestic VAZs. Grant parts are in less demand, the reasons are obvious - quality has improved. The same cannot be said about Priora, although the car is also good. |
| 6. | Sergey, 39 years old: I had an accident a month ago and had my windshield replaced. The windshield wipers began to rub badly, I had to replace them with new ones, I don’t blame the defect, rather the glass was installed with an excessive slope. |
| Negative | |
| 1. | Nikolai, 45 years old: after purchasing Grant, I immediately replaced a number of parts and components, including wipers. They don't clean them enough, they squeak occasionally, this is unacceptable to me. |
| 2. | Victor, 50 years old: after winter, the left wiper began to tap on medium mode. I replaced it with a new factory one, but the problem was not solved. The store advised me to buy from Renault Logan, I’ve been using it for several months, no complaints. |
Conclusion The process of replacing Granta liftback wipers yourself is not at all complicated. It takes no more than 10 minutes. Subject to the purchase of original brushes, the service life of the last 2 - 3 years, without mileage limitation. Regarding the manufacturer's brand, the decision here is purely individual for each owner. The choice depends on the size of the budget you are willing to spend on a car.
For Lada Granta, Kalina, Priora
It is worth noting that on sale you can find a wiper relay with advanced capabilities:
- There is a pause adjustment, that is, you can set any time between sweeps of the wipers;
- Three strokes after the washer, instead of four (there is no problem with the wipers squeaking on the glass);
- After the washer, the first stroke is delayed.
However, replacing a resistor in a relay yourself will cost only 5 rubles, and a functional relay will be 70-100 times more expensive.
Devices for diagnostics of electrical equipment
The set of basic diagnostic instruments includes a circuit tester or voltmeter (although it is quite possible to use a banal 12-volt test lamp equipped with a set of connecting wires). If available, you can use an open circuit indicator, which includes a lamp, an independent power source and connecting wires.
In addition, you should always carry a set of cables in your car to start the engine from an alternative source (usually the battery of another car). These wires are equipped with alligator clips.
It would be a good idea to have an electrical circuit breaker, since this equipment can be used to connect circuit elements and bypass electrical equipment during diagnostics.
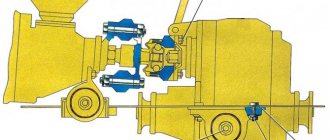
Symbols in the drawings
The Lada Granta car has been produced since 2022. This modern car has many of the latest instruments and electronics. All this ensures maximum safety and comfort for the driver. The AvtoVAZ corporation produces 3 types of modifications of the Lada Granta: Standard, Norma, Lux. The connection diagrams for the Norm and Standard trim levels are the same, but for the luxury version they are different.
New Lada: Creaks and knocks in the front suspension of the Lada Granta: causes and diagnostics
Electrical wiring consists of a large number of bundles. The drawings contain symbols and serial numbers of on-board network devices. The connection of elements to each other is shown by lines. For greater clarity, the lines vary in color. The wires are combined into bundles. The harnesses connect the blocks using detachable plugs.
The reader must study the operating principle of individual electronic control units and instruments on his own. Simple malfunctions will not create any special problems when repairing or replacing spare parts. In the event of a breakdown of a complex electronic unit, you will have to contact service. There is no need to remember by heart all the details of installing parts. It is advisable for the driver to understand the layout of the drawing and clearly know the locations of the most important devices and electrical wiring.