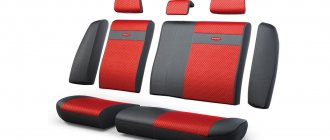
Description
The mat shell is made of non-flammable material. The seat heating element of the VAZ 2108 is made according to the forum: length of the heating thread - wire resistance - on-board network voltage. Thus, a heating wire of a given length, at a voltage of 12.0-13.7 V, physically cannot reach a temperature above 53°C. This means that the likelihood of the product catching fire is completely eliminated. A resistive polymer alloy made of alloy steel with fluoroplastic insulation is used as a heating element. Alloy steel gives the alloy flexibility and strength, which in turn extends the life of heated seats up to 10 years. The seat heating element is designed for one LADA (VAZ) 2108 seat. You can buy a VAZ 2108 heating element on our website.
Dismantling
We begin tuning and repairs with the removal and subsequent disassembly of the seats, which is carried out as follows:
- We unscrew the plastic fasteners with which the seats are attached to the body;
- Unscrew the slides (2 each in front and back);
- We take the seats out of the cabin;
- Separate the backs. To do this, you need to unscrew the bolts on the sides with a 10mm wrench;
- Directly on the bottom of the seat you need to pull out 4 plastic fasteners and remove the trim;
- On the backrest you need to remove the plugs for the headrests. Then, at the bottom, remove the upholstery from the hooks, which will require slightly straightening them. Now you can remove the casing completely.
When making such repairs, it would be very good to wash the upholstery in a regular washing machine at the same time. This will not harm her, and driving a VAZ 2110 clean is somehow more pleasant.
How to install
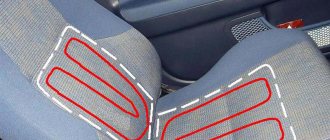
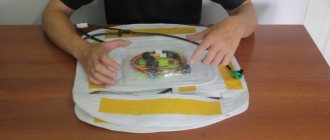
The seat heating element of the VAZ 2108 can be installed under the covers or under the upholstery of the seats. When installing a heating element under the upholstery of car seats, the heater is fixed to the seat using double-sided tape. The heating is glued to the foam base of the chair: one mat to the seat, the second to the back. The adapter is included.
Possible installation location:
- To the driver's seat
- To the passenger seat
- To the rear seats
Installation photo
Chair mounting diagram
Still have questions?
Get a free specialist consultation
Installation of heated seats "cape"
The heated seat “cowl” fits over the cover or seat of your vehicle. Fixed on the seat with elastic bands. The heating plug is inserted into the cigarette lighter and narrower, after which the desired operating mode is selected on the heating button. Such heating is dangerous because some models do not have protection and leaving it in the cigarette lighter can lead to dire consequences.
The installation of heated seats on your vehicle is complete. Standard heating only works when the car's ignition is turned on.
We hope our article was useful to you.
Specifications
| Characteristic | Meaning |
| Manufacturer | Russia |
| Corrosion Exposure | does not rust |
| brand, model | VAZ 2108 |
| Heating time | from 1.5 to 2 minutes |
| Installation under sheathing | Yes |
| Guarantee | 1 year |
| Power | 55 Watt |
| Heater type | Special wire |
| Heating type | Built-in heating |
| Life time | is not limited |
| Point load | up to 120 kg, high tensile strength |
| Voltage | 12 - 13.7 Volts |
| Total resistance | 3 Ohm |
| Heated passenger seat | Yes |
| Heating element size | 29x36 cm |
| Completeness | for one seat |
| Connecting mats | parallel |
| Heated driver's seat | Yes |
| Brand | Warm place |
| Installation under covers | Yes |
| Type of heating | Analogue |
| Heater insulation | fluoroplastic insulation, non-flammable |
| Maximum heating temperature | 53°С |
Kit contents
- seat heating element - 2 pcs.
- connection adapter - 1 pc.
Installing heated seats on a VAZ
For quite some time now, people have ceased to regard the presence of various amenities in a car as a manifestation of luxury, and this fully applies to heated seats, the benefits of which you begin to appreciate especially in winter. Unfortunately, until recently, manufacturers of domestic car brands did not consider this option mandatory and on quite modern models, such as VAZ 2109, VAZ 2110, VAZ 2114, etc. interested motorists are forced to solve the problem of installing seat heating on their own. It should be noted that these days it is not difficult to buy factory-made heating system kits and installing seat heating on your own is quite possible for any car owner.
In general, seat heating can be distinguished by the type of heating element:
- With nichrome threads (not a very reliable option due to frequent breaks);
- Based on carbon fiber (such elements are traditionally considered more reliable).
By heating zones:
- Heating of the seat plane only;
- Heated seat and lumbar area.
According to the operating modes used:
- With manual on/off;
- With the ability to change power;
- With automatic activation after sitting on the seat;
- With automatic maintenance of the set temperature (usually used in standard systems).
By placement:
- On top of a decorative cover (the simplest option);
- The heating elements are hidden under a cover.
It should be recognized that the standard heating system of the latest VAZ models is very reliable and, as a rule, is capable of operating without breakdowns for many years. The size of the heating elements for such standard systems is 5x30 cm and they are equipped with built-in thermostats that provide an average temperature ranging from 25°C to 31°C.
In recent years, you can find standard heating systems of a universal type, namely, those that allow you to heat both the seat and the lower back. Meanwhile, both the simplest and universal options are almost identical in their installation method, and in general, this procedure can be divided into two main stages:
1. Placement of heating elements.
2.Connecting the heating system to the electrical circuit of the car.
Installation of heating elements on the seats of VAZ cars
The simplest option is when heating elements are installed directly on the surface of the seats. In this case, the heating plane is simply placed on the seat and secured with special straps. As an option, an element for heating the back can be purchased additionally and installed in the same way.
It is somewhat more difficult to install heating under the seat upholstery, and in this case, although it is not necessary to completely remove the upholstery, it is still recommended to dismantle the seat itself and carry out the main work in a quieter environment.
Connecting the heating to the car circuit
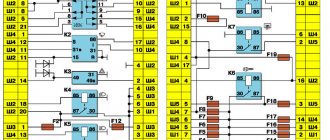
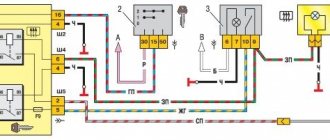
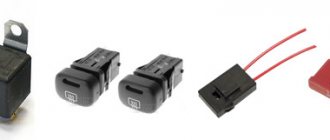
If you decide to connect seat heating through control buttons, it is most convenient to follow the standard connection diagrams used on VAZ cars, which traditionally use a 4-pin 30-amp relay. In practical implementation, the heating connection is performed as follows:
- Holes for control buttons are cut in the selected location;
- The “body” wire of the system is secured with a nut to the nearest metal part of the car body;
- The backlight circuit can be powered from the power window control buttons;
- The positive wire is routed to the fuse box and connected to the circuit of fuse No. 15 (it is designed specifically to protect heated seats).
In general, there are quite a lot of ways to connect heated seats and nothing prevents the contractor, again, from using the fuse box and taking the “plus” and “minus” from the rear window heating circuits, side lights, trunk lock, etc.
Depending on the type of electric seat heating kit purchased, the configuration of the buttons can be different and, in accordance with the preferences of the car owner, they can be placed both on the tunnel and on the dashboard and even on the door plane.
Tags heating, vases, do it yourself
Similar materials
Answers to frequently asked questions
Will this heater fit my car?
Yes, it will work if your car is in the compatibility table, see the modification table
How to connect? Will the chips fit my heated seats?
The kit includes an adapter for connection. You need to connect two wires + and - to your old header. After that, insert it into your standard connector. Watch the video
How to order?
To order, click the order button and fill out the required fields. Please include your last name, first name and telephone number, as well as address. After this, our manager will call you and agree on the cost and delivery methods
How to pay?
- You can pay through the website, with a Visa or MasterCard. Read the payment instructions
- You can pay using a Sberbank card. Read the payment instructions
- You can pay upon receipt at the point of issue. List of pick-up points
- You can pay upon receipt to the courier.
What is needed for this?
The first thing you need to figure out is what elements, materials and tools will be useful to you during the heating installation process.
Element
Explanation
They are required for backs and seats. Experts recommend choosing the standard ones provided for the VAZ 2110. They are sold in sets for two seats. Their cost ranges from 1000 to 1400 rubles. The kit also includes wiring and buttons to turn the heating on and off.
They are not always included. They are used to turn the seat heating system on and off.
It serves to connect the heating to the vehicle’s on-board network
If the seats are already quite worn, it would not hurt to replace the foam rubber, which is short-lived
Choose only high-quality materials, purchase kits from trusted retail outlets. Heating is carried out by electricity, which is always dangerous to human life and health.
On/off buttons
Heated seats VAZ 2110, 2111, 2112
The content of the article:
Heated front seats VAZ 2110
All of us, owners and users of the Premier and the last Ten, were lucky with this matter. Especially those for whom he works. Even more for those who have a late-production car with new heating elements.
All replacement activities were timed to coincide with the reupholstery of the interior seats. And since the new thing took a little longer, about two months, the installation of heating took place right at the end of January. But February was enough to evaluate the new products. Previously (back in the fall), a heating kit Emelya UK1 (Teplodom LLC) was purchased for this purpose. The task was to install Emelya UK1 to heat the front seats instead of the standard set, and transfer the latter to heat the rear ones.
Heating kit Emelya UK1.
Initial data: Heated front seats. Connected. The wiring is OK. The passenger seat heating works. Only sluggishly. You begin to feel its presence only after 15-20 minutes, that is, later than you heat the seat yourself. It fulfills its function. But it's pointless. The heating of the driver's seat is just as sluggish and only works partially: only the backrest, there is no plug from under the seat.
We consider that our chairs have already been removed, brought home, and the beer/kettle is charged.
I won’t describe this process at all, I’ll just show photos. Because, of course, at first I thought about making a full article, but later I decided that there were already a lot of them, and I wouldn’t add anything new. Everything is the same as with other lucky ones.
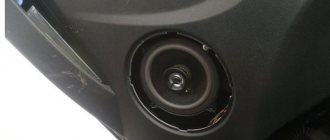
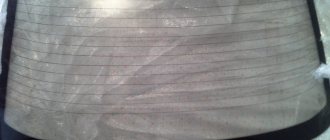
The back of one of the seats. The heating thread laid in a zigzag pattern is clearly visible. Only 4 pieces of thread are actively involved in heating. Later there were more of them, which increased the heating power.
In addition, the thick 8-mm standard seat upholstery prevents heat from getting through.
Front passenger seat.
Driver's seat. The heating filament is intact.
Standard heating element.
There is no need to invent anything new. Emelya is equipped with everything necessary: instructions, heating elements (4 pcs.), control unit, relay, wiring.
The operation will require tools for removing seats and upholstery from them, as well as thin double-sided tape for gluing heating elements.
In principle, you don’t have to complicate the process (depending on who knows) and change the heating elements without removing the seats. Carry out the process on the spot, just pulling the upholstery off the chairs.
If you are installing heating for the first time, then simply follow the connection diagram according to the instructions. If you are changing it, it is better to remove the old wiring, replacing it with a new one from Emelya - it is thicker, which means it is more reliable. Or you can connect the new wiring parallel to the old one (including the relay) - as I did, leaving the standard wiring for connecting the rear heating. I also did this because the old wiring is thinner than the new one, and could not withstand (and most likely would not have withstood) the power of the new heating elements (maximum power of one element is 70 W versus 40 W for the standard one).
Heated seats VAZ 2110, 2111, 2112
The content of the article:
Heated front seats VAZ 2110
All of us, owners and users of the Premier and the last Ten, were lucky with this matter. Especially those for whom he works. Even more for those who have a late-production car with new heating elements.
All replacement activities were timed to coincide with the reupholstery of the interior seats. And since the new thing took a little longer, about two months, the installation of heating took place right at the end of January. But February was enough to evaluate the new products. Previously (back in the fall), a heating kit Emelya UK1 (Teplodom LLC) was purchased for this purpose. The task was to install Emelya UK1 to heat the front seats instead of the standard set, and transfer the latter to heat the rear ones.
Heating kit Emelya UK1.
Initial data: Heated front seats. Connected. The wiring is OK. The passenger seat heating works. Only sluggishly. You begin to feel its presence only after 15-20 minutes, that is, later than you heat the seat yourself. It fulfills its function. But it's pointless. The heating of the driver's seat is just as sluggish and only works partially: only the backrest, there is no plug from under the seat.
We consider that our chairs have already been removed, brought home, and the beer/kettle is charged.
I won’t describe this process at all, I’ll just show photos. Because, of course, at first I thought about making a full article, but later I decided that there were already a lot of them, and I wouldn’t add anything new. Everything is the same as with other lucky ones.